
Gotts intake modification


Thread Starter
Senior Member
Joined: Aug 2009
Posts: 363
Likes: 8
Alright, I saw someone post a link in this forum that referenced f150online.net, I researched this modification and did it to my buddys f150 truck today while i had his intake off for his "aftermarket" throttle throttle body. he's been looking for a while at CAI's but just cant justify spending the money to himself if it's not going to give much back to him, his opinion, besides money is tight.
Anyways, I took some photos and wanted to document the installation for everyone else.
The purpose of this mod is to replace your stock air inlet tube that draws ambient air from your fender well with a larger diameter pipe so you can have the most ambient airflow into your engine. The internal diameter of the stock factory inlet tube from the fenderwell into the filter airbox is just under two inches, see photos below, this is actually chocking your engine.
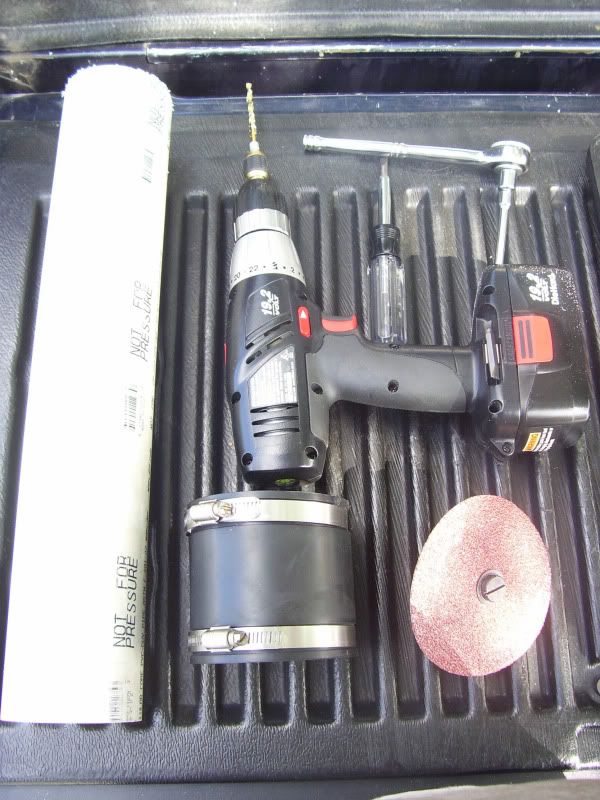
Tools You will need. (see P-1)
1. 3" dia. pvc tube. Can be purchased for $5.00, in a 2'-0" section of pipe
2. Some sort of grinding device, dremmel, sander, power drill w/ course, medium and fine sanding pad & bit, file, or something that generally can be used to tapper the pvc - explained later on.
3. Ratched & 8mm socket to remove battery cable
4. Flatblade screwdrive
5. 3" inner dia. pvc hose collar w/hose clamps - usually sold w/ hose clamp
6. Small saw for cutting pvc (i used my small power saw)
Photo P-1:
Once you have all the required items for this project you are ready to begin!
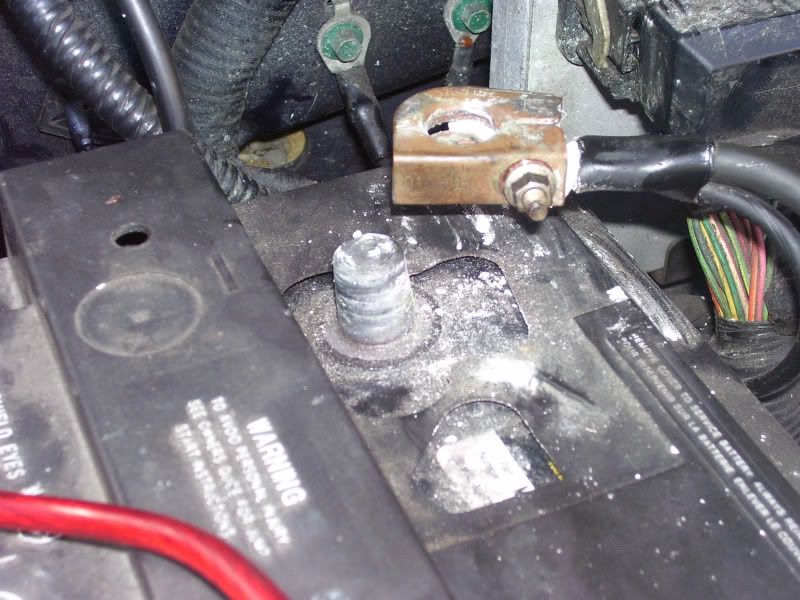
Step 1: Remove the negative battery cable from the battery using the 8mm socket. This serves two purposes a.) the obvious it keeps you from somehow getting shocked b.) it clears the pcm and once reattached allows the computer to recalibrate for the extra amount of fresh air.
Step 2: Now you can remove the entire intake and air filter assembly if you so choose or loosen certain parts to provide better work room. I already had the entire intake apart but i am going to assume your only removing the air filter and front part of the airbox going to the fender well. Remove the air filter by removing the ring clamp holding the two halfs of the filter housing together. Remove filter and set aside. Remove the filter box housing from the rubber grommets holding the feet to the metal. Remove the air box from the fenderwell by pulling towards the passenger side of the vehicle. The tube into the fenderwell is only held on by a grommet. See Photo Below
P-2:
P-3:
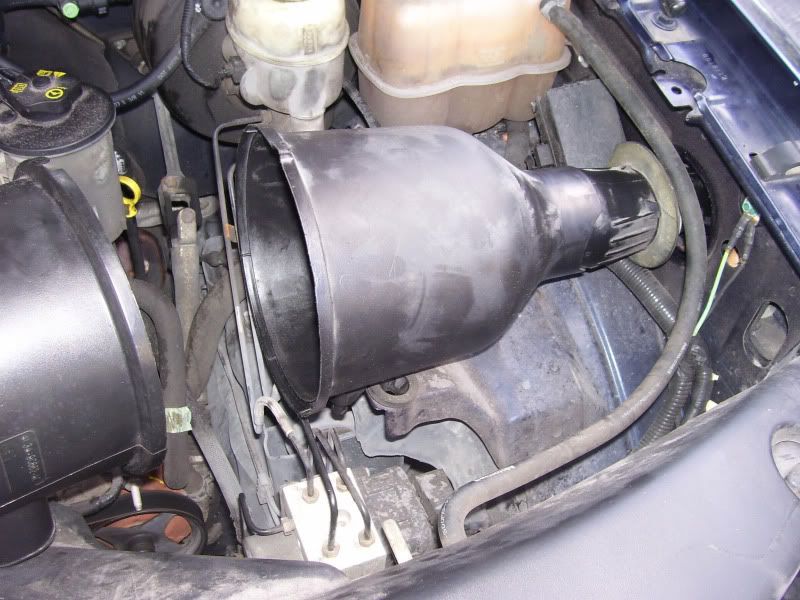
this is what the airfilter box and inlet tube look like, note the rubber grommets that hold the feet and the inlet tube.
Step 3: Remove the air intlet tube from the filter housing by depressing the inlet tube releasing the tabs holding it into the filter housing. Take note that the air inlet tube tapers from a nominal inner 3" dia where it attaches to the air filter housing to a nominal inner 1-3/4" diamater where it goes into the fender well. Looking at the hole in the fender well you can see space for a bigger about of air flow into engine.
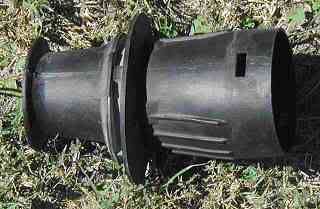
this is the air-inlet tube removed from the filter housing
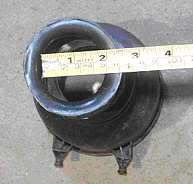
notice how restricted the stock inlet tube makes your intake - air flow is only as good as the smallet portion
Step 4: Grab your pvc tube and measure 2" from the edge and trace a line around it with a sharpie, this how far back you need to tapper the pvc with a sanding device. Grab your inlet tube and get a measurement from the grommet to the end of the inlet tube on the side where it connects to the airbox. Measure back this distance on your pvc pipe and draw a line around this pvc tube. You will cut the excess pvc off at this point later after you've done a bit of grinding. Note: The whole in the fenderwell is oblong and as a result the pvc needs to be ground down to a thickness of aproximatle 3 -1/16" outside diameter. I would grind down the pvc tube to 3-1/8" all around the tube then start test fitting it into the hole in the fenderwell. You will need to get you pvc tube 2" into the fenderwell. See photo below.
Step 5: Now grab your sanding device and start tappering the pvc pipe back to the 2" mark you made down to an outer diameter of 3-1/8", normal pvc pipe outer diameter is 3-1/2". Once you tapper to this you will need to cut the pvc pipe at the second mark you made, the mark where you cutt off the excess pvc. So grab your handy dandy, dremmel, sawzaa, hand saw, scroll saw, something to cut thru the pvc. I used a power drill to drill a start hole so i can get the blade of my jigsaw into the pvc tube and cut around the marking i made all around the pipe. At this point start test fitting the pipe into the fenderwell as far as you can then remove and tapper off a little bit evenly around the entire pipe. do this until the pipe is 2" into the fenderwell and fits snuggly and securely. See photo below
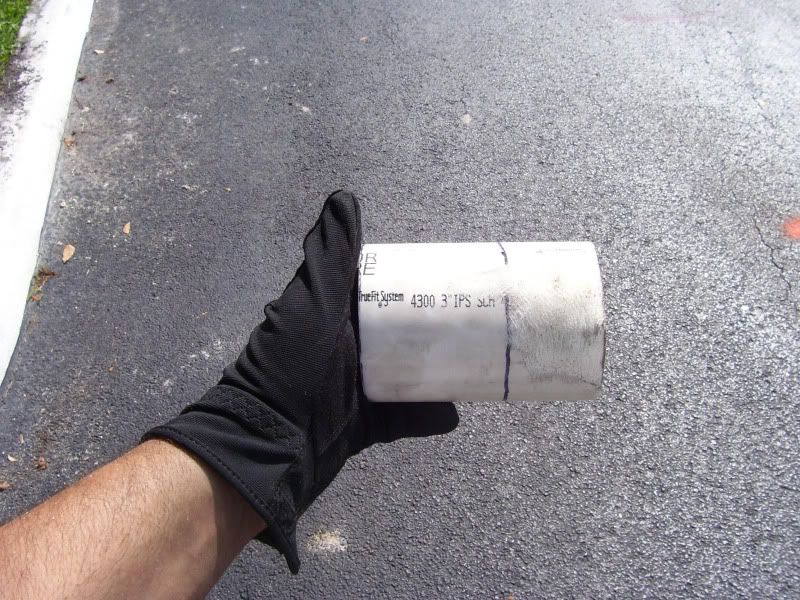
Picture of the pipe after you've cut the excess pvc off and are ready to test fit the pipe into the fenderwell.
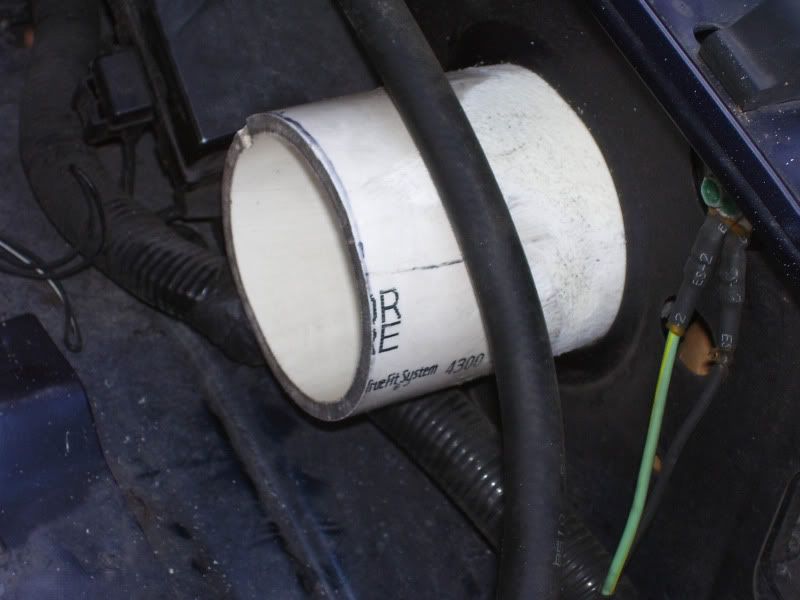
pvc tube fitted into the inlet tube and ready to receive collar clamp and filter box housing.
Step 5: Now that you've got the pvc tube installed your ready to install the collar clamp over the pvc and onto the filter box tube spout. Loosen the two hose clamps and slip onto the rubber collar. Slip the collar clamp onto the pvc pipe and slide it until its against the fenderwell. Reinstall the airfilter housing with the feet into the rubber grommets. Now the filter tube spout is at somewhat of a slight angle to the pvc tube so you'll need to push the spout end down a little bit. While holdig down the spout end slide the rubber collar over the air filter box spout.slide one hose clamp over the airbox spout and tighten it down. Slide the other hose clamp onto the pvc tube end of the collar and tighten it down. Note: While i was doing this i found that the collar was a little bit longer and got in the way of the spout while i was trying to push down on the airbox spout while trying to slide the collar over. As a result i removed the collar and trimmed it down until i could get the airbox spout past the collar. See photos below
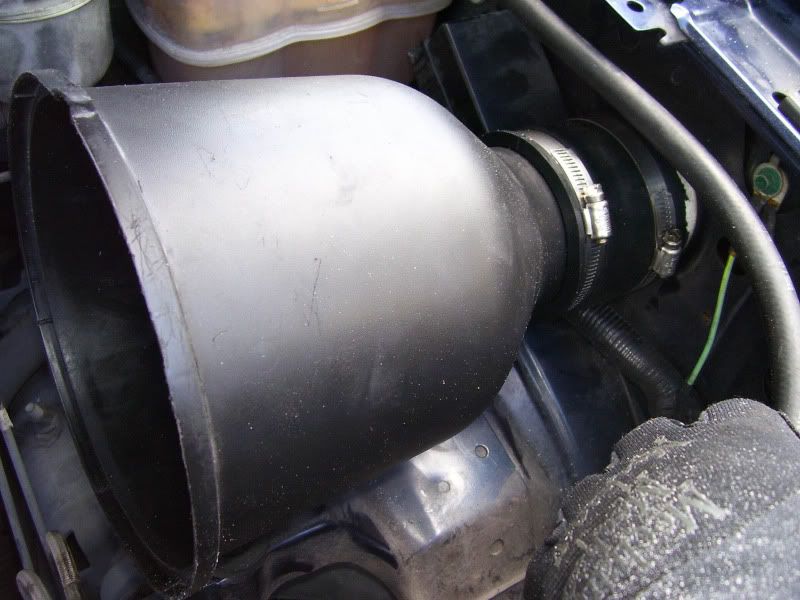
note the feet have been reinstalled and the position of the collar clamp over the inlet tube and airbox spout.
Step 6: Reinstall your air filter into the airbox and replace the other half to the air filter box. Reinstall the o-ring holding the airbox together.
Step 7: Using your 8mm socket re-install your negative battery cable.
Step 8: Start engine and give it ten minutes of idoling to recalibrate itself. and enjoy the power difference.

I've already noticed more throttle responce and less throttle lag when you press the gas. All and all you can expect to spend two hours doing this as most of your time is spent test fitting the pvc and grinding a little bit down and retesting until it it fits correctly.
Also refer to this link for additional instruction and photos - http://www.fordf150.net/articles/idx...ification.html
Let me know what you think of this post!
Neil
Anyways, I took some photos and wanted to document the installation for everyone else.
The purpose of this mod is to replace your stock air inlet tube that draws ambient air from your fender well with a larger diameter pipe so you can have the most ambient airflow into your engine. The internal diameter of the stock factory inlet tube from the fenderwell into the filter airbox is just under two inches, see photos below, this is actually chocking your engine.
Tools You will need. (see P-1)
1. 3" dia. pvc tube. Can be purchased for $5.00, in a 2'-0" section of pipe
2. Some sort of grinding device, dremmel, sander, power drill w/ course, medium and fine sanding pad & bit, file, or something that generally can be used to tapper the pvc - explained later on.
3. Ratched & 8mm socket to remove battery cable
4. Flatblade screwdrive
5. 3" inner dia. pvc hose collar w/hose clamps - usually sold w/ hose clamp
6. Small saw for cutting pvc (i used my small power saw)
Photo P-1:
Once you have all the required items for this project you are ready to begin!
Step 1: Remove the negative battery cable from the battery using the 8mm socket. This serves two purposes a.) the obvious it keeps you from somehow getting shocked b.) it clears the pcm and once reattached allows the computer to recalibrate for the extra amount of fresh air.
Step 2: Now you can remove the entire intake and air filter assembly if you so choose or loosen certain parts to provide better work room. I already had the entire intake apart but i am going to assume your only removing the air filter and front part of the airbox going to the fender well. Remove the air filter by removing the ring clamp holding the two halfs of the filter housing together. Remove filter and set aside. Remove the filter box housing from the rubber grommets holding the feet to the metal. Remove the air box from the fenderwell by pulling towards the passenger side of the vehicle. The tube into the fenderwell is only held on by a grommet. See Photo Below
P-2:
P-3:
this is what the airfilter box and inlet tube look like, note the rubber grommets that hold the feet and the inlet tube.
Step 3: Remove the air intlet tube from the filter housing by depressing the inlet tube releasing the tabs holding it into the filter housing. Take note that the air inlet tube tapers from a nominal inner 3" dia where it attaches to the air filter housing to a nominal inner 1-3/4" diamater where it goes into the fender well. Looking at the hole in the fender well you can see space for a bigger about of air flow into engine.
this is the air-inlet tube removed from the filter housing
notice how restricted the stock inlet tube makes your intake - air flow is only as good as the smallet portion
Step 4: Grab your pvc tube and measure 2" from the edge and trace a line around it with a sharpie, this how far back you need to tapper the pvc with a sanding device. Grab your inlet tube and get a measurement from the grommet to the end of the inlet tube on the side where it connects to the airbox. Measure back this distance on your pvc pipe and draw a line around this pvc tube. You will cut the excess pvc off at this point later after you've done a bit of grinding. Note: The whole in the fenderwell is oblong and as a result the pvc needs to be ground down to a thickness of aproximatle 3 -1/16" outside diameter. I would grind down the pvc tube to 3-1/8" all around the tube then start test fitting it into the hole in the fenderwell. You will need to get you pvc tube 2" into the fenderwell. See photo below.
Step 5: Now grab your sanding device and start tappering the pvc pipe back to the 2" mark you made down to an outer diameter of 3-1/8", normal pvc pipe outer diameter is 3-1/2". Once you tapper to this you will need to cut the pvc pipe at the second mark you made, the mark where you cutt off the excess pvc. So grab your handy dandy, dremmel, sawzaa, hand saw, scroll saw, something to cut thru the pvc. I used a power drill to drill a start hole so i can get the blade of my jigsaw into the pvc tube and cut around the marking i made all around the pipe. At this point start test fitting the pipe into the fenderwell as far as you can then remove and tapper off a little bit evenly around the entire pipe. do this until the pipe is 2" into the fenderwell and fits snuggly and securely. See photo below
Picture of the pipe after you've cut the excess pvc off and are ready to test fit the pipe into the fenderwell.
pvc tube fitted into the inlet tube and ready to receive collar clamp and filter box housing.
Step 5: Now that you've got the pvc tube installed your ready to install the collar clamp over the pvc and onto the filter box tube spout. Loosen the two hose clamps and slip onto the rubber collar. Slip the collar clamp onto the pvc pipe and slide it until its against the fenderwell. Reinstall the airfilter housing with the feet into the rubber grommets. Now the filter tube spout is at somewhat of a slight angle to the pvc tube so you'll need to push the spout end down a little bit. While holdig down the spout end slide the rubber collar over the air filter box spout.slide one hose clamp over the airbox spout and tighten it down. Slide the other hose clamp onto the pvc tube end of the collar and tighten it down. Note: While i was doing this i found that the collar was a little bit longer and got in the way of the spout while i was trying to push down on the airbox spout while trying to slide the collar over. As a result i removed the collar and trimmed it down until i could get the airbox spout past the collar. See photos below
note the feet have been reinstalled and the position of the collar clamp over the inlet tube and airbox spout.
Step 6: Reinstall your air filter into the airbox and replace the other half to the air filter box. Reinstall the o-ring holding the airbox together.
Step 7: Using your 8mm socket re-install your negative battery cable.
Step 8: Start engine and give it ten minutes of idoling to recalibrate itself. and enjoy the power difference.
I've already noticed more throttle responce and less throttle lag when you press the gas. All and all you can expect to spend two hours doing this as most of your time is spent test fitting the pvc and grinding a little bit down and retesting until it it fits correctly.
Also refer to this link for additional instruction and photos - http://www.fordf150.net/articles/idx...ification.html
Let me know what you think of this post!
Neil

Member
Joined: Aug 2009
Posts: 39
Likes: 0
From: MN
The mod will work on a 2005 with a bit of a modification. You will need to cut the PVC to about 11" and also sand down the last 3" to fit into the fender properly. You will not need to get the hose clamp as you can use the factory one that's included on the accordion section. If you compress the accordion portion and then clamp it to the PVC it should fit in very snugly. I haven't had mine come loose yet after over a month of use.

Member
Joined: Jul 2009
Posts: 79
Likes: 0
From: Timberlake, NC
The mod will work on a 2005 with a bit of a modification. You will need to cut the PVC to about 11" and also sand down the last 3" to fit into the fender properly. You will not need to get the hose clamp as you can use the factory one that's included on the accordion section. If you compress the accordion portion and then clamp it to the PVC it should fit in very snugly. I haven't had mine come loose yet after over a month of use.
^ drinks KC Tea
Joined: Apr 2008
Posts: 2,227
Likes: 5
From: maple grove mn
if your doin the gotts mod you might as well take out the silencer as it too is small in diameter. little bit more work but its worth it imo. and you can just sand down the outer edge of the pipe and slide it into the filter housing without clamping it and use a black pipe if you want it to look "better"
Last edited by Mike; Oct 9, 2009 at 05:37 PM.
Trending Topics
Thread Starter
Senior Member
Joined: Aug 2009
Posts: 363
Likes: 8
hey guys, glad you liked the write up, i hope to do one soon of when i installed my whipple - have pictures and even video - i've started the write up its a step by step diy project type installation. everything i had to do to install it on my 5.4l engine.
what gets me is who was the first person to think if i install a pvc pipe in my truck it will do this....got to love inginuity driven by cost savings huh...and honestly its thicker than stock plastic peice and is probably twice as efficient.
what gets me is who was the first person to think if i install a pvc pipe in my truck it will do this....got to love inginuity driven by cost savings huh...and honestly its thicker than stock plastic peice and is probably twice as efficient.
