

Rear view/backup camera anytime mod?

Member
Joined: Sep 2010
Posts: 62
Likes: 0
From: Ottawa
Verified.
-Spliced a power feed from PIN 1 on mirror 16 PIN Harness. Connects to Switch pole 1. (Switched 12V)
-Cut PIN 2 wire from 16 PIN harness 2 inch’s up from plug. Connects to Switch pole 3 (Normal reverse trigger)
-Ran new wire to PIN 2 on 16 PIN Harness. Connects to Switch pole 2. (New on demand display)
I have 3 position SPDT switch with on/off/on. Full forward works like factory. Flip back & Camera displays. No accessory delay, switched power.
Picked up from The Source/Radio Shack. Very tight squeeze for that spot. This was done on 2010 16 PIN harness, your PINs “might vary.
Thanks for the Saturday project. lol
Last edited by Lidy; May 21, 2011 at 06:24 PM. Reason: Got click happy
Thread Starter
Senior Member
Joined: May 2011
Posts: 427
Likes: 88
But do yo think you could provide more detailed instructions, preferably pictures with arrows pointing to what was cut where, and what was spliced/connected to what.
The only reason I talked myself into doing this to my Tacoma was because their forum had a step by step guide.
Also, I can't tell from your pics, but does it turn the reverse lights on, as was discussed in some of the previous posts?
Thanks, your help with this is much appreciated.
The only reason I talked myself into doing this to my Tacoma was because their forum had a step by step guide.
Also, I can't tell from your pics, but does it turn the reverse lights on, as was discussed in some of the previous posts?
Thanks, your help with this is much appreciated.
Junior Member
Joined: May 2011
Posts: 12
Likes: 0
I have the OEM Navigation with back-up camera on my '10 F150. I purchased and installed the LockPick and I can turn on my rear camera at will. I simply press and hold the phone button for 3 seconds. A message box pops up asking if I want to turn my camera on and I select yes. It'll stay up as long as the truck is running and to go back to the home screen I just push and hold the phone button on the steering wheel again for 3 seconds. Real handy feature for watching your trailer/load, cars behind you, or changing lanes.
I also got the added harness to run a front camera and in the process of getting that installed. The LockPick also allows me to use all features of the navigation system while driving (enter addresses, search for POI's) and allows my passengers to watch movies while driving. A lot will gawk at the $239 price tag, but I like the simple plug and play, clean and easy install, and additional features it unlocks.
Worth checking out if you don't mind spending the money.
Senior Member
Joined: Feb 2011
Posts: 1,773
Likes: 102
I have the OEM Navigation with back-up camera on my '10 F150. I purchased and installed the LockPick and I can turn on my rear camera at will. I simply press and hold the phone button for 3 seconds. A message box pops up asking if I want to turn my camera on and I select yes. It'll stay up as long as the truck is running and to go back to the home screen I just push and hold the phone button on the steering wheel again for 3 seconds. Real handy feature for watching your trailer/load, cars behind you, or changing lanes.
I also got the added harness to run a front camera and in the process of getting that installed. The LockPick also allows me to use all features of the navigation system while driving (enter addresses, search for POI's) and allows my passengers to watch movies while driving. A lot will gawk at the $239 price tag, but I like the simple plug and play, clean and easy install, and additional features it unlocks.
Worth checking out if you don't mind spending the money.
I also got the added harness to run a front camera and in the process of getting that installed. The LockPick also allows me to use all features of the navigation system while driving (enter addresses, search for POI's) and allows my passengers to watch movies while driving. A lot will gawk at the $239 price tag, but I like the simple plug and play, clean and easy install, and additional features it unlocks.
Worth checking out if you don't mind spending the money.
Junior Member
Joined: May 2011
Posts: 12
Likes: 0
Click here for Coastal E Tech's SYNC-LP1 LOCKPICK website link.
Main harness is the SYNC-LP1 and front camera interface is SYNCAM12 in the above link.
Main harness is the SYNC-LP1 and front camera interface is SYNCAM12 in the above link.
Senior Member
Joined: Feb 2011
Posts: 1,773
Likes: 102
Click here for Coastal E Tech's SYNC-LP1 LOCKPICK website link.
Main harness is the SYNC-LP1 and front camera interface is SYNCAM12 in the above link.
Main harness is the SYNC-LP1 and front camera interface is SYNCAM12 in the above link.
Junior Member
Joined: May 2011
Posts: 12
Likes: 0
So, to answer your question...no, you don't have to scroll through the entire menu every time. Mine is always on the camera function and it pulls right up when I press and hold the phone button.
Member
Joined: Sep 2010
Posts: 62
Likes: 0
From: Ottawa
K, hope this helps. Very easy mod & a few different ways to perform on the NO NAV project truck.
Hardest part is finding a switch mount location. I have rear slider switch on the OH, so very tight fit.
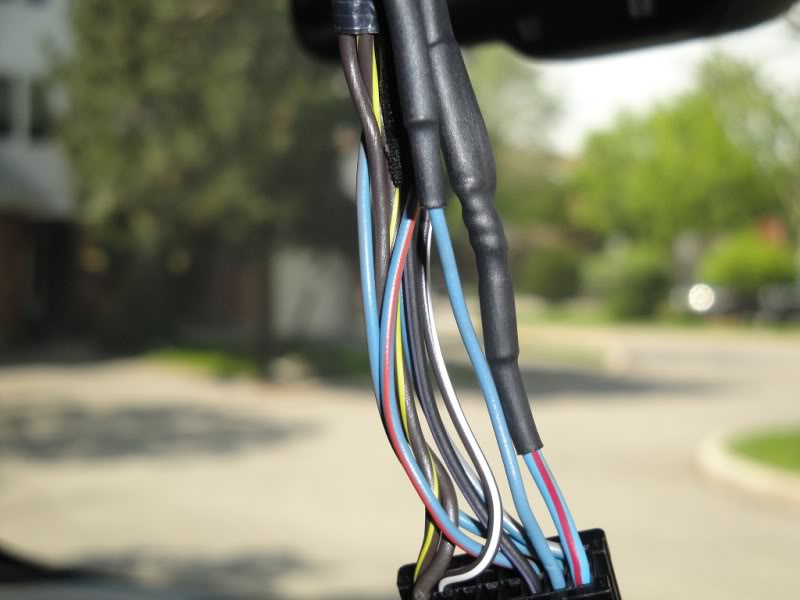
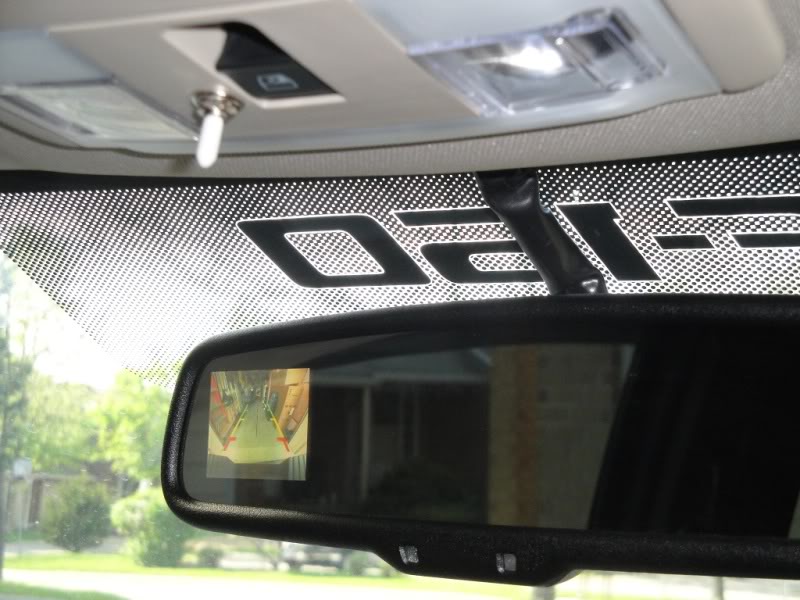
This is how the view works. With key on ACC/Run, camera is live. PIN 1 in Mirror is 12V live. Think of PIN 2 as the �remote� wire similar to an auto audio amplifier.
Provide 12V & LCD fires up the camera view. Normally PIN 2 is fed 12V from the same circuit as the reverse lights. (Sensor/Switch on Transmission)
This �mod� simply cuts PIN 2 from the mirror & places it on a SPDT switch. We then feed the factory wire that connected to PIN 2/Mirror & also connect to the switch.
Lastly, we splice/tap the 12V from PIN 1 over to the switch as well. Result is factory operation as designed in 1 position. The other position give me the �on demand� view.
Connecting in this method does not light the reverse lights with on demand. This also allows the mirror to receive 2 independent switched feeds. I don�t like the idea of a scenario where on demand is feeding 12V & then the reverse circuit adds it�s 12V. To clarify, SPDT. Single pole to Rear View PIN 2. Double throw from either factory/reverse OR on demand view.
Being Canadian, our Radio Shack is now �The Source�, but you will be looking for a switch similar to RS Catalog #: 275-613.
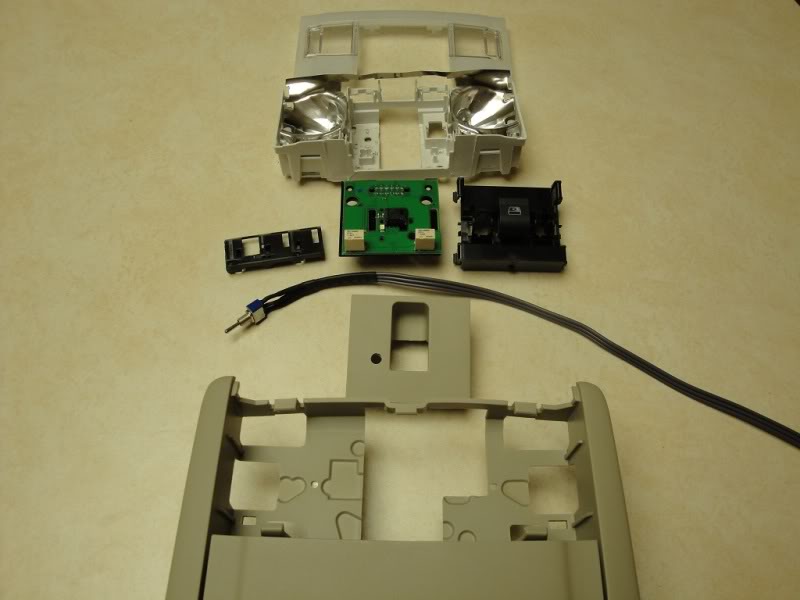
-Remove 16 PIN harness from rear view mirror
-Pull out over head. Pull down from back to release clips, not the front. Remove connectors. 1 for lights, 1 for rear slider if applicable
-Remove 2x Philips metal screws holding the plastic bracket
-Slide the bracket to the rear slightly, now pull the harness and find the wire feeds to rear view mirror & pull through the console hole in roof liner
-Cut the rubber loom at the top for easy access to the wires. Careful not to go to low as it would be exposed when replaced against the windshield.
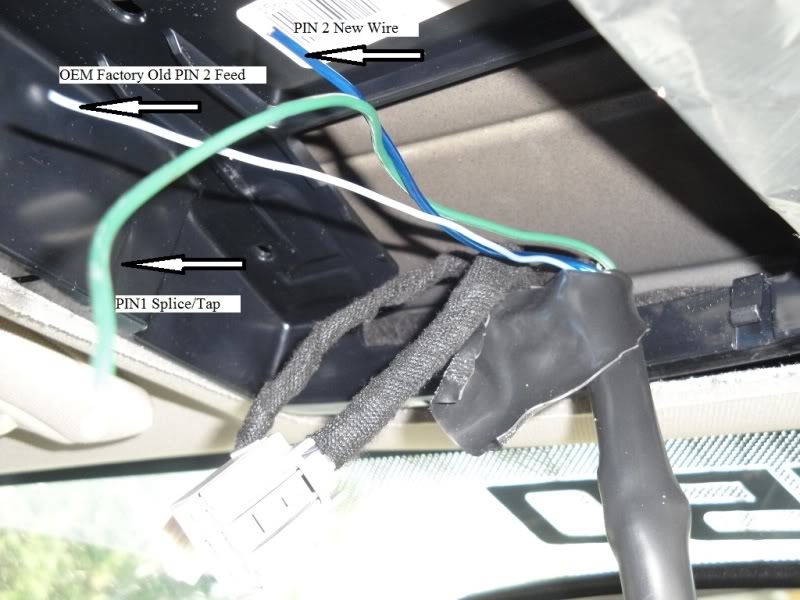
-Now you have 2 options. Pull PIN 1 & 2 from the harness connector so it can be soldered & shrink wrapped OR get 1 x wiretap & 1x bullet connector to half *** the job.
-No matter the above choice, cut PIN 2 wire from the 16 PIN mirror harness & pull up/out of loom. We will be using a new wire to that PIN from the SPDT switch.
Bellow, I soldered & double shrink wrapped a tap into PIN 1 for 12V. Other end feeds to SPDT switch. I also soldered a new wire to PIN 2. Other end feeds to SPDT switch
NOTE: If you use a wiretap clamp vs solder, do this as high as possible on PIN 1 wire. That thing will not fit back into the rubber loom that runs from headliner to mirror.
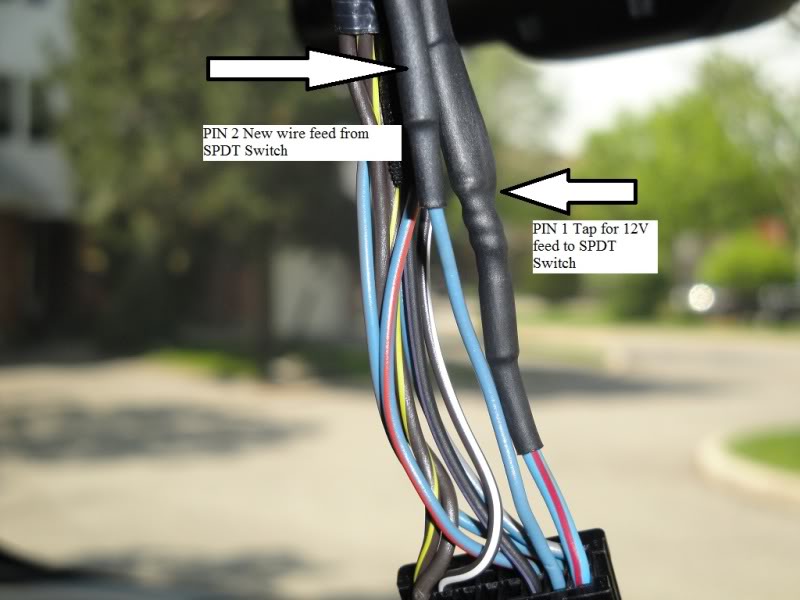
At this point, you should now have 3 lonely wires. 12V splice from PIN 1, new wire to PIN 2 connector & the original factory wire to PIN 2 connector.
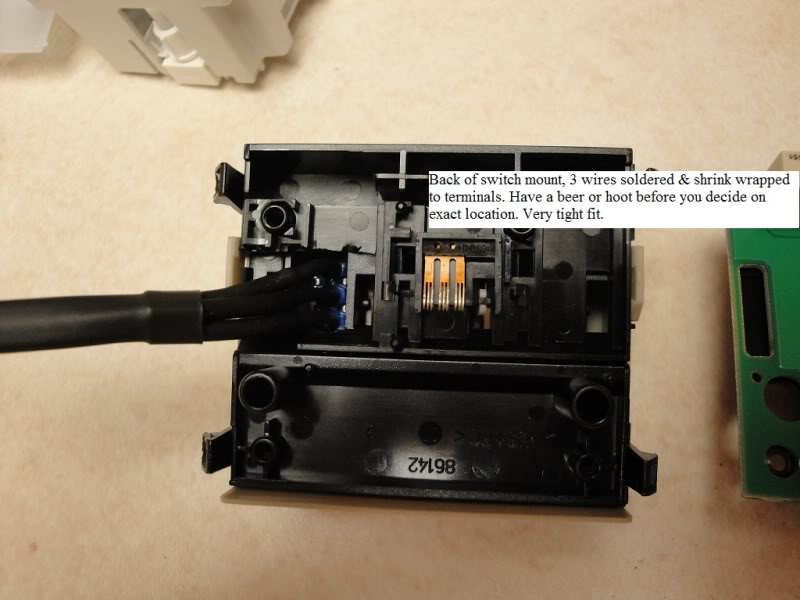
The switch required for the project has 3 connections. Now you have a ton of options.
Specifically where to mount the switch. I chose the ever so small slot beside the rear slider switch.
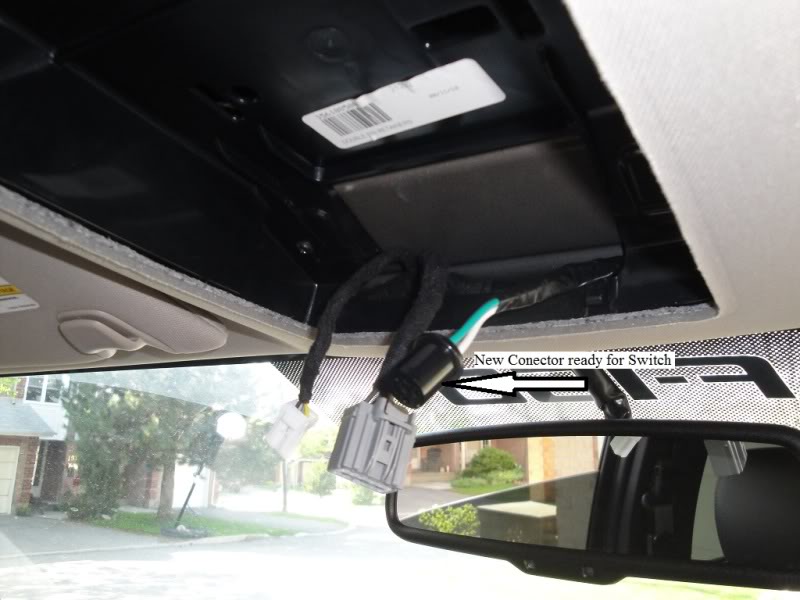
I opted for a connector so the OH can be removed later for future additions & allow the liner to be removed without a long �dooooohhh�.
Below is the large connector I used. NOTE: the connector will need to be stuffed into the headliner as there is no room under the OH console, it fits tight against the bracket.
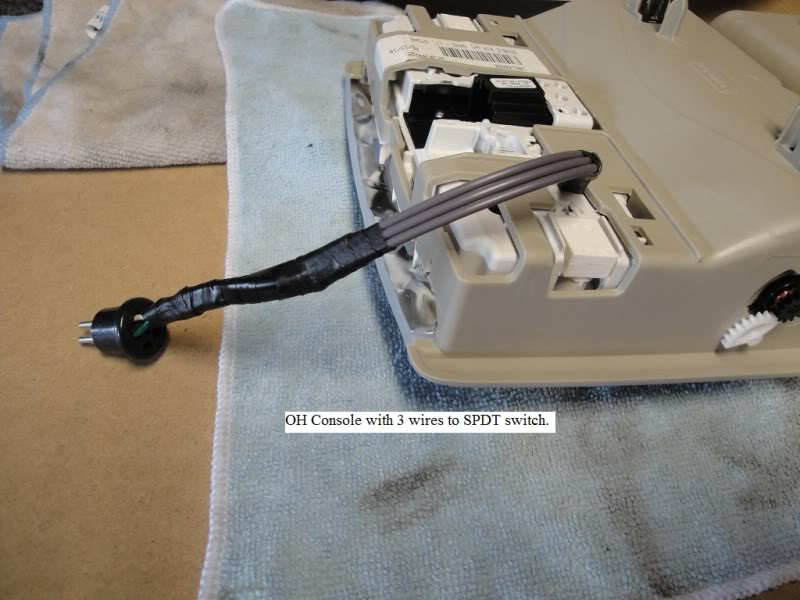
Now the next step really depends on your setup. Specifically the location of the switch. This could be placed anywhere. I went a bit cut happy & carved out a spot next to the rear slider switch.
The switch actually has 3 slots for switches, so I carved 1 out a bit bigger.
WTF is a SPDT switch? http://en.wikipedia.org/wiki/File:SPDT-Switch.svg
Makes sense? We are just controlling the feed. On Demand or factory style.
Hardest part is finding a switch mount location. I have rear slider switch on the OH, so very tight fit.
This is how the view works. With key on ACC/Run, camera is live. PIN 1 in Mirror is 12V live. Think of PIN 2 as the �remote� wire similar to an auto audio amplifier.
Provide 12V & LCD fires up the camera view. Normally PIN 2 is fed 12V from the same circuit as the reverse lights. (Sensor/Switch on Transmission)
This �mod� simply cuts PIN 2 from the mirror & places it on a SPDT switch. We then feed the factory wire that connected to PIN 2/Mirror & also connect to the switch.
Lastly, we splice/tap the 12V from PIN 1 over to the switch as well. Result is factory operation as designed in 1 position. The other position give me the �on demand� view.
Connecting in this method does not light the reverse lights with on demand. This also allows the mirror to receive 2 independent switched feeds. I don�t like the idea of a scenario where on demand is feeding 12V & then the reverse circuit adds it�s 12V. To clarify, SPDT. Single pole to Rear View PIN 2. Double throw from either factory/reverse OR on demand view.
Being Canadian, our Radio Shack is now �The Source�, but you will be looking for a switch similar to RS Catalog #: 275-613.
-Remove 16 PIN harness from rear view mirror
-Pull out over head. Pull down from back to release clips, not the front. Remove connectors. 1 for lights, 1 for rear slider if applicable
-Remove 2x Philips metal screws holding the plastic bracket
-Slide the bracket to the rear slightly, now pull the harness and find the wire feeds to rear view mirror & pull through the console hole in roof liner
-Cut the rubber loom at the top for easy access to the wires. Careful not to go to low as it would be exposed when replaced against the windshield.
-Now you have 2 options. Pull PIN 1 & 2 from the harness connector so it can be soldered & shrink wrapped OR get 1 x wiretap & 1x bullet connector to half *** the job.
-No matter the above choice, cut PIN 2 wire from the 16 PIN mirror harness & pull up/out of loom. We will be using a new wire to that PIN from the SPDT switch.
Bellow, I soldered & double shrink wrapped a tap into PIN 1 for 12V. Other end feeds to SPDT switch. I also soldered a new wire to PIN 2. Other end feeds to SPDT switch
NOTE: If you use a wiretap clamp vs solder, do this as high as possible on PIN 1 wire. That thing will not fit back into the rubber loom that runs from headliner to mirror.
At this point, you should now have 3 lonely wires. 12V splice from PIN 1, new wire to PIN 2 connector & the original factory wire to PIN 2 connector.
The switch required for the project has 3 connections. Now you have a ton of options.
Specifically where to mount the switch. I chose the ever so small slot beside the rear slider switch.
I opted for a connector so the OH can be removed later for future additions & allow the liner to be removed without a long �dooooohhh�.
Below is the large connector I used. NOTE: the connector will need to be stuffed into the headliner as there is no room under the OH console, it fits tight against the bracket.
Now the next step really depends on your setup. Specifically the location of the switch. This could be placed anywhere. I went a bit cut happy & carved out a spot next to the rear slider switch.
The switch actually has 3 slots for switches, so I carved 1 out a bit bigger.
WTF is a SPDT switch? http://en.wikipedia.org/wiki/File:SPDT-Switch.svg
Makes sense? We are just controlling the feed. On Demand or factory style.