

Road Armor Brush Guard - Review and Installation Tips


Thread Starter
Senior Member
Joined: Apr 2012
Posts: 250
Likes: 19
From: New England
When I bought my 2012 F150 FX4, there were a few modifications that were absolutely must-haves: nerf bars, mud flaps, and a brush guard, or as my wife likes to call it, a zombie catcher. I am posting both a review and some installation notes in order to help anyone who is thinking about something like this but can't find much information on line.
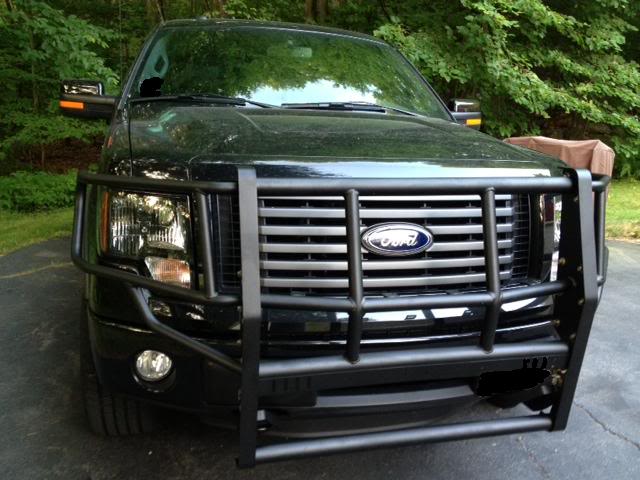
First, the Review(and pictures):
Zombie_catcher1.jpg?t=1340569089
I could not be happier with the Road Armor Brush Guard. It is a very solid brush guard that is aggressive looking yet remarkably subdued at the same time. From 100 yards away, you hardly notice the guard, but up close it is simply massive. It is much heavier duty than most of the other brush guards I have seen. It looks great on the truck, as if it belongs there. This brush guard clearly isn't designed to be used to keep the azaleas away from your headlights. It looks urban, para-military. As if somewhere there is an M1 Abrams with a bumper sticker that says, "My other car is an F150". The feedback I have gotten so far has been overwhelmingly positive, and often primal.
Unlike many brush guards, the Road Armor version comes in three pieces. I wasn't thrilled with this as I find all the bolts ugly, but I have to admit that the final product feels like you could drive through a concrete wall and not damage the truck, and the bolts will probably be treated to some sort of paint once everything gets its final torque check.
The brush guard attaches to the frame where the tow hooks go, and contrary to what you've read, you can keep the tow hooks with this brush guard. It makes the install a bit awkward, but it's a minor inconvenience.
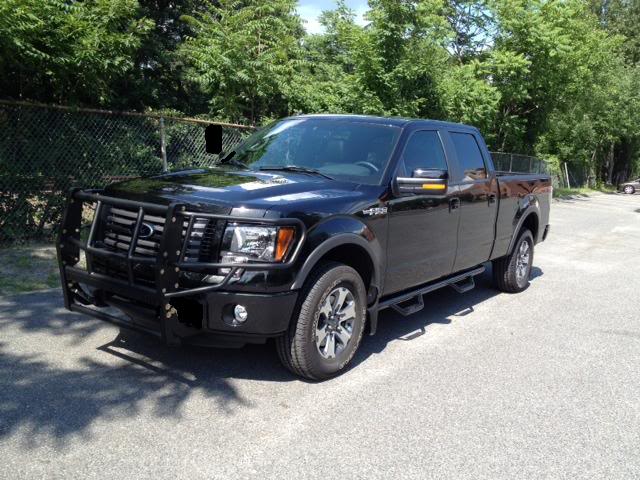
Front_Left.jpg?t=1340569088
The Purchase and Installation:
After taking an inventory of what was available in the marketplace, and having seen a few brush guards in person at various events where real truck people go(I am not a real truck person), I was a bit disappointed. The only product that I saw that looked even vaguely along the lines of what I wanted was the Road Armor Brush Guard. After much ado, and some gnashing of teeth, (because let's face it, when you buy this kind of thing and it ships freight, you're pretty much stuck with it), I bought the Road Armor Brush Guard.
I bought it from Ranger Offroad in Texas. They had the best price, free shipping, and Erik(the owner) was very friendly. Not only was their price better than anyone else, but when I called Road Armor, they couldn't match Ranger's total price. There was a minor hiccup when the freight company told us it would be delivered 2 days earlier than it did, but in any case, the guard arrived in one week, which isn't bad.
The brush guard comes in three boxes: One contains the center section, one contains the eye guards, and the third contains the frame mounts and hardware. It's very well packed, and will give your kids a very large supply of bubble wrap. When I opened everything up and checked the hardware, I noticed that the double tab bolts for the frame mounts were missing, so I called Road Armor. They were a bit skeptical that the parts were missing, and over the course of our emails, told me that the '4x4 version' doesn't come with the tab bolts, and you should use the factory bolts. Nonetheless, they sent me a pair of the tab bolts via overnight UPS, which was appreciated, though I would have been happy with 1st class mail.
The installation itself is fairly easy once you figure it out. You remove the tow hooks(if you have a 2WD, you have to cut holes in the bumper) and mount the frame mounts. If you don't want to keep the tow hooks, use the tab bolts that come with the kit. If you do want to keep the tow hooks, you have to use the factory tab bolts, because the ones that come with the brush guard aren't long enough. Another important note: The instructions tell you to use the Road Armor tab bolts, and make it seem like it's really easy to install the frame mounts and the tow hooks. This is by far the most difficult part of the installation. You have very little space, tight clearances, and, if you are using the Road Armor tab bolts, a maddeningly almost-but-not-quite-long enough-ness. Do not waste 2 hours on this: Either lose the tow hooks or use the factory tab bolts.
I recommend that prior to tightening the frame mounts, you pull both mounts as far out as possible and pushed towards the outside of the vehicle, to the extent that there is any play. Putting on the frame mounts is the only part of this job that is hard, and mainly because there is very little room to work unless you remove the lower valance under the bumper(I didn't). Even then, the space where you are working is just too tight to get good leverage on the mounting bolts.
Once the frame mounts are on, have a helper hold the center section in place and put the mounting bolts in. I recommend you put a towel, bubble wrap, and other protective layers on the front of the truck for this part, as this is where the greatest potential for damage occurs, I think. This goes pretty quick, and once you have 2 bolts on each side, the center section sits pretty well. At this point, you need to check 3 things: First, you don't want the guard in the lowest position or else the eyeguards can't be installed properly; second, once you have the guard where you want it, you need to check that the hood can be opened without hitting the guard; and three, you need to start checking for level.
The final thing to do is install the eye guards. Again, have your friend help you by holding the eye guard in place, and keep the bubble wrap on the guards(except the mounting part) until you have a few of the bolts in place and snug.
The fit and finish of the guard is excellent. The symmetry is perfect. Other than adjusting height and level to your preference, the brush guard is even, fits perfectly, and again, looks great.
You don't need many tools for this job. The factory tow hooks require a 15mm socket and wrench to loosen, and possibly reinstall. The Road Armor guard requires 3/4" socket and wrench, 9/16" socket and wrench for the eye guards, a level and a torque wrench. If you follow the instructions to the letter and install the lateral frame mount screw, then you also need a 9/32" drill bit, drill, and socket for that, along with an Allen wrench for mounting the Road Armor logo.
In all, my assistant and I completed the whole installation in about 3 hours. Most of that time was me dicking around with the frame mounts and tab bolts. If I had to do it again, I could probably do it in 1-1/2 hours.
Once again, I am very happy with this upgrade. I think that the product is excellent for the price, (Thanks Ranger Offroad), the installation isn't bad, and it adds a look that you don't see on very many trucks.
First, the Review(and pictures):
Zombie_catcher1.jpg?t=1340569089
I could not be happier with the Road Armor Brush Guard. It is a very solid brush guard that is aggressive looking yet remarkably subdued at the same time. From 100 yards away, you hardly notice the guard, but up close it is simply massive. It is much heavier duty than most of the other brush guards I have seen. It looks great on the truck, as if it belongs there. This brush guard clearly isn't designed to be used to keep the azaleas away from your headlights. It looks urban, para-military. As if somewhere there is an M1 Abrams with a bumper sticker that says, "My other car is an F150". The feedback I have gotten so far has been overwhelmingly positive, and often primal.
Unlike many brush guards, the Road Armor version comes in three pieces. I wasn't thrilled with this as I find all the bolts ugly, but I have to admit that the final product feels like you could drive through a concrete wall and not damage the truck, and the bolts will probably be treated to some sort of paint once everything gets its final torque check.
The brush guard attaches to the frame where the tow hooks go, and contrary to what you've read, you can keep the tow hooks with this brush guard. It makes the install a bit awkward, but it's a minor inconvenience.
Front_Left.jpg?t=1340569088
The Purchase and Installation:
After taking an inventory of what was available in the marketplace, and having seen a few brush guards in person at various events where real truck people go(I am not a real truck person), I was a bit disappointed. The only product that I saw that looked even vaguely along the lines of what I wanted was the Road Armor Brush Guard. After much ado, and some gnashing of teeth, (because let's face it, when you buy this kind of thing and it ships freight, you're pretty much stuck with it), I bought the Road Armor Brush Guard.
I bought it from Ranger Offroad in Texas. They had the best price, free shipping, and Erik(the owner) was very friendly. Not only was their price better than anyone else, but when I called Road Armor, they couldn't match Ranger's total price. There was a minor hiccup when the freight company told us it would be delivered 2 days earlier than it did, but in any case, the guard arrived in one week, which isn't bad.
The brush guard comes in three boxes: One contains the center section, one contains the eye guards, and the third contains the frame mounts and hardware. It's very well packed, and will give your kids a very large supply of bubble wrap. When I opened everything up and checked the hardware, I noticed that the double tab bolts for the frame mounts were missing, so I called Road Armor. They were a bit skeptical that the parts were missing, and over the course of our emails, told me that the '4x4 version' doesn't come with the tab bolts, and you should use the factory bolts. Nonetheless, they sent me a pair of the tab bolts via overnight UPS, which was appreciated, though I would have been happy with 1st class mail.
The installation itself is fairly easy once you figure it out. You remove the tow hooks(if you have a 2WD, you have to cut holes in the bumper) and mount the frame mounts. If you don't want to keep the tow hooks, use the tab bolts that come with the kit. If you do want to keep the tow hooks, you have to use the factory tab bolts, because the ones that come with the brush guard aren't long enough. Another important note: The instructions tell you to use the Road Armor tab bolts, and make it seem like it's really easy to install the frame mounts and the tow hooks. This is by far the most difficult part of the installation. You have very little space, tight clearances, and, if you are using the Road Armor tab bolts, a maddeningly almost-but-not-quite-long enough-ness. Do not waste 2 hours on this: Either lose the tow hooks or use the factory tab bolts.
I recommend that prior to tightening the frame mounts, you pull both mounts as far out as possible and pushed towards the outside of the vehicle, to the extent that there is any play. Putting on the frame mounts is the only part of this job that is hard, and mainly because there is very little room to work unless you remove the lower valance under the bumper(I didn't). Even then, the space where you are working is just too tight to get good leverage on the mounting bolts.
Once the frame mounts are on, have a helper hold the center section in place and put the mounting bolts in. I recommend you put a towel, bubble wrap, and other protective layers on the front of the truck for this part, as this is where the greatest potential for damage occurs, I think. This goes pretty quick, and once you have 2 bolts on each side, the center section sits pretty well. At this point, you need to check 3 things: First, you don't want the guard in the lowest position or else the eyeguards can't be installed properly; second, once you have the guard where you want it, you need to check that the hood can be opened without hitting the guard; and three, you need to start checking for level.
The final thing to do is install the eye guards. Again, have your friend help you by holding the eye guard in place, and keep the bubble wrap on the guards(except the mounting part) until you have a few of the bolts in place and snug.
The fit and finish of the guard is excellent. The symmetry is perfect. Other than adjusting height and level to your preference, the brush guard is even, fits perfectly, and again, looks great.
You don't need many tools for this job. The factory tow hooks require a 15mm socket and wrench to loosen, and possibly reinstall. The Road Armor guard requires 3/4" socket and wrench, 9/16" socket and wrench for the eye guards, a level and a torque wrench. If you follow the instructions to the letter and install the lateral frame mount screw, then you also need a 9/32" drill bit, drill, and socket for that, along with an Allen wrench for mounting the Road Armor logo.
In all, my assistant and I completed the whole installation in about 3 hours. Most of that time was me dicking around with the frame mounts and tab bolts. If I had to do it again, I could probably do it in 1-1/2 hours.
Once again, I am very happy with this upgrade. I think that the product is excellent for the price, (Thanks Ranger Offroad), the installation isn't bad, and it adds a look that you don't see on very many trucks.
Last edited by Rider; Jun 26, 2012 at 04:24 PM.

Thread Starter
Senior Member
Joined: Apr 2012
Posts: 250
Likes: 19
From: New England
Thanks. I do like it a lot. Maybe some Plasti-dip....
You can put this on an FX2, you just have to cut holes in the bumper. The instructions come with a template to go on the bumper showing you where to cut.
You can put this on an FX2, you just have to cut holes in the bumper. The instructions come with a template to go on the bumper showing you where to cut.
Senior Member
Joined: May 2012
Posts: 150
Likes: 11
From: Texas
Thanks for the review/advice.
I always get grille guards installed on my trucks. One tip is to get it Line-X'd or Rhino-lined up front. This will prevent rusting and eventually having to replace it. The grille will catch rocks, debris, etc. and eventually chip/rub off the paint exposing the metal to rust.
I always get grille guards installed on my trucks. One tip is to get it Line-X'd or Rhino-lined up front. This will prevent rusting and eventually having to replace it. The grille will catch rocks, debris, etc. and eventually chip/rub off the paint exposing the metal to rust.
Thread Starter
Senior Member
Joined: Apr 2012
Posts: 250
Likes: 19
From: New England
A guy at work was commenting on my truck today, saying that it looks too nice to actually be used as a truck, and started talking about guys with beat up old trucks, and how having seen mine, he can't believe anyone actually uses these as trucks because they are so nice. I guess this weekend I'll drive through some mud to make him feel better.
Last edited by Rider; Jun 26, 2012 at 06:56 PM.


Trending Topics
Thread Starter
Senior Member
Joined: Apr 2012
Posts: 250
Likes: 19
From: New England
 The real question is why doesn't everyone have on on their truck.


