MustangAndy's 2018 XLT Sport - "Baloo 2"
 08-07-2022, 08:06 AM
#21
Bleeds Ford Blue
Thread Starter

Yea, the GlowShift plate is the easiest I've found thus far. Did the same thing on my '14 F150 and the Mustang. I had bad luck few years back with my '03 5.4 trying to tap into the existing sensor with brass fittings a' la what the forum said to do. Resulted in a sizable leak that I had to have undone by a mechanic friend.
Mustang differs though in that it's a mechanical gauge so there's an 1/8" copper line running into the car. Both 150's used an electronic gauge so it's just a few prebundled and terminated wires running - much safer. I'd recommend the electronic style over mechanical these days. Also see what size the sensor is. GlowShift uses a very small one - think OEM style - whilst AutoMeter uses a giant can sensor. There are other gauge manufacturers out there but I've only dealt with those two.
I did oil pressure on the BMW as well though that involved splicing into the existing sensor with an eBay "T" adapter. That in turn leads to this contraption hanging off the valve cover:
Not mine - pic stolen off google search - and here's a perfect example of sensor size in aftermarket gauges. That's an OEM/GlowShift size sensor vs. an AutoMeter can.

The following users liked this post:
[F2C]MaDMaXX (08-07-2022)
08-07-2022, 08:03 PM
#22
Dielectrically 5w30
Hmm, maybe one day, though i can't be bothered messing with the A pillar to mount it, i'll have a think about that one.
08-08-2022, 11:00 AM
#23
Bleeds Ford Blue
Thread Starter
If you're only putting the oil pressure in and nothing else AutoMeter makes a replacement steering wheel top: https://www.autometer.com/2-1-16-sin...150-09-14.html
OR
Ortiz has several options - vent replacement, side trim replacement, triple across the top of the radio, etc: https://ortizcustompods.com/ford.html
Food for thought.
_
OR
Ortiz has several options - vent replacement, side trim replacement, triple across the top of the radio, etc: https://ortizcustompods.com/ford.html
Food for thought.
_
The following users liked this post:
[F2C]MaDMaXX (08-08-2022)
08-08-2022, 03:42 PM
#24
Dielectrically 5w30
Ha, they're pretty nice options 
08-09-2022, 11:03 AM
#25
Bleeds Ford Blue
Thread Starter
Some work:
Forgot that I put a filler neck on the oil cap using a Mustang part:
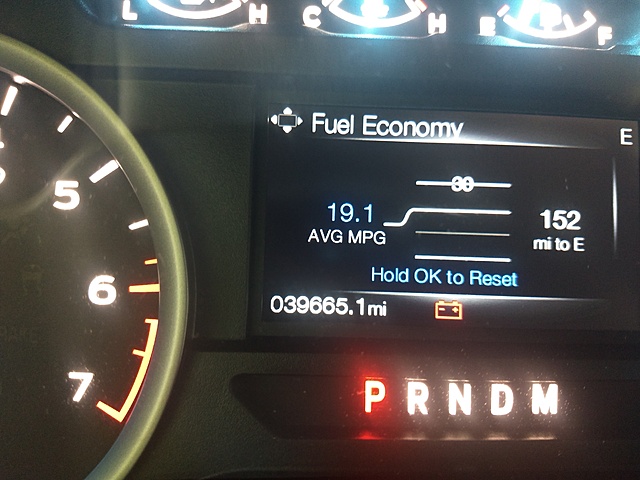
Latest trip yielded some impressive results on the Lie-o-Meter considering Baloo 1 struggled to maintain 16 on my last Midwest trip. Anxious to see if I can get it into the 20's next time I drive out there:
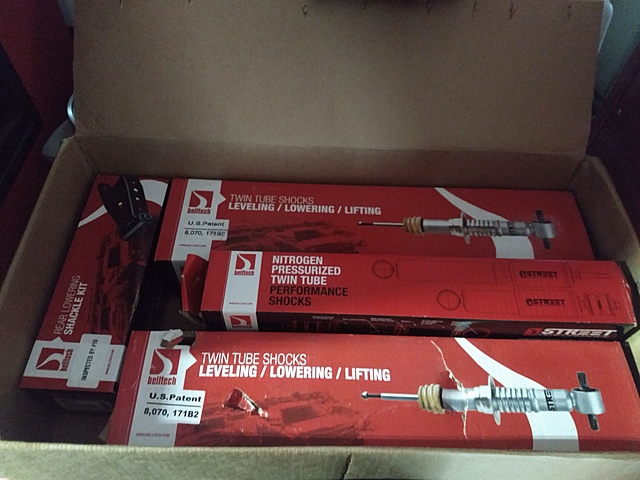
8/7/22: Belltech 2" drop installed.
Kit 1002SP:
Stock:
Managed to get the OEM struts out this time without having to cut the studs. Key is to remove the 13mm axle retaining nut and let the axle slide out of the IWE.
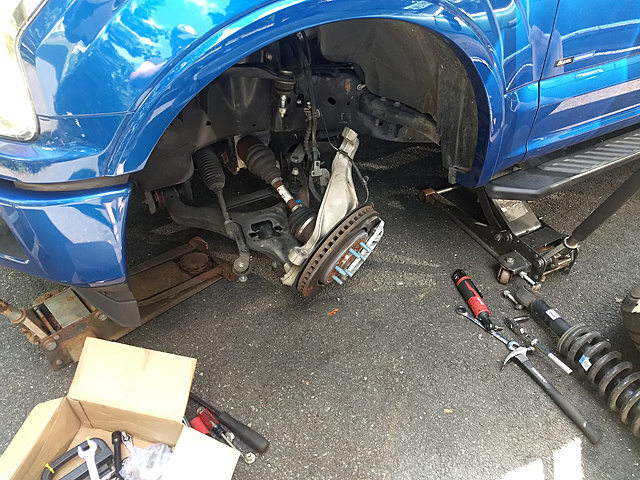
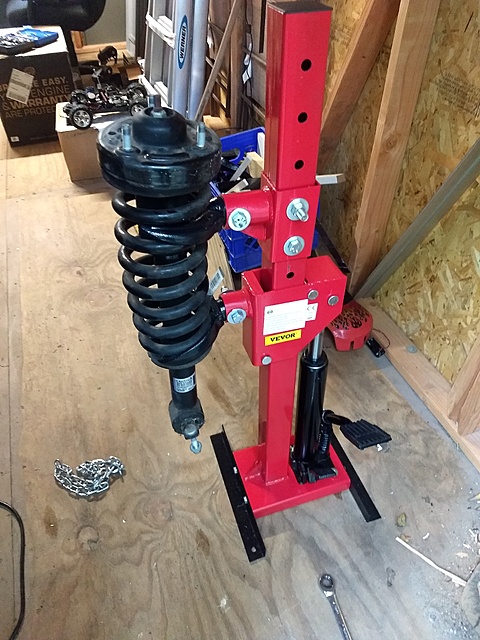
New $150 toy. Worked so much better than the cheap timebomb spring compressors I used last time:
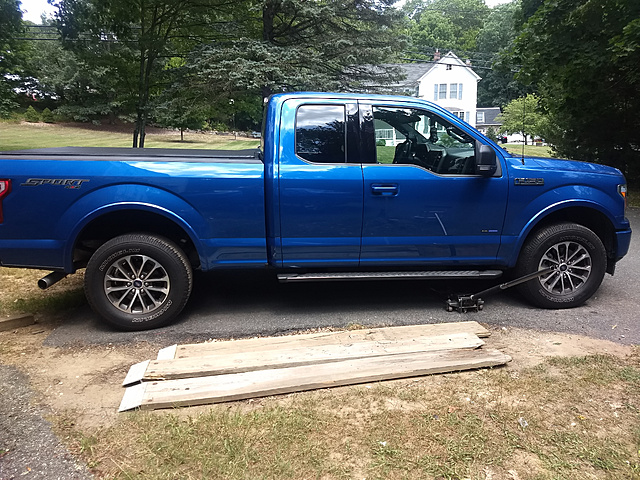
Just the fronts done:
Full kit installed. Hoping the rear settles out a bit more - otherwise I'll have to pull the fronts and add an extra spacer:
_
Forgot that I put a filler neck on the oil cap using a Mustang part:

Latest trip yielded some impressive results on the Lie-o-Meter considering Baloo 1 struggled to maintain 16 on my last Midwest trip. Anxious to see if I can get it into the 20's next time I drive out there:

8/7/22: Belltech 2" drop installed.
Kit 1002SP:

Stock:

Managed to get the OEM struts out this time without having to cut the studs. Key is to remove the 13mm axle retaining nut and let the axle slide out of the IWE.

New $150 toy. Worked so much better than the cheap timebomb spring compressors I used last time:

Just the fronts done:

Full kit installed. Hoping the rear settles out a bit more - otherwise I'll have to pull the fronts and add an extra spacer:

_
The following 2 users liked this post by MustangAndy:
Newbie 5 (08-09-2022),
[F2C]MaDMaXX (08-09-2022)
08-09-2022, 01:35 PM
#26
Abigail & Hannah�s dad

That strut compressor looks great- I looked at a few like that and decided I didn�t want to dedicate that space to own one- after spending the same $$ and using what I bought, I�d gladly redo that decision if I had a time machine.
08-11-2022, 09:07 AM
#27
Bleeds Ford Blue
Thread Starter
Reasoning behind this purchase was I looked at what I have in the driveway and realized everything is getting newer - 4 out of the 7 (soon to be 6 - brother's Mazda is going bye-bye) cars were built after 2010. Cheap and dangerous coil compressors weren't gonna cut it anymore. They never fit the way you need them to and they're time bombs if you set them down the wrong way.

The following users liked this post:
Newbie 5 (08-11-2022)
08-11-2022, 04:25 PM
#28
Abigail & Hannah�s dad
Would it benefit to maybe sell/trade-off what you have and buy one of these towers? Doesn't take up much space. The height is what takes the most, however the arms are interchangeable as it came with two different size "dies" (for lack of better word). F150 used the smaller ones. You can always pull those off as well as the larger pedal (single retaining screw) to save space.
Reasoning behind this purchase was I looked at what I have in the driveway and realized everything is getting newer - 4 out of the 7 (soon to be 6 - brother's Mazda is going bye-bye) cars were built after 2010. Cheap and dangerous coil compressors weren't gonna cut it anymore. They never fit the way you need them to and they're time bombs if you set them down the wrong way.
Reasoning behind this purchase was I looked at what I have in the driveway and realized everything is getting newer - 4 out of the 7 (soon to be 6 - brother's Mazda is going bye-bye) cars were built after 2010. Cheap and dangerous coil compressors weren't gonna cut it anymore. They never fit the way you need them to and they're time bombs if you set them down the wrong way.

The problem I had, I needed it in a good vise instead of working on the ground. But I think I paid about what you did 🤷🏻♂️ You live and you learn and I learned I�m not doing that job again haha
08-11-2022, 07:21 PM
#29
Senior Member
At 82,000 miles on my 2005 I am replacing the front struts using loaded struts already with the springs so that way I do not need to mess with the springs. I have removed front coil springs from my 69 Mustang using an internal spring compressor & they are scary to mess with.

The following users liked this post:
MustangAndy (08-12-2022)
09-21-2022, 03:36 AM
#30
Bleeds Ford Blue
Thread Starter
Aight so I've done a bunch of other work to the truck but wanted to get this down for others who may want to do this mod to their 3rd gen 5.0's. This is the stock engine cover found on late model Mustangs. The cover can be found on eBay for under $100 either as a new take-off or used.
***I'm not responsible if you break something - assume your own risks***
You'll need sections of 3/8" and 5/8" hose with spider/worm clamps
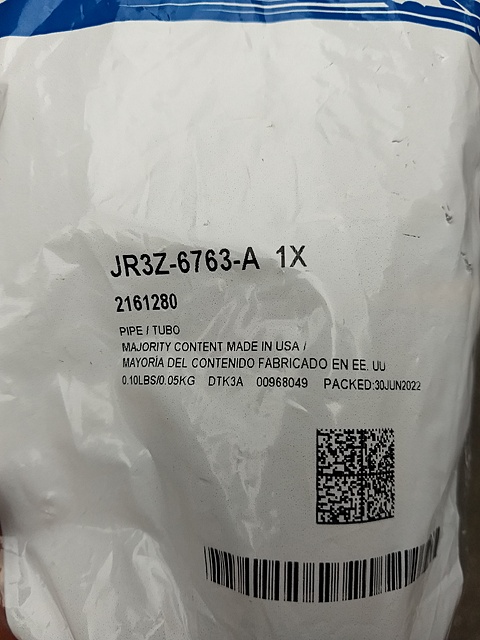
You'll also need the oil neck extension - Ford part # JR3Z-6763-A
You'll also also need a 90* "Bundy" fitting - see below
I'm going to eventually replace the two fitting on my S&B with 45* or 90* fittings for better hose routing but this is working for now:
Attachment 565147
I can't take all the credit for this, as a lot of info can be found on this thread here: https://www.f150forum.com/f2/2018-5-...-cover-436959/
The biggest hold up for getting this to fit is the extensive vacuum lines atop the upper manifold. I affectionately referred to this as "The Spider" once I pulled it off the truck. Two slight modifications to this will solve most of your woes.
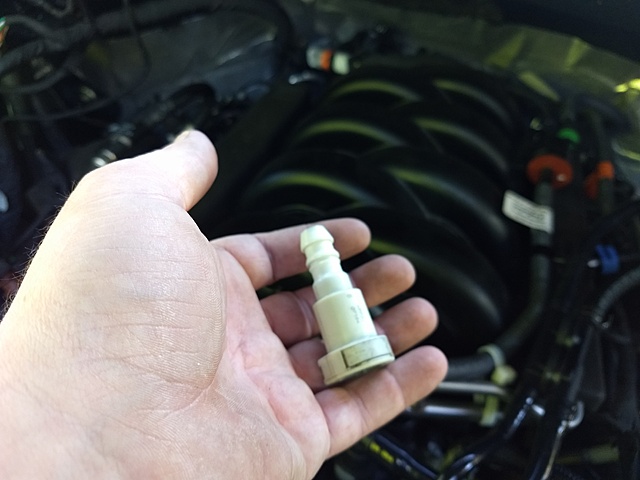
Since you'll already be on eBay buying the cover buy one of these as well: https://www.ebay.com/itm/16290132679...Bk9SR57O9-zrYA
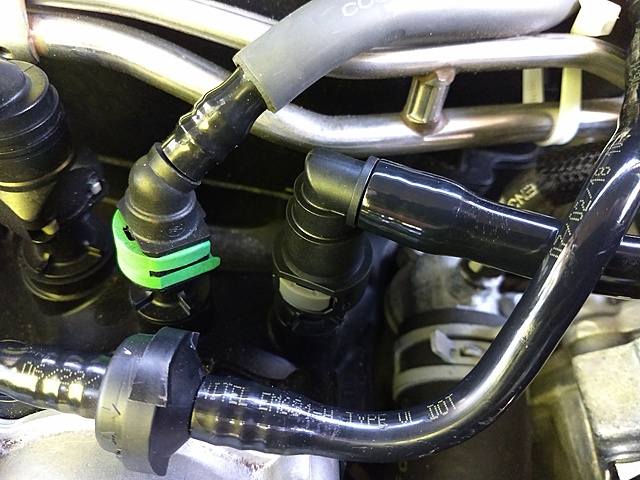
It's a 90* replacement for one of the straight on fittings and locks tight with the male end on the engine. The one you need to change is on the right side front above the throttle sticking straight up. To get the old one out will require a bit of heat. For me it was a few seconds on two sides of the fitting with my Wagner (Home Depot) heat gun on medium heat, low fan and flip it over a few times. Don't put too much direct heat on it as you don't want it to melt. Once it's got some heat in it try to rotate the fitting, there will be a small pop/crack and it will move. Once it's loose twist it back and forth as you pull and it will eventually come out. Replace it with the 90* you got off eBay:
90* installed:
You'll also have to remove the section that comes off the check valve and attaches to the intake pipe:
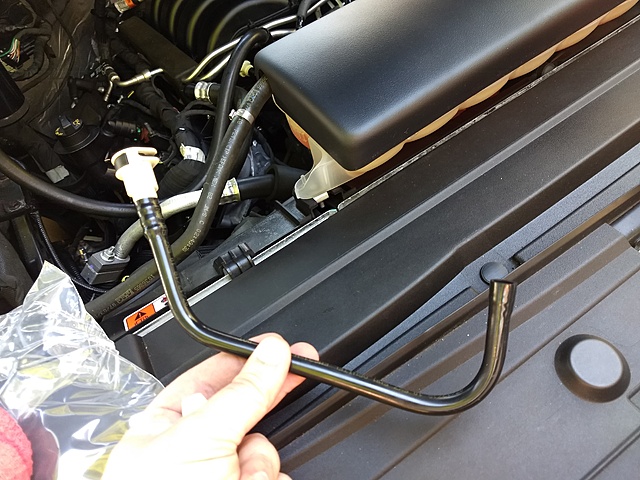
Replace that piece with a section of 3/8" hose of your choice and a spider/worm clamp. The whole thing should look like this once your done. Nice and flat. You may need to heat and rotate some of the other fittings to get this result. The second larger hardline on the driver's side coming off the valve cover to the intake can be replaced directly with the 5/8" hose. NOTE: I have a 4x4 so your vac lines may differ on a 2WD. Also I'm not sure about the hard line on the passenger side head as I previously installed a catch can so those hoses sit lower and are much more flexible.

The two front mounting studs were another thing I had an issue with. Originally I bought a pair of M6 cap screws, milled the heads slightly, then epoxied them in the holes. These both failed as I was running down the supplied M6 nylocks. I went a hair too tight on both and felt the epoxy break loose. The cover lifted the next day after I took the truck on some errands. My remedy was to sink a pair of Amazon's finest M8 helicoils into the valve covers and pick up a pair of M8x1.25 x 16mm flange bolts from Home Depot. This worked much better and is holding tight:

That's all for now that I can think of for now. Feel free to ask any questions if need be, I'll see if I can help.
_
***I'm not responsible if you break something - assume your own risks***
You'll need sections of 3/8" and 5/8" hose with spider/worm clamps
You'll also need the oil neck extension - Ford part # JR3Z-6763-A
You'll also also need a 90* "Bundy" fitting - see below
I'm going to eventually replace the two fitting on my S&B with 45* or 90* fittings for better hose routing but this is working for now:
Attachment 565147
I can't take all the credit for this, as a lot of info can be found on this thread here: https://www.f150forum.com/f2/2018-5-...-cover-436959/
The biggest hold up for getting this to fit is the extensive vacuum lines atop the upper manifold. I affectionately referred to this as "The Spider" once I pulled it off the truck. Two slight modifications to this will solve most of your woes.
Since you'll already be on eBay buying the cover buy one of these as well: https://www.ebay.com/itm/16290132679...Bk9SR57O9-zrYA
It's a 90* replacement for one of the straight on fittings and locks tight with the male end on the engine. The one you need to change is on the right side front above the throttle sticking straight up. To get the old one out will require a bit of heat. For me it was a few seconds on two sides of the fitting with my Wagner (Home Depot) heat gun on medium heat, low fan and flip it over a few times. Don't put too much direct heat on it as you don't want it to melt. Once it's got some heat in it try to rotate the fitting, there will be a small pop/crack and it will move. Once it's loose twist it back and forth as you pull and it will eventually come out. Replace it with the 90* you got off eBay:

90* installed:

You'll also have to remove the section that comes off the check valve and attaches to the intake pipe:

Replace that piece with a section of 3/8" hose of your choice and a spider/worm clamp. The whole thing should look like this once your done. Nice and flat. You may need to heat and rotate some of the other fittings to get this result. The second larger hardline on the driver's side coming off the valve cover to the intake can be replaced directly with the 5/8" hose. NOTE: I have a 4x4 so your vac lines may differ on a 2WD. Also I'm not sure about the hard line on the passenger side head as I previously installed a catch can so those hoses sit lower and are much more flexible.

The two front mounting studs were another thing I had an issue with. Originally I bought a pair of M6 cap screws, milled the heads slightly, then epoxied them in the holes. These both failed as I was running down the supplied M6 nylocks. I went a hair too tight on both and felt the epoxy break loose. The cover lifted the next day after I took the truck on some errands. My remedy was to sink a pair of Amazon's finest M8 helicoils into the valve covers and pick up a pair of M8x1.25 x 16mm flange bolts from Home Depot. This worked much better and is holding tight:

That's all for now that I can think of for now. Feel free to ask any questions if need be, I'll see if I can help.
_
The following 3 users liked this post by MustangAndy: