
Installing your own accessory switch and USB


Thread Starter
I Love My Ford
Joined: Jul 2010
Posts: 42
Likes: 2
From: Michigan
Recently I bought my second F-150 and decided that I wanted to do some of my own modifications on it.
I have looked on this forum all over the place and I did find some things that helped me a little bit I still couldn't find exactly what I was looking for so now that I'm finished I decided I would do a write up to help others out that might want to do the same thing or something similar.
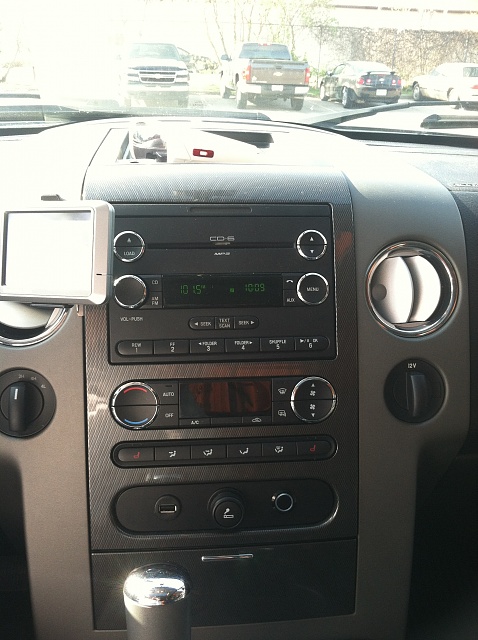
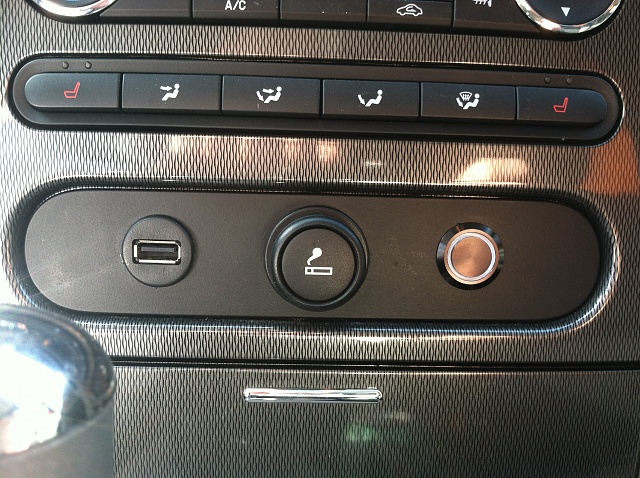
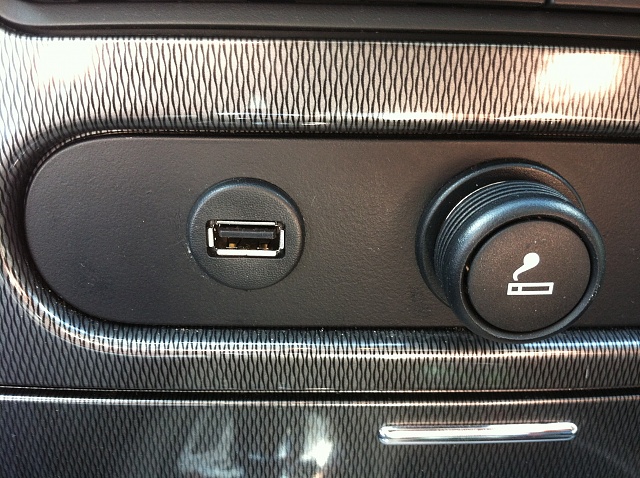
One thing I decided was that I wanted something in my truck that would allow me to charge my iPhone and any other electronics I have without occupying the cigarette lighter. Since the spots on either side of the cigarette lighter had nothing there and looked kinda bare I thought I would put a USB plug next to it to charge my stuff.
The other thing is that I like to have my GPS in my truck at all times because I travel a lot. If your anything like me I hate having cords all over the place so I decided I was going to hard wire my GPS in. Well since I don't always need my GPS I thought that I could occupy the space on the opposite side of the cigarette light to even things out a bit with some kind of switch to turn the GPS on and off.
Keep on reading below to see how I did it....
I have looked on this forum all over the place and I did find some things that helped me a little bit I still couldn't find exactly what I was looking for so now that I'm finished I decided I would do a write up to help others out that might want to do the same thing or something similar.
One thing I decided was that I wanted something in my truck that would allow me to charge my iPhone and any other electronics I have without occupying the cigarette lighter. Since the spots on either side of the cigarette lighter had nothing there and looked kinda bare I thought I would put a USB plug next to it to charge my stuff.
The other thing is that I like to have my GPS in my truck at all times because I travel a lot. If your anything like me I hate having cords all over the place so I decided I was going to hard wire my GPS in. Well since I don't always need my GPS I thought that I could occupy the space on the opposite side of the cigarette light to even things out a bit with some kind of switch to turn the GPS on and off.


Keep on reading below to see how I did it....
Last edited by Ward9320; Mar 26, 2012 at 02:20 PM.

Thread Starter
I Love My Ford
Joined: Jul 2010
Posts: 42
Likes: 2
From: Michigan
My first attempt at this was a fail, it did work but I did not trust it. I'm not really going to get into it though, mostly going to focus on the right way to do it.
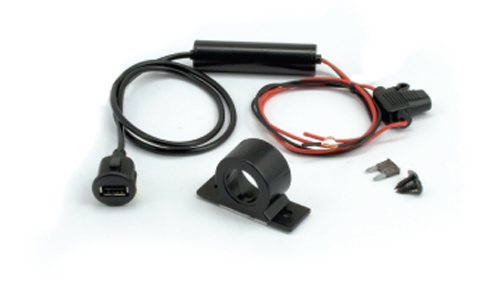
I did some searching online and found a USB setup made to hard wire right into your vehicle. Go to www.hifisoundconnection.com the part is $17.95 and it works great! If you can find one some place else for cheaper please post it because I couldn't find any.
Once you get your USB in the mail the next thing your going to want to do is take the black oval piece out of your dash. On my truck if you open the ash tray and grab a hold of the bottom part of the dash and give it a good pull out it will pop out. Work your way up popping out all the prongs but be careful because your going to have some wires connected to the back of that panel your pulling off.
Now carefully remove all the plugs on the back of that panel. On my truck I had (from the top) the passenger air bag on/off light wire, A/C control wires (two of them side by side), then three plugs plugged into the black panel where the cigarette lighter is located. I don't know about you but when I took this off I was like "What the heck do these plugs go on either side of the cigarette lighter go to? They aren't plugged into anything?" Well from what I have found is it all part of a generic wiring harness Ford came up with. Obviously you don't need either one of these plugs. I just zip tied out of the way in the dash somewhere.
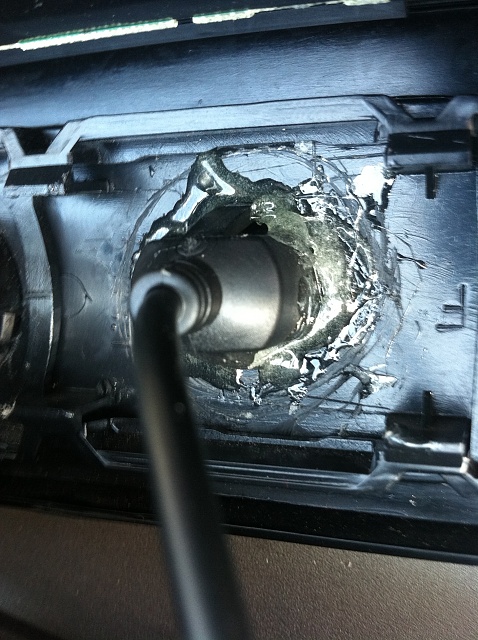
The black oval panel that the cigarette lighter is on needs to come out. There are three clips on the top and bottom of that. Just push them in and it will pop right out. You will now need to make a hole for your USB to go into. There are several ways you can do this, I used a dremel. On the back side of the panel there are the spots where the unused wires plugged in, I used these spots as a guide to make sure my hole was center and even. Be sure not to make the hole to big. Once my hole was made I put the USB in and noticed that I could wiggle it around a bit to much so I ran to Wal-Mart real quick and got some 5 minute epoxy. Put some of the on it and now it won't move at all.
The USB Kit (Get it HERE)
5-Minute Epoxy
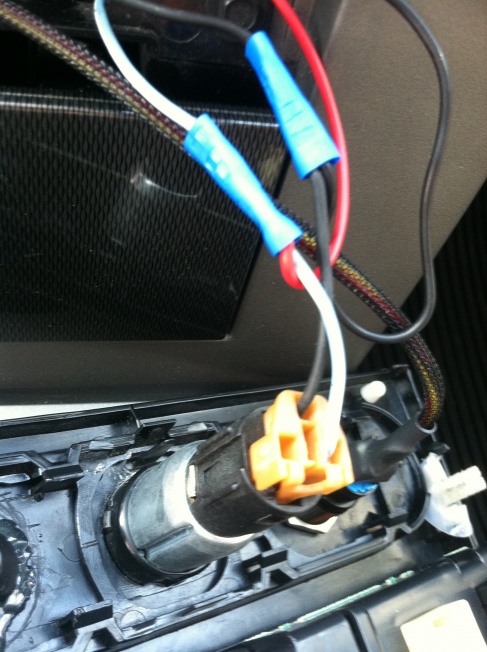
What your going to want to do now is take the plug the plugs into the cigarette lighter and splice the USB into that. The black wire from the USB needs to be spliced into the black wire from the cigarette lighter and the red wire from the USB needs to be spliced into the blue with white stripe wire from the cigarette lighter.
Wiring

When your done with that just pop that black panel the cigarette light and now your USB back into the dash piece and then put everything back together in reverse order you took it off and your done.
The Finished Product
I did some searching online and found a USB setup made to hard wire right into your vehicle. Go to www.hifisoundconnection.com the part is $17.95 and it works great! If you can find one some place else for cheaper please post it because I couldn't find any.
Once you get your USB in the mail the next thing your going to want to do is take the black oval piece out of your dash. On my truck if you open the ash tray and grab a hold of the bottom part of the dash and give it a good pull out it will pop out. Work your way up popping out all the prongs but be careful because your going to have some wires connected to the back of that panel your pulling off.
Now carefully remove all the plugs on the back of that panel. On my truck I had (from the top) the passenger air bag on/off light wire, A/C control wires (two of them side by side), then three plugs plugged into the black panel where the cigarette lighter is located. I don't know about you but when I took this off I was like "What the heck do these plugs go on either side of the cigarette lighter go to? They aren't plugged into anything?" Well from what I have found is it all part of a generic wiring harness Ford came up with. Obviously you don't need either one of these plugs. I just zip tied out of the way in the dash somewhere.
The black oval panel that the cigarette lighter is on needs to come out. There are three clips on the top and bottom of that. Just push them in and it will pop right out. You will now need to make a hole for your USB to go into. There are several ways you can do this, I used a dremel. On the back side of the panel there are the spots where the unused wires plugged in, I used these spots as a guide to make sure my hole was center and even. Be sure not to make the hole to big. Once my hole was made I put the USB in and noticed that I could wiggle it around a bit to much so I ran to Wal-Mart real quick and got some 5 minute epoxy. Put some of the on it and now it won't move at all.
The USB Kit (Get it HERE)
5-Minute Epoxy

What your going to want to do now is take the plug the plugs into the cigarette lighter and splice the USB into that. The black wire from the USB needs to be spliced into the black wire from the cigarette lighter and the red wire from the USB needs to be spliced into the blue with white stripe wire from the cigarette lighter.
Wiring
When your done with that just pop that black panel the cigarette light and now your USB back into the dash piece and then put everything back together in reverse order you took it off and your done.
The Finished Product

Last edited by Ward9320; Mar 26, 2012 at 01:55 PM.
Thread Starter
I Love My Ford
Joined: Jul 2010
Posts: 42
Likes: 2
From: Michigan
This is going to cover adding a switch and hard wiring an accessory. I Hard wired my GPS in.
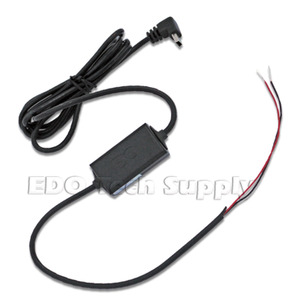
If you would like to use the same mount as me you can pick one up at http://store.xmfanstore.com, they are a little pricey but I'm real OCD about this kinda stuff. Also if your hooking up a GPS you need to get a hard wire kit for it at http://www.edotechsupply.com. I would not cut the end off of your existing cord and use that because I'm pretty sure that the plug on the end of it is what converts the 12V to 5V, which is what most accessories run off of. If you want just a plain jane switch then run to an automotive store and grab one there but for me, I wanted something with a little more style but was also low profile. I originally found this switch that is made for this type of thing and would have been great but they only make it with the chrome finish, I wanted black. So after much searching I found one at http://www.performance-pcs.com. I know what your thinking, why the heck are you putting stuff made for computers in your truck. Well I e-mailed the company before I order it and asked them if it would work. They said that the voltage rating was the same so it would in fact work. If you decide to go with the same switch I got I recommend the 22mm over the 16mm because I think the 16mm is to small and also make sure you get the prewired switch (the link will take you directly to the one you need), it will make life a little easier for you. The next thing you need to do is run to the local automotive store and pick yourself up some splice connectors, some automotive wire (two different color preferably), an Add-a-Fuse, and a extra 10A fuse.
The Mount for the GPS (Get it HERE)
GPS Hardwire Kit (Get it HERE)
The on/off Switch (Get it HERE)
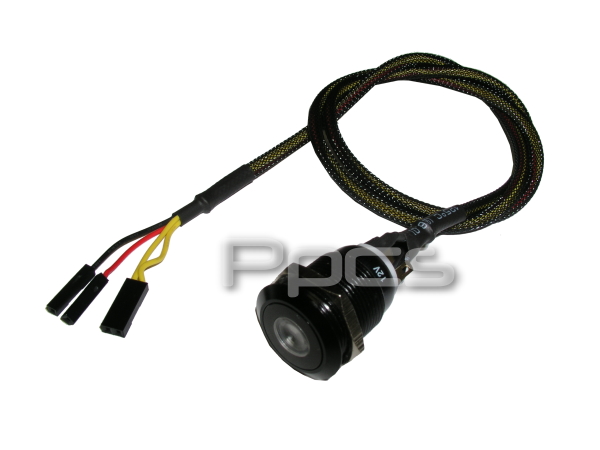
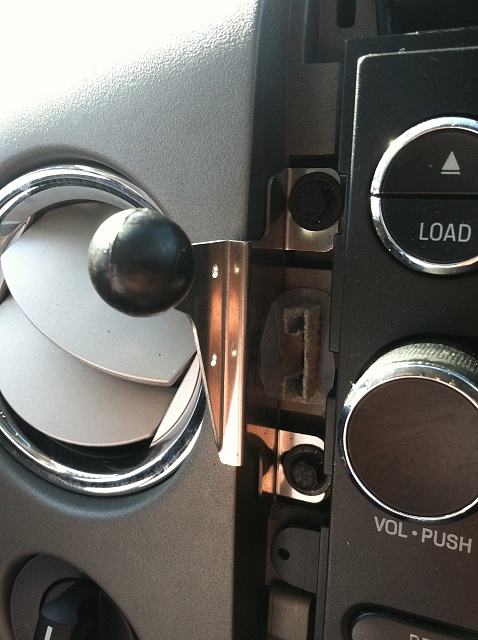
The first step is to take your dash apart and if you don't know how to do that it is explained in the previous post. Once you get the black oval panel out that had your cigarette lighter adapter on it your going to have to make a hole in it to fit your switch. If you ordered the pre-wired switch like I said it will have three wires coming from it. A Black wire (ground), Red wire (power), and a Yellow wire (accessory). The accessory your going to hook up should have two wires, typically a Black wire (ground) and a Red wire (power).
The next step is to connect your accessory to the switch. Take the yellow wire (accessory) from your switch and using a splice connector connect it to the Red wire (power) from your accessory.
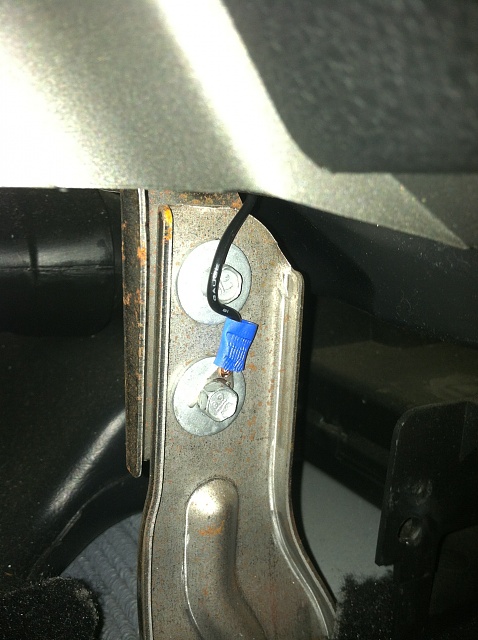
Next take the Black wire (ground) from your switch and the Black wire (ground) from your accessory and twist them together and them put them both in the same side of a splice connector. Now take some of the automotive wire you picked up and connect one end to the opposite side of the splice connector we just hooked the other Black (ground) wires to. Find a good spot to ground your wire and ground the other end of your wire there. I found a spot on the passenger side behind a panel on the floorboard.
The Ground Spot
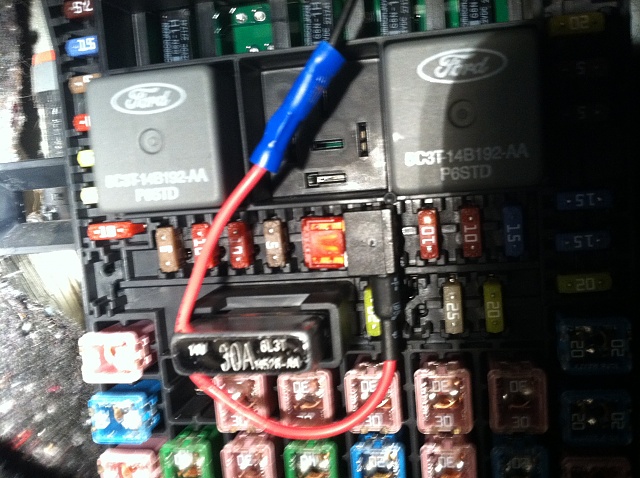
Now you need to get to the fuse box in your truck. It is located on the right side of the passenger side behind a panel. Once you have found that run some more of the automotive wire from the fuse box to the Red wire (power) on your switch. Connect that wire using a splice connector to the Red wire on your switch and connect the other end to the Add-a-Fuse's splice connector. Find the fuse that you want to use to plug in the Add-a-Fuse. I used the fuse that controls my heated seats because I knew that it would shut off when my truck shut off. If your not sure look in your owners manual and it has a break down of what they all do in there. After you pull your fuse out put it into the Add-a-Fuse along with the other 10A fuse you bought and then insert the Add-a-Fuse into the fuse box.
Fuse Box with the Add-A-Fuse
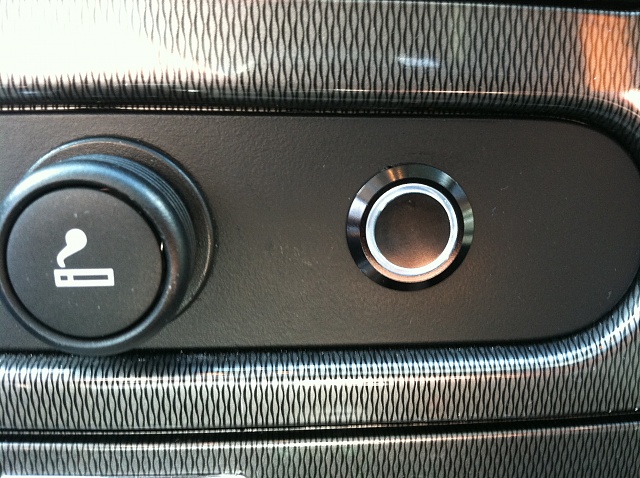
Now just put everything back together in the reverse order you took it apart and enjoy.
The Finished Product
I really hope this will help some of you out.
If anyone has any questions please ask away and I will do my best to answer them.
If you would like to use the same mount as me you can pick one up at http://store.xmfanstore.com, they are a little pricey but I'm real OCD about this kinda stuff. Also if your hooking up a GPS you need to get a hard wire kit for it at http://www.edotechsupply.com. I would not cut the end off of your existing cord and use that because I'm pretty sure that the plug on the end of it is what converts the 12V to 5V, which is what most accessories run off of. If you want just a plain jane switch then run to an automotive store and grab one there but for me, I wanted something with a little more style but was also low profile. I originally found this switch that is made for this type of thing and would have been great but they only make it with the chrome finish, I wanted black. So after much searching I found one at http://www.performance-pcs.com. I know what your thinking, why the heck are you putting stuff made for computers in your truck. Well I e-mailed the company before I order it and asked them if it would work. They said that the voltage rating was the same so it would in fact work. If you decide to go with the same switch I got I recommend the 22mm over the 16mm because I think the 16mm is to small and also make sure you get the prewired switch (the link will take you directly to the one you need), it will make life a little easier for you. The next thing you need to do is run to the local automotive store and pick yourself up some splice connectors, some automotive wire (two different color preferably), an Add-a-Fuse, and a extra 10A fuse.
The Mount for the GPS (Get it HERE)

GPS Hardwire Kit (Get it HERE)
The on/off Switch (Get it HERE)
The first step is to take your dash apart and if you don't know how to do that it is explained in the previous post. Once you get the black oval panel out that had your cigarette lighter adapter on it your going to have to make a hole in it to fit your switch. If you ordered the pre-wired switch like I said it will have three wires coming from it. A Black wire (ground), Red wire (power), and a Yellow wire (accessory). The accessory your going to hook up should have two wires, typically a Black wire (ground) and a Red wire (power).
The next step is to connect your accessory to the switch. Take the yellow wire (accessory) from your switch and using a splice connector connect it to the Red wire (power) from your accessory.
Next take the Black wire (ground) from your switch and the Black wire (ground) from your accessory and twist them together and them put them both in the same side of a splice connector. Now take some of the automotive wire you picked up and connect one end to the opposite side of the splice connector we just hooked the other Black (ground) wires to. Find a good spot to ground your wire and ground the other end of your wire there. I found a spot on the passenger side behind a panel on the floorboard.
The Ground Spot

Now you need to get to the fuse box in your truck. It is located on the right side of the passenger side behind a panel. Once you have found that run some more of the automotive wire from the fuse box to the Red wire (power) on your switch. Connect that wire using a splice connector to the Red wire on your switch and connect the other end to the Add-a-Fuse's splice connector. Find the fuse that you want to use to plug in the Add-a-Fuse. I used the fuse that controls my heated seats because I knew that it would shut off when my truck shut off. If your not sure look in your owners manual and it has a break down of what they all do in there. After you pull your fuse out put it into the Add-a-Fuse along with the other 10A fuse you bought and then insert the Add-a-Fuse into the fuse box.
Fuse Box with the Add-A-Fuse

Now just put everything back together in the reverse order you took it apart and enjoy.
The Finished Product

I really hope this will help some of you out.
If anyone has any questions please ask away and I will do my best to answer them.
Last edited by Ward9320; Mar 26, 2012 at 02:53 PM.
Thread Starter
I Love My Ford
Joined: Jul 2010
Posts: 42
Likes: 2
From: Michigan
I got the plug HERE and yes it does convert from 12V to 5V so you don't have to worry about blowing up your devices.

Trending Topics
5 Year Member


Joined: Mar 2012
Posts: 409
Likes: 105
From: Texas
Nice Install Ward9320 !
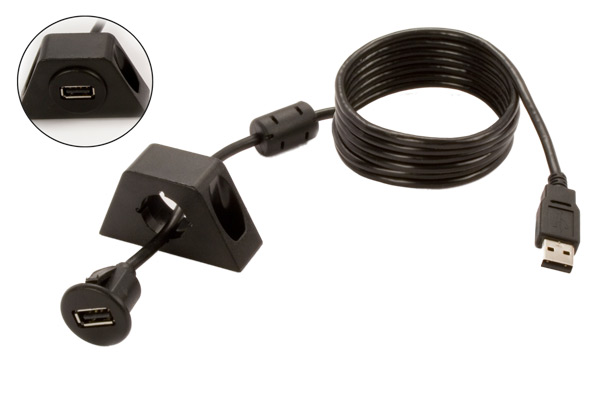
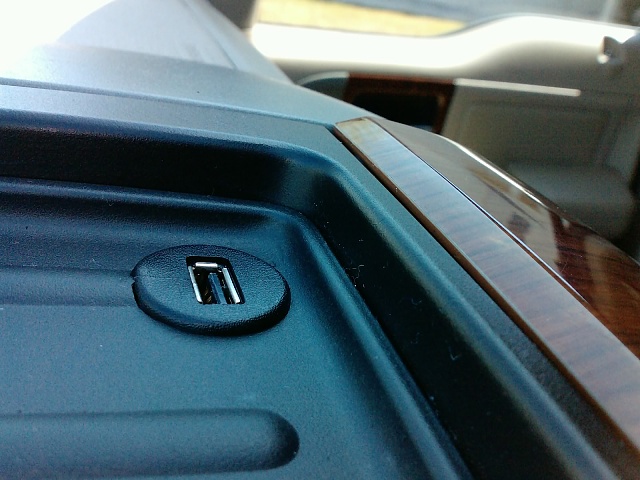
Here's a USB cable almost similar the one above but this one connects to any head unit with integrated USB. In my case I have a DNX9980HD and I can charge any USB device from that USB port and play any video or picture file from a memory stick.
You can just google "USBCBL" and you'll find it, I believe it's a Pac-Audio product.
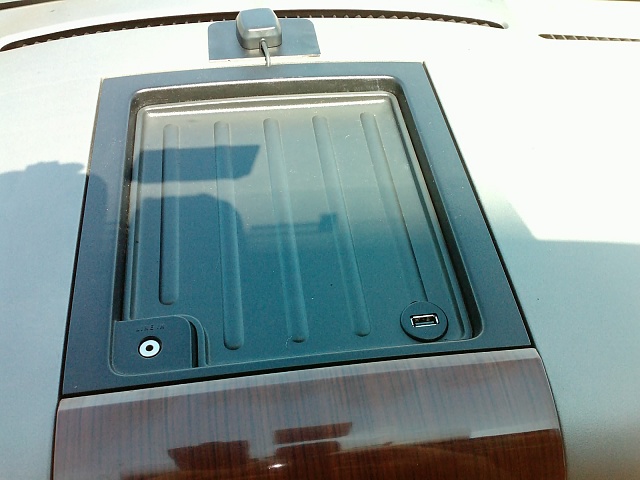
I drilled the top tray on the opposite corner of the Factory AUX LINE-IN, I didn't want to mess up my woodgrain The GPS antenna in the front is for the Kenwood Navigation, there I also drilled a tiny hole with a dremmel tool to allow passage for the wire and also make sure the tray snaps back in flush.
Here's a USB cable almost similar the one above but this one connects to any head unit with integrated USB. In my case I have a DNX9980HD and I can charge any USB device from that USB port and play any video or picture file from a memory stick.
You can just google "USBCBL" and you'll find it, I believe it's a Pac-Audio product.
I drilled the top tray on the opposite corner of the Factory AUX LINE-IN, I didn't want to mess up my woodgrain
The GPS antenna in the front is for the Kenwood Navigation, there I also drilled a tiny hole with a dremmel tool to allow passage for the wire and also make sure the tray snaps back in flush.

Thread Starter
I Love My Ford
Joined: Jul 2010
Posts: 42
Likes: 2
From: Michigan
Looks good... I kinda like that it is mounted up there so that you can just set your device in the tray. The reason I decided to put it where I did was because the panel the cigarette lighter is on looked very bare and I also knew I was going to put the switch in too to even it out.
5 Year Member
Joined: Mar 2012
Posts: 409
Likes: 105
From: Texas
Looks good... I kinda like that it is mounted up there so that you can just set your device in the tray. The reason I decided to put it where I did was because the panel the cigarette lighter is on looked very bare and I also knew I was going to put the switch in too to even it out.
Eventhough it already came with the LINE-IN (factory), after I installed the Aftermarket HU it became unusable so I had to install my own


Last edited by TXFRDOwner; Mar 26, 2012 at 02:54 PM.