

Flow through console shifter install tips


Senior Member
Joined: Jun 2012
Posts: 733
Likes: 83
From: Florida
Mamonti has some great Info on this. I printed out all the diagrams I got from him. And did a "walk down" today. Need to pick up one harness from ford. Then I may just take a stab at it next weekend. The column shouldn't take to long to remove. It's taking the time to lay out each wire. And connect it the "right" way.
Thread Starter
Senior Member
Joined: Jul 2012
Posts: 132
Likes: 4
From: Charlotte
Mamonti has some great Info on this. I printed out all the diagrams I got from him. And did a "walk down" today. Need to pick up one harness from ford. Then I may just take a stab at it next weekend. The column shouldn't take to long to remove. It's taking the time to lay out each wire. And connect it the "right" way.
Im not really worried about the wires at all, I've done so much splicing to my truck that Im very comfortable with rerouting power.
What I am more concerned about is hooking up the transmission cable and removing the old shifter.
I looked at the column shifter today and it looks like with two bolts it may be possible to take off the lever and move it out of the way.
Anyway, Consoles still in the mail, and Ive got to order the new radio panels and a couple other pieces before I can do a complete install, but Ill update this forum with pictures as I go along.
Thread Starter
Senior Member
Joined: Jul 2012
Posts: 132
Likes: 4
From: Charlotte
I don't think you will have any problems doing it.. I am old school so once I realized Ford doesn't do the one harness fits all deal I knew it was just more work,,, of course that is because I wanted to go the extra mile or two instead of just bolting in a console. I think you are the same way and won't have any problems doing this mod!
(console came in today XD)
Could you explain what you did, or direct me to where you got your information from?
thanks.
Senior Member

Joined: Jan 2012
Posts: 1,383
Likes: 224
From: DuBois, Pa.
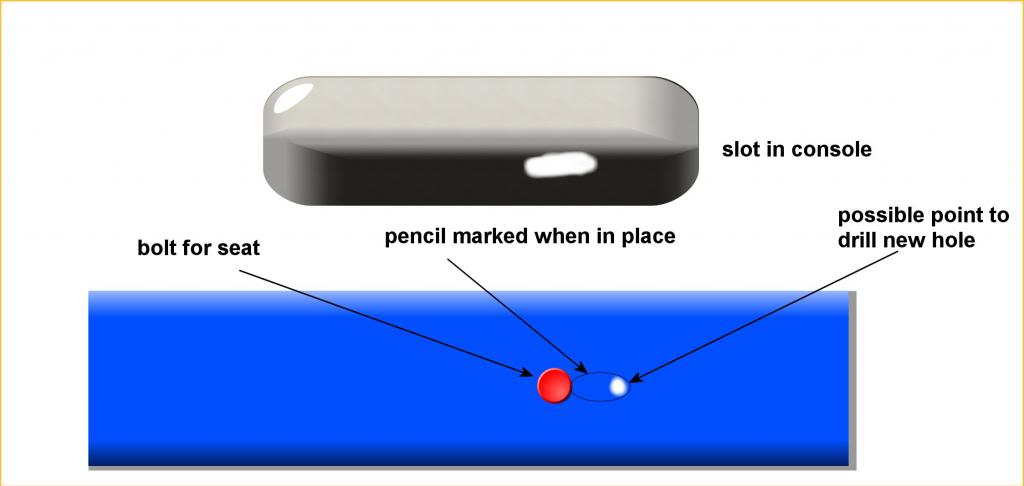
Not a problem at all... When you remove the seat you will see the mounting bracket has the holes tapped in a couple of places. The problem is they are tapped at the factory for the application being installed so center seat is different that the console and the flow through console could be different than the standard console... you will notice on your new console that the mounting holes are slotted, that is there so you can loosen the bolt and slide the console back to get access to the lower heat actuator and so on. Just simply place the console in its place and slide it forward to meet when it should set. The best way to do this is to have the new AC panels in place. That way you will see it line up. Once you do that just slide a marker or pencil in and mark the whole slotted mount. The remover the console and drill the hole in the back of the slot. that way when you loosen it up it will allow the console to slide back. Get a nice self tapping bolt at lowes or where ever. you don't have to be to exact at to the size of the drill verses the size of the bolt threads since it is aluminum. just work it in and out a couple of time and it will self tap fine. little sample not to say this is where to drill but to show what I am posting here.


