
Aftermarket heated seat inserts
 01-02-2013, 01:05 PM
#111
2013 Ruby Red FX4 SCrew
Thread Starter

I made a plate to mount my switches. I used lexan and tried to paint it flat black. The first coat went on nicely, but the second coat made the first coat shrivel up. Tried it on the other side and it did the same thing. Had to sand it off and use vinyl wrap instead.

-
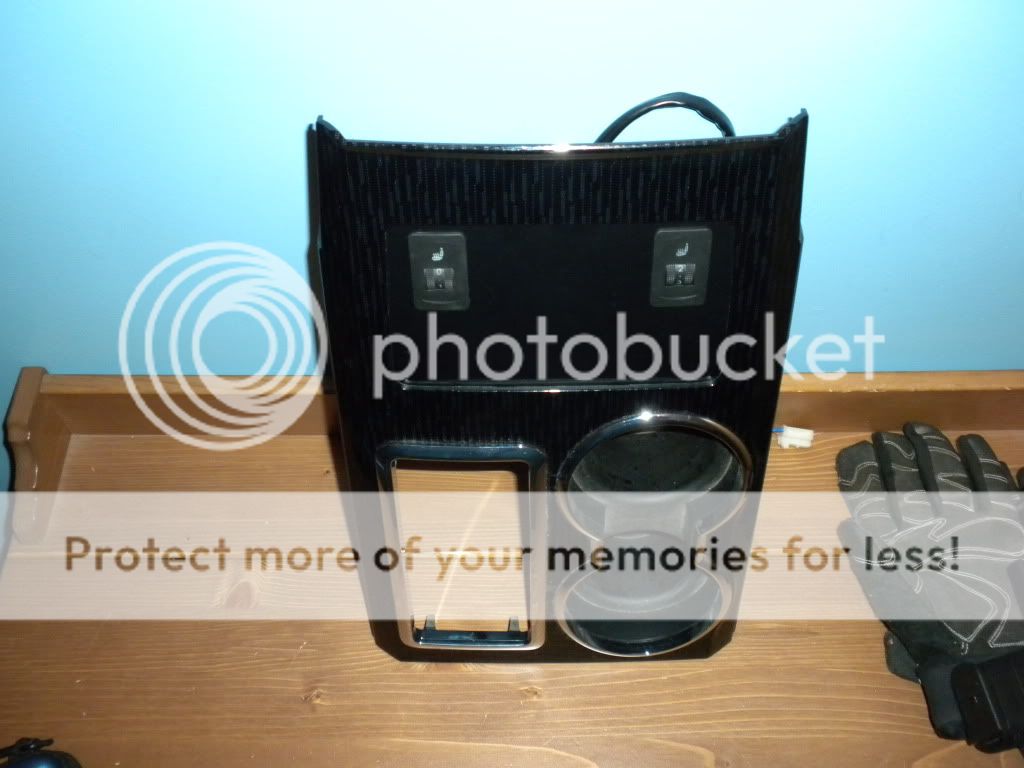
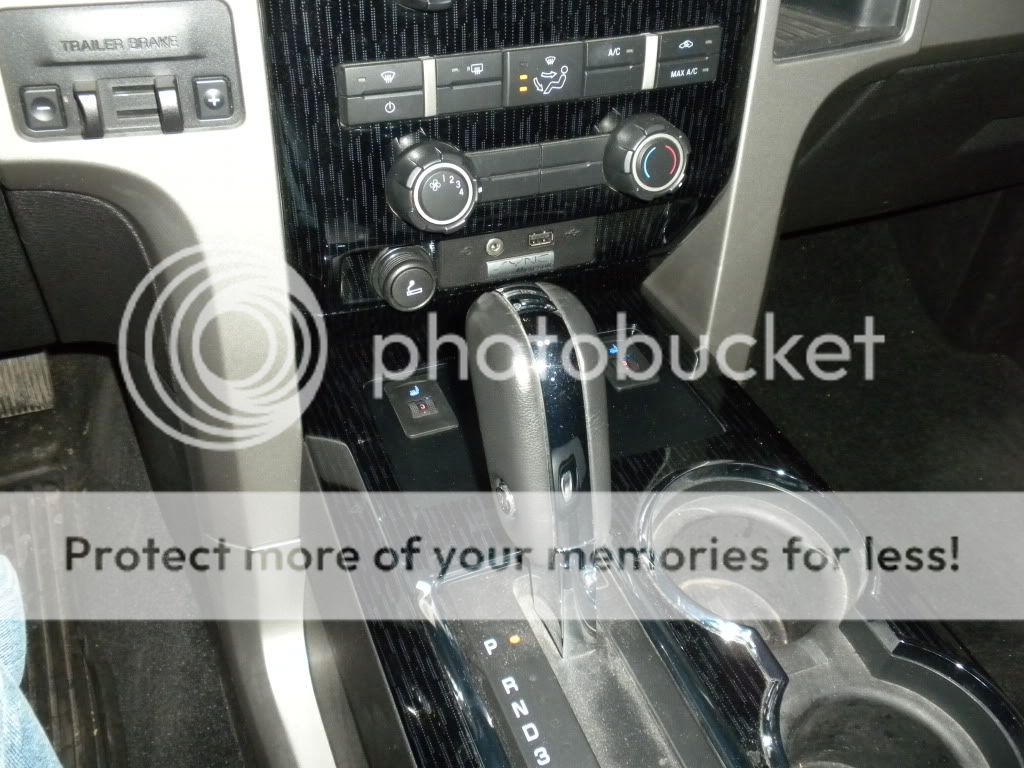
Here's the plate in the console trim piece. Plenty of room to add more switches when needed.
-
The original pocket is still there and is used to clamp the plate in place to force the contour to match. If I change my mind about the switch locations, it can all easily be put back to stock. The rubber mat can drop in and cover the little hole I cut in the pocket.

Finished product:
-
Here's the plate in the console trim piece. Plenty of room to add more switches when needed.
-
The original pocket is still there and is used to clamp the plate in place to force the contour to match. If I change my mind about the switch locations, it can all easily be put back to stock. The rubber mat can drop in and cover the little hole I cut in the pocket.
Finished product:
 I would not have been able to go that route...... I keep too much crap in that space..
 Thats part of the reason for my switch in door placement.
 01-02-2013, 08:02 PM
#112
Senior Member


Thanks! I always put my phone and other stuff in that pocket too, but the cup holders will have to work now. I want to add a couple more switches anyway.
And thanks to everyone for their advice and experiences installing this kit. Made it easier for me to make some decisions.
And thanks to everyone for their advice and experiences installing this kit. Made it easier for me to make some decisions.
01-02-2013, 08:26 PM
#113
Senior Member
Next thing I want to do with this is tap the lighted part of the switch into the interior lighting. I don't like the switches lit up all the time. It'll have to wait for warmer weather though.
01-02-2013, 08:29 PM
#114
Meaner than ymeski56
Thanks! I always put my phone and other stuff in that pocket too, but the cup holders will have to work now. I want to add a couple more switches anyway.
And thanks to everyone for their advice and experiences installing this kit. Made it easier for me to make some decisions.
And thanks to everyone for their advice and experiences installing this kit. Made it easier for me to make some decisions.

Congrats on the heaters, looks good!
 02-02-2013, 02:20 PM
#115
Junior Member

Join Date: Feb 2013
Posts: 1
Likes: 0
Received 0 Likes
on
0 Posts
I have the front driver seat out of my car and cannot figure out how to remove the side panel from the seat. can anyone provide suggestions? I removed the one screw in the rear and and seat tilt lever. Not sure how/if to remove the lumbar **** and electrical power movement switch. I cannot find any discussion of this problem.
02-02-2013, 10:26 PM
#116
Member
I have the front driver seat out of my car and cannot figure out how to remove the side panel from the seat. can anyone provide suggestions? I removed the one screw in the rear and and seat tilt lever. Not sure how/if to remove the lumbar **** and electrical power movement switch. I cannot find any discussion of this problem.
Getting the lumbar **** is a pain. Take an old strip of cloth and wrap it around the **** a few times, Leaving enough to pull up on. It will take some ooomph but it will come off. Youtube has videos about installing leather interiors that show this. Hope this helped.
02-02-2013, 10:34 PM
#117
Meaner than ymeski56
I popped the panel with the switch out just enough to reach in to attach the leather. I used a small pick but a small screwdriver would probably work as well. There is a small clip on the lumbar **** to take off. It comes off alright but to put it back on later is a bit of a pain. Hope this helps
02-02-2013, 11:17 PM
#118
One Clean Machine
iTrader: (5)
How long did it take you guys typically to install the heated seat kit? Thanks
02-03-2013, 11:12 AM
#120
I bought mine from 'autowarm' on eBay. This is their website: http://www.autowarm.com/
The heaters were cheaper on eBay.
I expect most or all units available are actually manufactured overseas. I chose autowarm because they shipped from within Canada. I don't know where they are made. I am very happy with the heaters which I have used every day for the last three months.
The heaters were cheaper on eBay.
I expect most or all units available are actually manufactured overseas. I chose autowarm because they shipped from within Canada. I don't know where they are made. I am very happy with the heaters which I have used every day for the last three months.