
Aftermarket heated seat inserts
 03-20-2012, 04:16 PM
#1
2013 Ruby Red FX4 SCrew
Thread Starter

I have a 2010 FX4 no luxury. Reason was, I really didn't want leather. But I live in a cold climate and would love to have heated seats.
I have looked on ebay and have seen several makes.... most from China or Korea. Is there any big difference in any of them.
Just wondering.... price is not the issue here. i just want ones that aren't gonna crap out or burn my truck out....
I have looked on ebay and have seen several makes.... most from China or Korea. Is there any big difference in any of them.
Just wondering.... price is not the issue here. i just want ones that aren't gonna crap out or burn my truck out....
 03-20-2012, 05:44 PM
#2
Girthy Member

I bought mine from 'autowarm' on eBay. This is their website: http://www.autowarm.com/
The heaters were cheaper on eBay.
I expect most or all units available are actually manufactured overseas. I chose autowarm because they shipped from within Canada. I don't know where they are made. I am very happy with the heaters which I have used every day for the last three months.
The heaters were cheaper on eBay.
I expect most or all units available are actually manufactured overseas. I chose autowarm because they shipped from within Canada. I don't know where they are made. I am very happy with the heaters which I have used every day for the last three months.
03-20-2012, 05:53 PM
#3
2013 Ruby Red FX4 SCrew
Thread Starter
Thanx for the reply. Just wondering if it was difficult to install them?..
Any way possible to post a pic of switch placement?
Any way possible to post a pic of switch placement?
03-21-2012, 12:09 PM
#4
Girthy Member
The first seat took me about 2.5 hours start to finish, because I was being very careful and taking my time. The second about 90 minutes - removing seat, to seat back in.
Most people put the switches on the side of the seat, near the seat controls. I put them at the bottom of my center stack so both passengers can reach. I'll move them to my console when I have one. With your flow through console you'd have to do something different.
EDIT: If you were thinking of this... don't bother taking your climate control apart to put the switches in the stock location, between the two *****. The PC board runs behind the blanks so it is impossible.
Last edited by sllydderrr; 03-21-2012 at 12:13 PM.

The following users liked this post:
69Shark (11-26-2013)
03-21-2012, 12:48 PM
#6
Girthy Member
 03-21-2012, 02:22 PM
#7
2013 Ruby Red FX4 SCrew
Thread Starter
Thanx for the pics and the replys guys.
Just one more thing.... Do the seat logos on the switches light up when in the "off" position. Or are they just painted on?
Just one more thing.... Do the seat logos on the switches light up when in the "off" position. Or are they just painted on?
Trending Topics
03-21-2012, 07:29 PM
#9
2013 Ruby Red FX4 SCrew
Thread Starter
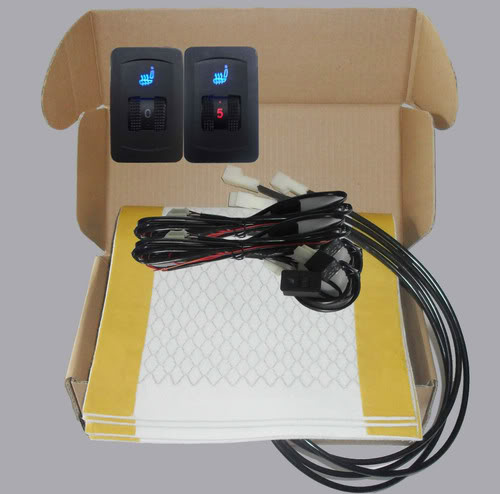
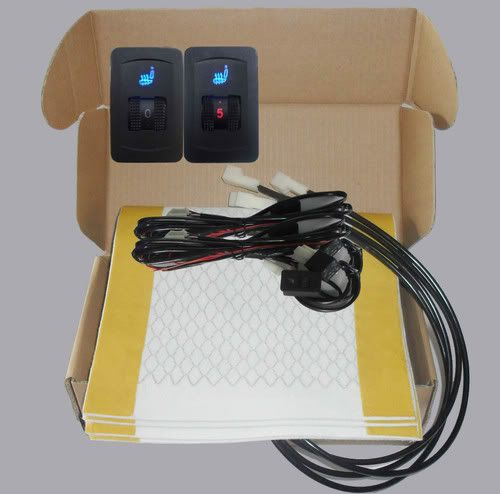
It isn't difficult at all. You will need a ratchet set and a T50 Torx to remove the seats. You'll need something to cut the hog rings in the seat. I used aviation snips. I reassembled with zip ties instead of hog rings. You will also need scissors to cut the heating pad to make room for the hog rings or zip ties.
The first seat took me about 2.5 hours start to finish, because I was being very careful and taking my time. The second about 90 minutes - removing seat, to seat back in.
Most people put the switches on the side of the seat, near the seat controls. I put them at the bottom of my center stack so both passengers can reach. I'll move them to my console when I have one. With your flow through console you'd have to do something different.
EDIT: If you were thinking of this... don't bother taking your climate control apart to put the switches in the stock location, between the two *****. The PC board runs behind the blanks so it is impossible.
So, since I want my switches illuminated and mounted in my console somewhere, I decided to go this route......
..... and to place them on either side of the front console (silver area) directly below the brake controller on the drivers side and the same open area on the passenger side..
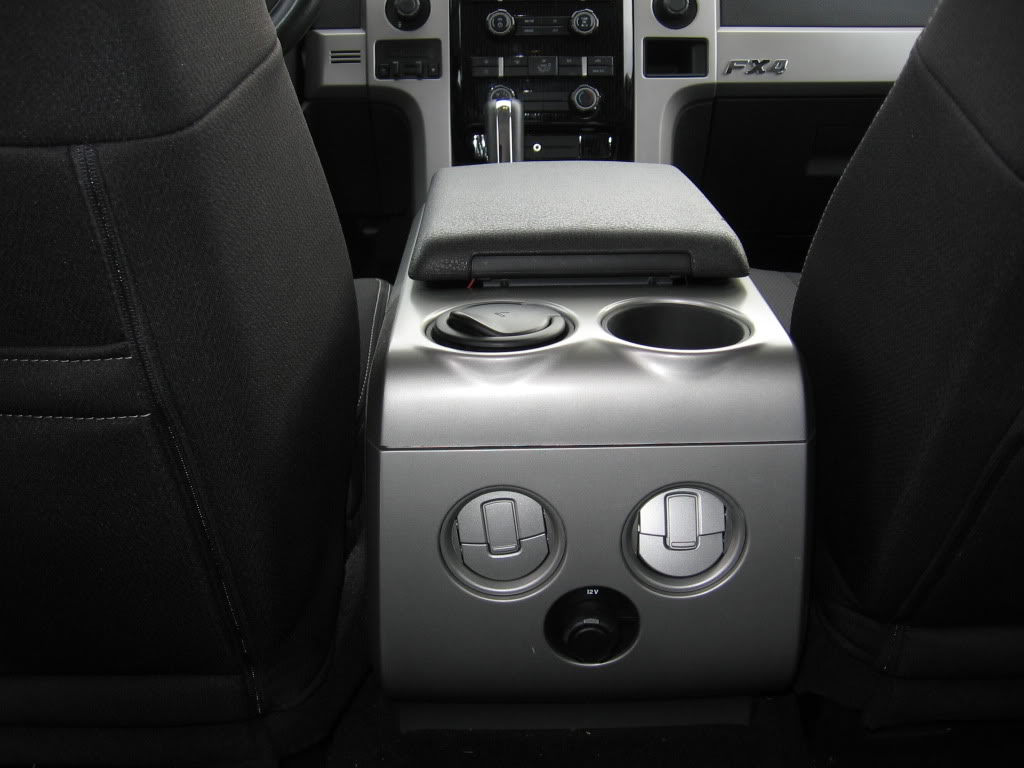
And if that works well, I may consider doing the same for the rear seat and mounting the switches under the rear vents on either side of the 12v source.....
 03-22-2012, 01:36 PM
#10
Girthy Member
Ha Ha.... You read my mind with stock location for the switches..... Crap!!!!
So, since I want my switches illuminated and mounted in my console somewhere, I decided to go this route......
..... and to place them on either side of the front console (silver area) directly below the brake controller on the drivers side and the same open area on the passenger side..

And if that works well, I may consider doing the same for the rear seat and mounting the switches under the rear vents on either side of the 12v source.....
So, since I want my switches illuminated and mounted in my console somewhere, I decided to go this route......
..... and to place them on either side of the front console (silver area) directly below the brake controller on the drivers side and the same open area on the passenger side..
And if that works well, I may consider doing the same for the rear seat and mounting the switches under the rear vents on either side of the 12v source.....
 I wasted a lot of time disassembling that thing.
The rectangular controls ought to look fine there. I look forward to seeing your results!
