

Adding 4A to 2011-2014 F150

Thread Starter
Beeps and Boops


Joined: Oct 2020
Posts: 2,666
Likes: 1,786
From: Iowa
Hello all,
I was inspired by this thread in the 2015-2020 section to document what I needed to do to add 4A to my 2011 Lariat. If you want to argue about whether or not 4A is helpful, feel free to read that thread, lots of good and bad arguments made there. What it comes down to for me is that 4A is super useful for commuting in bad, snowy, slushy, icy weather that we get here. It gives the best possible performance in inclement weather while still maintaining good on-road manners without binding while on patches of clean pavement. Arguments against 4A typically boil down to, "I'm a big strong man and I can turn a little **** back and forth whenever I want to." Got that out of the way? Cool.
In theory, all that is needed is a 4-mode transfer case, the 4-mode ****, and the correct transfer case control module (TCCM). Flip a few bits in Forscan and BOOM, 4A. This is how it works in the 2015-up trucks, I'm hoping that's how it will work for me.
I picked up a 4-mode transfer case from a 2012 with 88,000 miles on it for $200 this weekend. I searched car-part.com and found it a few hours away from me and snatched it up, everything closer was $400+. Unfortunately they had already crushed the truck so I couldn't get the 4-mode **** or the TCCM, so I ordered those from Tasca. Total with shipping and tax was about $110.
Here are the part numbers I grabbed:
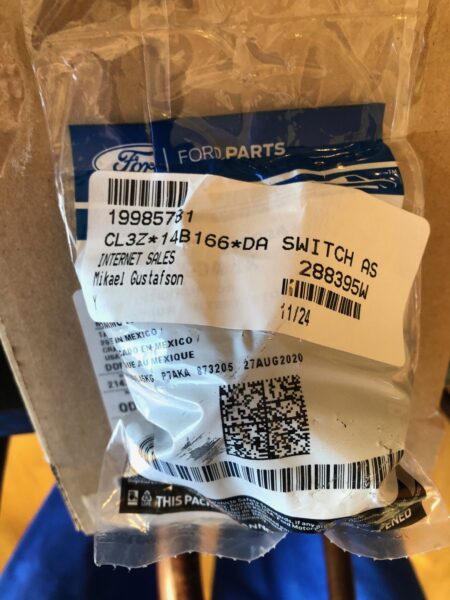
- Switch: CL3Z-14B166-DA
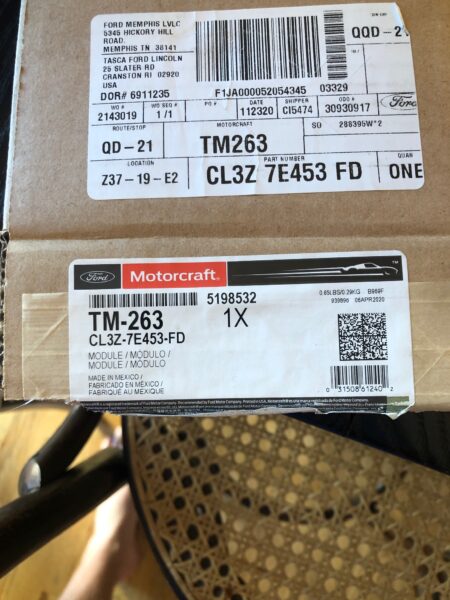
- TCCM: CL3Z-7E453-FD
If you have the e-locker, you'll need a different switch and TCCM that supports both Torque on Demand and the e-locker. Those parts are (I believe):
- Switch: CL3Z-14B166-EA
- TCCM: CL3Z-7E453-GD
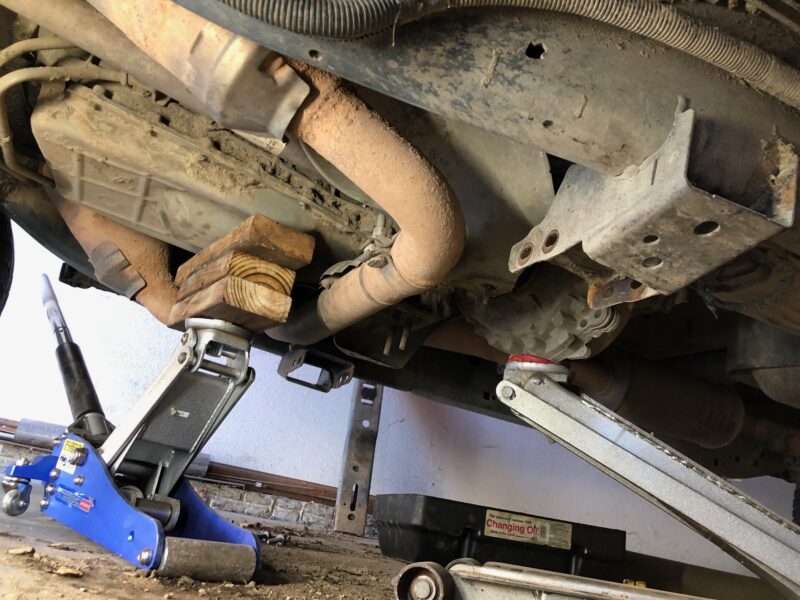
Yesterday I swapped the transfer case over. All in it took me about 4 hours, but much of that time was spent figuring out how the hell I was going to get to each of the bolts. I could probably cut an hour or two off if I did it again, knowing now what extensions and procedure to use. Here's the basic process:
- You need a 12mm 12-point socket to pull the rear driveshaft, mark the diff and driveshaft flanges so that you can put the driveshaft back in the same orientation.
- Drain the TC
- Disconnect the front driveshaft CV at the transfer case. 10mm socket. Soak the perimeter of the CV in penetrating oil, use a pickle fork on the lip and rap it with a hammer to knock the CV loose
- Unplug the electrical connection from the TC and pop the wire holders out of their two holes on the TC
- I found it easier to drop the crossmember that holds up the TC and transmission.
- Jack up and secure the transmission, disconnect the two heat/splash shields that bolt down into the crossmember (10mm) then remove the two big vertical nuts (18mm deep) and the four horizontal bolts (15mm bolt head, 18mm nut)
- With the crossmember out of your way, you have better access to the TC mount and some of the bolts underneath
- I pulled the TC mount off of the bottom of the TC in place, though I'm not sure you have to do that, it might have just made my life harder and would have been a better idea to swap it over to the new one outside of the truck.
- The TC-to-transmission bolts are aluminum and use an e-torx socket. They are fragile, so make sure your socket is seated well on the bolt head before applying torque. It's easy to shred the head. It wouldn't be a bad idea to have 8 new bolts on hand (I believe Ford says to replace them anyway).
- It's helpful to have a couple feet worth of extensions here along with 1 or 2 u-joints to get to the really difficult bolts. You can drop the trans down a bit to get better access up top.
- Pop the vent tube off of the barbed fitting up top
- With those 8 bolts removed, the TC can be pulled back off of the transmission and dropped down. I had a jack under the TC and my 7 year old helped me lower the jack while I balanced everything underneath.
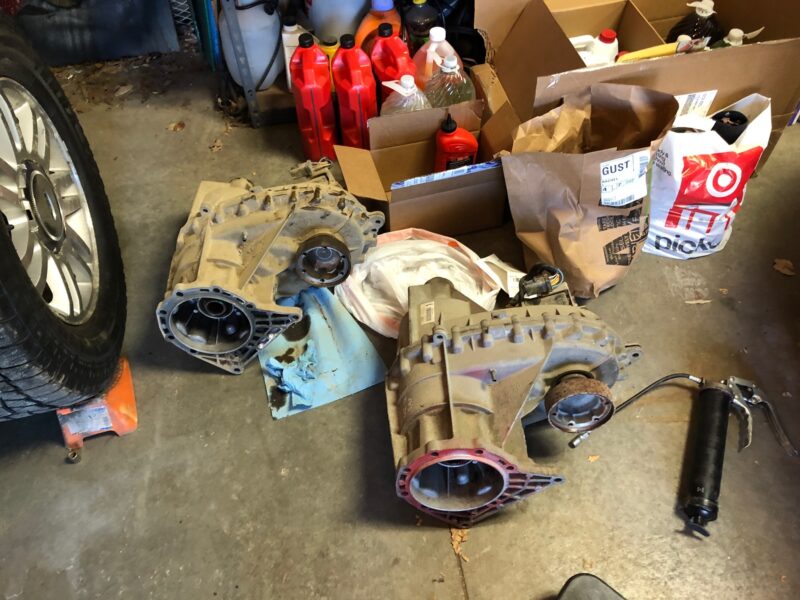
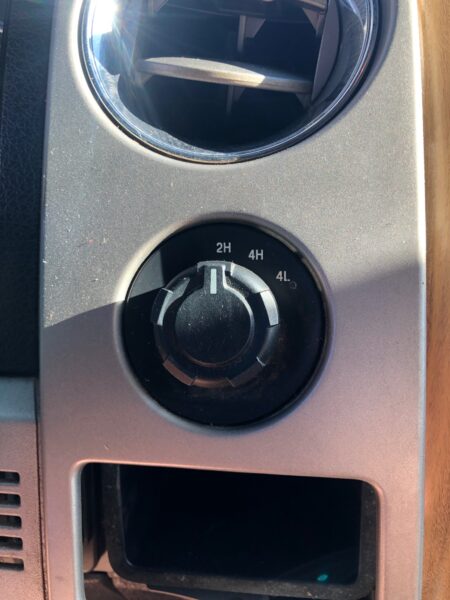
- Externally they look the same, though the 4A has stickers on it that denote Torque on Demand.

- Now jack the new one up in place. I greased up the TC-to-trans coupling teeth and the CV socket to make them go together easier.
- Be sure the CV joint is lined up in its socket as you push the TC forward
- Be sure the exhaust hangers are lined up with their bushings
- Don't overtorque the aluminum bolts. I tightened them by hand for fear of shredding the weak threads.
- Reconnect the electrical plug and secure the wire loom into its holders
- Secure the CV joint
- Put the crossmember back in place
- Reconnect the rear driveshaft
- Fill up with ~1.8 quarts of Mercon LV
This is where I'm at right now, as I'm still waiting for my switch and TCCM. As it sits, 2H and 4H still work, but it errors out if I try to go into 4L.
I'll update when I get the rest of the parts installed and we'll see if this works!
I was inspired by this thread in the 2015-2020 section to document what I needed to do to add 4A to my 2011 Lariat. If you want to argue about whether or not 4A is helpful, feel free to read that thread, lots of good and bad arguments made there. What it comes down to for me is that 4A is super useful for commuting in bad, snowy, slushy, icy weather that we get here. It gives the best possible performance in inclement weather while still maintaining good on-road manners without binding while on patches of clean pavement. Arguments against 4A typically boil down to, "I'm a big strong man and I can turn a little **** back and forth whenever I want to." Got that out of the way? Cool.
In theory, all that is needed is a 4-mode transfer case, the 4-mode ****, and the correct transfer case control module (TCCM). Flip a few bits in Forscan and BOOM, 4A. This is how it works in the 2015-up trucks, I'm hoping that's how it will work for me.
I picked up a 4-mode transfer case from a 2012 with 88,000 miles on it for $200 this weekend. I searched car-part.com and found it a few hours away from me and snatched it up, everything closer was $400+. Unfortunately they had already crushed the truck so I couldn't get the 4-mode **** or the TCCM, so I ordered those from Tasca. Total with shipping and tax was about $110.
Here are the part numbers I grabbed:
- Switch: CL3Z-14B166-DA
- TCCM: CL3Z-7E453-FD
If you have the e-locker, you'll need a different switch and TCCM that supports both Torque on Demand and the e-locker. Those parts are (I believe):
- Switch: CL3Z-14B166-EA
- TCCM: CL3Z-7E453-GD
Yesterday I swapped the transfer case over. All in it took me about 4 hours, but much of that time was spent figuring out how the hell I was going to get to each of the bolts. I could probably cut an hour or two off if I did it again, knowing now what extensions and procedure to use. Here's the basic process:
- You need a 12mm 12-point socket to pull the rear driveshaft, mark the diff and driveshaft flanges so that you can put the driveshaft back in the same orientation.
- Drain the TC
- Disconnect the front driveshaft CV at the transfer case. 10mm socket. Soak the perimeter of the CV in penetrating oil, use a pickle fork on the lip and rap it with a hammer to knock the CV loose
- Unplug the electrical connection from the TC and pop the wire holders out of their two holes on the TC
- I found it easier to drop the crossmember that holds up the TC and transmission.
- Jack up and secure the transmission, disconnect the two heat/splash shields that bolt down into the crossmember (10mm) then remove the two big vertical nuts (18mm deep) and the four horizontal bolts (15mm bolt head, 18mm nut)
- With the crossmember out of your way, you have better access to the TC mount and some of the bolts underneath
- I pulled the TC mount off of the bottom of the TC in place, though I'm not sure you have to do that, it might have just made my life harder and would have been a better idea to swap it over to the new one outside of the truck.
- The TC-to-transmission bolts are aluminum and use an e-torx socket. They are fragile, so make sure your socket is seated well on the bolt head before applying torque. It's easy to shred the head. It wouldn't be a bad idea to have 8 new bolts on hand (I believe Ford says to replace them anyway).
- It's helpful to have a couple feet worth of extensions here along with 1 or 2 u-joints to get to the really difficult bolts. You can drop the trans down a bit to get better access up top.
- Pop the vent tube off of the barbed fitting up top
- With those 8 bolts removed, the TC can be pulled back off of the transmission and dropped down. I had a jack under the TC and my 7 year old helped me lower the jack while I balanced everything underneath.
- Externally they look the same, though the 4A has stickers on it that denote Torque on Demand.
- Now jack the new one up in place. I greased up the TC-to-trans coupling teeth and the CV socket to make them go together easier.
- Be sure the CV joint is lined up in its socket as you push the TC forward
- Be sure the exhaust hangers are lined up with their bushings
- Don't overtorque the aluminum bolts. I tightened them by hand for fear of shredding the weak threads.
- Reconnect the electrical plug and secure the wire loom into its holders
- Secure the CV joint
- Put the crossmember back in place
- Reconnect the rear driveshaft
- Fill up with ~1.8 quarts of Mercon LV
This is where I'm at right now, as I'm still waiting for my switch and TCCM. As it sits, 2H and 4H still work, but it errors out if I try to go into 4L.
I'll update when I get the rest of the parts installed and we'll see if this works!
Last edited by Laminar; Nov 23, 2020 at 07:40 AM.

Thread Starter
Beeps and Boops
Joined: Oct 2020
Posts: 2,666
Likes: 1,786
From: Iowa
SUCCESS!
Either the 4A switch or the 4A TCCM was special order so it took a couple of weeks for Tasca to get it to me. I would have preferred to just get them from the transfer case donor truck but it was crushed by the time I got to it. I can confirm that the parts I received are the same part numbers I posted above. The TCCM is also referred to as "TM-263."
The switch is easy to swap out. Just pull the silver overlay starting at the bottom. It pops out enough that you can reach behind it and get to the switch.
If you look at the new switch, you can see how it's retained and then pop the old one out. New one snaps right in, trim snaps back in place.
TCCM is a little tricker just because it's hard to get to. In the passenger footwell, pop the cover off and look above the fuse box. See that white label/barcode up there? That's the TCCM.
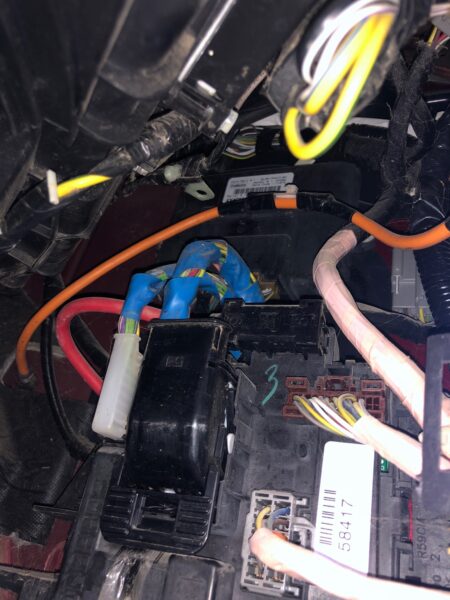
There are two bolts, one on each side. 8mm head. Unplug the electrical connectors first. Get one bolt all of the way out and then loosen the other and you can pop the TCCM out. The bolts can be hard to get to, I used a small 1/4" ratchet with a short 8mm socket on it and contorted my arm up in there, handled most of it by feel. Then pop the other TCCM in and tighten both bolts. Plug the wires in and it's done.
New one on top (2TOD), old on on the bottom (ESOF).

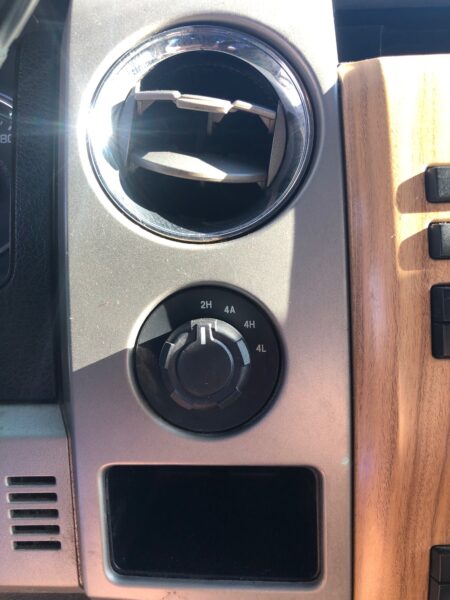
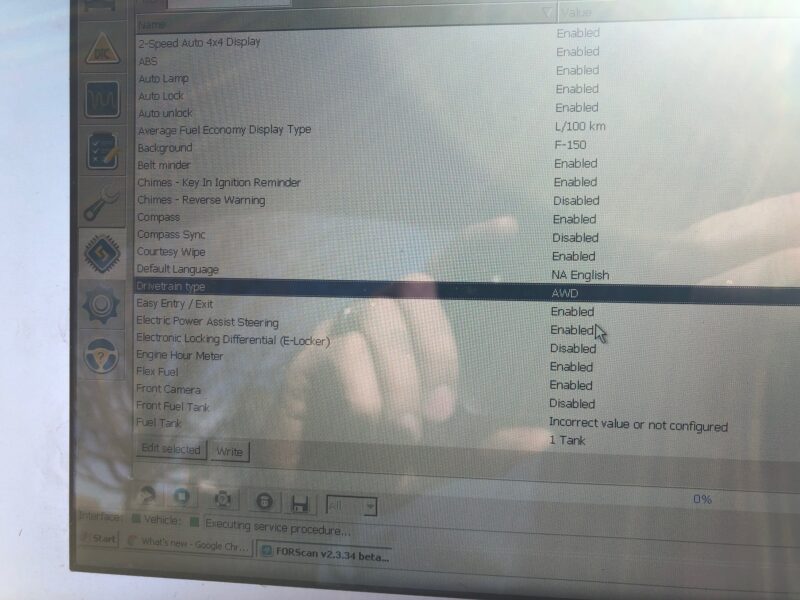
Next is Forscan. You can configure for AWD in two places in the IPC. The first is "2-Speed Auto 4x4 Display." I'm not sure that does anything, I didn't notice a difference but it didn't hurt anything. The second is "Drivetrain type." Change that from 4x4 to AWD and write it.
After a power cycle I was good to go. I now have 2x4, AWD, 4x4 HIGH, and 4x4 LOW as shown on the instrument panel display. I was able to select each of them and drive up and down the driveway. Now I just need a good snowy day to try 4A out for real!
Either the 4A switch or the 4A TCCM was special order so it took a couple of weeks for Tasca to get it to me. I would have preferred to just get them from the transfer case donor truck but it was crushed by the time I got to it. I can confirm that the parts I received are the same part numbers I posted above. The TCCM is also referred to as "TM-263."
The switch is easy to swap out. Just pull the silver overlay starting at the bottom. It pops out enough that you can reach behind it and get to the switch.
If you look at the new switch, you can see how it's retained and then pop the old one out. New one snaps right in, trim snaps back in place.
TCCM is a little tricker just because it's hard to get to. In the passenger footwell, pop the cover off and look above the fuse box. See that white label/barcode up there? That's the TCCM.
There are two bolts, one on each side. 8mm head. Unplug the electrical connectors first. Get one bolt all of the way out and then loosen the other and you can pop the TCCM out. The bolts can be hard to get to, I used a small 1/4" ratchet with a short 8mm socket on it and contorted my arm up in there, handled most of it by feel. Then pop the other TCCM in and tighten both bolts. Plug the wires in and it's done.
New one on top (2TOD), old on on the bottom (ESOF).
Next is Forscan. You can configure for AWD in two places in the IPC. The first is "2-Speed Auto 4x4 Display." I'm not sure that does anything, I didn't notice a difference but it didn't hurt anything. The second is "Drivetrain type." Change that from 4x4 to AWD and write it.
After a power cycle I was good to go. I now have 2x4, AWD, 4x4 HIGH, and 4x4 LOW as shown on the instrument panel display. I was able to select each of them and drive up and down the driveway. Now I just need a good snowy day to try 4A out for real!
Last edited by Laminar; Dec 4, 2020 at 03:19 PM.


Thread Starter
Beeps and Boops
Joined: Oct 2020
Posts: 2,666
Likes: 1,786
From: Iowa
I went back and forth between 4H and 4A a few times and couldn't feel a significant difference. The only thing I did notice was in 4A if I went to full lock on the steering, I'd hear some noise up front, it may have been the auto disengagement of 4wd to allow for a tight turn without binding.
We should get some snow this weekend, I'll see how it does then. Should be fun!
5 Year Member


Joined: Apr 2016
Posts: 3,675
Likes: 1,719
From: Georgia
I don't dispute the advantages of having the ability to have full time 4X4 as it was called back in the 1970's. For a few years it was almost impossible to buy a conventional 4X4 truck or SUV. I had one back in 1975 and I've owned AWD vehicles in the past. They work as advertised. It's just not worth the extra expense to me, especially to convert an older truck. But it sounds like you made it work for a moderate cost by doing all of the work yourself.
Trending Topics
Senior Member
Joined: Jul 2012
Posts: 428
Likes: 37
From: Honoeye New Yorkistan
What is the point of all wheel drive 4a..vs 4x4.....it binds turning on dry road surface?? so it just removes the binding you get in 4x4... I guess I want to understand the beneifts of AWD vs 4x4....
I just want to learn I guess... Thanks...
2012 Fx4.....5.0
I just want to learn I guess... Thanks...
2012 Fx4.....5.0

Senior Member
Joined: Feb 2013
Posts: 6,696
Likes: 3,086
Its not AWD...its 4A or torque on demand. Big difference.
Thread Starter
Beeps and Boops
Joined: Oct 2020
Posts: 2,666
Likes: 1,786
From: Iowa
Not that big of a difference. Some people in the 2015-up thread I linked to tried to make some weird distinctions about how AWD requires a system that is front-biased or that can transfer more than 50% of the power to the front, none of those things are requirements to be called "AWD." For example, Subaru's DCCD on the STI has a default 35/65 front/rear bias, but the center differential can be locked to provide a 50/50 split front/rear (like a locked transfer case), and nobody would say that the STI doesn't have AWD just because it can't send more than 50% of the power to the front, or that it's not naturally front-biased.
In many FWD-based (Haldex-style) AWD systems, the front wheels are engaged by default, and a Power Transfer Unit is able to transfer some variable percent of power to the rear wheels when it needs to. Some of these systems choose to lock the rear axle in by default and only disengage at steady speed to reduce wasted energy.
4A in the F-150 works just like that but in reverse. The rear wheels are locked in and always receiving power, but the power sent to the front can be varied as the TCCM deems necessary. The real-world end results of 4A and AWD are the same, so trying split hairs about what makes it "technically different" is pointless.
4x4: Front and rear axles hard-locked together, not for use on dry pavement.
AWD: Speed differences between front and rear axles are absorbed by a differential or other torque-varying device, designed for use on dry pavement
The kicker is that the instrument panel actually displays "AWD" when 4A is engaged.