
TRS HID PROJECTOR RETROFIT: Installation thread
 08-31-2011, 06:01 PM
#41

That is what I wish I had done. I started to miss my truck. I only have 550 or so on it.
Having a spare set takes the pressure off in more ways than one. I wish there was an aftermarket alternative to the single light OEM housings. All I have seen are quad setups in the aftermarket. The aftermarket may be much easier to get apart. I think this is the first time I ever bitched about something too well put together.
Having a spare set takes the pressure off in more ways than one. I wish there was an aftermarket alternative to the single light OEM housings. All I have seen are quad setups in the aftermarket. The aftermarket may be much easier to get apart. I think this is the first time I ever bitched about something too well put together.
 08-31-2011, 06:17 PM
#42
Member

Join Date: Jul 2011
Location: Lompoc, CA.
Posts: 43
Likes: 0
Received 0 Likes
on
0 Posts
Let us know how that works out, some pics would be nice when your done. I think that may be the way to do it for a clean looking install.
The light will still be well sealed by the inside lip. Then a nice neat bead around the outside of sealant. With the outside cut away, you should be able to get the inside permaseal to release without bunging up the housing. I really hate when I do something and it is obvious it has been modded. When TRS comes out with the new lights I may try the same thing with some new housings.
The light will still be well sealed by the inside lip. Then a nice neat bead around the outside of sealant. With the outside cut away, you should be able to get the inside permaseal to release without bunging up the housing. I really hate when I do something and it is obvious it has been modded. When TRS comes out with the new lights I may try the same thing with some new housings.
08-31-2011, 06:32 PM
#43
Master Gunner


I would not trust it for hard off road use. Driving off the pavement bouncing up a rough trail to take a photo or something I wouldn't worry about. Mashing the go pedal and launching the truck would be a different story.
Best would be to check with TRS for their experience.
Best would be to check with TRS for their experience.
I just got a response from TRS and they pointed me to a YouTube video of a customer with similar (not for F150) aftermarket Halogen projector headlights and that guy used zip ties to attach the HID projector to some mount (which I assume came of the aftermarket headlight assembly). Not exactly confidence inspiring...
08-31-2011, 07:08 PM
#44
Member
Join Date: Jul 2011
Location: Lompoc, CA.
Posts: 43
Likes: 0
Received 0 Likes
on
0 Posts
If we could get some of the perma seal Ford used to seal the lens, a bead or two between the two reflectors would most likely hold it with the nut, but If the alignment was off it would be really hard to correct it. My concern for the mounting is the silicone gasket between the two reflectors compressing over time allowing the nut to loose pressure against the stock housing. The alignment would go straight in the toilet if this happens.
Thank you for your service. You are a man that would know a thing or two about vibration. Great pics in your profile.
Thank you for your service. You are a man that would know a thing or two about vibration. Great pics in your profile.
Don't plan on doing the "Raptor" run (that bent most of the participant's frames) that's for sure! But some long bumpy trails make me leery that this retrofit will withstand the vibration.
I just got a response from TRS and they pointed me to a YouTube video of a customer with similar (not for F150) aftermarket Halogen projector headlights and that guy used zip ties to attach the HID projector to some mount (which I assume came of the aftermarket headlight assembly). Not exactly confidence inspiring...
I just got a response from TRS and they pointed me to a YouTube video of a customer with similar (not for F150) aftermarket Halogen projector headlights and that guy used zip ties to attach the HID projector to some mount (which I assume came of the aftermarket headlight assembly). Not exactly confidence inspiring...
Last edited by filterking; 08-31-2011 at 07:39 PM.
 08-31-2011, 09:03 PM
#46
Member
Join Date: Jul 2011
Location: Lompoc, CA.
Posts: 43
Likes: 0
Received 0 Likes
on
0 Posts
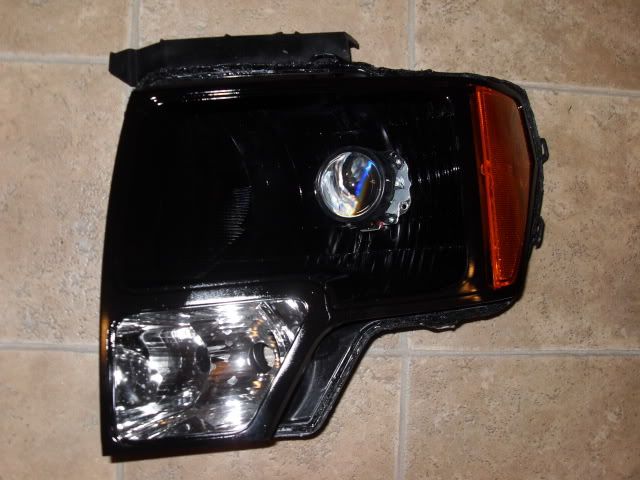
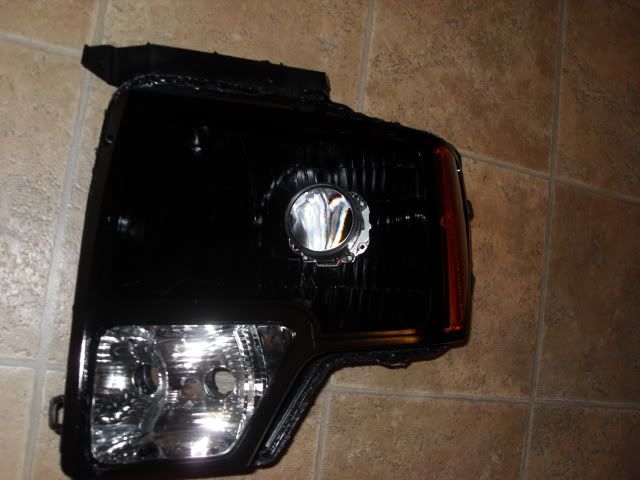
I can't really tell from your pic, did you take the stock reflector out or is it painted?
Did you make a guide before taking the stock bulb out?
If you took it out you will need to put it back in.
Did you make a guide before taking the stock bulb out?
If you took it out you will need to put it back in.
Last edited by filterking; 08-31-2011 at 09:05 PM.
09-01-2011, 06:54 AM
#47

Blue/black is the low beam.
The projector has provisions to screw it to the back reflector in addition to the rear nut. I will likely go this route but the problem I see is after getting adjustment completed, will need to take the projector out to drill the holes, I'm looking for a really long drill bit right now.
The gap doesn't look near as bad as mine though I don't have the front clear lens attached with the trim piece mounted yet. I plan to cut up a 3rd shroud to use as an extension - will see how it works.
09-01-2011, 07:12 AM
#48
Member

Join Date: Aug 2011
Posts: 54
Likes: 0
Received 0 Likes
on
0 Posts
09-01-2011, 07:14 AM
#49
Member
Join Date: Aug 2011
Posts: 54
Likes: 0
Received 0 Likes
on
0 Posts
Blue/black is the low beam.
The projector has provisions to screw it to the back reflector in addition to the rear nut. I will likely go this route but the problem I see is after getting adjustment completed, will need to take the projector out to drill the holes, I'm looking for a really long drill bit right now.
The gap doesn't look near as bad as mine though I don't have the front clear lens attached with the trim piece mounted yet. I plan to cut up a 3rd shroud to use as an extension - will see how it works.
The projector has provisions to screw it to the back reflector in addition to the rear nut. I will likely go this route but the problem I see is after getting adjustment completed, will need to take the projector out to drill the holes, I'm looking for a really long drill bit right now.
The gap doesn't look near as bad as mine though I don't have the front clear lens attached with the trim piece mounted yet. I plan to cut up a 3rd shroud to use as an extension - will see how it works.
09-01-2011, 11:41 AM
#50
The projector reflector bowl has 4 holes available on the flange. This lets you use screws to attach the front bowl to the headling housing/reflector. The matchboxes has 2 holes.