
HID Installation Instructions


Thread Starter
Senior Member
Joined: Aug 2009
Posts: 363
Likes: 8
Here we will be outlining the full installation process of the HID aftermarket headlights provided by Third Gear Performance. Please note that the vehicle the HID kit is being installed on is a 2004 Ford F150 5.4l v8 super cab, new body style that requires a H13 (bi-xenon) high/low beam bulb.
First and foremost I want emphasize that you cannot touch the HID bulb glass with your hands as the oil and residues can damage the bulbs themselves. Extreme caution should be taken when removing the bulb from the packaging and installing into the headlight housing. Make note when installing the wiring harness & ballasts that you mount the “plugged” in ballast to the factory headlight connector on the same side as the battery.
Start by opening the packaging to verify that all the contents are present and you are not missing anything. For the H13 hi/low beam kit you should have:
1. Wiring harness complete with fuse & relay harness (make sure you have the correct harness – the bi-xenon kit on the connectors to the factory harness will have a “plug” to connect to the wiring harness….the xenon harness with have “pins” to connect to your factory wiring harness.
After verifying the contents of your kit here are the tools you will need:
1. Power drill with 1/4” drill bit
2. Extra package of zip ties
3. Various sockets w/ a 3/8” drive and extensions
4. Flat blade screw driver
5. Wire cutters or snips.
6. Electrical tape
7. Open wrench
Start by opening your hood and locating the seven plastic screws on the plastic cowl cover over the fan shroud and the radiator. Begin to remove these plastic screws and the sleeve they sit in. There are four or five across the top front of the vehicle, two on the fan housing and one at each headlight connecting the air dam to the cowl. (See photo below for more information) I had no problem removing these but did break a few so be careful when removing them as they are only plastic.
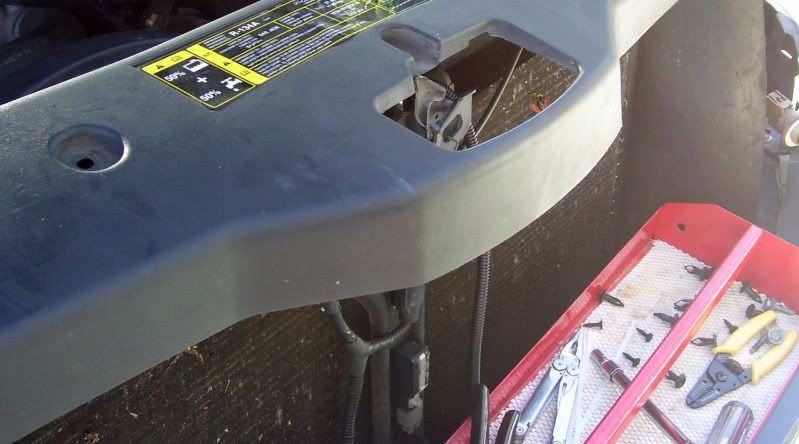
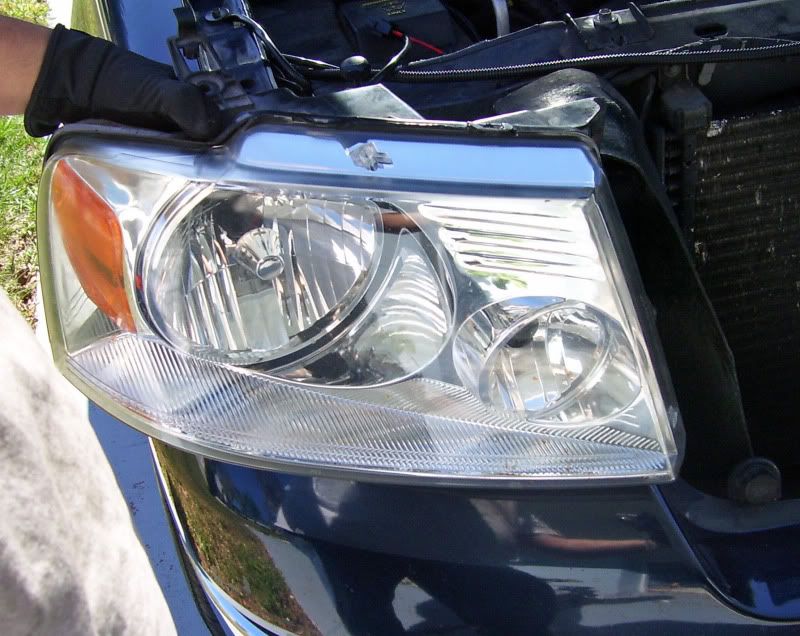
Next lets remove the headlights – Start by locating the three 12mm bolts & plastic retaining clip that hold the headlight assembly in. Two are located underneath the air dam rubber piece of material and one is located on the top of the engine compartment where the hood closes. Take note of the plastic retaining clip and its location. Remove the three bolts and pull up on the retaining clip to release the headlight. Carefully remove the headlight from its housing pulling the headlight forward out of the vehicle. Be careful when pulling the housing out as to not damage the headlight wiring harness at the back of the housing for the head light bulbs. Disconnect the headlight harness from the bulb and leave the main headlight bulb inside the headlight housing for now. Remove the turn signal bulbs from the headlight housing and let dangle on wire. Set headlight assembly aside for now. Repeat process for other opposite side. (See photo below)
At this point you’re ready to install the HID kit into your vehicle. Let’s start with installing the ballasts. Looking at the location of the headlight assembly where it sits under the vehicle make not or a horizontal portion of metal frame that curves with the bumper. This flat surface is where we will mount our ballasts for both sides. Using the mounting harness on the ballast draw with a pencil on the metal the holes to be drilled into the metal so the mounting bolts for the ballasts can be installed to secure your ballasts. Grab your power drill and drill thru the metal I started with a smaller bit and then used a bigger bit after I had a hole in the metal. I found the larger bit wouldn’t go thru with no hole in the metal. After drilling the holes orient the ballast and harness so that the “plug and bottom of the harness” are facing towards the outside of the vehicle away from the engine. Use the supplied bolts, washers and nuts to mount the ballast and harness to the frame of the truck. Using a socket and a wrench tighten down the bolts. Repeat this process for the opposite side (See photos below)
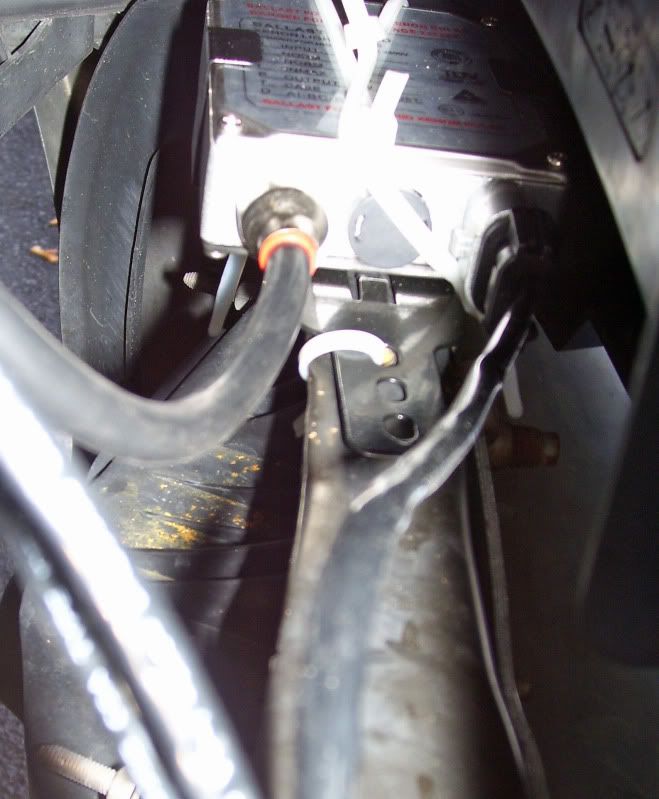
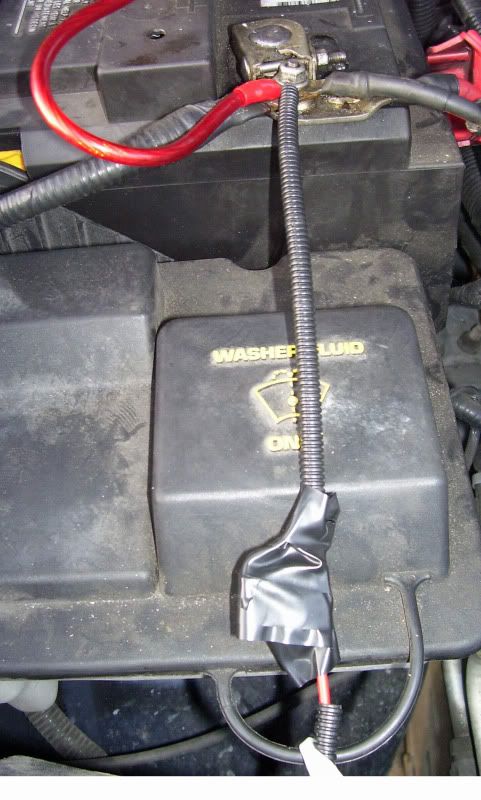
Next lets install the wiring harness into the vehicle. To begin this is a decision that needs to be made on how you plan to route the wiring harness. For this installation I am going to assume the location of my run. Start by removing the fuse from the relay harness. Using a 7mm socket & ratchet remove the bolt on the positive terminal to attach the positive wire from the relay over the terminal post positive battery cable – replace after slipping the positive terminal ring onto terminal post on battery cable. Next route the cable so that the wire harness runs between the upper part of the bumper and plastic piece just underneath the bottom of where the grill sits when the grill is closed. (see photo for better understanding). Proceed to route wire harness to the ballasts on either side of the vehicle. At this point, you might need to get creative to find a good ground for the wiring harness. Note: Each side requires a ground. I grabbed my dremel and ground down the paint to bare metal underneath one of the headlight retaining bolts, one of the three you removed earlier when removing the headlight, near the air dam piece of material you removed one of the plastic clips from earlier. Now you will need to mount your relay in a protected location and for this I mounted mine to a bolt that held the horn assembly to the vehicle as this horn assembly had a bracket arm to attach to. Now connect the connector on the wiring harness to the factory headlight connector the battery side of the vehicle (passanger side on my truck) (See attached photo) At this point your wires should be routed to where the need to be & its time to secure these using zip ties. Take care in zip tying these down and make note of any moving parts, direct “runoff” of any water that could constantly
drain onto the wires, connections, etc… At this point if you have not already connected the wiring plug into your ballast on both sides, do so. (See photo of ballast above for connection location) Make sure that the clips on the plug completely come over the post they slide over.
Now let’s focus back to the headlights that you set aside earlier. On a good, flat & stable working surface set your headlights. Remove the standard halogen bulbs from the headlight housing for both headlights. Remove the HID bulbs from the packaging (One at at time & only when directly ready to put into the headlight itself. – this means don’t take both out of the packaging and set one down while you work with the other) Carefully – slide the HID bulb into the headlight assembly and twist to tighten down until it “clicks” that it is locked in. Repeat for the other side
Lets Grab the headlight for the battery side of vehicle (on 04-08 f150’s this is the passenger side of the vehicle). Now, position the headlight assembly so that the posts align to the holes they came out of when headlights were removed. Install any disconnected parking lamp & turn signal bulbs that were removed from initial disassembly. Before pushing the headlight back into the vehicle make sure to connect the main connector off of the HID bulb to the ballast & connect the high beam wire from the HID bulb to the connector on the wiring harness for the high beam. Also verify the headlight is connected to the OEM factory headlight connector. Grab some electrical tape and tape over all connections for the HID lights, factory wiring harness to HID system connector, and any other connections made for the system (except the ballast) Remember that one of your ground wires is to be held down by one of the bolts that holds the headlight assembly so make sure you “slip” the ground wire terminal into place before inserting the retaining bolt. At this point repeat the process for the opposite headlight with the exception that when checking connections make sure the “un-used “factory harness connector has been taped over with electrical tape.
Re-install the cowl over the radiator and fan shroud as removed earlier.
First and foremost I want emphasize that you cannot touch the HID bulb glass with your hands as the oil and residues can damage the bulbs themselves. Extreme caution should be taken when removing the bulb from the packaging and installing into the headlight housing. Make note when installing the wiring harness & ballasts that you mount the “plugged” in ballast to the factory headlight connector on the same side as the battery.
Start by opening the packaging to verify that all the contents are present and you are not missing anything. For the H13 hi/low beam kit you should have:
1. Wiring harness complete with fuse & relay harness (make sure you have the correct harness – the bi-xenon kit on the connectors to the factory harness will have a “plug” to connect to the wiring harness….the xenon harness with have “pins” to connect to your factory wiring harness.
After verifying the contents of your kit here are the tools you will need:
1. Power drill with 1/4” drill bit
2. Extra package of zip ties
3. Various sockets w/ a 3/8” drive and extensions
4. Flat blade screw driver
5. Wire cutters or snips.
6. Electrical tape
7. Open wrench
Start by opening your hood and locating the seven plastic screws on the plastic cowl cover over the fan shroud and the radiator. Begin to remove these plastic screws and the sleeve they sit in. There are four or five across the top front of the vehicle, two on the fan housing and one at each headlight connecting the air dam to the cowl. (See photo below for more information) I had no problem removing these but did break a few so be careful when removing them as they are only plastic.
Next lets remove the headlights – Start by locating the three 12mm bolts & plastic retaining clip that hold the headlight assembly in. Two are located underneath the air dam rubber piece of material and one is located on the top of the engine compartment where the hood closes. Take note of the plastic retaining clip and its location. Remove the three bolts and pull up on the retaining clip to release the headlight. Carefully remove the headlight from its housing pulling the headlight forward out of the vehicle. Be careful when pulling the housing out as to not damage the headlight wiring harness at the back of the housing for the head light bulbs. Disconnect the headlight harness from the bulb and leave the main headlight bulb inside the headlight housing for now. Remove the turn signal bulbs from the headlight housing and let dangle on wire. Set headlight assembly aside for now. Repeat process for other opposite side. (See photo below)
At this point you’re ready to install the HID kit into your vehicle. Let’s start with installing the ballasts. Looking at the location of the headlight assembly where it sits under the vehicle make not or a horizontal portion of metal frame that curves with the bumper. This flat surface is where we will mount our ballasts for both sides. Using the mounting harness on the ballast draw with a pencil on the metal the holes to be drilled into the metal so the mounting bolts for the ballasts can be installed to secure your ballasts. Grab your power drill and drill thru the metal I started with a smaller bit and then used a bigger bit after I had a hole in the metal. I found the larger bit wouldn’t go thru with no hole in the metal. After drilling the holes orient the ballast and harness so that the “plug and bottom of the harness” are facing towards the outside of the vehicle away from the engine. Use the supplied bolts, washers and nuts to mount the ballast and harness to the frame of the truck. Using a socket and a wrench tighten down the bolts. Repeat this process for the opposite side (See photos below)
Next lets install the wiring harness into the vehicle. To begin this is a decision that needs to be made on how you plan to route the wiring harness. For this installation I am going to assume the location of my run. Start by removing the fuse from the relay harness. Using a 7mm socket & ratchet remove the bolt on the positive terminal to attach the positive wire from the relay over the terminal post positive battery cable – replace after slipping the positive terminal ring onto terminal post on battery cable. Next route the cable so that the wire harness runs between the upper part of the bumper and plastic piece just underneath the bottom of where the grill sits when the grill is closed. (see photo for better understanding). Proceed to route wire harness to the ballasts on either side of the vehicle. At this point, you might need to get creative to find a good ground for the wiring harness. Note: Each side requires a ground. I grabbed my dremel and ground down the paint to bare metal underneath one of the headlight retaining bolts, one of the three you removed earlier when removing the headlight, near the air dam piece of material you removed one of the plastic clips from earlier. Now you will need to mount your relay in a protected location and for this I mounted mine to a bolt that held the horn assembly to the vehicle as this horn assembly had a bracket arm to attach to. Now connect the connector on the wiring harness to the factory headlight connector the battery side of the vehicle (passanger side on my truck) (See attached photo) At this point your wires should be routed to where the need to be & its time to secure these using zip ties. Take care in zip tying these down and make note of any moving parts, direct “runoff” of any water that could constantly
drain onto the wires, connections, etc… At this point if you have not already connected the wiring plug into your ballast on both sides, do so. (See photo of ballast above for connection location) Make sure that the clips on the plug completely come over the post they slide over.
Now let’s focus back to the headlights that you set aside earlier. On a good, flat & stable working surface set your headlights. Remove the standard halogen bulbs from the headlight housing for both headlights. Remove the HID bulbs from the packaging (One at at time & only when directly ready to put into the headlight itself. – this means don’t take both out of the packaging and set one down while you work with the other) Carefully – slide the HID bulb into the headlight assembly and twist to tighten down until it “clicks” that it is locked in. Repeat for the other side
Lets Grab the headlight for the battery side of vehicle (on 04-08 f150’s this is the passenger side of the vehicle). Now, position the headlight assembly so that the posts align to the holes they came out of when headlights were removed. Install any disconnected parking lamp & turn signal bulbs that were removed from initial disassembly. Before pushing the headlight back into the vehicle make sure to connect the main connector off of the HID bulb to the ballast & connect the high beam wire from the HID bulb to the connector on the wiring harness for the high beam. Also verify the headlight is connected to the OEM factory headlight connector. Grab some electrical tape and tape over all connections for the HID lights, factory wiring harness to HID system connector, and any other connections made for the system (except the ballast) Remember that one of your ground wires is to be held down by one of the bolts that holds the headlight assembly so make sure you “slip” the ground wire terminal into place before inserting the retaining bolt. At this point repeat the process for the opposite headlight with the exception that when checking connections make sure the “un-used “factory harness connector has been taped over with electrical tape.
Re-install the cowl over the radiator and fan shroud as removed earlier.
Last edited by fastford04150; Mar 9, 2010 at 12:47 AM.
