

TunaSlayer Mod Progress

Formerly "ZCHPRO"
Joined: Jul 2010
Posts: 1,950
Likes: 36
From: Chandler
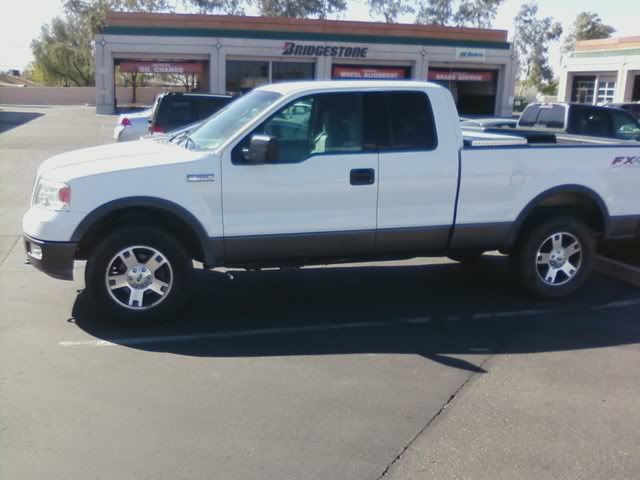
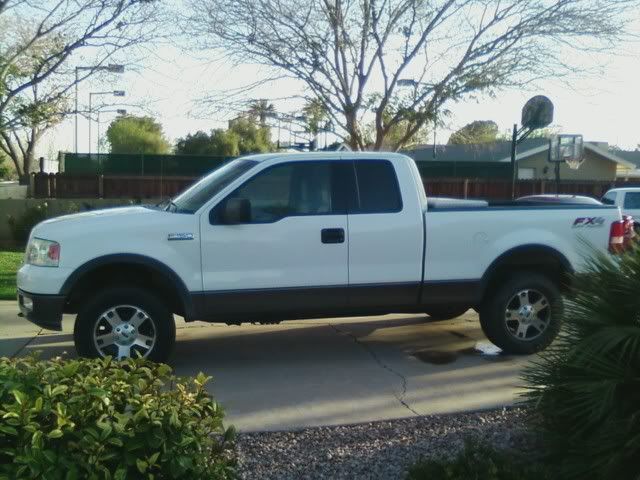
hey tuna, finally had my leveling kit installed
got a little bit into the project and realized I didn't have the patience or tools to properly deal with this mod. So I called up Firestone and it was 223 for and alignment and install. The weird thing is that the space from the top of the hub cap is 20.5"s except the back left side is 21.75". Do you think it's possible that the rear leaf spring are less worn on that side?
before
after
Senior Member
Joined: Nov 2007
Posts: 557
Likes: 7
From: NYC
your truck is amazing looking. i just looked at every page in this thread from start to finish. You just gave me a bunch more ideas for my truck now lol...but one thing i think you should do to your truck is something i have done. Tint the windshield...my side windows are all 20% and i have the windshield 35%....makes a huge difference in the look. here is a pic
Last edited by F-1Fizzy; Mar 7, 2011 at 09:07 PM.

Member
Joined: Feb 2011
Posts: 92
Likes: 0
From: Nebraska
Originally Posted by TunaSlayer
That's a fine looking F150 there booberdee. Maybe a light bar with 4 off road lights and paint the fender flares. Is that a Fabtech lift?
Thread Starter
Offshore Poster
Joined: Nov 2010
Posts: 1,457
Likes: 4
From: Martha's Vineyard
hey tuna, finally had my leveling kit installed
got a little bit into the project and realized I didn't have the patience or tools to properly deal with this mod. So I called up Firestone and it was 223 for and alignment and install. The weird thing is that the space from the top of the hub cap is 20.5"s except the back left side is 21.75". Do you think it's possible that the rear leaf spring are less worn on that side?
before
after
got a little bit into the project and realized I didn't have the patience or tools to properly deal with this mod. So I called up Firestone and it was 223 for and alignment and install. The weird thing is that the space from the top of the hub cap is 20.5"s except the back left side is 21.75". Do you think it's possible that the rear leaf spring are less worn on that side?
before
after
Thread Starter
Offshore Poster
Joined: Nov 2010
Posts: 1,457
Likes: 4
From: Martha's Vineyard
your truck is amazing looking. i just looked at every page in this thread from start to finish. You just gave me a bunch more ideas for my truck now lol...but one thing i think you should do to your truck is something i have done. Tint the windshield...my side windows are all 20% and i have the windshield 35%....makes a huge difference in the look. here is a pic
That does look badass. The only thing that stopped me when I originally got her tinted was Mass State Police and the F150 dot matrix on the top center part. I don't really drive on highways much anymore so cops are the least of my worries, but on my Stang it had the dot matrix on the top of the rear window and the tint would not release all the air pockets so it looked really sloppy. I ended up getting some gloss black vinyl adhesive backed and cut it about 6" wide and the length of the rear window to cover up the mess. It really blended well, in fact this is the only pic I have of it where you can actually barely see the vinyl on the rear window.

Senior Member
Joined: Nov 2007
Posts: 557
Likes: 7
From: NYC
That does look badass. The only thing that stopped me when I originally got her tinted was Mass State Police and the F150 dot matrix on the top center part. I don't really drive on highways much anymore so cops are the least of my worries, but on my Stang it had the dot matrix on the top of the rear window and the tint would not release all the air pockets so it looked really sloppy. I ended up getting some gloss black vinyl adhesive backed and cut it about 6" wide and the length of the rear window to cover up the mess. It really blended well, in fact this is the only pic I have of it where you can actually barely see the vinyl on the rear window.
the Dot Matrix on the windshield of the F150 is laminated. So it is in the glass....you can tint right over it....you cant feel it like you can on the mustang....thats one of the good things about the f150 windshield is that it has the dot matrix inside the glass so tint looks clean. so i say go for it now. lol its such a difference while driving night and day time
Formerly "ZCHPRO"
Joined: Jul 2010
Posts: 1,950
Likes: 36
From: Chandler
thanks man! I'm really digging it
Thread Starter
Offshore Poster
Joined: Nov 2010
Posts: 1,457
Likes: 4
From: Martha's Vineyard
Got around to installing my new little project today. Here's the unveil:
Picked up 5 clearance lights, each with 6 LEDS. They're universal, made for trailers, trucks, campers, big rigs, etc. Got them pretty cheap too from my friends store at cost. These are normally mounted to a metal surface since one bolt grounds each light, meaning there isn't a ground wire per say. Figure I'd do a mini how-to.


First step was to find the center point of the front plastic molding below the bumper. Easy with a license plate that's already centered right there.

I tape the lights up where I thought they would look best. I ended up spacing them 6" apart. I wanted them more on the front and not really on the curve of the plastic molding.

I drilled the hole for the positive wire 1/2" above the bottom edge of the molding

After drilling and mounting each light, it was time to wire them. I started with grounds. What I did was crimp a terminal on my own wiring to bolt on the backside of the plastic molding bumper piece on each grounding bolt on the lights.

What I did, starting from passenger side to drivers side was bolt the ground terminals from light 1, to 2, to 3, 4, then 5 and from there up to the engine bay where I grounded it to the chassis. I did basically the same thing with the positive leads coming off each light. I used my own wiring and spliced each lead into it, then ran one end up to the drivers side DRL and spliced into the turn on wire at the bulb harness end. FYI, there are 3 wires on the harness, green/white, black, and grey. The wire you want is the grey one. I soldered the positive wire into it. This way the new lights will come on when my DRLs are on.
All done wiring
What do you guys think? I love them.


Picked up 5 clearance lights, each with 6 LEDS. They're universal, made for trailers, trucks, campers, big rigs, etc. Got them pretty cheap too from my friends store at cost. These are normally mounted to a metal surface since one bolt grounds each light, meaning there isn't a ground wire per say. Figure I'd do a mini how-to.
First step was to find the center point of the front plastic molding below the bumper. Easy with a license plate that's already centered right there.
I tape the lights up where I thought they would look best. I ended up spacing them 6" apart. I wanted them more on the front and not really on the curve of the plastic molding.
I drilled the hole for the positive wire 1/2" above the bottom edge of the molding
After drilling and mounting each light, it was time to wire them. I started with grounds. What I did was crimp a terminal on my own wiring to bolt on the backside of the plastic molding bumper piece on each grounding bolt on the lights.
What I did, starting from passenger side to drivers side was bolt the ground terminals from light 1, to 2, to 3, 4, then 5 and from there up to the engine bay where I grounded it to the chassis. I did basically the same thing with the positive leads coming off each light. I used my own wiring and spliced each lead into it, then ran one end up to the drivers side DRL and spliced into the turn on wire at the bulb harness end. FYI, there are 3 wires on the harness, green/white, black, and grey. The wire you want is the grey one. I soldered the positive wire into it. This way the new lights will come on when my DRLs are on.
All done wiring
What do you guys think? I love them.