Budget Off Road Rig
 05-19-2014, 08:01 AM
#11
For 35s 4.56 will put you back to a stock ratio,for 37s 4.88 will put you back to stock. I'm about to be running 37s and 5.13s
 05-19-2014, 09:13 AM
#12
05-19-2014, 09:34 AM
#13
05-19-2014, 10:12 AM
#14
05-19-2014, 10:32 AM
#15
Not a problem! Just look at a chart for our trucks,like my 5.13s will be stock ratio for 40s when I get them and at the high end of stock for 37s. 4.88s would be perfect if I was staying with these
06-01-2014, 10:12 PM
#16
Sorry about the long delay. I didn't want to post anything that we didn't know was final. Anyway, Dad and I finished the Winch Project, so here's the rest of what we did. This is going to be in two posts because of all the pictures...
So first, after we primed the bumper, we watersanded and painted it. We used white "Rustoleum Protective Enamel" for the paint. It holds up well on all our projects.

After that, we went to the junkyard and snatched a valence off a 2000 Expedition.

Next was to work on the biggest part. The winch bracket. My Dad's buddies helped us out by cutting and bending some 12 gauge steel up for us.

First was to get a light mock up with measurements we took. It took some persuasion with a hammer and steel bending to get the prototype on. We adjusted our measurements and changed design slightly for the final product.

The same guys who bent the protoype for us bent a final product, which fit without a problem.

I welded a big 1/4" plate to the top, and 1/4" plates to the bottom. The whole thing turned out to be pretty heavy, but is extremely sturdy.

(Continuing on next post)
So first, after we primed the bumper, we watersanded and painted it. We used white "Rustoleum Protective Enamel" for the paint. It holds up well on all our projects.
After that, we went to the junkyard and snatched a valence off a 2000 Expedition.
Next was to work on the biggest part. The winch bracket. My Dad's buddies helped us out by cutting and bending some 12 gauge steel up for us.
First was to get a light mock up with measurements we took. It took some persuasion with a hammer and steel bending to get the prototype on. We adjusted our measurements and changed design slightly for the final product.
The same guys who bent the protoype for us bent a final product, which fit without a problem.
I welded a big 1/4" plate to the top, and 1/4" plates to the bottom. The whole thing turned out to be pretty heavy, but is extremely sturdy.
(Continuing on next post)
Last edited by bobkyle2; 06-01-2014 at 10:54 PM. Reason: Fixed problem with picture loading
06-01-2014, 10:23 PM
#17

Sorry about the long delay. I didn't want to post anything that we didn't know was final. Anyway, Dad and I finished the Winch Project, so here's the rest of what we did. This is going to be in two posts because of all the pictures...
So first, after we primed the bumper, we watersanded and painted it. We used white "Rustoleum Protective Enamel" for the paint. It holds up well on all our projects.
Attachment 322017
After that, we went to the junkyard and snatched a valence off a 2000 Expedition.
Attachment 322018
Next was to work on the biggest part. The winch bracket. My Dad's buddies helped us out by cutting and bending some 12 gauge steel up for us.
Attachment 322020
First was to get a light mock up with measurements we took. It took some persuasion with a hammer and steel bending to get the prototype on. We adjusted our measurements and changed design slightly for the final product.
Attachment 322023
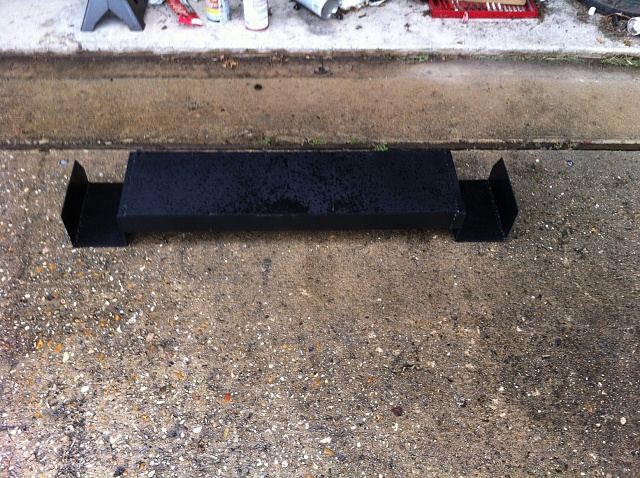
The same guys who bent the protoype for us bent a final product, which fit without a problem.
Attachment 322027
I welded a big 1/4" plate to the top, and 1/4" plates to the bottom. The whole thing turned out to be pretty heavy, but is extremely sturdy.
Attachment 322028
(Continuing on next post)
So first, after we primed the bumper, we watersanded and painted it. We used white "Rustoleum Protective Enamel" for the paint. It holds up well on all our projects.
Attachment 322017
After that, we went to the junkyard and snatched a valence off a 2000 Expedition.
Attachment 322018
Next was to work on the biggest part. The winch bracket. My Dad's buddies helped us out by cutting and bending some 12 gauge steel up for us.
Attachment 322020
First was to get a light mock up with measurements we took. It took some persuasion with a hammer and steel bending to get the prototype on. We adjusted our measurements and changed design slightly for the final product.
Attachment 322023
The same guys who bent the protoype for us bent a final product, which fit without a problem.
Attachment 322027
I welded a big 1/4" plate to the top, and 1/4" plates to the bottom. The whole thing turned out to be pretty heavy, but is extremely sturdy.
Attachment 322028
(Continuing on next post)
06-01-2014, 10:25 PM
#18
Next up was to paint the finalized bracket to prevent rust. We started using Rustoleum Enamel but ran out and switched to krylon.
Bolted it in used 5 inch Grade 8 bolts.
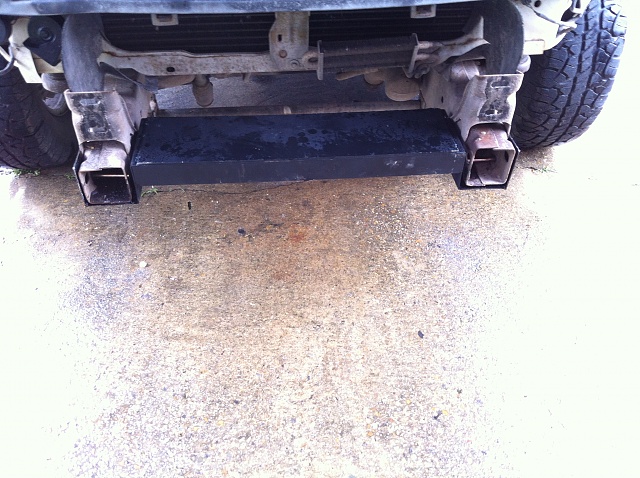
Side view of it bolted in.

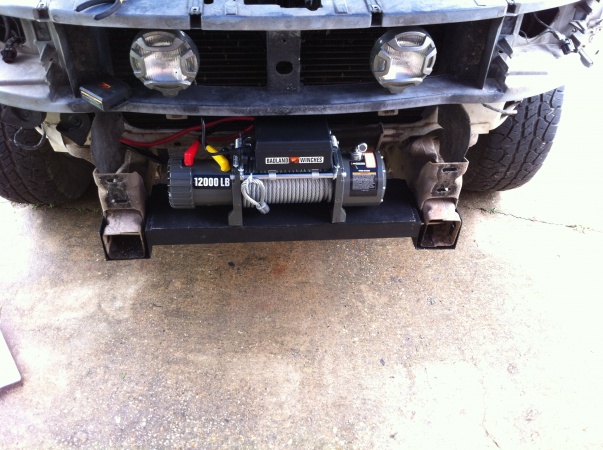
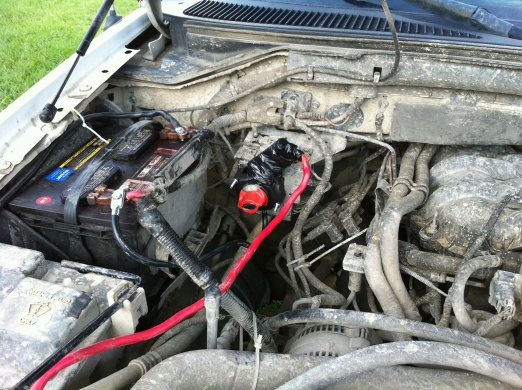
Bolted in the winch and wired it to the battery. It fit so snuggly it's almost like it was designed for the truck. The solenoid box is a solid 2 mm from the oil cooler.

We put back on the grille, headlights and new bumper. Then we fed the wire through. We're finished! I like how the logo on the solenoid box perfectly fits between the bumper and grille
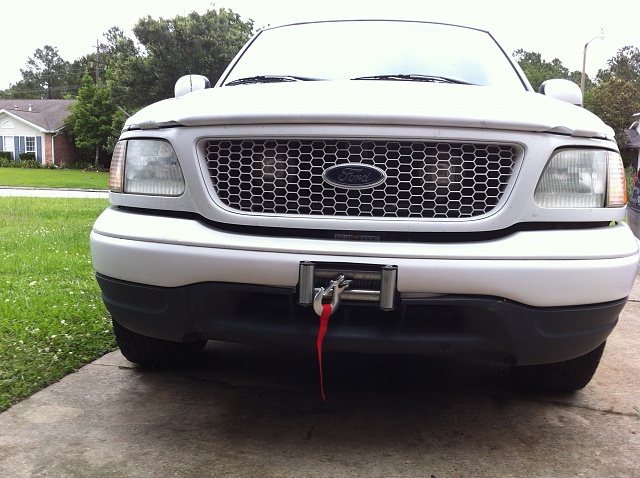
Then, as a finishing touch, we installed a big switch for the winch under the hood so it wont ever accidentally start spooling or anything like that. Especially since the wireless remote is in my console.

Friends and I are going off roading Tuesday to test it out.
Bolted it in used 5 inch Grade 8 bolts.

Side view of it bolted in.

Bolted in the winch and wired it to the battery. It fit so snuggly it's almost like it was designed for the truck. The solenoid box is a solid 2 mm from the oil cooler.
We put back on the grille, headlights and new bumper. Then we fed the wire through. We're finished! I like how the logo on the solenoid box perfectly fits between the bumper and grille

Then, as a finishing touch, we installed a big switch for the winch under the hood so it wont ever accidentally start spooling or anything like that. Especially since the wireless remote is in my console.
Friends and I are going off roading Tuesday to test it out.
06-01-2014, 10:26 PM
#19
06-03-2014, 10:16 PM
#20
So today me and a friend went out to some potential mud spots we found a couple days back. Unfortunately, we found out from the locals that either spot would either get our vehicles confiscated by Federal Wildlife management or a greeting from the police. So no mud today. However, we did find a trail through the woods that we're going to try expanding on. It was under a foot or two of water from all the rain lately so we just took my friends ATV back there to get a good look.
Other than that, we just tested the winch at home. It pulls the truck without a problem.
Other than that, we just tested the winch at home. It pulls the truck without a problem.