
HOW-to: Properly fix Faded Headlights

Thread Starter
Squishy Heads
Joined: Jan 2011
Posts: 1,473
Likes: 8
From: Stafford, VA
Hey guys here is another How-to from me on how to properly clear up your faded yellow headlights. This will work on ANY headlight Ive done this to my 2002 Jetta and my sisters 06 Mazda 3.
I did this because all those crappy headlight repair kits you can get from Walmart and such never worked worth a crap for me, so I thought I would show you a better way.
Anyway do all this at your own risk, while it is VERY easy you can mess it up if you keep the buffing pad in one spot too long.
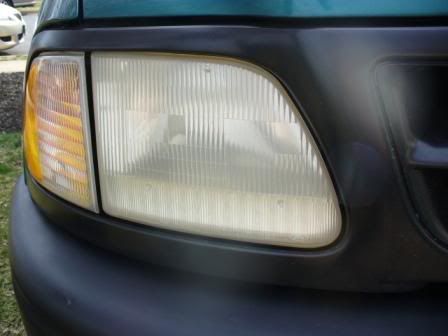
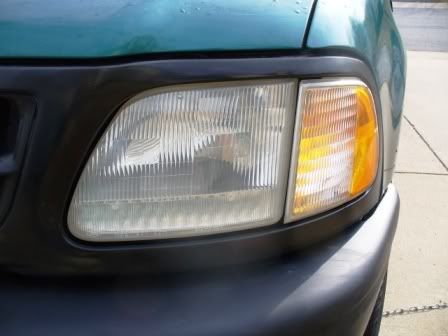
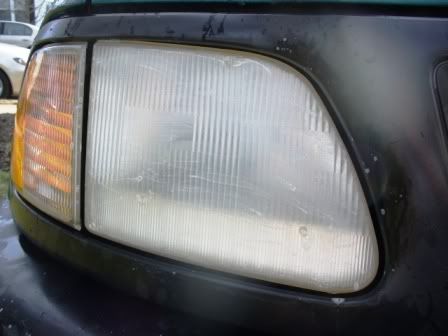
This is a before and after.
Anyway, here it is.
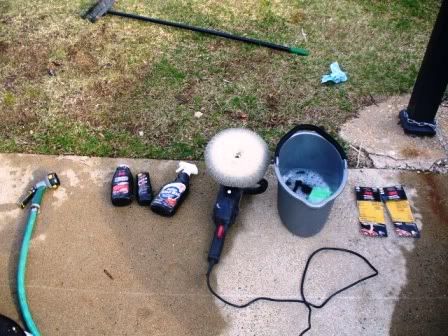
These are the things you will need.
Hose
wet-dry sand paper (400 grit and 2000 grit)
Electric buffer with a wool polishing pad (you can do it by hand)
Bucket full of soapy water
3M Rubbing compound (liquid form in the bottle)
Meguires Scratch X 2.0 (liquid form)
Spray Teflon wax
Extension cord
Various types of towels
Shop Rags
Brewskies
1. Take your wet-dry sand paper and put it in the soapy bucket and let it soak for at least 5 minutes.
2. Spray your headlight with the hose and make it wet. Then take your 400 grit sand paper and start sanding the headlight from LEFT TO RIGHT! Don't go in circles, don't go left to right and up and down LEFT TO RIGHT ONLY!
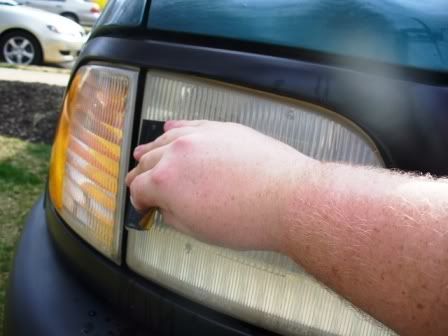
Your headlight will start to get this yellowish goo like substrate on it, this is all the crap coming off your headlight. Once the whole thing is done spray it with the hose and wash it off, then put that sandpaper back in the bucket of water and wash it off. Make sure you keep the headlight and sandpaper wet, dunk it in the bucket every so often.
Do this step 2 times, except on the second time around go UP AND DOWN! Every time you wash your headlight off and start again go the opposite direction with the sand paper. If you went up and down then washed the head lamp off you will now go left to right.
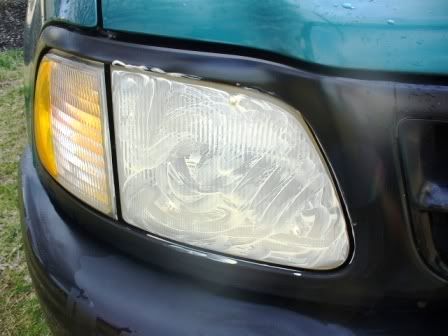
3. Now that you have done step 2 twice and rinsed your head light it should resemble this.
Now take your 2000 grit and start doing the same thing in the opposite direction you just did with the 400 grit. Everything in this step is the same as step 2 just with 2000 grit sand paper.
You want to do this step 3 times!
4. Now rinse and dry your head light, it should look kind of opaque and not clear, this is how it should look don't worry.
I did this because all those crappy headlight repair kits you can get from Walmart and such never worked worth a crap for me, so I thought I would show you a better way.
Anyway do all this at your own risk, while it is VERY easy you can mess it up if you keep the buffing pad in one spot too long.
This is a before and after.
Anyway, here it is.
These are the things you will need.
Hose
wet-dry sand paper (400 grit and 2000 grit)
Electric buffer with a wool polishing pad (you can do it by hand)
Bucket full of soapy water
3M Rubbing compound (liquid form in the bottle)
Meguires Scratch X 2.0 (liquid form)
Spray Teflon wax
Extension cord
Various types of towels
Shop Rags
Brewskies
1. Take your wet-dry sand paper and put it in the soapy bucket and let it soak for at least 5 minutes.
2. Spray your headlight with the hose and make it wet. Then take your 400 grit sand paper and start sanding the headlight from LEFT TO RIGHT! Don't go in circles, don't go left to right and up and down LEFT TO RIGHT ONLY!
Your headlight will start to get this yellowish goo like substrate on it, this is all the crap coming off your headlight. Once the whole thing is done spray it with the hose and wash it off, then put that sandpaper back in the bucket of water and wash it off. Make sure you keep the headlight and sandpaper wet, dunk it in the bucket every so often.
Do this step 2 times, except on the second time around go UP AND DOWN! Every time you wash your headlight off and start again go the opposite direction with the sand paper. If you went up and down then washed the head lamp off you will now go left to right.
3. Now that you have done step 2 twice and rinsed your head light it should resemble this.
Now take your 2000 grit and start doing the same thing in the opposite direction you just did with the 400 grit. Everything in this step is the same as step 2 just with 2000 grit sand paper.
You want to do this step 3 times!
4. Now rinse and dry your head light, it should look kind of opaque and not clear, this is how it should look don't worry.
Last edited by bradseabridge; Mar 18, 2011 at 06:44 PM.
Thread Starter
Squishy Heads
Joined: Jan 2011
Posts: 1,473
Likes: 8
From: Stafford, VA
5. After your headlight is fully dry Take your Meguires Scratch X 2.0 and either rub it on with your fingers or put is on a rag or something and rub some on.
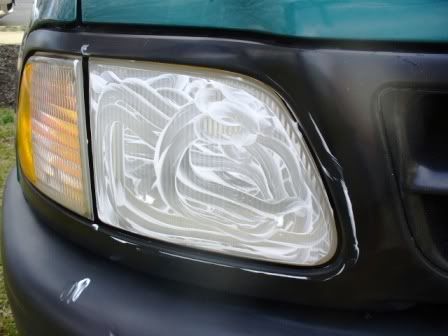
6. Now take your polisher and set it to a medium speed and start working your way up and down over the headlight polishing the hell out of it. Get the pad inside the edges of the headlight and around the bezel, this helps keep compound out of places you can't get to when it's dry. Keep polishing till the compound is completely gone.
Be careful not to keep it in one place for too long or you can melt your headlight a little!
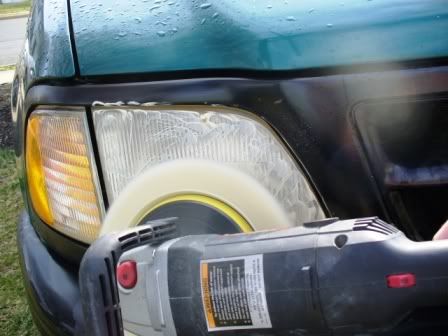
7. Now take a shop rage and wipe all the residue off the headlamp and proceed to step 8.
8. Now do the same thing as step 7 except use your 3M rubbing compound, literally the same thing as step 7.
9. Now after your have used your shop rag and got all the residue off your headlight and your bezels and stuff, take the teflon spray wax and spray some onto a shop rag and rub it on to the head light. Now use your polisher again and polish the hell out of it same steps as 7 and 8.
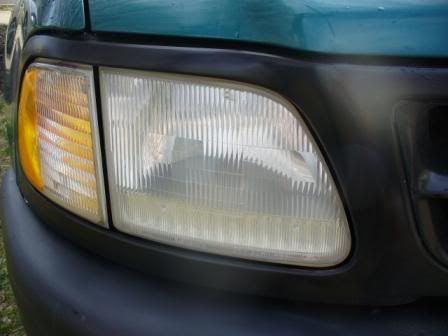
10. Wipe the left over wax off and rub the headlight with a shop rag to get any streaks out and you are done.
1 Clear headlight!
Now do the same thing to the other side and you're DONE!
Any questions post em up and I'll help you out.
The pictures don't even show close to the full effect, they are so clear it's great, they look brand new. I can't wait to take the truck out tonight and see how much more light I have. That's the main reason I did it, my headlights were so dim.
6. Now take your polisher and set it to a medium speed and start working your way up and down over the headlight polishing the hell out of it. Get the pad inside the edges of the headlight and around the bezel, this helps keep compound out of places you can't get to when it's dry. Keep polishing till the compound is completely gone.
Be careful not to keep it in one place for too long or you can melt your headlight a little!
7. Now take a shop rage and wipe all the residue off the headlamp and proceed to step 8.
8. Now do the same thing as step 7 except use your 3M rubbing compound, literally the same thing as step 7.
9. Now after your have used your shop rag and got all the residue off your headlight and your bezels and stuff, take the teflon spray wax and spray some onto a shop rag and rub it on to the head light. Now use your polisher again and polish the hell out of it same steps as 7 and 8.
10. Wipe the left over wax off and rub the headlight with a shop rag to get any streaks out and you are done.
1 Clear headlight!
Now do the same thing to the other side and you're DONE!
Any questions post em up and I'll help you out.
The pictures don't even show close to the full effect, they are so clear it's great, they look brand new. I can't wait to take the truck out tonight and see how much more light I have. That's the main reason I did it, my headlights were so dim.
Last edited by bradseabridge; Mar 18, 2011 at 06:39 PM.


Junior Member
Joined: Apr 2011
Posts: 1
Likes: 0
Might sound odd, but I accomplished the same thing with a little bit of white toothpaste and a soft cotton rag. Just applied a the toothpaste and swirled it around in small circles, like I was polishing a pair of boots. Wiped off the excess and washed the rest off with a hose.
Trending Topics

Junior Member
Joined: Jan 2011
Posts: 8
Likes: 0
don't remove the head light to buff with electric buffer...i did this and sent it flying after catching the edge almost cracking the whole thing.
unless you have a vice keep it in place and mask off the surrounding area.
i got that same buffer with the warranty. harbor and freight 40.00.
nice post shoulda checked it out 2 days ago lol.
unless you have a vice keep it in place and mask off the surrounding area.
i got that same buffer with the warranty. harbor and freight 40.00.
nice post shoulda checked it out 2 days ago lol.