2008 Limited Exhaust Manifold Replacement
 08-24-2013, 08:43 PM
#1

My truck is a 2008 Supercrew Limited 4x4, 5.4 with around 140,000 well maintained miles. I scheduled an appointment with my non-dealership, but former longterm dealership mechanic, to replace the passenger side exhaust manifold. I ordered the parts in advance from Tasca including new genuine Ford studs, nuts, flange bolts and nuts, gaskets, and manifold.
I dropped the truck off the night before. The next morning about an hour after the shop opened I received a call from the mechanic. He said that the job was too risky since after he saw it firsthand he realized it there was limited space and the job was very much harder than the previous generation trucks. I told him I didn't care how long it took or costs, just please do it. He said no.
I picked it up and brought it home. This morning I started on it myself at 11:00 am and finished putting my tools away at 7:00 pm. Stopped only for a quick lunch. 7 1/2 hours.
As so many on this forum have stated; it's a difficult job. Here is what I learned and recommend-
1-Remove the Battery cable from the battery
2-jack the truck up and secure on Jack stands on the frame rails behind the front wheel.
3-Remove the front wheel
4-Remove the inner fender
5-Spray PB Blaster on, let soak and then remove the nuts on the exhaust manifold/exhaust pipe flange. This is the only place I recommend the use of PB Blaster. More about this below.
6-Remove the stater mounting bolts without removing the power cables to the bendix. Remove the started and slide it back onto a structural member.
7-Remove 2 nuts on the right side motor mount.
8-Remove 2 nuts on the transmission mount.
9-Place jack under front mounting lip of the transmission as extreme far right as possible. Use a piece of wood 2x4 between the lip and the jack to cushion the lip
10-Jack up the engine until the transmission fill tube firmly contacts the fire wall. This should be about 1 1/2 inches or so.
11-Make sure you have a good selection of 6 point 13mm deep well sockets, various extentions, ratchet (flex head) wrenches, flex and non-flex ratchets and universals before attempt removal of the manifold studs/nuts.
12-Remove the manifold studs by trying to remove the nuts. In most cases the nuts will be seized to the studs and they will come out together. I mentioned about that I do not recommend PB Blaster. I say this because you are better off removing the stud and the nut as one piece. If you are able to do this it will allow much more room to snake the manifold out.
13-if the nuts loosen up before the stud comes out you should try to spin on a jam nut and remove the stud.
14-Once all the studs are out you can snake the manifold out and down behind the front sway bar. Since you moved the starter toward the front of the vehicle in step 6 you should have plenty of room.
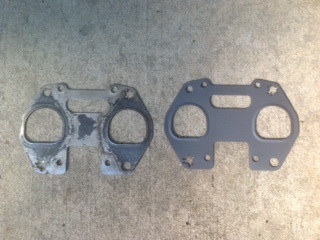
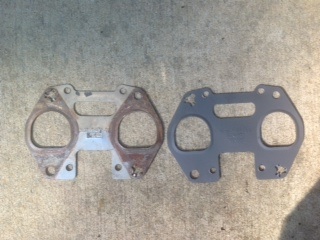
15-Remember the orientation of the exhaust gaskets while removing the old ones. They are directional as far as which side goes toward the manifold and which goes toward the head.
Put it back together in reverse order.
I dropped the truck off the night before. The next morning about an hour after the shop opened I received a call from the mechanic. He said that the job was too risky since after he saw it firsthand he realized it there was limited space and the job was very much harder than the previous generation trucks. I told him I didn't care how long it took or costs, just please do it. He said no.
I picked it up and brought it home. This morning I started on it myself at 11:00 am and finished putting my tools away at 7:00 pm. Stopped only for a quick lunch. 7 1/2 hours.
As so many on this forum have stated; it's a difficult job. Here is what I learned and recommend-
1-Remove the Battery cable from the battery
2-jack the truck up and secure on Jack stands on the frame rails behind the front wheel.
3-Remove the front wheel
4-Remove the inner fender
5-Spray PB Blaster on, let soak and then remove the nuts on the exhaust manifold/exhaust pipe flange. This is the only place I recommend the use of PB Blaster. More about this below.
6-Remove the stater mounting bolts without removing the power cables to the bendix. Remove the started and slide it back onto a structural member.
7-Remove 2 nuts on the right side motor mount.
8-Remove 2 nuts on the transmission mount.
9-Place jack under front mounting lip of the transmission as extreme far right as possible. Use a piece of wood 2x4 between the lip and the jack to cushion the lip
10-Jack up the engine until the transmission fill tube firmly contacts the fire wall. This should be about 1 1/2 inches or so.
11-Make sure you have a good selection of 6 point 13mm deep well sockets, various extentions, ratchet (flex head) wrenches, flex and non-flex ratchets and universals before attempt removal of the manifold studs/nuts.
12-Remove the manifold studs by trying to remove the nuts. In most cases the nuts will be seized to the studs and they will come out together. I mentioned about that I do not recommend PB Blaster. I say this because you are better off removing the stud and the nut as one piece. If you are able to do this it will allow much more room to snake the manifold out.
13-if the nuts loosen up before the stud comes out you should try to spin on a jam nut and remove the stud.
14-Once all the studs are out you can snake the manifold out and down behind the front sway bar. Since you moved the starter toward the front of the vehicle in step 6 you should have plenty of room.
15-Remember the orientation of the exhaust gaskets while removing the old ones. They are directional as far as which side goes toward the manifold and which goes toward the head.
Put it back together in reverse order.

The following 3 users liked this post by F150Limited:
 08-24-2013, 11:02 PM
#3
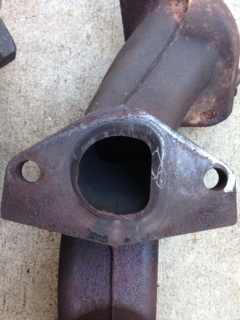
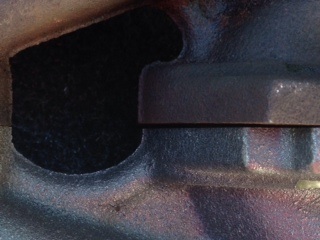
You can see the exhaust creep on the side of the rear port that is adjacent to the 3rd port. This is where the blow out was.
Last edited by F150Limited; 08-24-2013 at 11:10 PM.
08-24-2013, 11:03 PM
#4
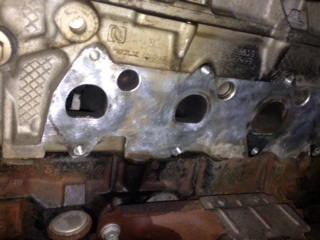
This is after I cleaned the block with a brass wire attachment chucked up in a cordless drill with a 12" drill bit extension.
Last edited by F150Limited; 08-24-2013 at 11:12 PM.
 08-24-2013, 11:06 PM
#6
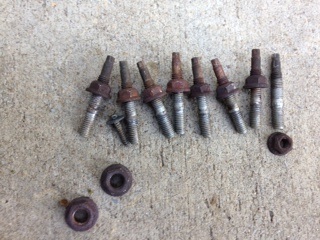
The studs came out with the nuts on all but one. I simply jam nutted that one and removed it as well. If you want to do this as I did- do not PB Blast the nuts. I am glad the studs came out at the same time. With the studs removed you will more easily be able to remove the manifold and snake it out.
Last edited by F150Limited; 08-24-2013 at 11:15 PM.