
new TSB? 14-00-90


 09-30-2014, 07:41 AM
#12

Finally got someone to listen to me. The service Mgr drove my truck and admitted he could hear what I was hearing. Lash in the ring/pinion was 0.018". It is now 0.007" and the noise is fixed. Finally.
GP
GP
09-30-2014, 08:27 AM
#13
Just so everyone knows, heres the article, superseded to this tsb
FORD: 2011-2014 F-150
This article supersedes TSB 13-7-7 to update the vehicle model application, model years, Part List and Service Procedure.
ISSUE:
Some 2011-2014 F-150 vehicles built on 1/1/2011 and through 4/1/2014 may exhibit an intermittent click or snap-type noise from the rear axle on initial light acceleration from a stop while in drive or reverse. The noise may also occur on light acceleration after changing direction from drive to reverse, or reverse to drive. ACTION:
Follow the Service Procedure steps to correct the condition. SERVICE PROCEDURE
All good and dandy but it wont change a lash problem
FORD: 2011-2014 F-150
This article supersedes TSB 13-7-7 to update the vehicle model application, model years, Part List and Service Procedure.
ISSUE:
Some 2011-2014 F-150 vehicles built on 1/1/2011 and through 4/1/2014 may exhibit an intermittent click or snap-type noise from the rear axle on initial light acceleration from a stop while in drive or reverse. The noise may also occur on light acceleration after changing direction from drive to reverse, or reverse to drive. ACTION:
Follow the Service Procedure steps to correct the condition. SERVICE PROCEDURE
- Does the vehicle exhibit a single click or snap-type noise from the rear axle on light acceleration after the initial engagement into Drive or Reverse, or after stopping to reverse vehicle direction?
- Yes - proceed to Step 2.
- No - this article does not apply. Refer to Workshop Manual (WSM), Section 205-00 for normal diagnostics.
- Is the noise heard at the rear driveshaft universal joint area?
- Yes - apply a few drops of Motorcraft� Penetrating and Lock Lubricant to each of the driveshaft universal joint retaining clips, wipe off the excess and retest. If the noise is resolved the repair is complete. Release vehicle to the customer. If the noise is still present proceed to Step 3.
- No - proceed to Step 3.
- With the vehicle in neutral, position it on a hoist. Refer to WSM, Section 100-02.
- Index-mark the driveshaft flange and pinion flange for correct alignment during installation. (Figure 1)

Figure 1 - 14-0090
- Remove and discard the four (4) driveshaft flange bolts.
- Disconnect the driveshaft centering socket yoke from the pinion flange. (Figure 2)
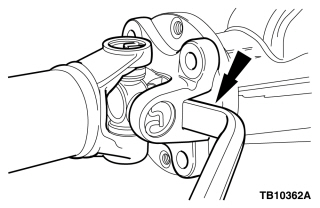
Figure 2 - 14-0090- The driveshaft centering socket yoke fits tightly on the pinion flange pilot. Never hammer on the driveshaft or any of its components to disconnect the driveshaft centering socket yoke from the pinion flange. Pry only in the area shown with a suitable tool to disconnect the driveshaft centering socket yoke from the pinion flange.
- Support and position the driveshaft aside.
- Remove the rear disc brake calipers and support them out of the way to allow the axles to rotate freely. Refer to WSM, Section 206-04.
- It is not necessary to remove the brake lines from the brake calipers for this procedure.
- Rotate the rear axle pinion and record the turning torque with the differential and axle shafts installed.
- Remove the rear pinion flange, pinion seal, and oil slinger. Refer to WSM, Section 205-02B, In-Vehicle Repair, Drive Pinion Flange and Drive Pinion Seal.
- It is critical to follow the WSM procedure to press the pinion flange off and on to prevent damage to the pinion flange.
- Replace the oil slinger with a new oil slinger.
- Lubricate both faces of the shim with Motorcraft� Premium Long-Life Grease.
- Install shim, pinion seal, and pinion flange. Refer to WSM, Section 205-02B.
- Adjust rear pinion preload to � 0.14 kg/cm (2 lb-in) from the initial pinion turning torque recorded in Step 9.
- Used bearings require a lower preload than new bearings.
- Install the rear disc brake calipers. Refer to WSM, Section 206-04.
- Position the driveshaft to the pinion flange and align the index marks. (Figure 1)
- Install four (4) new driveshaft flange bolts and tighten to 103 Nm (76 lb-ft).
- If new bolts are not available, coat the threads of the original driveshaft flange bolts with Motorcraft� Threadlock and Sealer.
- The driveshaft centering socket yoke fits tightly on the pinion flange. To make sure the driveshaft centering socket yoke seats squarely on the pinion flange, tighten the driveshaft flange bolts evenly in a cross pattern.
All good and dandy but it wont change a lash problem
Last edited by Knielsen; 09-30-2014 at 08:30 AM.