
How-To replace spur gear inside power fold mirrors... PICTURE HEAVY !!
 11-11-2017, 10:02 PM
#1
Senior Member
Thread Starter


Hi everybody, today I’m gonna explain you how to replace the spur gear inside your power fold mirrors. Thank to Paul Gruven AKA Gruvenparts for providing those very high quality gears.
You can buy the gears for non-towing/towing power fold mirrors at www.gruvenparts.com
First of all, let me explain why I had to replace the gears.
I'm have an F-150 Fx4 2014. When I bought the truck, I decided to have the power fold, painted to match mirrors. Great decision until the driver side mirror stop folding like it used to. So I called the dealership and arrange an appointment (truck was still under warranty at the time). The technician looked at the mirror and 3 hours later, I received a call for the service advisor say that Ford Canada is declining the warranty repair because my mirror got a rock chip on it! So I ****ing lost it (I wasn't mad at the tech or the advisor but mad at the situation!!). I live in Alberta, Canada and during the winter, the city use rocks and sand to cover the slippery road. So when I decided to buy the truck, I went straight to a shop that I trust and pay over 500$ to have the complete front end of the vehicle wrapped with some 3M paint protection (headlight, hood, bumper, mirrors, etc...). If you take a look at the pictures, you'll see the rock chip. I haven't peel the 3M on the mirror but I'm 99% sure that the paint isn't damaged. Even though, is a rock chip is enough to ruin a motor/gears that are buried inside a shell!


Now that you know the reason why I’m doing this tutorial.
Let’s start!!
First of all, I strongly recommend to take a lots of pictures it will help for the reassembly and have the stored in a warm place so the plastic will be malleable and you won’t freeze your bag off. I recommend to leave the mirror attach to the truck for the first few steps (it will make your life easier). So the first thing you’ll do is popping the glass by pulling the small tabs behind it. I used a sharp long metal hook and it was really easy to unclip.

One the glass is unclipped, make sure you gently disconnect all the wires (take pictures !!!).


Once you have the glass in your hand, put it somewhere safe.

Then, you’ll have to unscrew the 3 screws that hold the tilt motor to the shell.

Unplug the motor and put it beside the glass.


You can buy the gears for non-towing/towing power fold mirrors at www.gruvenparts.com
First of all, let me explain why I had to replace the gears.
I'm have an F-150 Fx4 2014. When I bought the truck, I decided to have the power fold, painted to match mirrors. Great decision until the driver side mirror stop folding like it used to. So I called the dealership and arrange an appointment (truck was still under warranty at the time). The technician looked at the mirror and 3 hours later, I received a call for the service advisor say that Ford Canada is declining the warranty repair because my mirror got a rock chip on it! So I ****ing lost it (I wasn't mad at the tech or the advisor but mad at the situation!!). I live in Alberta, Canada and during the winter, the city use rocks and sand to cover the slippery road. So when I decided to buy the truck, I went straight to a shop that I trust and pay over 500$ to have the complete front end of the vehicle wrapped with some 3M paint protection (headlight, hood, bumper, mirrors, etc...). If you take a look at the pictures, you'll see the rock chip. I haven't peel the 3M on the mirror but I'm 99% sure that the paint isn't damaged. Even though, is a rock chip is enough to ruin a motor/gears that are buried inside a shell!
Now that you know the reason why I’m doing this tutorial.
Let’s start!!
First of all, I strongly recommend to take a lots of pictures it will help for the reassembly and have the stored in a warm place so the plastic will be malleable and you won’t freeze your bag off. I recommend to leave the mirror attach to the truck for the first few steps (it will make your life easier). So the first thing you’ll do is popping the glass by pulling the small tabs behind it. I used a sharp long metal hook and it was really easy to unclip.
One the glass is unclipped, make sure you gently disconnect all the wires (take pictures !!!).
Once you have the glass in your hand, put it somewhere safe.
Then, you’ll have to unscrew the 3 screws that hold the tilt motor to the shell.
Unplug the motor and put it beside the glass.
Last edited by Pigcrew; 11-12-2017 at 12:13 PM.
 11-11-2017, 10:03 PM
#2
Senior Member
Thread Starter
The next step would be to remove the external shell by prying a series of clips (especially if you have painted to match skull, you don’t want to scratch those !).


Gently disconnect all electrical connectors.


Now you’re at the step of taking the inside door panel off. To do so, you’ll have couple screws to remove (arm rest, door handle and 2x at the bottom of the panel).


Disconnect the main mirror connector and remove the 3 nuts that hold the mirror on the door.


Gently disconnect all electrical connectors.
Now you’re at the step of taking the inside door panel off. To do so, you’ll have couple screws to remove (arm rest, door handle and 2x at the bottom of the panel).
Disconnect the main mirror connector and remove the 3 nuts that hold the mirror on the door.
Last edited by Pigcrew; 11-12-2017 at 12:19 PM.
11-11-2017, 10:04 PM
#3
Senior Member
Thread Starter
Now, put down the mirror on a work bench and feed the connector off the sleeve so you’ll have a safe surface to work with. Now this step will make you swear a lot !!! You have to remove that push nut and slowly release the spring. ATTENTION ATTENTION…THE SPRING IS VERY HEAVY SO USE CAUTION AND SAFETY GLASSES. My recommendation is simply to use a C-Clamp to hold the spring in place and cut the damn push nut because you won’t save it..trust me…I tried for 2 hours !! You’ll need a replacement push nut size ľ.


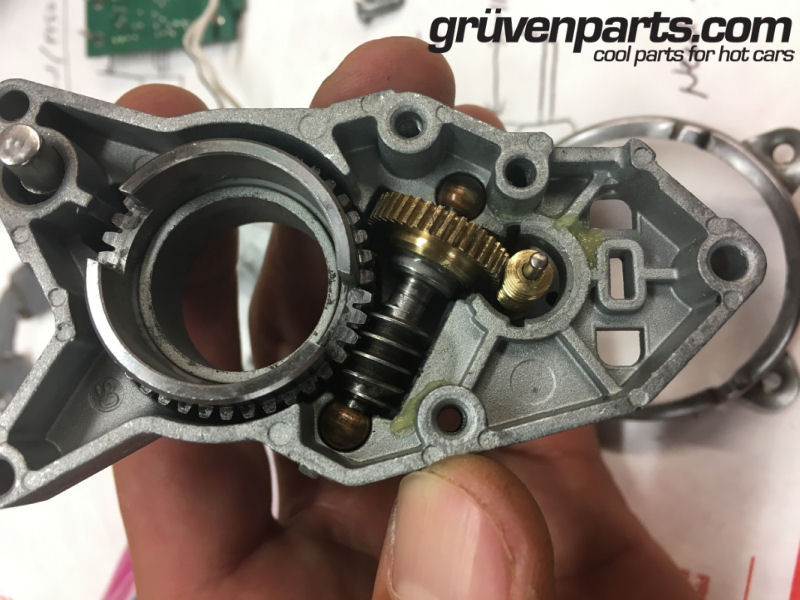
Once the nut is off and the spring is also removed, you’ll have complete access to the motor. Mark his position with a paint marker and start taking it apart.


Once the motor is open and the ****ty plastic gear is exposed, you can simply pull it out by pulling gently. You can't really see here but the gear was ****ed.


Be very careful to not lose the 2 copper bushings at the extremities. Take pictures of the shaft and the gear. Take a propane torch and melt the plastic gear.


Clean everything, open the JB weld 24h epoxy (YOU NEED THE 24H STUFF AND YOU NEED TO LET IT CURE OF 24H IF YOU DON’T WANT ANY SURPRISE). Mix some JB Weld 50/50 and screw the brass gear on the shaft. Try to replicate the position of the old gear on the shaft and find something that will prevent the gear from sliding during the curing process.


Once the nut is off and the spring is also removed, you’ll have complete access to the motor. Mark his position with a paint marker and start taking it apart.
Once the motor is open and the ****ty plastic gear is exposed, you can simply pull it out by pulling gently. You can't really see here but the gear was ****ed.
Be very careful to not lose the 2 copper bushings at the extremities. Take pictures of the shaft and the gear. Take a propane torch and melt the plastic gear.
Clean everything, open the JB weld 24h epoxy (YOU NEED THE 24H STUFF AND YOU NEED TO LET IT CURE OF 24H IF YOU DON’T WANT ANY SURPRISE). Mix some JB Weld 50/50 and screw the brass gear on the shaft. Try to replicate the position of the old gear on the shaft and find something that will prevent the gear from sliding during the curing process.
Last edited by Pigcrew; 11-12-2017 at 12:25 PM.
11-11-2017, 10:04 PM
#4
Senior Member
Thread Starter
24 H later, hold the shaft and try to spin the gear…it shouldn’t (obviously!). Clean all residue and reinstall the shaft into the casing.


My recommendation would be to put new grease everywhere…I used Lubriplate motor assembly grease.


Now reverse the installation procedure however, remember to push carefully in the center of the glass when re clipping it on the tilt motor.
Resynchronize your motor by following the procedure, available at this address :
https://owner.ford.com/how-tos/vehic...g-mirrors.html.
Thanks for you time and I hope this tutorial will help. If you have any questions, feel free to ask.
P.S. It's the same procedure for the passenger side !!
My recommendation would be to put new grease everywhere…I used Lubriplate motor assembly grease.
Now reverse the installation procedure however, remember to push carefully in the center of the glass when re clipping it on the tilt motor.
Resynchronize your motor by following the procedure, available at this address :
https://owner.ford.com/how-tos/vehic...g-mirrors.html.
Thanks for you time and I hope this tutorial will help. If you have any questions, feel free to ask.
P.S. It's the same procedure for the passenger side !!
Last edited by Pigcrew; 11-12-2017 at 07:24 PM.
The following 2 users liked this post by Pigcrew:
cajunsteve7 (09-24-2022),
Flowpro (11-15-2017)
11-12-2017, 05:15 PM
#5
How's she goin' eh?
Sounds like your dealer is a bag of dicks. Glad to see it worked out for you though.
The following users liked this post:
[F2C]MaDMaXX (02-14-2022)
11-15-2017, 01:39 AM
#7
 Hi, those mirrors are shoved in and out all of the time and made to turn in if hit by something. A tiny rock ding would be nothing compared to manually moving the mirror in and out. Cheap plastic gear.
Trending Topics
 12-13-2017, 04:41 PM
#9

Thanks very much for this excellent write up ! This should help others in the same boat. If it makes you feel any better, Ive dealt with both Ford and GM on folding mirror issues such as this 1 and they ALWAYS come up with a reason to decline warranty. A tiny rock chip, wow. Thats almost worth a lawsuit.
Anyway, glad we were able to get you the brass gears and glad it all worked out. I will put this tutorial also in a PDF format on our website product page.
I will also provide people with the new locking ring, as you said you must cut it to remove it so a new 1 is needed. i will put that info in the DIY article too, sorry for not originally providing it.
Keep us all posted on how the brass gear continues to perform. We guarantee it for LIFE, and that DOES include rock chips I'd be surprised if you could break that gear without destroying the side of the truck too, but let me know ..
For those interested in the product link, please just click on the pic below. Please also note we have the helical gears for power fold on the towing mirrors now too. Those tow mirrors suffer pretty much the same fate, with a plastic gear in the fold mechanism thats obviously there to make Ford and their dealer network some serious $.
Click Here for the F150 Power Folding Mirror Gears / Motors !

GRUVENPARTS.COM Solid Brass Replacement Gears for Ford F Series Trucks with Power Folding Towing Mirrors - Click Here for the Product Page !
Anyway, glad we were able to get you the brass gears and glad it all worked out. I will put this tutorial also in a PDF format on our website product page.
I will also provide people with the new locking ring, as you said you must cut it to remove it so a new 1 is needed. i will put that info in the DIY article too, sorry for not originally providing it.
Keep us all posted on how the brass gear continues to perform. We guarantee it for LIFE, and that DOES include rock chips
I'd be surprised if you could break that gear without destroying the side of the truck too, but let me know ..For those interested in the product link, please just click on the pic below. Please also note we have the helical gears for power fold on the towing mirrors now too. Those tow mirrors suffer pretty much the same fate, with a plastic gear in the fold mechanism thats obviously there to make Ford and their dealer network some serious $.
Click Here for the F150 Power Folding Mirror Gears / Motors !
GRUVENPARTS.COM Solid Brass Replacement Gears for Ford F Series Trucks with Power Folding Towing Mirrors - Click Here for the Product Page !
09-06-2019, 09:35 PM
#10
Junior Member

Join Date: Sep 2019
Posts: 1
Likes: 0
Received 0 Likes
on
0 Posts
Hey Guys - I got the gear from Gruven and Paul has been really helpful. Unfortunately, I just cannot get it to work because the gear is not perfectly square and centered on the shaft. After several emails with Paul (many thanks for his patience) and about 6 hours of fiddling with this...I'm giving up. Super frustrated that it hasn't gone better and that I won't have power fold mirrors.
So - I have the mirror almost back together (gears in place but motor will not turn). Can anybody give me a suggestion of how to compress the spring to install the push nut?
My kit didn't come with the new push nut...any suggestions on where to buy one?
Thanks for your help.
So - I have the mirror almost back together (gears in place but motor will not turn). Can anybody give me a suggestion of how to compress the spring to install the push nut?
My kit didn't come with the new push nut...any suggestions on where to buy one?
Thanks for your help.