
How To Recover/Put Together a Roll-X Cover
 04-16-2016, 10:55 AM
#1

Hi All!
So I was fortunate enough to receive a Bak Roll-X cover that our friend Joe on here was giving away because he traded his truck in in the middle of fixing it from a wreck. You can check out the thread here if you want.
First I want to Thank Joe for being an awesome guy and giving me the opportunity to do this, it was quite fun and he helped the whole way with pictures, questions and emails.
So After I got all the packages and made sure everything was here I went shopping for fabric, I have an awesome fabric store in my town. I didn't want to use the typical vinyl that comes on them for a few reasons, it's very belly button and gets hot in the sun. I looked around the outdoor fabrics and decided I was going to use some fabric called Cordura which is similar in appearance to a jeep top fabric, waterproof, and looks really cool. You will need two yards for a 5.5" bed if you take this on.
So lets see how this thing goes back together, Joe did all the hard work of removing the majority of the glue, thanks Joe!
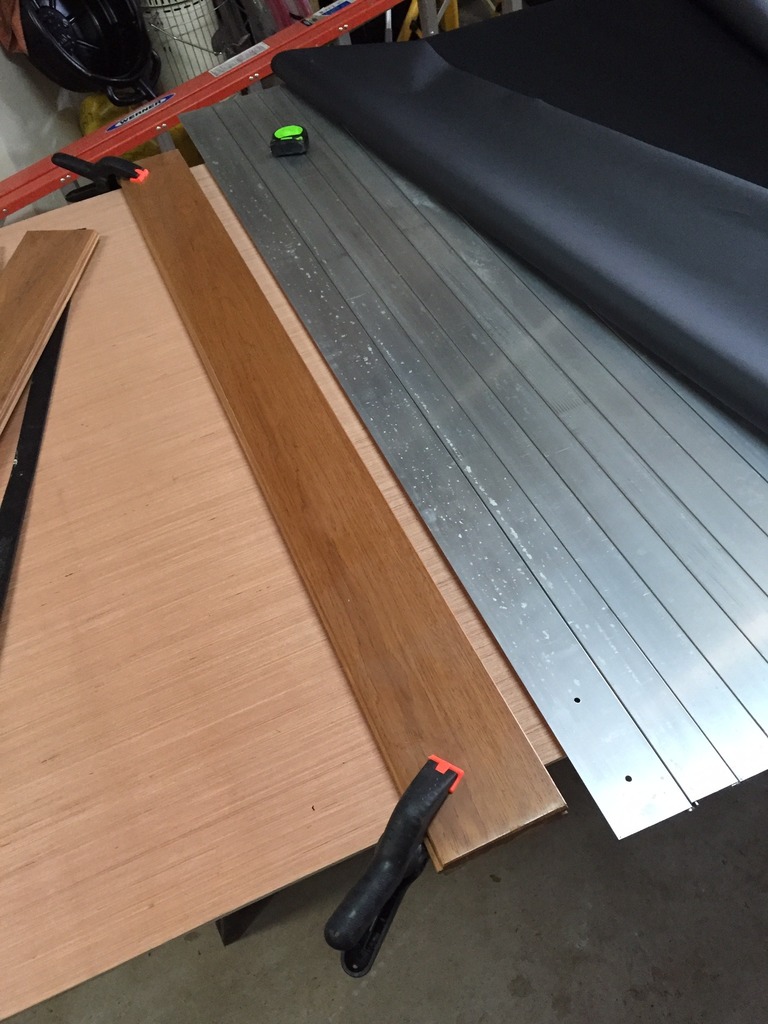
I used a sheet of 1/4" lauan on some saw horses to lay out all the slats out on to start to make sure all the slats were clean and there was nothing in the groves to keep the cover from rolling nicely.
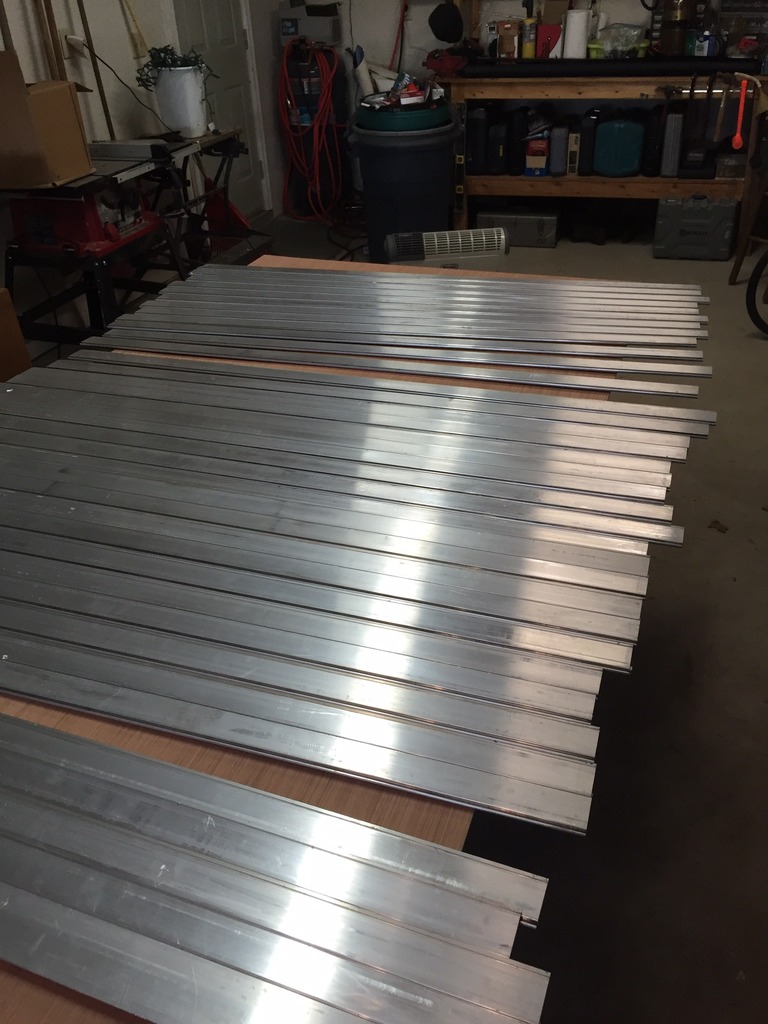
Here is what we were after, this takes awhile, be patient it is worth it
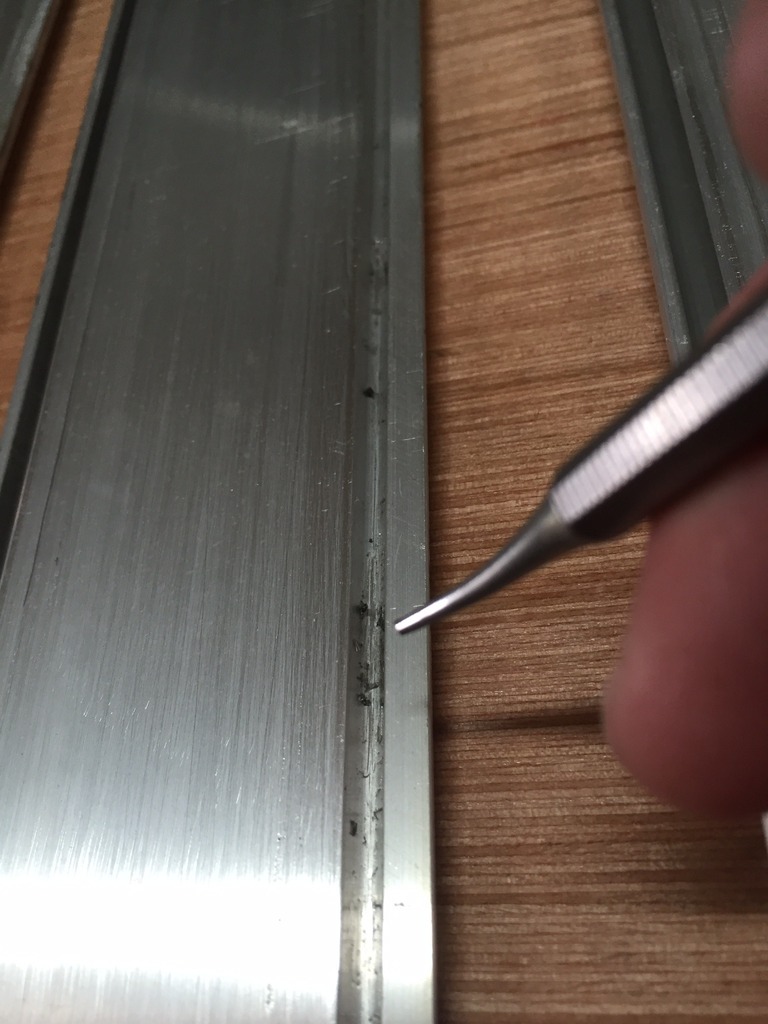
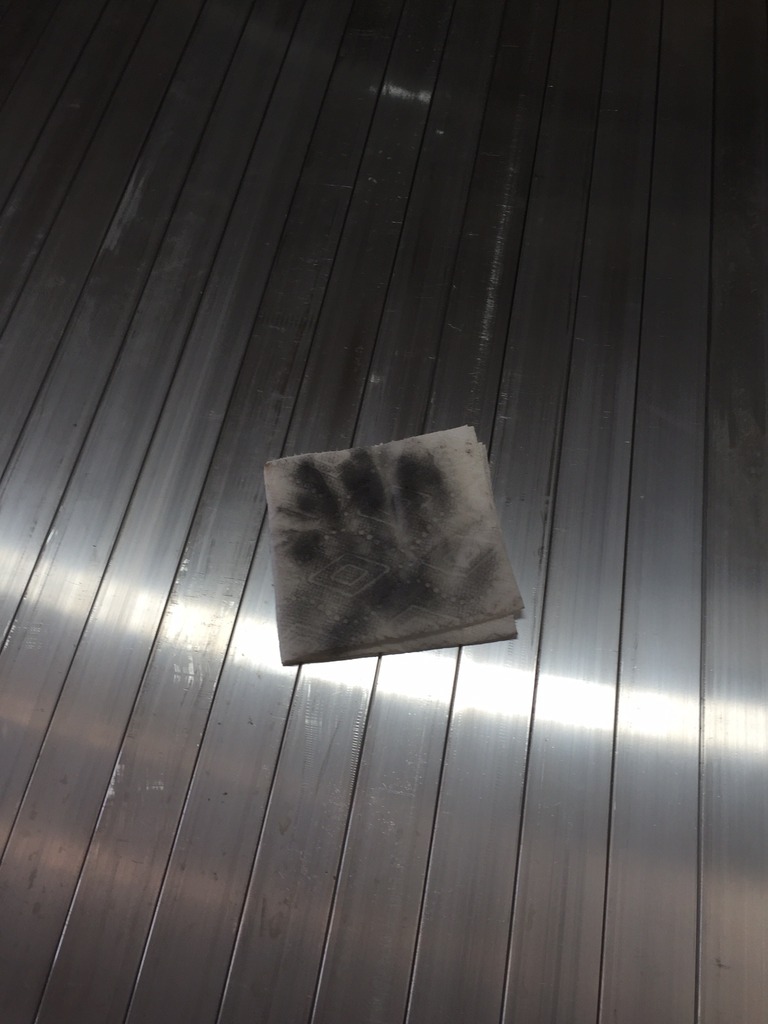
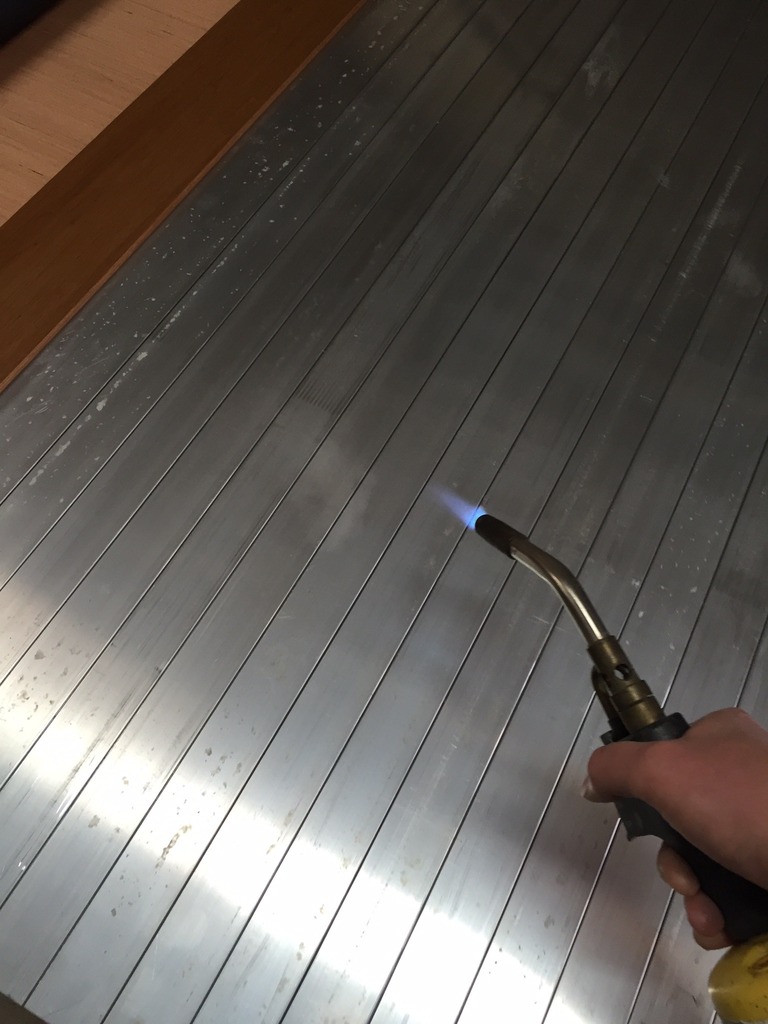
Once Everything was nice and clean I locked all the slats together and set out to clean the top of the slats that the fabric will glue to. I used mineral spirits and wiped and wiped and wiped until the paper towels were staying white. I also used a blow torch to make sure the slats were perfectly clean and didn't have any mineral spirits puddling anywhere.
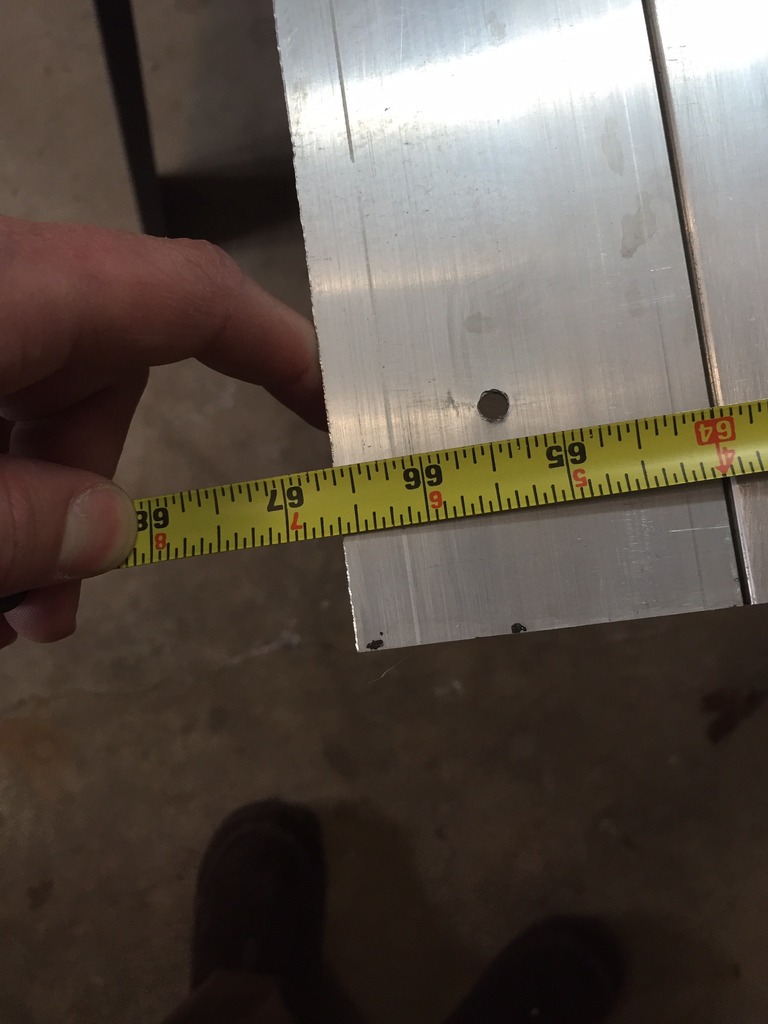
All the slats have to be TIGHT together to come out to the correct length and roll correctly. I used a piece of hardwood flooring on either end to keep the slats tight while I squared everything up. The magic number for a 5.5" bed is 66 3/4" front to back.
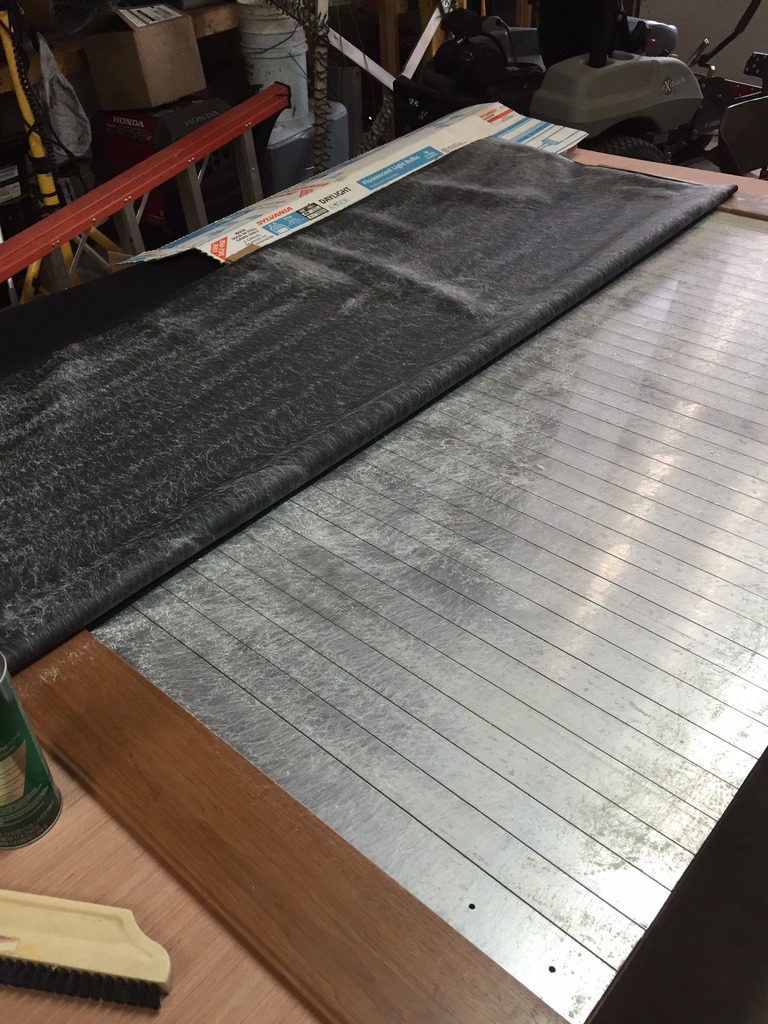
I used to install carpet and I know how much it helps to let any fabric relax overnight then get it hot before you work with it. After everything was squared I laid the fabric on top and let it sit overnight. Got off work and got home and turned the heater on and got the garage up to about 75, it was 40 outside so that wasn't going to help.
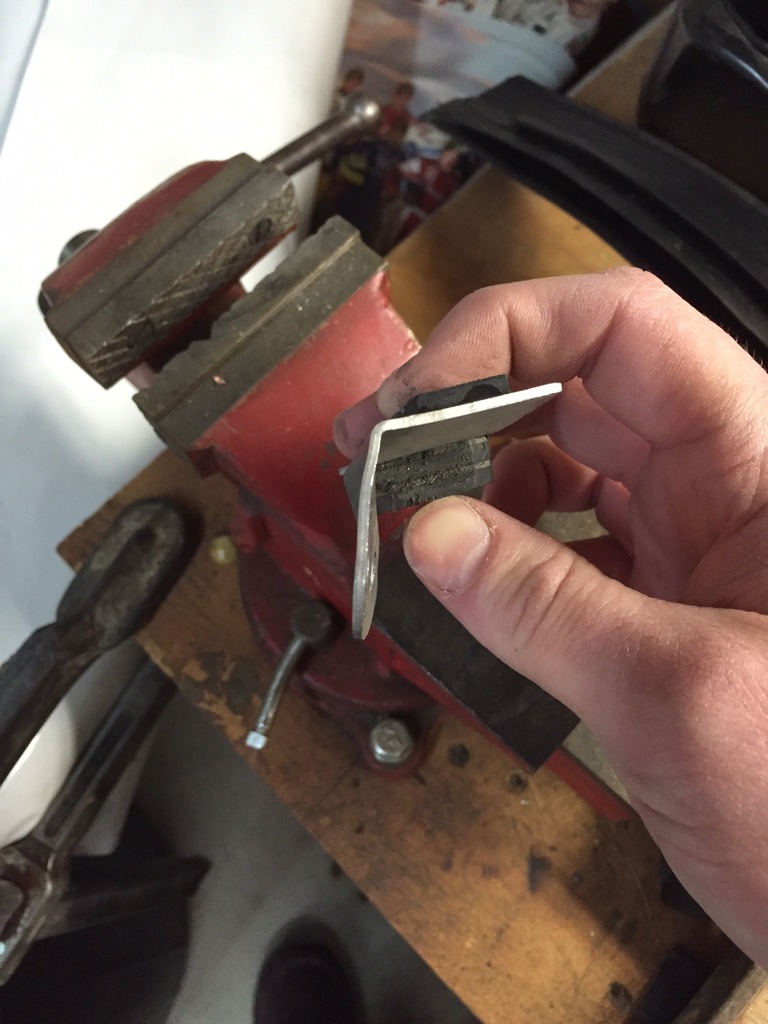
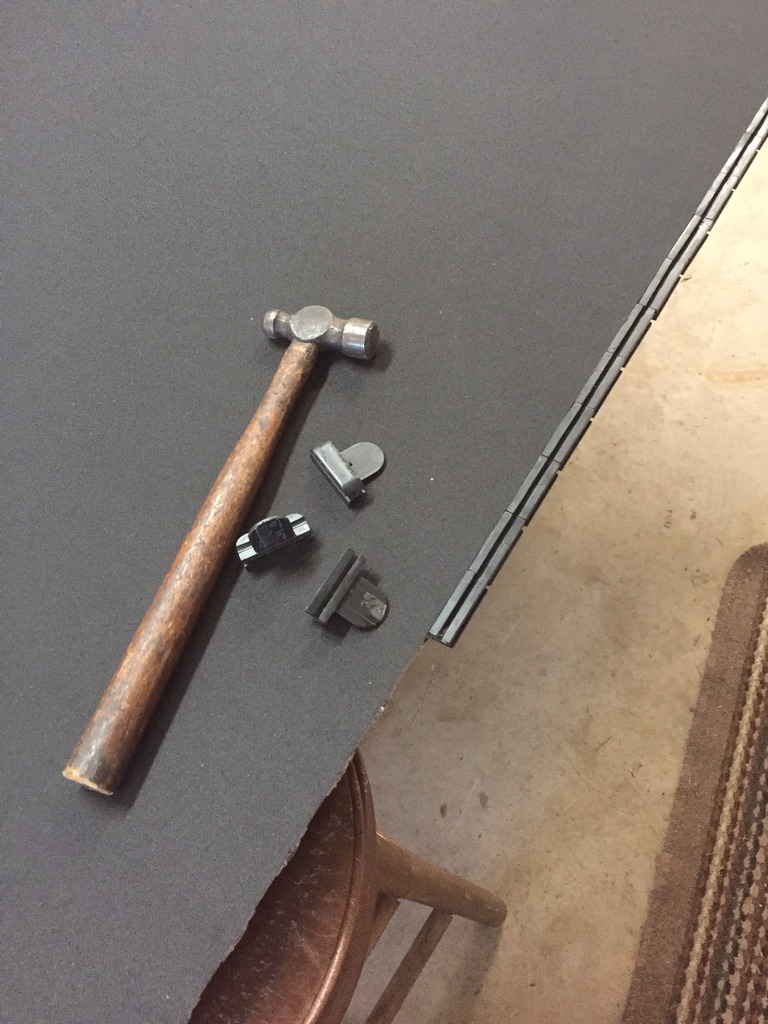
While waiting for the garage to heat up I bent up the tabs that the latch hits on either side back square. UPS adjusted them for me somewhere between Florida and Virginia. They should stick to shipping and not tonneau cover repair. I hate UPS, they break everything that comes to my door and never do anything about it. I'm done now.
So I was fortunate enough to receive a Bak Roll-X cover that our friend Joe on here was giving away because he traded his truck in in the middle of fixing it from a wreck. You can check out the thread here if you want.
First I want to Thank Joe for being an awesome guy and giving me the opportunity to do this, it was quite fun and he helped the whole way with pictures, questions and emails.
So After I got all the packages and made sure everything was here I went shopping for fabric, I have an awesome fabric store in my town. I didn't want to use the typical vinyl that comes on them for a few reasons, it's very belly button and gets hot in the sun. I looked around the outdoor fabrics and decided I was going to use some fabric called Cordura which is similar in appearance to a jeep top fabric, waterproof, and looks really cool. You will need two yards for a 5.5" bed if you take this on.
So lets see how this thing goes back together, Joe did all the hard work of removing the majority of the glue, thanks Joe!
I used a sheet of 1/4" lauan on some saw horses to lay out all the slats out on to start to make sure all the slats were clean and there was nothing in the groves to keep the cover from rolling nicely.

Here is what we were after, this takes awhile, be patient it is worth it

Once Everything was nice and clean I locked all the slats together and set out to clean the top of the slats that the fabric will glue to. I used mineral spirits and wiped and wiped and wiped until the paper towels were staying white. I also used a blow torch to make sure the slats were perfectly clean and didn't have any mineral spirits puddling anywhere.


All the slats have to be TIGHT together to come out to the correct length and roll correctly. I used a piece of hardwood flooring on either end to keep the slats tight while I squared everything up. The magic number for a 5.5" bed is 66 3/4" front to back.


I used to install carpet and I know how much it helps to let any fabric relax overnight then get it hot before you work with it. After everything was squared I laid the fabric on top and let it sit overnight. Got off work and got home and turned the heater on and got the garage up to about 75, it was 40 outside so that wasn't going to help.
While waiting for the garage to heat up I bent up the tabs that the latch hits on either side back square. UPS adjusted them for me somewhere between Florida and Virginia. They should stick to shipping and not tonneau cover repair. I hate UPS, they break everything that comes to my door and never do anything about it. I'm done now.

 04-16-2016, 10:56 AM
#2
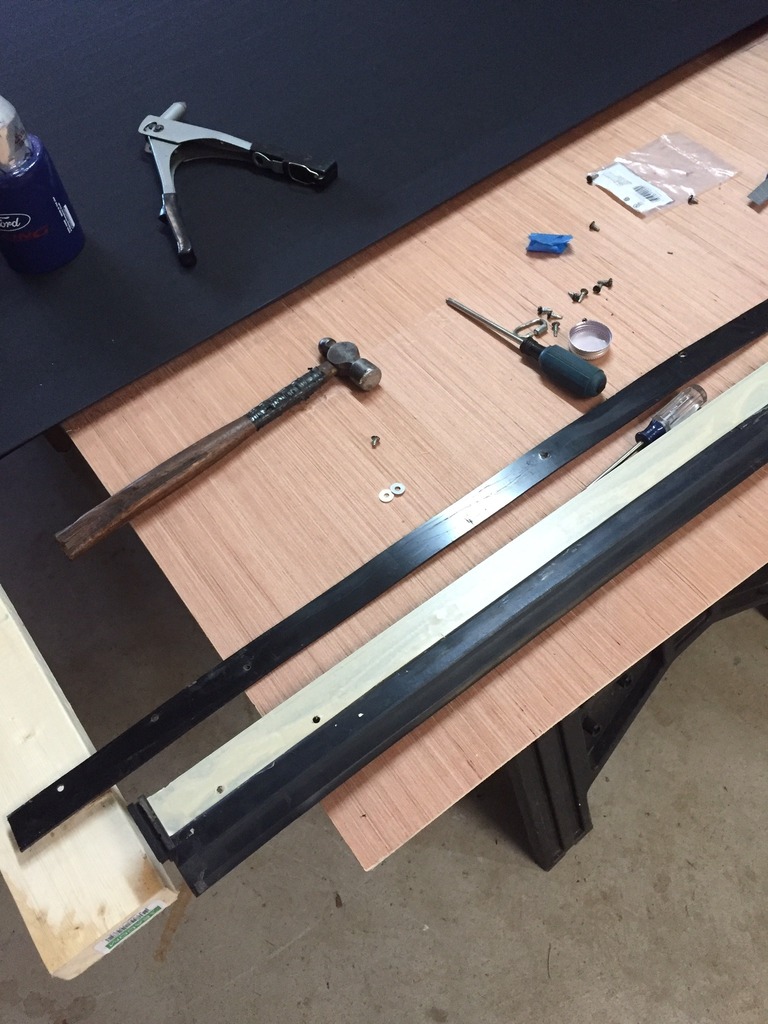
After everything was good and warm I got ready to start gluing, this is where you don't want to screw up. I used 3M Super 90 I got from Lowe's, read the directions on whatever you choose. I had to apply three coats of glue to each piece, aluminum and fabric. I did this by myself because I was comfortable with the idea and fairly confident I could do it. Learn from me and get someone to help you do this, I almost screwed up and had a huge piece of sticky mess. Everything worked out and I glued half and half but it was a handful.
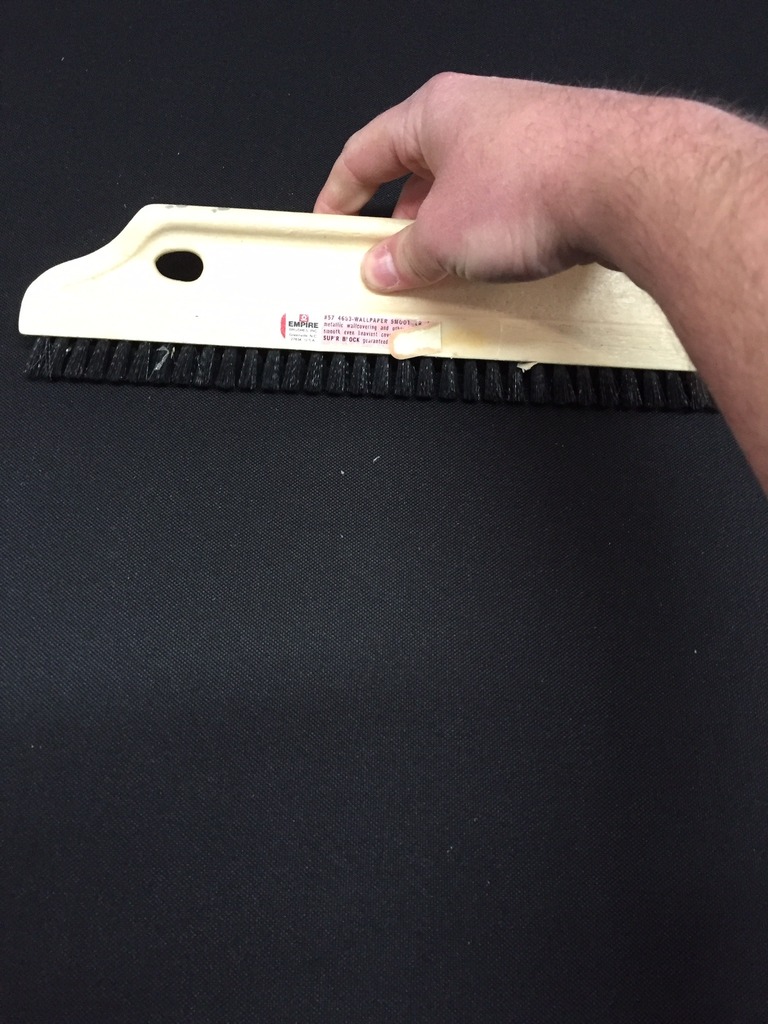
After everything was smoothed out by hand and the bigger bumps laid down I used a wall paper smoothing tool to push the glue together and make everything nice and smooth.
After that was done I let it sit for two days until the fabric would pick the slats up off the plywood without pulling away. You could probably do it sooner but it was cold out and took longer to cure for me. I trimmed the sides only at this point and started assembly. I started with the tailgate end since it was the easier one to start on. I used the screw driver to wrap the fabric around either end, you can push the fabric around the corner and it will stretch it and help it stay. I used some double sided tape to hold it underneath.
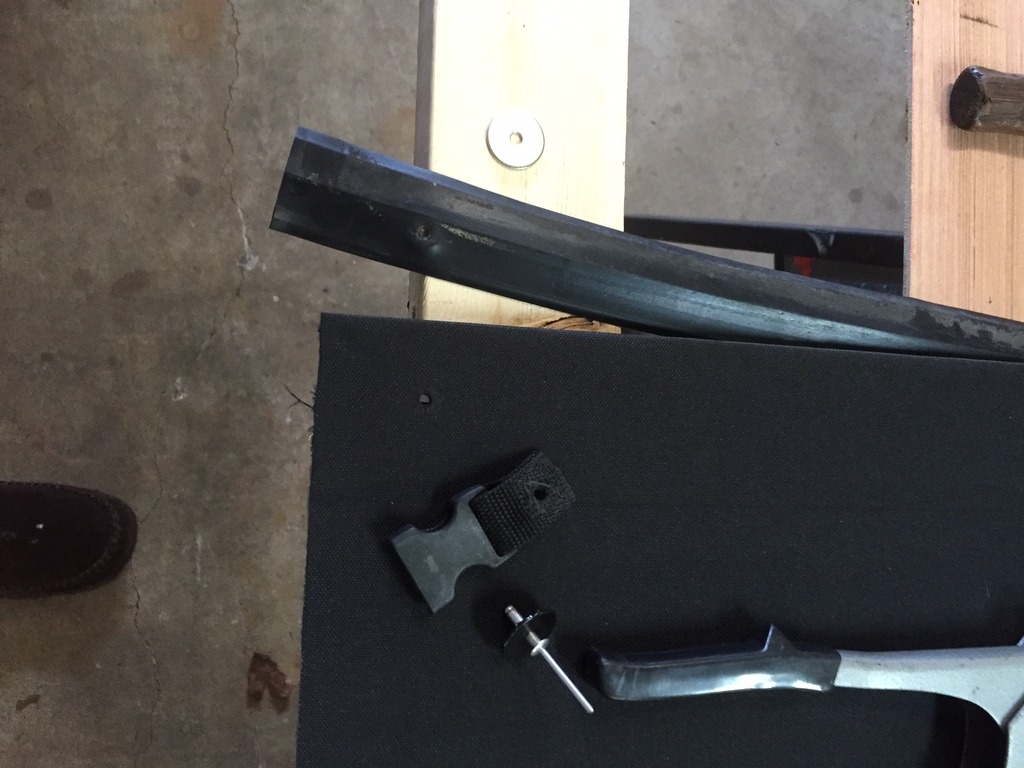
I used a finish nail that I heated up with a blow torch to punch the holes for the rivets and hopefully keep it from fraying later. I wrapped the top washer in black duck tape so it didn't stand out so bad stainless 3/8" fender washers and the longest aluminum rivets Lowe's sells.
Then we moved to the tailgate/latch end and repeated the fabric wrapping by stretching it around the slat then riveting on the piece the latch attached to. This is where I had to get creative about how it went back together, the way Bak assembles would be very hard to do in your garage so I used the piece of plastic as a spacer and double sided the fabric to the aluminum slat and sandwiched it all together.
All done with the ends!
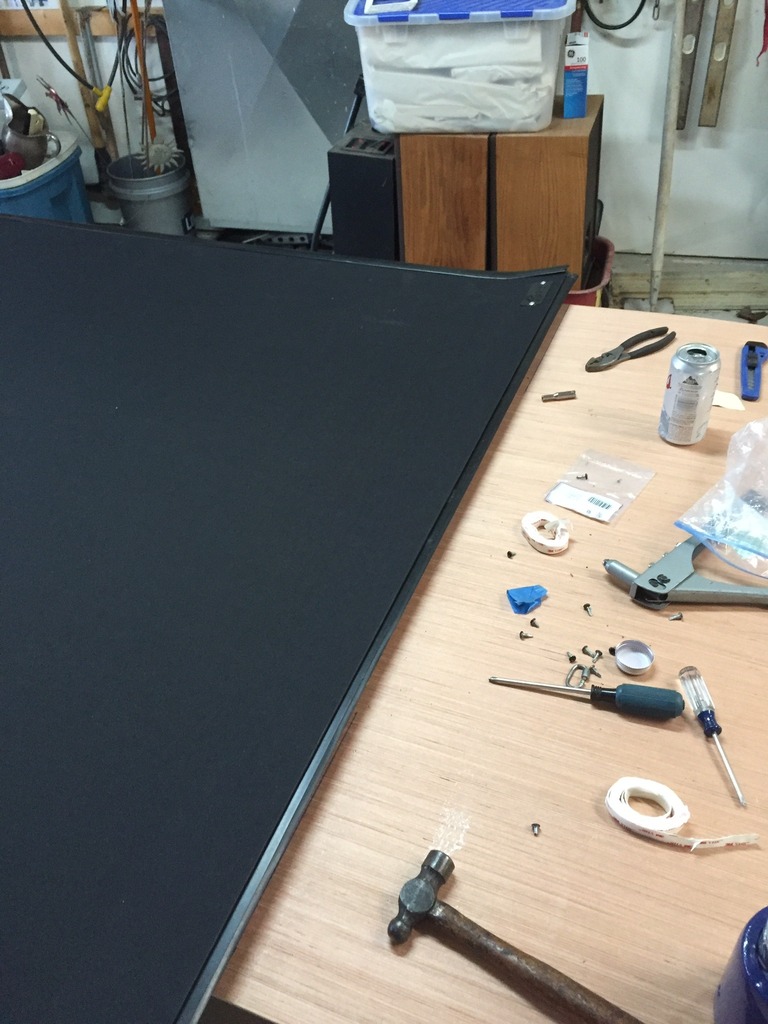
So the sides are really easy, tap the end caps in and slide the side weather strip in the groove. I thought this was going to take all day to get through there. It was done in a minute for both sides, cool. I didn't glue the end caps in, they fit tight enough I wasn't worried about it.
Mount your rails and throw it on there and adjust your latches and strikes, you are done!
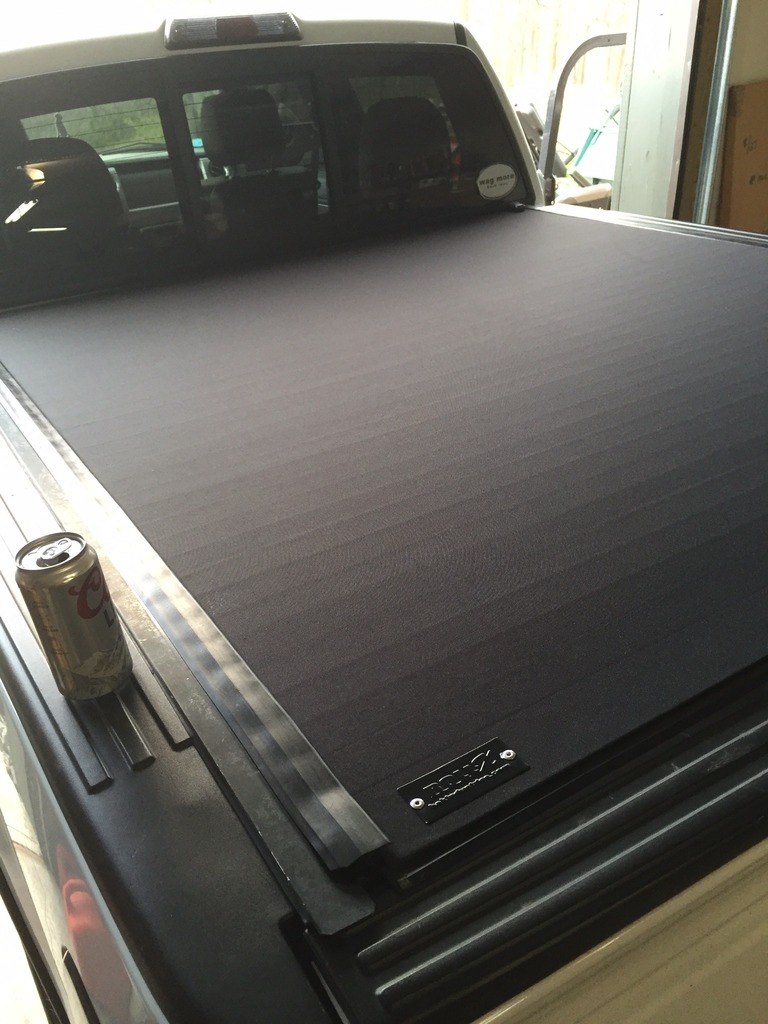
Slight update, since it's been warm out the fabric and glue have cured and the top looks perfectly smooth. I didn't glue the side strips on yet, I am going to wait till it's warm out and the rubber relaxes and probably just put a dot of window weld at either end to keep it down. This fabric may not be the best with pollen but so far so good it washed off.
If any of you are brave enough to tackle this on your cover and have any questions just let me know.

After everything was smoothed out by hand and the bigger bumps laid down I used a wall paper smoothing tool to push the glue together and make everything nice and smooth.

After that was done I let it sit for two days until the fabric would pick the slats up off the plywood without pulling away. You could probably do it sooner but it was cold out and took longer to cure for me. I trimmed the sides only at this point and started assembly. I started with the tailgate end since it was the easier one to start on. I used the screw driver to wrap the fabric around either end, you can push the fabric around the corner and it will stretch it and help it stay. I used some double sided tape to hold it underneath.

I used a finish nail that I heated up with a blow torch to punch the holes for the rivets and hopefully keep it from fraying later. I wrapped the top washer in black duck tape so it didn't stand out so bad stainless 3/8" fender washers and the longest aluminum rivets Lowe's sells.
Then we moved to the tailgate/latch end and repeated the fabric wrapping by stretching it around the slat then riveting on the piece the latch attached to. This is where I had to get creative about how it went back together, the way Bak assembles would be very hard to do in your garage so I used the piece of plastic as a spacer and double sided the fabric to the aluminum slat and sandwiched it all together.

All done with the ends!

So the sides are really easy, tap the end caps in and slide the side weather strip in the groove. I thought this was going to take all day to get through there. It was done in a minute for both sides, cool. I didn't glue the end caps in, they fit tight enough I wasn't worried about it.

Mount your rails and throw it on there and adjust your latches and strikes, you are done!

Slight update, since it's been warm out the fabric and glue have cured and the top looks perfectly smooth. I didn't glue the side strips on yet, I am going to wait till it's warm out and the rubber relaxes and probably just put a dot of window weld at either end to keep it down. This fabric may not be the best with pollen but so far so good it washed off.
If any of you are brave enough to tackle this on your cover and have any questions just let me know.
04-16-2016, 02:11 PM
#3


Nice work!!
You've got more patience than I do. If/when my rollx needs attention, it will likely be someone else's problem because I'll trade my truck in on a new one long before it does.
.
You've got more patience than I do. If/when my rollx needs attention, it will likely be someone else's problem because I'll trade my truck in on a new one long before it does.
.
04-17-2016, 06:47 AM
#4
Senior Member

Great job Derek! Glad to see it all came together. When I was thinking about doing it, i wasn't quite sure how I would accomplish a few of the steps. Interesting to see your solutions. Looks like they worked great. Makes me happy to see the top back on a truck where it belongs. Hope you get many of years of use out of it.
The following users liked this post:
DerekL (04-22-2016)
04-17-2016, 09:38 AM
#6
Nice Work!!!
The following users liked this post:
DerekL (04-22-2016)