
How do you remove the front shocks on a 2014?
 07-17-2014, 10:30 PM
#21
Senior Member


 07-18-2014, 04:51 PM
#23
here's the deal ... if you are going to undo the LCA from the frame, then keep the LCA connected to the steering knuckle, and keep the steering knuckle connected to the UCA ... you will need a jack stand or something to support LCA and the rest of the assembly while you've got it undone, but that's easy to do.
Only if you're going to "try" to pivot the LCA down far enough to remove the shock/strut should you undo the lower ball joint from the LCA ... but as I said, that's the harder way to do it because of the vertical bolts on the strut. Then imagine adding 1.5 to 2" of length to it (spacer) and trying to get it back in place? LOL
Ps. you will still need to undo the tie rods and the sway bar links to pivot the LCA down ... just leave the UCA, knuckle, and LCA all connected ... just support the wheel hub and/or the LCA while it's disconnected from the frame to keep any undo stresses off the joints ...
07-18-2014, 04:55 PM
#24
Senior Member
on a 2014 you have to rotate the top cap because the bolts on the bottom of the strut are not in line w/ the strut ... they are at about a 10 degree angle ... so the shock MUST be mounted in the same position as before. I'm going to draw a picture in cad in just a moment to illustrate for you (and whoever else) ...
On the 2013's and previous, with a crossbolt attachment, the shock can just be turned as a whole ... that's what's wrong with his instructions ... he hasn't upgraded them for 2014's ..
On the 2013's and previous, with a crossbolt attachment, the shock can just be turned as a whole ... that's what's wrong with his instructions ... he hasn't upgraded them for 2014's ..
07-18-2014, 05:58 PM
#25
Senior Member
ok, here it is ...
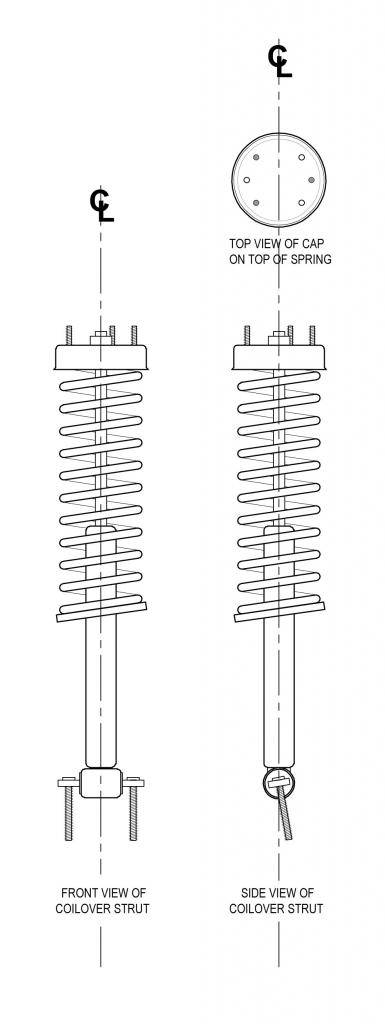
As you can see, from the "front view", the bolts are vertical ... but from the side view, they are rotated to an angle of about 10 degrees or so (best guess), and they are FIXED in place, meaning that they do not rotate. So, the strut on either side (driver/passenger) has to be inserted into place with the bolts facing the same direction as they were when you took it out (which is inward towards the truck).
For this reason, you have to rotate ONLY the top cap. Look at that portion of the drawing ... there are 3 bolts on top that are part of the cap assembly - represented by the circles that are NOT filled w/ shading. When you put the spacer on, the bolt pattern is opposite of these bolts (at least on the 1.5" spacer that I got from Autospring). This is because the bolts on top of the strut cap are longer than the space from top to bottom of the spacer. There are holes on top of the spacer to let the bolts stick thru just a little bit. Kevin (Autospring) has the bolt pattern twisted 180 degrees so that the new bolts (that are part of the spacer, welded to it) are out of the way of the factory bolts. THEREFORE you have to rotate the CAP ONLY 180 degrees to get the bolts on the spacer into the same position that the strut bolts were, and so that they will line up with the holes in the frame mount where the top of strut goes.
Now, if you do a 2" or 2.5" kit, it may be tall enough that the bolts on the spacer are already in the proper positions, and do not have to be adjusted by rotating the strut cap.
Hope that helps you understand how it works on the 2014's ...
The following 2 users liked this post by Wiggum:
Damn Dirty Ape (07-19-2014),
wags259 (07-22-2014)
07-18-2014, 06:08 PM
#26
Senior Member
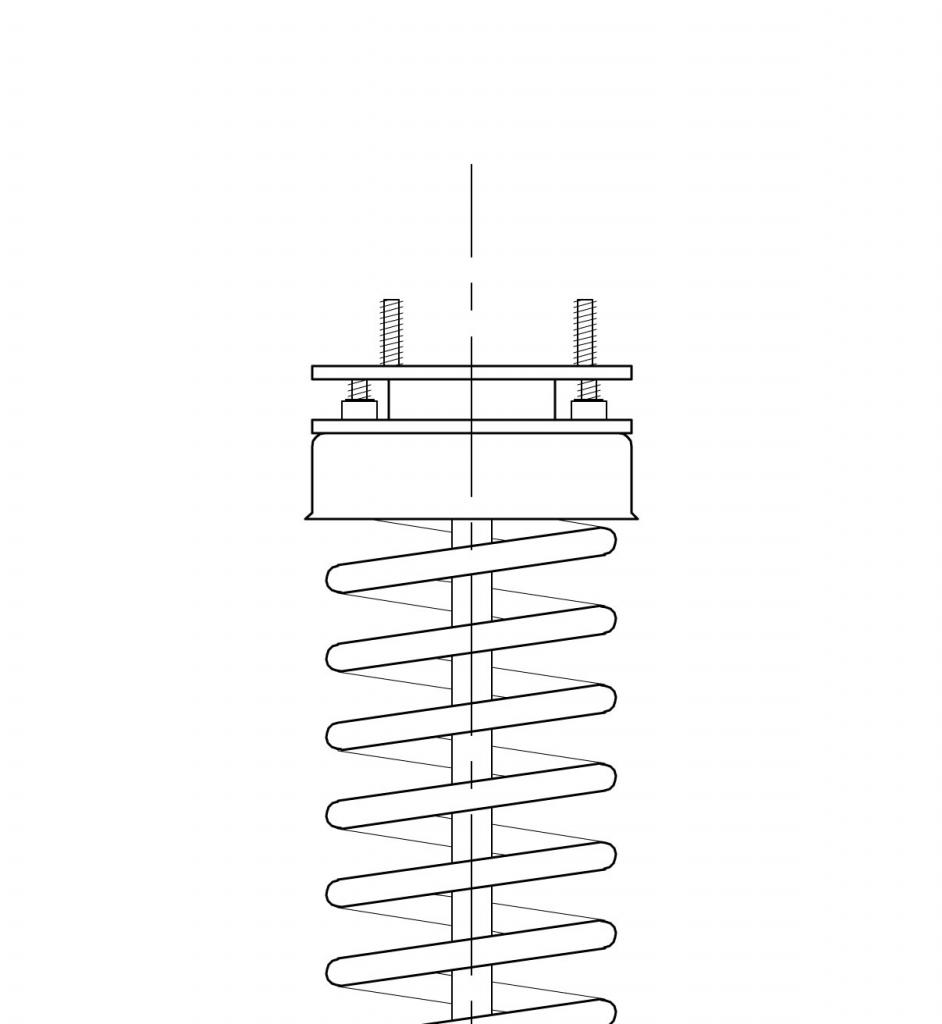
ok, one more ... this one shows the top of the strut w/ the spacer on it ... it really doesn't show you a whole hell of a lot, but it's just to illustrate how the bolts on top of the spacer are going to be out of wack with respect to how they should be when you first mount the spacer on there. It's only after you rotate it 180 degrees that everything is back in line and ready to be put back on the truck.
The following users liked this post:
Damn Dirty Ape (07-19-2014)
07-18-2014, 06:49 PM
#27
ok, one more ... this one shows the top of the strut w/ the spacer on it ... it really doesn't show you a whole hell of a lot, but it's just to illustrate how the bolts on top of the spacer are going to be out of wack with respect to how they should be when you first mount the spacer on there. It's only after you rotate it 180 degrees that everything is back in line and ready to be put back on the truck.
One other question, any thoughts on having this ready when getting an alignment for the tech to install? It allows to more precise adjustments apparently.
Moog K100025 Alignment Caster/Camber Kit by Moog
07-18-2014, 09:22 PM
#28
Custom User Title!
Thread Starter
ok, here it is ...
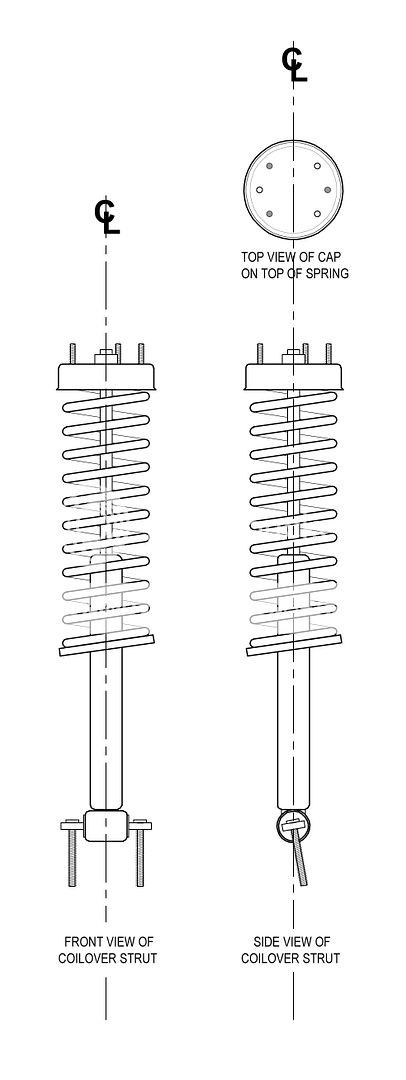
As you can see, from the "front view", the bolts are vertical ... but from the side view, they are rotated to an angle of about 10 degrees or so (best guess), and they are FIXED in place, meaning that they do not rotate. So, the strut on either side (driver/passenger) has to be inserted into place with the bolts facing the same direction as they were when you took it out (which is inward towards the truck).
For this reason, you have to rotate ONLY the top cap. Look at that portion of the drawing ... there are 3 bolts on top that are part of the cap assembly - represented by the circles that are NOT filled w/ shading. When you put the spacer on, the bolt pattern is opposite of these bolts (at least on the 1.5" spacer that I got from Autospring). This is because the bolts on top of the strut cap are longer than the space from top to bottom of the spacer. There are holes on top of the spacer to let the bolts stick thru just a little bit. Kevin (Autospring) has the bolt pattern twisted 180 degrees so that the new bolts (that are part of the spacer, welded to it) are out of the way of the factory bolts. THEREFORE you have to rotate the CAP ONLY 180 degrees to get the bolts on the spacer into the same position that the strut bolts were, and so that they will line up with the holes in the frame mount where the top of strut goes.
Now, if you do a 2" or 2.5" kit, it may be tall enough that the bolts on the spacer are already in the proper positions, and do not have to be adjusted by rotating the strut cap.
Hope that helps you understand how it works on the 2014's ...
As you can see, from the "front view", the bolts are vertical ... but from the side view, they are rotated to an angle of about 10 degrees or so (best guess), and they are FIXED in place, meaning that they do not rotate. So, the strut on either side (driver/passenger) has to be inserted into place with the bolts facing the same direction as they were when you took it out (which is inward towards the truck).
For this reason, you have to rotate ONLY the top cap. Look at that portion of the drawing ... there are 3 bolts on top that are part of the cap assembly - represented by the circles that are NOT filled w/ shading. When you put the spacer on, the bolt pattern is opposite of these bolts (at least on the 1.5" spacer that I got from Autospring). This is because the bolts on top of the strut cap are longer than the space from top to bottom of the spacer. There are holes on top of the spacer to let the bolts stick thru just a little bit. Kevin (Autospring) has the bolt pattern twisted 180 degrees so that the new bolts (that are part of the spacer, welded to it) are out of the way of the factory bolts. THEREFORE you have to rotate the CAP ONLY 180 degrees to get the bolts on the spacer into the same position that the strut bolts were, and so that they will line up with the holes in the frame mount where the top of strut goes.
Now, if you do a 2" or 2.5" kit, it may be tall enough that the bolts on the spacer are already in the proper positions, and do not have to be adjusted by rotating the strut cap.
Hope that helps you understand how it works on the 2014's ...
07-19-2014, 10:32 AM
#30
Senior Member
the "piece" that holds the bolts on MY struts did not rotate. It had a little play in it but there was not enough to allow us to just rotate the entire strut.