
How-to: Mini H1 Projector Retrofit
 09-07-2011, 03:35 AM
#11
 09-22-2011, 10:46 AM
#12
Member

Join Date: Feb 2008
Posts: 32
Likes: 0
Received 0 Likes
on
0 Posts

Are there any alternatives for the rotational aiming process in step 4 ? Where I am there is absolutely no level spots to use. Can the projectors be lined up with the horizontal lines within the bucket, for example ?? As in Level the bucket horizontal line and then level the top of the projector and tighten up ?? Just trying to find another way to do this. Thanks
09-23-2011, 01:53 AM
#13
Are there any alternatives for the rotational aiming process in step 4 ? Where I am there is absolutely no level spots to use. Can the projectors be lined up with the horizontal lines within the bucket, for example ?? As in Level the bucket horizontal line and then level the top of the projector and tighten up ?? Just trying to find another way to do this. Thanks
09-26-2011, 11:16 PM
#14
Member
Join Date: Feb 2008
Posts: 32
Likes: 0
Received 0 Likes
on
0 Posts
Materials needed:
-MiniH1 complete kit from theretrofitsource.com
-oven
-large flathead
-1 tube of high temp. Epoxy
-large roll of butyl tape sealant
-small hex screw driver (T20 i believe)
-clamps or very large zip-ties
-4mm socket
-4 to 6 hours of free time and some beer!
-MiniH1 complete kit from theretrofitsource.com
-oven
-large flathead
-1 tube of high temp. Epoxy
-large roll of butyl tape sealant
-small hex screw driver (T20 i believe)
-clamps or very large zip-ties
-4mm socket
-4 to 6 hours of free time and some beer!
If I may ask, what brand of Hi Temp Epoxy did you use for this project ??
Thanks
10-02-2011, 11:59 PM
#16
Member
Join Date: Feb 2008
Posts: 32
Likes: 0
Received 0 Likes
on
0 Posts
STEP 2: MOUNTING THE PROJECTOR
First, you must remove the bulb-shield using the hex screw-driver.

Once its off, grab the projector and fit it into the bulb hole. It should be pretty obvious how it works. Now, I found that the H13 adapter is somewhat useless. So I took the thinish metal washer that came with the kit, trimmed it down with shears, and use it to mount the projector with the provided nut. It must be trimmed so you can slide it on, get the nut on tight, and get the bulb holder (thingy with 3 little screws) back on the projector securely. If you cant get the bulb holder on flush, the bulb wont sit right in the projector and you won�t get the full output of light. Once mounted, it looks like this:
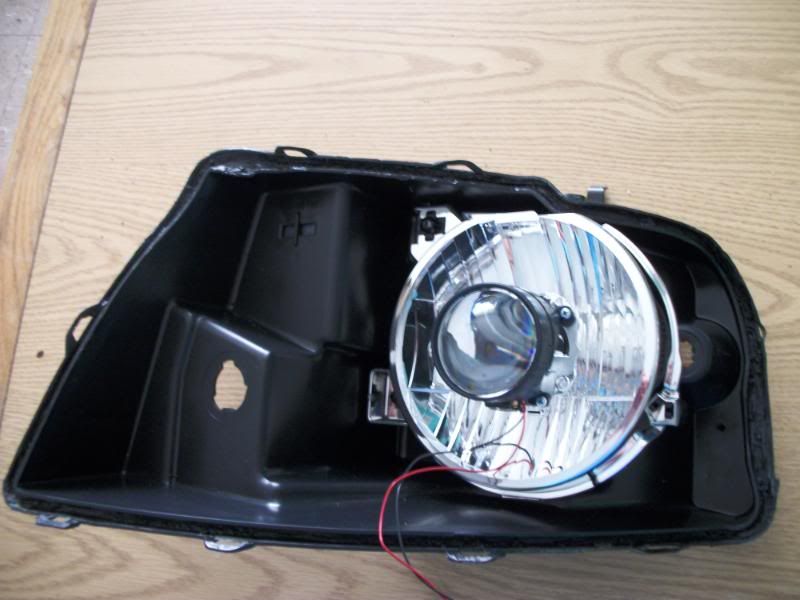
You must also drill a tiny hole I in the reflector to put the high-beam wires through. They will also need to be put through the headlight bucket, also through a small drilled hole.
STEP 3: WIRING UP BALLASTS
There are other guides on how to do this with provided pictures, and it is pretty idiot proof. Simply string the wiring harness across the truck and secure it to other harnesses using zip-ties. Mount the ballasts using the provided bolt-on accessories, or by using high strength glue or cement ontop of the frame (I mounted ballasts for my fogs this way).
STEP 4: AIMING PROJECTORS
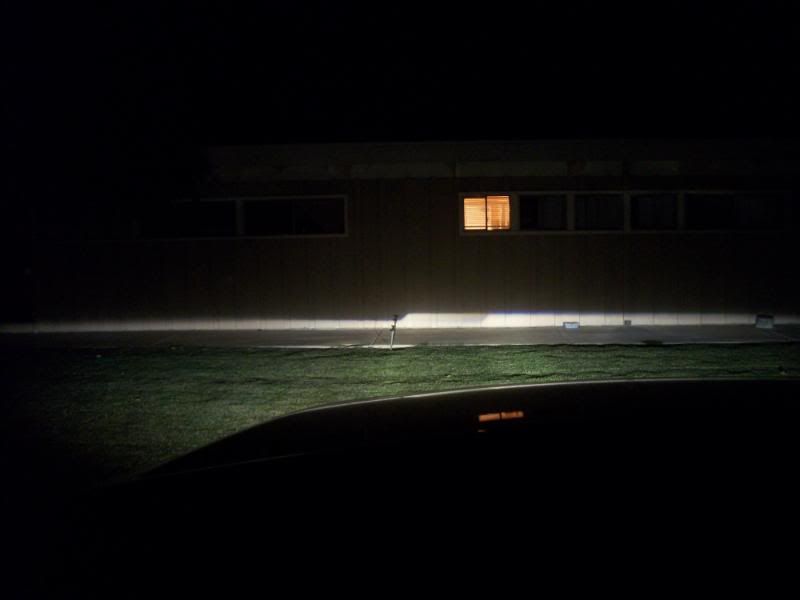
This is the most important step, do not rush this. Take the headlight bucket that you have mounted the projectors to and install it back onto your truck. You need to be on a completely flat surface with a wall of some sort in front of you and it should be somewhat dark out. To start, install the HID bulbs into the projector and hook them up to the ballasts. Turn on the headlights, make sure both bulbs fire up. Wait about 30 seconds for them to warm up. Pull the truck up as close to the wall as you can get. Now, shift the projectors so that cutoff lines are perfectly flat (rotational alignment).Put tape on the wall along the cutoff lines of both projectors (maybe 12-15� of tape per side) and also put a small vertical piece of tape where the �step� in the cutoff is. Now reverse the truck so you are 25ft from the wall. The cutoff will be in different spots, and the goal is to get them aimed 2-3� below the tape line (lifted guys should do 4� drop since the truck is higher). You want the steps to be on the vertical tape lines to insure the projectors are pointed straight, and the cutoff lines should be FLAT and 3� below your tape. Shift the projectors rotationally to adjust the rotation, and use the 4mm bolt on the back of the headlight bucket to shift them up or down.
Here is what the Mini H1 output will look like (this is my fogs, your headlights will obviously be aimed higher):
First, you must remove the bulb-shield using the hex screw-driver.
Once its off, grab the projector and fit it into the bulb hole. It should be pretty obvious how it works. Now, I found that the H13 adapter is somewhat useless. So I took the thinish metal washer that came with the kit, trimmed it down with shears, and use it to mount the projector with the provided nut. It must be trimmed so you can slide it on, get the nut on tight, and get the bulb holder (thingy with 3 little screws) back on the projector securely. If you cant get the bulb holder on flush, the bulb wont sit right in the projector and you won�t get the full output of light. Once mounted, it looks like this:
You must also drill a tiny hole I in the reflector to put the high-beam wires through. They will also need to be put through the headlight bucket, also through a small drilled hole.
STEP 3: WIRING UP BALLASTS
There are other guides on how to do this with provided pictures, and it is pretty idiot proof. Simply string the wiring harness across the truck and secure it to other harnesses using zip-ties. Mount the ballasts using the provided bolt-on accessories, or by using high strength glue or cement ontop of the frame (I mounted ballasts for my fogs this way).
STEP 4: AIMING PROJECTORS
This is the most important step, do not rush this. Take the headlight bucket that you have mounted the projectors to and install it back onto your truck. You need to be on a completely flat surface with a wall of some sort in front of you and it should be somewhat dark out. To start, install the HID bulbs into the projector and hook them up to the ballasts. Turn on the headlights, make sure both bulbs fire up. Wait about 30 seconds for them to warm up. Pull the truck up as close to the wall as you can get. Now, shift the projectors so that cutoff lines are perfectly flat (rotational alignment).Put tape on the wall along the cutoff lines of both projectors (maybe 12-15� of tape per side) and also put a small vertical piece of tape where the �step� in the cutoff is. Now reverse the truck so you are 25ft from the wall. The cutoff will be in different spots, and the goal is to get them aimed 2-3� below the tape line (lifted guys should do 4� drop since the truck is higher). You want the steps to be on the vertical tape lines to insure the projectors are pointed straight, and the cutoff lines should be FLAT and 3� below your tape. Shift the projectors rotationally to adjust the rotation, and use the 4mm bolt on the back of the headlight bucket to shift them up or down.
Here is what the Mini H1 output will look like (this is my fogs, your headlights will obviously be aimed higher):
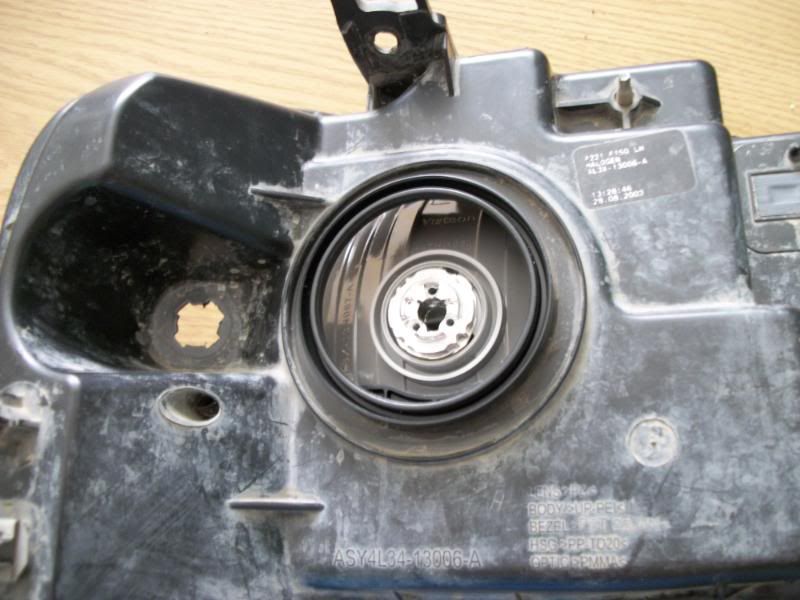
From pic #6..other than the big rubber grommet and the bulb obliviously, do you use anything to keep moisture from getting in from behind. The original setup with the H13 Bulb, the bulb has a large rubber seal on the base. Any thoughts on this?? The reason I ask is because I now have Retro FX-R setup and have gotten some moisture into the projector through the back of the light. Any thoughts ?? Thanks
10-10-2011, 03:33 PM
#17
Senior Member
Thread Starter
From pic #6..other than the big rubber grommet and the bulb obliviously, do you use anything to keep moisture from getting in from behind. The original setup with the H13 Bulb, the bulb has a large rubber seal on the base. Any thoughts on this?? The reason I ask is because I now have Retro FX-R setup and have gotten some moisture into the projector through the back of the light. Any thoughts ?? Thanks
11-30-2011, 10:12 AM
#19
Senior Member
http://www.theretrofitsource.com/pro...roducts_id=141
What selections should i make in the ballasts, bulbs, angeleyes, etc selection area. What options would you suggest. and Did you just put the miniH1 bulbs in the fog light spot.
What selections should i make in the ballasts, bulbs, angeleyes, etc selection area. What options would you suggest. and Did you just put the miniH1 bulbs in the fog light spot.
01-05-2012, 11:05 PM
#20

Anyone have an issue with the jam nut being wrong for the projector? Mine seems coarse thread while the projector threads seem fine. And the nut might be slightly oversize as there is a LOT of slop and wiggle between the jam nuts and the prejectors. I can't get them more than finger tight before the nut jumps threads.
I'll be contacting theretrofit people, but just wondered if anyone else experienced this?
Also, with no included directions I'm assembling it:
Projector - thick white rubber gasket - housing - big metal washer - jam nut.
Is that right? It's the only way I see to make it work right now.
I'll be contacting theretrofit people, but just wondered if anyone else experienced this?
Also, with no included directions I'm assembling it:
Projector - thick white rubber gasket - housing - big metal washer - jam nut.
Is that right? It's the only way I see to make it work right now.