Serpentine Belt replacement
#1
I have a 2015 F-150 XLT, 5.0. Replacing the outer serpentine belt. The one that runs around the alternator among other things. The inner belt tensioner is obvious, How does one release the tension on the main outer belt. I really dont want to tug on something I shouldn't, much less in the wrong direction. I consulted one of the manuals out there and it was very vague, obviously not for the novice shade tree mechanic. Any info in detail would be appreciated to the utmost.
#2
I have a 2015 F-150 XLT, 5.0. Replacing the outer serpentine belt. The one that runs around the alternator among other things. The inner belt tensioner is obvious, How does one release the tension on the main outer belt. I really dont want to tug on something I shouldn't, much less in the wrong direction. I consulted one of the manuals out there and it was very vague, obviously not for the novice shade tree mechanic. Any info in detail would be appreciated to the utmost.
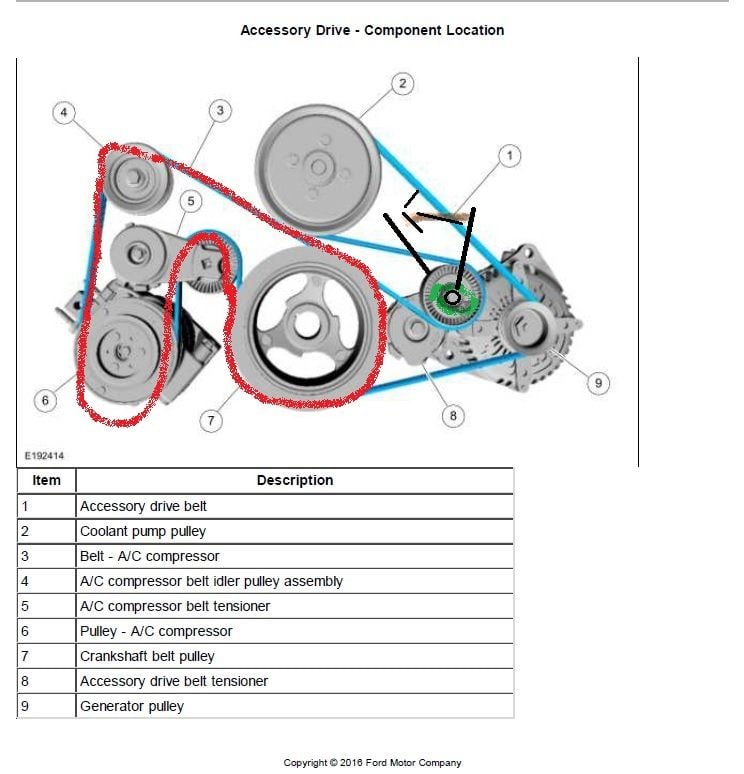
Number 5 or number 8 depending.... I would not be surprised if the bolts on the tensioners were left handed thread if the tensioners need replacing, although I have not done this on this Ford truck.

The following users liked this post:
Kevin O'Neill (04-08-2020)
#3
Thanks for the info, it will be #8 because #5 is for the inner belt which feeds the A/C compressor. it's a misleading pic because unless you knew already you would think there was only on belt but there is in fact two. How hard would it have been for Ford to make the tensioners the same? Question now is, how hard do I need to tug on this bolt to figure it really goes the other way before I sheer it off?
#4

Thanks for the info, it will be #8 because #5 is for the inner belt which feeds the A/C compressor. it's a misleading pic because unless you knew already you would think there was only on belt but there is in fact two. How hard would it have been for Ford to make the tensioners the same? Question now is, how hard do I need to tug on this bolt to figure it really goes the other way before I sheer it off?
For belt replacement (from what I remember on my other truck) find the size of the bolt on which the tensioner pully rotates, using that size socket on your ratchet wrench, pull on the tensioner to loosen the tension on the belt.. Use a rope or a bungy on the end of your wrench to hold the tensioner open so that belt can be slipped off. Make a diagram or take a picture of the belt path so you remember how the new one goes back on.
Last edited by reg boulette; 06-07-2018 at 02:17 PM.
#6

If you are replacing the belt, you do not need to remove the tensioner - just threw that in as on last truck, I did have to replace a tensioner and was luckily warned ahead of time.
For belt replacement (from what I remember on my other truck) find the size of the bolt on which the tensioner pully rotates, using that size socket on your ratchet wrench, pull on the tensioner to loosen the tension on the belt.. Use a rope or a bungy on the end of your wrench to hold the tensioner open so that belt can be slipped off. Make a diagram or take a picture of the belt path so you remember how the new one goes back on.
#7
I need to replace the A/C drive tensioner (#5 in the diagram) on my 2015 5.0. I can't get a socket on the 10mm nut because there's a hydraulic line right in front of the nut. I can't get a wrench on it completely either. How did you get that nut off and back on? Thanks in advance.
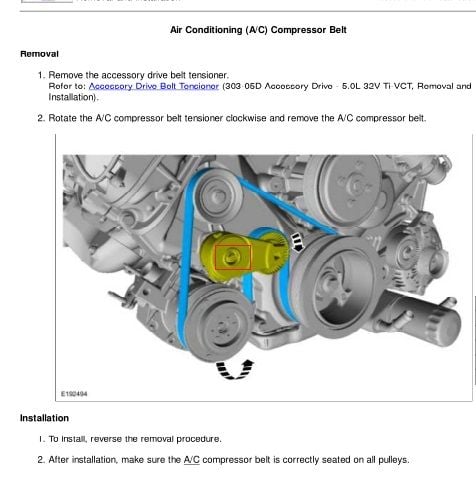
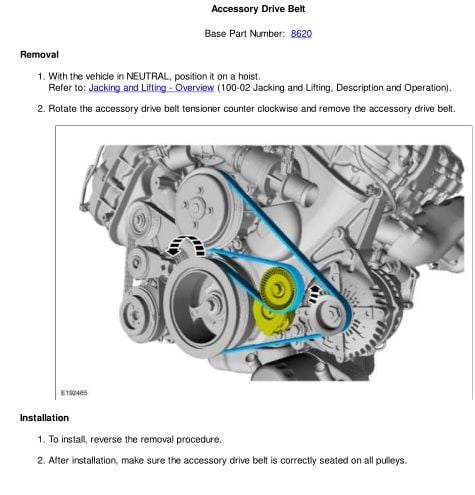
It is easier working from above on the A/C belt system, and working from below with front end on ramps for the Accessories belt system. All regular bolts i.e. no left hand threaded fasteners for idlers, or tensioners. The accessories belt (water pump, alternator ) and tensioner must be removed before the air conditioning belt can be replaced.
Here are some pictures which show belt routing better than post above.


Last edited by reg boulette; 09-06-2020 at 05:52 PM.
The following users liked this post:
mbrick (12-15-2022)
Trending Topics
#8
I just changed belts on 2015 and 2012 Ford F150 with the 5.0.
One vehicle had level kit, the other a lift kit so they were easy to access from underneath in the front, jacking the vehicle up would work too.
Disconnecting the battery is a good idea especially if you have remote start.
Easiest and quickest way I found: Looking at your truck from the front, there's two tensioners, upper left and bottom right.
Crawl under the vehicle legs first, you can get both arms up and head in front of the engine, plenty of room, using a 15 mm socket and 3/8 breaker bar, release tension on bottom right tensioner and remove the belt. I then used a stubby 3/8 Milwaukee impact with a 13 mm socket to remove the bottom right tensioner from the engine. I could not figure out a way to remove the second belt without removing the bottom right tenionser itself because there isn't enough space to get the belt in or out between the crank and this tensioner.
While still underneath the vehicle, use your 3/8 breaker bar and release tension on upper left tensioner and remove the belt. Installation is same as reverse order, I put some thread locker on the tensioner bolt upon re-installation. It only lines up one way because the bottom right tensioner is notched on the back. Double check belt to make sure they are tracking correctly. Have your phone or diagram near you for reference on belt routing. Took me less than thirty minutes doing this way. Having a second pair of hands on top helps to track belts but not necessary.
Tools I used: 18 inch 3/8 breaker bar (purchased from local auto parts), 13 mm socket, 15 mm socket, belts x 2, belt diagram, stubby impact.
Last edited by Ron R; 09-07-2020 at 02:33 PM. Reason: udpated tools used
The following 2 users liked this post by Ron R:
chris24 (08-08-2022),
Especial86 (12-14-2022)
#9
Senior Member
iTrader: (1)
I just changed belts on 2015 and 2012 Ford F150 with the 5.0.
One vehicle had level kit, the other a lift kit so they were easy to access from underneath in the front, jacking the vehicle up would work too.
Disconnecting the battery is a good idea especially if you have remote start.
Easiest and quickest way I found: Looking at your truck from the front, there's two tensioners, upper left and bottom right.
Crawl under the vehicle legs first, you can get both arms up and head in front of the engine, plenty of room, using a 15 mm socket and 3/8 breaker bar, release tension on bottom right tensioner and remove the belt. I then used a stubby 3/8 Milwaukee impact with a 13 mm socket to remove the bottom right tensioner from the engine. I could not figure out a way to remove the second belt without removing the bottom right tenionser itself because there isn't enough space to get the belt in or out between the crank and this tensioner.
While still underneath the vehicle, use your 3/8 breaker bar and release tension on upper left tensioner and remove the belt. Installation is same as reverse order, I put some thread locker on the tensioner bolt upon re-installation. It only lines up one way because the bottom right tensioner is notched on the back. Double check belt to make sure they are tracking correctly. Have your phone or diagram near you for reference on belt routing. Took me less than thirty minutes doing this way. Having a second pair of hands on top helps to track belts but not necessary.
Tools I used: 18 inch 3/8 breaker bar (purchased from local auto parts), 13 mm socket, 15 mm socket, belts x 2, belt diagram, stubby impact.
One vehicle had level kit, the other a lift kit so they were easy to access from underneath in the front, jacking the vehicle up would work too.
Disconnecting the battery is a good idea especially if you have remote start.
Easiest and quickest way I found: Looking at your truck from the front, there's two tensioners, upper left and bottom right.
Crawl under the vehicle legs first, you can get both arms up and head in front of the engine, plenty of room, using a 15 mm socket and 3/8 breaker bar, release tension on bottom right tensioner and remove the belt. I then used a stubby 3/8 Milwaukee impact with a 13 mm socket to remove the bottom right tensioner from the engine. I could not figure out a way to remove the second belt without removing the bottom right tenionser itself because there isn't enough space to get the belt in or out between the crank and this tensioner.
While still underneath the vehicle, use your 3/8 breaker bar and release tension on upper left tensioner and remove the belt. Installation is same as reverse order, I put some thread locker on the tensioner bolt upon re-installation. It only lines up one way because the bottom right tensioner is notched on the back. Double check belt to make sure they are tracking correctly. Have your phone or diagram near you for reference on belt routing. Took me less than thirty minutes doing this way. Having a second pair of hands on top helps to track belts but not necessary.
Tools I used: 18 inch 3/8 breaker bar (purchased from local auto parts), 13 mm socket, 15 mm socket, belts x 2, belt diagram, stubby impact.
looks like Iím just going to order both belts and tensioner since this looks like a layer cake setup.


