When you click on links to various merchants on this site and make a purchase, this can result in this site earning a commission. Affiliate programs and affiliations include, but are not limited to, the eBay Partner Network.
Roughly a month ago, I had started a thread for assistance on PATS programming on a 2015 F150 w/ Push Start and Easy (Passive) Entrance/Exit. Ford IDS is locked down for some procedures, requiring a VSP ID from the NASTF. Older versions of IDS, prior to roughly v110, may have supported PATS security functions offline when no keys are available. However, I couldn't get these older IDS versions to function as Ford requires the software to be updated after it gets so old. All the date & clock resets, and trickery in the world wasn't working without using those software cracks and hacks for IDS, but that's just something I wasn't willing to do. I don't want my expensive hardware blacklisted.
However, for those of you who have an older IDS version working via offline mode, I thought I'd take the time to write up how I gained security access to the vehicle to erase and program the keys on a push-start vehicle. By offline, I’m referring to IDS not requiring running all PATS security functions via the Ford “Cloud”. You will still need an internet connection for certain parts of this, depending on what your goals are.
**You can skip down to the Module Fun! section if you want to save some reading**:
First, let me identify clearly what my projects was. I had a cellular antenna mounted via a specially designed bracket, behind my 3rd brake lights. While I was away for several months from the truck, I left it parked outside. The seal on this bracket broke, and water started coming in. Long story short, when I went to drive my truck after it having sat for a while, the entire interior was covered in mold. It was all over the carpets, seats, plastic trims, etc. It grew on anything with just a wee bit of shade. So, I decided to gut the truck and rebuild the interior. It’s something I had wanted to do anyways since I hated the gray interior and wanted it all to be black. I also wanted to do a console conversion and eliminate the center, front seat. However, as I was working on this, since the truck was parked on a slight incline, where the front of the vehicle was positioned lower than the rear, and the drain holes located under the body wiring harness (under the door jamb treads) was clogged with dirt, the water from the leak stayed in the vehicle and rose high enough to submerge half of my BCM.
My truck did have another problem at the time. The battery would lose its charge if left alone for just a weekend so I was fairly confident that the vehicle was essentially off when the BCM flooded, slowly over a length of time. All the rest of the vehicle electronics were fine after further testing, except the TCCM, located right next to the BCM but I knew I could replace both of them for a several hundred bucks in total. This didn’t greatly concern me as an irreparable problem. It’s more of a great inconvenience...
I went all-out, buying all new interior parts, trims, electronics and modules for the vehicle’s interior. I want ahead and replaced the cab (body) harness, instrument panel harness as well as with the mods I want to do, I’d like the wiring to stay factory whilst I’m in there doing it. That said, I also needed to replace the BCM.
Module Fun!:
Now as I was doing my research for this, I noticed that there are two common tear tags on a majority of 2015 F150s:
PUB0
HGM0
I thought that these might correlate to vehicles built at a specific plant with certain features, but then I found vehicle VINs built in the same plant, near the same time period, with the same trim levels that used different tear tags. However, the tear tags do seem to correlate closely to vehicles with specific topologies, such as dual vs manual climate or column vs console shift), not necessarily the trim level, even if built in different factories. HGM0 seems to be very common in vehicles with push button start.
Furthermore, I know that a lot of folks have previously stated that if you replace a BCM with a used one, you need to try and match the models as printed on the back of the BCM. I too thought this was very important, but I would later learn that there is some wiggle room. I ended up buying a used BCM because at the time I purchased it, they were backordered from Ford. That said, when I entered the VIN of my F150 and the VIN of the donor truck into IDS to check for Ford BCM updates, I noticed that the new strategy, calibration, & configuration files all had the same part numbers. I ended up duplicating these files (zipped .vbf files), converting them to binary, and loading them into a hex comparer and was able to determine that these files had the exact same prefixes. I also verified the file signature (SHA256 Sum), which is a great way to determine if two files are identical and they were. This meant that as long as the BCM I purchased had an upgrade path identical to the original BCM, I could upgrade it without necessarily bricking it, and all the features should stay working post-programming. ***The important thing to note is that the BCM you purchase, matches the BCM model range described in the as-built database for the vehicle. You need the as-built file to determine this.
Both my original and new-to-me BCM had used FU5T-14C184-AAH for the Calibration. However, the strategy files (part of the calibration for BCM firmware) did differ but both modules could be upgraded to the new calibration P/N FU5T-14B476-AAR. I downloaded this new calibration twice via each VIN in IDS and noticed that the boatloader, strategy, and other VBF files were all identical. I had no way of determining when the original strategy files were released. I would imagine that they differed simply because the vehicles were not released at the same time and there was a new version by the time one of them rolled off the factory floor. Now obviously, the as-built configuration will be different between each vehicle, but both vehicles (My F150 and the donor), with their different options, can run the same firmware in their respective "original" BCMs. This greatly reduces the difficulty in finding a compatible BCM (provided you have the means to properly upgrade them to ensure compatibility). In my case, both BCMs were from 2015 F150s. For a 2015, you could potentially use a 2016 BCM if it follows the same "genealogy". The issue isn't likely the ICs inside, but the power handling circuitry that will may have changes between each hardware generation.
Installing the Module:
Now that I’ve identified a module that I believe will work, it’s time to complete the programming. Since I didn’t have the keys to the used BCM, I would have to use the Blank Path Vehicle ID method to gain PATS Security access, to allow me to erase and reprogram two new keys (you must have at least two keys). Also, the VIN in the new BCM was different than my F150 of course. This must also be corrected, or the vehicle will never run.
I wanted to verify the current configuration on the BCM before I changed anything, so that I could back it up. I chose to use FORScan for this. You can use the Blank Path Vehicle ID method, vehicle prep steps to allow FORScan to gain limited access to the vehicle modules. It will have Read access for all connected modules & write access to all but the BCM and PCM modules. This allowed me to save the current BCM as-built config so that I could verify what’s in there, in case somebody else had monkeyed with it before. I completed this step first because I had to reconfigure PATS first before I could proceed to module programming.
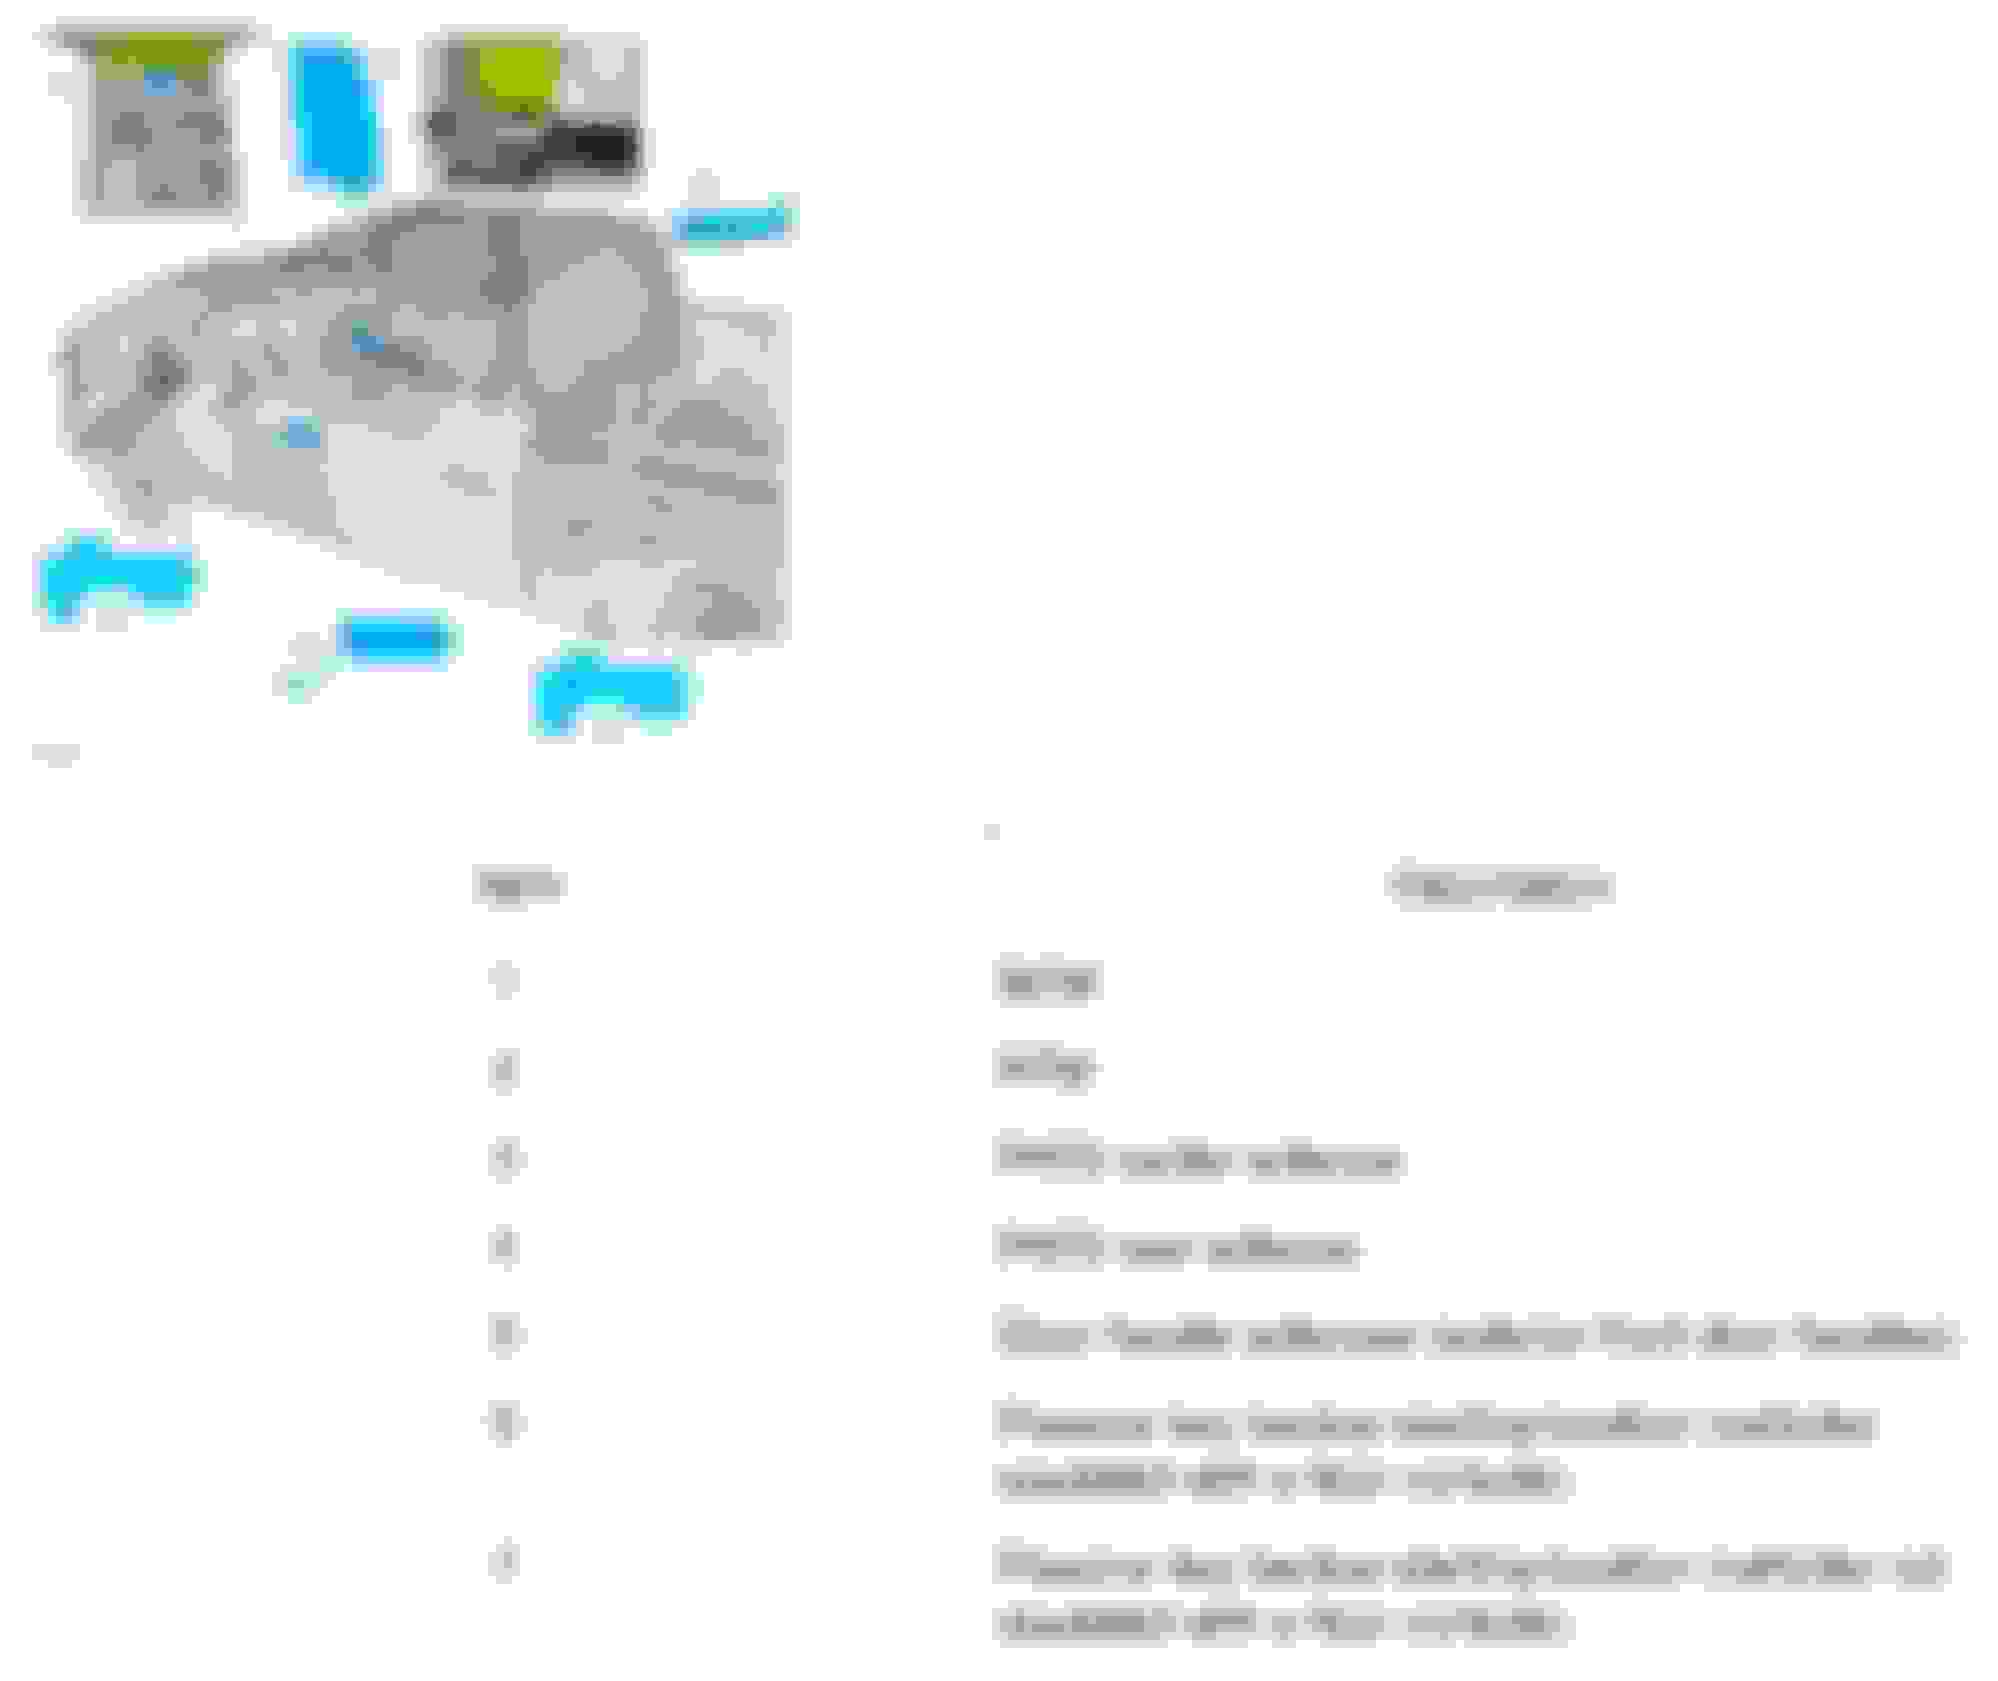
That said, since the new BCM had a different VIN than my vehicle and since I did not want it throwing a bunch of errors with the other modules, I disconnected all modules except for the door modules, the BCM, IPC, RTM (Radio Transmitter Module), and the GWM (Gateway Module w/OBDII port). The PCM is not required to reset PATS in our 2015-2020 F150’s, per the service manual. There are up to 7 components used with PATS on vehicles with push button start (See below image). There may be a 3rd antenna mounted in the tailgate if you have an electronic tailgate release (no pull handle):
PATS Security Components
Items 1, 2, 3 & 4 are required for PATS to operate properly. Your push-start vehicle may not have item 5 (passive entry door handles). Items 6 & 7 are alternates. This is the key programming location (key slot) that utilizes item 3, the PATS center antenna for programming, and in key-battery-dead situations. The antennas and the RTM all wire directly to the BCM; thus, you can successfully reprogram PATS if only the GWM, BCM, IPC, RTM, and respective antennas are left connected.
Gaining Security Access to the vehicle for use with FORScan or the Blank Path Vehicle Identification Method in IDS:
When I started this process, I had not yet connected my steering column and steering wheel, and as I mentioned, a bunch of modules were left disconnected. That works just fine. You will need to connect the push-start button. Even though the IPC will throw some DLCs, I would keep it connected for this procedure.
The first thing you need to do is arm the truck’s alarm. If your vehicle has the ultrasonic alarm sensors, either disconnect them, or cover them for this procedure. Start by closing all doors, hood and tailgate. For the driver door, either roll down the window if you are able, or if you’d like to keep the door open, you can manually position the latch closed with a screwdriver but leave it opened for now. This process will take some time, so I'd recommend that you connect a battery charger for this process. However, leave the charger disconnected for now. Leave the hood open but manually position the hood latch closed. The hood ajar sensor is built into the latch. When it is closed, the BCM identifies the hood as closed.
Last edited by btbutts; Oct 17, 2023 at 09:42 PM.
Reason: Correct typos and adopt better nomenclature
Once you’ve verified that all doors are latched closed, including the vehicle hood and tailgate, except for the driver door, lock the vehicle by using the driver door lock button. Then, within 10 seconds, either close the driver door or position the latch closed. You will hear feedback from the IPC after completing this. This triggers the alarm to arm itself. Wait at least 60 seconds. Make them long, Mississippi seconds!
Then disconnect the battery entirely, including the positive and negative battery posts. Count to 15 Mississippi. Reconnect the battery. Then, immediately open the driver door by using the INSIDE DOOR HANDLE. This will trigger an alarm activation event after about 20 seconds. Immediately close the door or reposition the driver door latch closed with a screwdriver once again. After the about 20 seconds, the horn begins blaring and all exterior and courtesy lights begin to flash. DO NOT disarm the alarm by entering the door key code or any other method. This will stop the alarm event. The alarm event must continue for 10 minutes to gain security access. Immediately set a timer 4 minutes and 30 seconds once the alarm begins. You may disconnect the horn via the horn connecter behind the front grille if you’d like to eliminate the horn noise. However, it will stop in about 30 seconds. The lights will continue to flash. You can also go ahead and connect your battery charger at this time, if preferred.
There is a battery saver feature that will stop the alarm event after 5 minutes. After the 4 minute and 30 second timer has elapsed, open and close the driver door using the INSIDE DOOR HANDLE, then reposition the door latch closed or close the door. This will prevent the alarm event from terminating. After a minute has lapsed from the time you reopened and closed the door midway through the 10-minute period, you can go ahead and reconnect the horn at this time. It will not be blaring anymore. There is a single horn chirp you’ll need to listen for in a bit to indicate that 1 minute programming window has begun so it's good to have this ready.
After the 10-minute period has lapsed, the horn will chirp once, and the lights will stop flashing. (Note: There may be a small delay after lights stop flashing before the horn chirps to indicate the 1-minute window has begun. It should take no longer than 30 seconds. Don't start a FORScan session or start the PATS Procedure until this chirp is heard.) Then, place one of the keys in the programming location (Shown via item 6 or 7) in the image above. Press the start/stop button (do not push the brake). The IPC will display a message that no key is detected. This is normal. The IPC will also appear to be off as if the vehicle is not in run mode. This is also normal. Push Start vehicles are programmable even in a "key-off" state. Cycling the ignition cycles the BCM through its various states.
You may now initiate a connection via your scan tool, such as FORScan, for mainly read access, or if you’re ready to program the vehicle & PATS, then proceed with the Blank Path Vehicle Method in IDS. You only have 1-minute to gain access once that short window begins so you might find it necessary to prepare IDS/FORScan during the 10-minute waiting period described above. Just don't start a session to the vehicle until the 1-minute window begins or the 10-minute process will restart.
Last edited by btbutts; Oct 17, 2023 at 08:13 PM.
Reason: Correct typos and adopt better nomenclature
Blank Path Vehicle Identification Method in IDS (with used BCM)
This involves using the BCM tear tag and VIN to program PATS security functions. You can get the tear tag for the new BCM via the as-built DB here.
I found that the easiest way to do this is to start a new session the normal way in IDS. It will fail of course and display a message that no vehicle is detected. Press the checkmark to retry. Shortly, IDS will ask you if you’d like to proceed by identifying the vehicle with the VIN, tear tag, or part number from the PCM.
Choose the option to identify the vehicle with its tear tag and select the checkmark. Give it a few moments and it will load a new page asking for the VIN, RO, & Mileage. You only need the last 8 characters of the VIN. Disregard the other fields. Ensure that you use the tear tag and VIN associated with the donor vehicle's BCM. After that, IDS will take some time to load and then bring you to the vehicle session menu. Open the PATS security menu under tools and then choose the option “Erase and Program Keys".
You will be required to provide a NASTF ID to proceed with this option. You'll login to Ford first. This will be the same credential you use for www.motorcraftservice.com. Note: If you have an owner.ford.com account and have never visited www.motorcraftservice.com whilst logged in, make sure you do that separately first as there are some specific user fields that must be filled out to complete your account setup.
Once you've signed into Ford, another popup will appear asking for the NASTF ID. This popup may appear behind the IDS window so you may need to minimize IDS to see it. There will be no taskbar icon for this credential window.
When IDS attempts to gain access to the vehicle, the alarm will likely go off again (in my experience), and IDS will say that the vehicle connection has failed. This is normal. IDS often takes longer to load everything than the 1-minute security interval by the BCM allows. You will simply need to set another 4 minute, 30 second timer, starting from the moment the alarm starting blaring again, and proceed with step 3 from the “Gaining Security Access to the Vehicle” instructions above.
Once you’ve completed the “Gaining Security Access to the Vehicle” process again, proceed with the steps as described in IDS and with any luck, it should work, and you should get a message that all keys have been erased successfully. Once this occurs, you can breathe a little easier. Once IDS has gained security access, you’re in, regardless of the 1-minute window. Go ahead and program the new keys.
Next Steps…
Now that the keys are programmed, you can proceed by upgrading and reprogramming the BCM. Full security access is required for these functions to work, in my experience, which means that the vehicle is in a key on, engine off condition. The PATS programming will be retained after a module upgrade and the as-built data written to it to correct the VIN. This is because the PATS programming is stored elsewhere in the BCM memory.
I hope this helps anyone else that has struggled with the Blank Path Vehicle ID method. The service manual discusses this procedure, but it’s never gone entirely like Ford describes it in the real world. Cheers!
Last edited by btbutts; Oct 17, 2023 at 08:29 PM.
Reason: Correct typos and adopt better nomenclature