

Fuse panel removal

Thread Starter
Member

Joined: Apr 2012
Posts: 52
Likes: 3
From: North Carolina
I've got a 2017 F150 super crew that has a blockage in the passenger side sunroof drain line. I've tried everything I can think of to clear it but no luck so far. I'm trying to remove the line where it exits the cab. I've found where it does but it seems like I need to remove the passenger side fuse block that's behind the kick panel. Does anyone know how to remove it or how to remove that drain line without removing the fuse block?
Senior Member


Joined: Jul 2018
Posts: 14,630
Likes: 8,822
From: My House
BCM Removal. This is a copy/paste so the formatting will probably be out of whack.Removal
NOTE
Removal steps in this procedure may contain installation details.
 Click here to learn about symbols, color coding, and icons used in this manual.
 Click here to learn about symbols, color coding, and icons used in this manual.
 Click here to learn about symbols, color coding, and icons used in this manual.

NOTE
Removal steps in this procedure may contain installation details.
- NOTE
If the BCM (body control module) did not respond to the diagnostic scan tool, As-Built Data may need to be entered as part of the repair. This step is only necessary if the BCM (body control module) is being replaced
NOTE
If equipped, the PAM (parking assist control module) is integral to the BCM (body control module) . This step is only necessary if the BCM (body control module) is being replaced.
Using a diagnostic scan tool, begin the PMI (programmable module installation) process for the BCM (body control module) following the on-screen instructions.
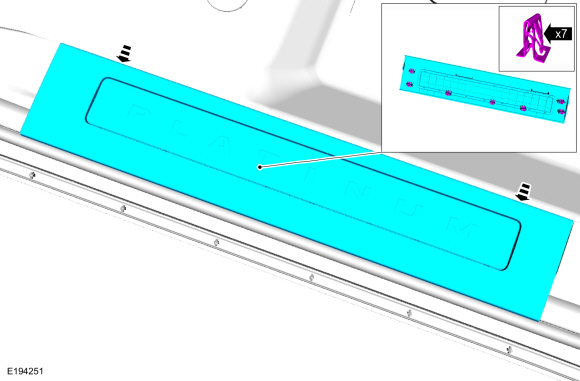
- Release the clips and remove the RH (right-hand) side front scuff plate.
Click here to learn about symbols, color coding, and icons used in this manual.-
- Position aside the weather strip.
- Remove the BCM (body control module) access cover.
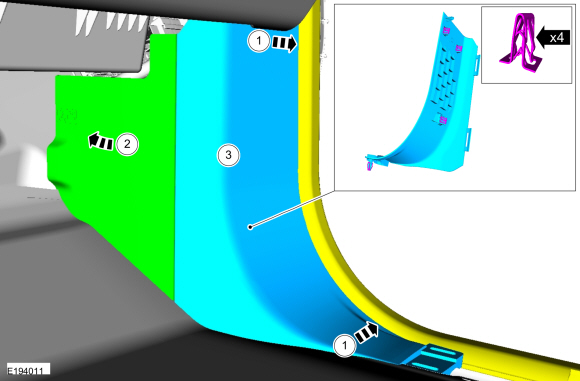
- Release the 4 clips and remove the RH (right-hand) side lower cowl trim panel.
- Position aside the weather strip.
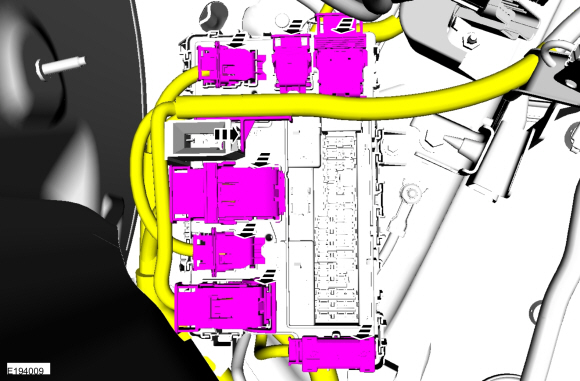
Click here to learn about symbols, color coding, and icons used in this manual.- Disconnect the electrical connectors.
- Release the harness retainer.
- Release the harness retainer.
Click here to learn about symbols, color coding, and icons used in this manual.- Remove the bolt and the BCM (body control module) .
Thread Starter
Member
Joined: Apr 2012
Posts: 52
Likes: 3
From: North Carolina
Thanks for the reply. I finally found where the drain exits behind the wheel well (had to get my daughter to help as I needed another set of eyes). Blew out something hard (some type of small hard berry or nut). Sounded like BB when it hit my toolbox LOL. Also blew out a wad of gunk/trash on the drivers side. Drains like new now.