Random crap I'm doing to my '03 Lariat SuperCrew
 08-09-2013, 08:52 PM
#11
Member
Thread Starter

Join Date: Nov 2012
Posts: 77
Likes: 0
Received 0 Likes
on
0 Posts

If you're wanting black lights these are the way to go, the black housing gives you that dark look, but the clear lens does t kill the light output like those smoked ones would. I have them on mine and love the quality and output.
http://item.mobileweb.ebay.com/viewi...w=321181903433
http://item.mobileweb.ebay.com/viewi...w=321181903433
 08-09-2013, 11:11 PM
#12
Member
Thread Starter
Join Date: Nov 2012
Posts: 77
Likes: 0
Received 0 Likes
on
0 Posts
Finished up the stereo wiring harness tonight. Normally I'd heatshrink off all the connections, but I didn't have any. I did have liquid electrical tape though, so I just soldered everything solid and went with that to insulate everything. For those keeping score, the Mute line on the stereo harness, and the Dimmer Ground and Amp Ground lines on the truck harness went unconnected.
I installed a MicroBypass parking brake bypass (the little black packet) for the unit by line tapping the amp/system remote signal (the little red clip on the blue wire), and left some extra hanging out for when I ultimately do install an amp. I took the excess parking brake wire that was left over after patching in the bypass (the long green wire) and mated it onto the reverse signal line (purple) so I have some slack I can ultimately run over to a fuse tap for the reverse lights for switching on the backup camera I'm installing.
Short and sweet.
08-11-2013, 10:10 PM
#14
Member
Thread Starter
Join Date: Nov 2012
Posts: 77
Likes: 0
Received 0 Likes
on
0 Posts
Got started on stereo work in the dash today. Attaching some before and during pictures. The dash insert popped off no problem. Took the opportunity to clean everything out really well to help get rid of smoke smells too (there was a lot of "smoke dust" inside everything there). Pulled the stereo with a couple pieces of wire hanger (simpler and cheaper than buying the premade versions).
I ended up cutting out about 1/2" of the top of the opening out to make way for the new head unit. Didn't have a Dremel handy, but a rotary saw worked fine for me, if it was a little sloppier than it would have been otherwise. At least for my head unit, I didn't have to remove or otherwise modify the space at all for it to fit. All the lines dropped straight down the opening in the back, and I've stored them behind the black kick panel on the floor for now (it's pretty easy to get the a hand up behind there and run the lines down). The microphone for the handsfree functionality was ran under the dash and up the A pillar, then mounted to the sun visor.
So, the head unit is in now, but I didn't take a picture of the finished product yet because I'm not overly happy just yet. I ran into a couple specific issues I need to address. The first is that my parking brake bypass has a short somewhere. It was working sporadically, until it stopped completely. So I have a feeling I'm gonna pull and resolder the wiring harness to check that. The second issue I ran into was that the dash kit bezel was too tight, even after trying to trim the hell out of it. Ultimately, I think I need to file down about 1/16" off the bottom of the stereo opening so the head unit sits just a tad lower. This head unit has the full slide down display to put disks in, and with the bezel on, it's too tight - it needs some space so that it can clear the edges and drop down. All a shame too, because the dash kit otherwise looked great in place.
For those interested, and I'll show in the finished pic later, the AVH-X4500BT has the ability to customize the interface and button colors, which is cool because you can basically get it to match almost perfectly the green of the dash/climate controls.
08-12-2013, 12:54 AM
#15
Senior Member
Got started on stereo work in the dash today. Attaching some before and during pictures. The dash insert popped off no problem. Took the opportunity to clean everything out really well to help get rid of smoke smells too (there was a lot of "smoke dust" inside everything there). Pulled the stereo with a couple pieces of wire hanger (simpler and cheaper than buying the premade versions).
I ended up cutting out about 1/2" of the top of the opening out to make way for the new head unit. Didn't have a Dremel handy, but a rotary saw worked fine for me, if it was a little sloppier than it would have been otherwise. At least for my head unit, I didn't have to remove or otherwise modify the space at all for it to fit. All the lines dropped straight down the opening in the back, and I've stored them behind the black kick panel on the floor for now (it's pretty easy to get the a hand up behind there and run the lines down). The microphone for the handsfree functionality was ran under the dash and up the A pillar, then mounted to the sun visor.
So, the head unit is in now, but I didn't take a picture of the finished product yet because I'm not overly happy just yet. I ran into a couple specific issues I need to address. The first is that my parking brake bypass has a short somewhere. It was working sporadically, until it stopped completely. So I have a feeling I'm gonna pull and resolder the wiring harness to check that. The second issue I ran into was that the dash kit bezel was too tight, even after trying to trim the hell out of it. Ultimately, I think I need to file down about 1/16" off the bottom of the stereo opening so the head unit sits just a tad lower. This head unit has the full slide down display to put disks in, and with the bezel on, it's too tight - it needs some space so that it can clear the edges and drop down. All a shame too, because the dash kit otherwise looked great in place.
For those interested, and I'll show in the finished pic later, the AVH-X4500BT has the ability to customize the interface and button colors, which is cool because you can basically get it to match almost perfectly the green of the dash/climate controls.
I ended up cutting out about 1/2" of the top of the opening out to make way for the new head unit. Didn't have a Dremel handy, but a rotary saw worked fine for me, if it was a little sloppier than it would have been otherwise. At least for my head unit, I didn't have to remove or otherwise modify the space at all for it to fit. All the lines dropped straight down the opening in the back, and I've stored them behind the black kick panel on the floor for now (it's pretty easy to get the a hand up behind there and run the lines down). The microphone for the handsfree functionality was ran under the dash and up the A pillar, then mounted to the sun visor.
So, the head unit is in now, but I didn't take a picture of the finished product yet because I'm not overly happy just yet. I ran into a couple specific issues I need to address. The first is that my parking brake bypass has a short somewhere. It was working sporadically, until it stopped completely. So I have a feeling I'm gonna pull and resolder the wiring harness to check that. The second issue I ran into was that the dash kit bezel was too tight, even after trying to trim the hell out of it. Ultimately, I think I need to file down about 1/16" off the bottom of the stereo opening so the head unit sits just a tad lower. This head unit has the full slide down display to put disks in, and with the bezel on, it's too tight - it needs some space so that it can clear the edges and drop down. All a shame too, because the dash kit otherwise looked great in place.
For those interested, and I'll show in the finished pic later, the AVH-X4500BT has the ability to customize the interface and button colors, which is cool because you can basically get it to match almost perfectly the green of the dash/climate controls.
08-12-2013, 01:26 AM
#16
Member
Thread Starter
Join Date: Nov 2012
Posts: 77
Likes: 0
Received 0 Likes
on
0 Posts
Yeah, but luckily that's a pretty painless process, all things being equal. Fixing the bezel issue won't be that bad. I'm mostly just hoping the brake bypass doesn't have a short inside the package itself, because I'm pretty confident that my wiring is rock solid.
On the plus side, even as it is, it looks pretty good in the dash. It sounds great, and I've got some new 6x8s coming for the doors to give them a nice little boost too.
On the plus side, even as it is, it looks pretty good in the dash. It sounds great, and I've got some new 6x8s coming for the doors to give them a nice little boost too.
08-12-2013, 02:32 AM
#17
Senior Member
Yeah, but luckily that's a pretty painless process, all things being equal. Fixing the bezel issue won't be that bad. I'm mostly just hoping the brake bypass doesn't have a short inside the package itself, because I'm pretty confident that my wiring is rock solid.
On the plus side, even as it is, it looks pretty good in the dash. It sounds great, and I've got some new 6x8s coming for the doors to give them a nice little boost too.
On the plus side, even as it is, it looks pretty good in the dash. It sounds great, and I've got some new 6x8s coming for the doors to give them a nice little boost too.
08-12-2013, 09:52 AM
#18
Member
Thread Starter
Join Date: Nov 2012
Posts: 77
Likes: 0
Received 0 Likes
on
0 Posts
Not at all, the premade ones are like $12 or something. You can probably do it cheaper if you wire up your own relay for it. If anything, it's way easier than trying to hunt down a parking brake light to wire tap into.
08-13-2013, 12:10 PM
#19
Member
Thread Starter
Join Date: Nov 2012
Posts: 77
Likes: 0
Received 0 Likes
on
0 Posts
So, it turns out I found one other frustrating issue. It turns out the AVH-X4500BT from Pioneer says: "Get more from your Android-based smartphone with access to your music via Bluetooth and Pioneer-compatible applications directly from the Pioneer touchscreen interface." The reality is, the BT part is really the only part of that that's true, because there's basically no application support for Android, despite that statement and a big Android logo on the box with the phrase "Smartphone Compatible." I am not pleased.
Rather than argue the finer points of their crappy product details, I'm solutioning. The only thing I truly cared about was shooting my phone's navigation up to the unit to make it easier to see and refer to. CREATIVITY MAY PREVAIL. Here's what I'm thinking:
Galaxy Nexus ->
->
->
AUX input on head unit
See, really, I don't even care about most all the app functionality their AppRadio tool offers. It's neat, but all I really cared about navigation, because I hear the AVIC-U250 sucks something awful, especially for the price. I figure my crazy daisy chain above should let me at least turn the head unit into a dummy monitor for the phone, which would really be good enough given my desire. That of course assumes I'm not bending the rules of video conversion beyond their breaking point.
Last edited by TheQuicksilver; 08-13-2013 at 12:12 PM.
08-23-2013, 10:47 PM
#20
Member
Thread Starter
Join Date: Nov 2012
Posts: 77
Likes: 0
Received 0 Likes
on
0 Posts
NEW SPEAKER DAY!
Well, at least for the front doors today (will do the back doors soon, I expect the process to be identical). Nothing too crazy, just wanted something better than stock. So I went with . FWIW, I went 2-way instead of 3 way mostly because the price:rating ratio was really good, and I'll be putting in a sub soon to balance out the low end.
http://www.flickr.com/photos/fienen/9577896553/Here are the speakers, front and back, along with the preinstalled. I'd highly recommend these, as it makes everything plug-and-play - no cutting or soldering needed to patch in new speaker connectors. $7 and it saves so much piddle work.
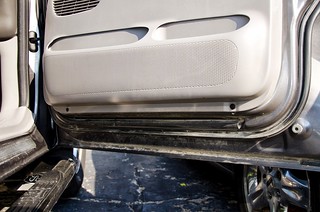
Next, pull these two screws at the bottom.
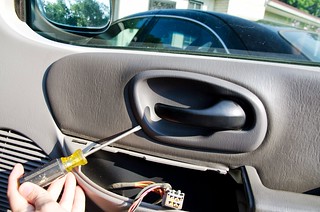
http://www.flickr.com/photos/fienen/9577953083/Then pop the plate off from around the door handle, and take out the screw behind it. You'll see a little slot for the screwdriver, and it's just got clips holding it.
http://www.flickr.com/photos/fienen/9580683186/ http://www.flickr.com/photos/fienen/9577896403/Next, pop off the window/lock control panel. Just give it a tug up on the frontmost part to release the clip, and pull up and forward - there's just a slip clip along the black holding it in there, so don't try to pull straight up on the back. Release the cable wiring harnesses (each connector has a retention clip to depress first), and then there's a 9/32" hex head screw holding the armrest to the door to remove. That's all the screws holding the panel on (four total in my case, some doors will be slightly different).
Now, finishing the removal of the door panel is basically just a matter of firmly shimmying it up and off. The backside of the panel has a series of L-shaped brackets that slide into slots on the door itself. As far as door panels go, these are pretty damn easy.
http://www.flickr.com/photos/fienen/9577896789/ http://www.flickr.com/photos/fienen/9580683466/If you use the wiring harnesses, putting the new speakers in just takes four screws, then plug them in. Removing the factory screws requires a 1/4" driver. At least with these speakers, you'll need to use the screws that come with them, as the truck's stock hex heads are flared enough that they won't fit the bezel quite right.
http://www.flickr.com/photos/fienen/9577896715/Reinstallation is just a reverse process. Getting all the panel brackets back into their holes take a couple moments of patience, but isn't bad otherwise.
Total time... roughly 45 minutes, which included cleaning everything while it was disassembled. Not too shabby, and I can't complain one bit about the sound quality.
Well, at least for the front doors today (will do the back doors soon, I expect the process to be identical). Nothing too crazy, just wanted something better than stock. So I went with . FWIW, I went 2-way instead of 3 way mostly because the price:rating ratio was really good, and I'll be putting in a sub soon to balance out the low end.
http://www.flickr.com/photos/fienen/9577896553/Here are the speakers, front and back, along with the preinstalled. I'd highly recommend these, as it makes everything plug-and-play - no cutting or soldering needed to patch in new speaker connectors. $7 and it saves so much piddle work.
http://www.flickr.com/photos/fienen/9580683186/ http://www.flickr.com/photos/fienen/9577896403/Next, pop off the window/lock control panel. Just give it a tug up on the frontmost part to release the clip, and pull up and forward - there's just a slip clip along the black holding it in there, so don't try to pull straight up on the back. Release the cable wiring harnesses (each connector has a retention clip to depress first), and then there's a 9/32" hex head screw holding the armrest to the door to remove. That's all the screws holding the panel on (four total in my case, some doors will be slightly different).
Now, finishing the removal of the door panel is basically just a matter of firmly shimmying it up and off. The backside of the panel has a series of L-shaped brackets that slide into slots on the door itself. As far as door panels go, these are pretty damn easy.
http://www.flickr.com/photos/fienen/9577896789/ http://www.flickr.com/photos/fienen/9580683466/If you use the wiring harnesses, putting the new speakers in just takes four screws, then plug them in. Removing the factory screws requires a 1/4" driver. At least with these speakers, you'll need to use the screws that come with them, as the truck's stock hex heads are flared enough that they won't fit the bezel quite right.
http://www.flickr.com/photos/fienen/9577896715/Reinstallation is just a reverse process. Getting all the panel brackets back into their holes take a couple moments of patience, but isn't bad otherwise.
Total time... roughly 45 minutes, which included cleaning everything while it was disassembled. Not too shabby, and I can't complain one bit about the sound quality.