Poor Man's Retrofit (Picture Heavy)
#84
Texas A&M Aggie
Thread Starter
Originally Posted by dom07
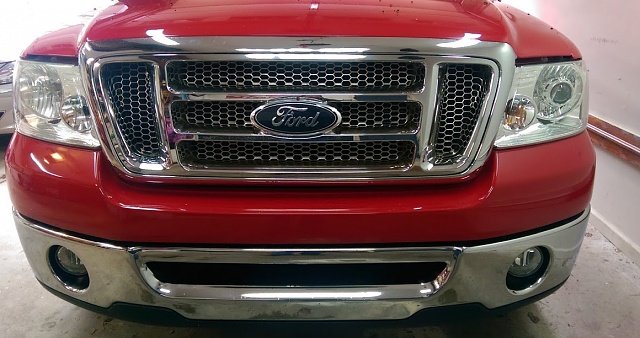
Passenger side is a stock lamp, drivers side is done.
374347
374348
374347
374348
It's going to be after spring break probably before I can clean up my wiring. I've got the engine tore down currently doing plugs, boots, phasers, VCT solenoids, chains, tensioners, and guides.
#85
The shrouds are the ones that come with the projectors (Nilight's from tareeds first post).
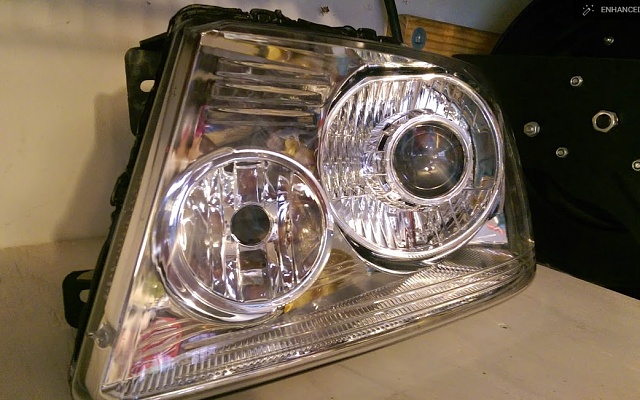
My phone ran out of space and i didn't want to stop, but on these ebay housings, all you need to do is trim the 3 bump outs that the original bulb used to lock in. After that, I trimmed the inside ring of the reflector out (down to basically flush or flat with the area between the rings), and fit the large washer such that the 3 prongs on the washer contacted the outer ring on the reflectors.
The large washer was too thick to go between the reflector and the projector, and still allow the bulb retainer to screw back on.I didn't want to cut the reflector out a ton, which would let the projector sit further back -- then you have to clearance the frame of the truck (or the front clip behind the headlights).
I used too much butyl on the first one. I dont think it will hurt anything, but on the second one I used probably 1/4 less. It also helps alot to throw the housing in the oven for 5 minutes after you put the butyl in. I tried the heat gun approach on the first, the second went in the oven, then the lense popped right on, and some big **** zipties overnight and we're in business.
Also, I siliconed the rubber grommet at the back to seal up the gap between the black rubber grommet and the projector. We had a humid 30 degree temp change today, and they're both clear... so that's good.
Since I did clear marker light diffusers (instead of the amber diffusers), I already hate the amber halogen turn signals, so I ordered the flasher and LED 3157's today.
TAREED... your fog light bulbs (those LED's) are crap!! And I can say that because I bought them too!! THey're bright, but they throw light everywhere -- I wonder if there's a different style bulb, or even some way of masking the housing to not throw light UP. It's blinding.... gotta do something about that. I aimed them up and down to no avail.
#86
Texas A&M Aggie
Thread Starter
Originally Posted by dom07
I used too much butyl on the first one. I dont think it will hurt anything, but on the second one I used probably 1/4 less. It also helps alot to throw the housing in the oven for 5 minutes after you put the butyl in. I tried the heat gun approach on the first, the second went in the oven, then the lense popped right on, and some big **** zipties overnight and we're in business.
Originally Posted by dom07
TAREED... your fog light bulbs (those LED's) are crap!! And I can say that because I bought them too!! THey're bright, but they throw light everywhere -- I wonder if there's a different style bulb, or even some way of masking the housing to not throw light UP. It's blinding.... gotta do something about that. I aimed them up and down to no avail.
#88
Texas A&M Aggie
Thread Starter
Originally Posted by MikeyDubs
Any finished pics?
#89
I used too much butyl on both of mine since I didn't remove all the old stuff (shouldn't have added any) and couldn't get my clips back in. Figured it'd be fine but it appears it's not. I'm probably gonna get a heat gun and warm up the spots that are looking like separating, squish them down, then put windshield sealant around them. It'll hold them together and make them water tight.
Throw light up? Blinding to who? Mine work fine. If I try to observe the bulb while it's on it's uncomfortable but all bulbs tend to be uncomfortable to look directly at. I had them in before I finished my headlights and they practically outperformed my headlights.
Throw light up? Blinding to who? Mine work fine. If I try to observe the bulb while it's on it's uncomfortable but all bulbs tend to be uncomfortable to look directly at. I had them in before I finished my headlights and they practically outperformed my headlights.
If you can strip them and throw back in the oven, it'll go alot quicker. Might have to trim off the excess butyl.
So, on the fog lights, they throw light up. I've gone oncoming at night with my other car, and it's blinding. However, I found if you put just a little bit of masking on the fog housing (top 1/3rd), it's perfect. LOTS of light down low and on the sides, and no annoying light thrown up.
Also, for anyone who, like me, hates the halogen turn signal lights in your nice new crystal clear housings, I used "JDM ASTAR Extremely Bright PX Chipsets 3056 3156 3156 3157 LED Bulbs ,Amber Yellow"
The difference between running light at blinker is DRAMATIC, which if you've messed with LED switchbacks or dual brightness LEDs you know its a problem (the difference between intensities is barely noticeable)
I also stuck one of these in for a marker light:
#90
Texas A&M Aggie
Thread Starter
Originally Posted by dom07
If you can strip them and throw back in the oven, it'll go alot quicker. Might have to trim off the excess butyl.
So, on the fog lights, they throw light up. I've gone oncoming at night with my other car, and it's blinding. However, I found if you put just a little bit of masking on the fog housing (top 1/3rd), it's perfect. LOTS of light down low and on the sides, and no annoying light thrown up.
Also, for anyone who, like me, hates the halogen turn signal lights in your nice new crystal clear housings, I used "JDM ASTAR Extremely Bright PX Chipsets 3056 3156 3156 3157 LED Bulbs ,Amber Yellow"
 Amazon.com: JDM ASTAR Extremely Bright PX Chipsets 3056 3156 3156 3157 LED Bulbs ,Amber Yellow: Automotive
The difference between running light at blinker is DRAMATIC, which if you've messed with LED switchbacks or dual brightness LEDs you know its a problem (the difference between intensities is barely noticeable)
I also stuck one of these in for a marker light:
So, on the fog lights, they throw light up. I've gone oncoming at night with my other car, and it's blinding. However, I found if you put just a little bit of masking on the fog housing (top 1/3rd), it's perfect. LOTS of light down low and on the sides, and no annoying light thrown up.
Also, for anyone who, like me, hates the halogen turn signal lights in your nice new crystal clear housings, I used "JDM ASTAR Extremely Bright PX Chipsets 3056 3156 3156 3157 LED Bulbs ,Amber Yellow"
The difference between running light at blinker is DRAMATIC, which if you've messed with LED switchbacks or dual brightness LEDs you know its a problem (the difference between intensities is barely noticeable)
I also stuck one of these in for a marker light:
I want to change mine out but after the timing stuff I had to do Im broke. Do the amber LEDs cause any rapid flashing when you use your turn signals?


