
Tow Mirror Running Lights


 12-21-2012, 09:53 PM
#82
Meaner than ymeski56
Thread Starter

My how-to thread is sitting in the submissions thread waiting to get approved...
12-23-2012, 10:18 AM
#85
Meaner than ymeski56
Thread Starter
Here's a video of the lights 
http://www.youtube.com/watch?nomobile=1&v=nIRNRy-sPvQ
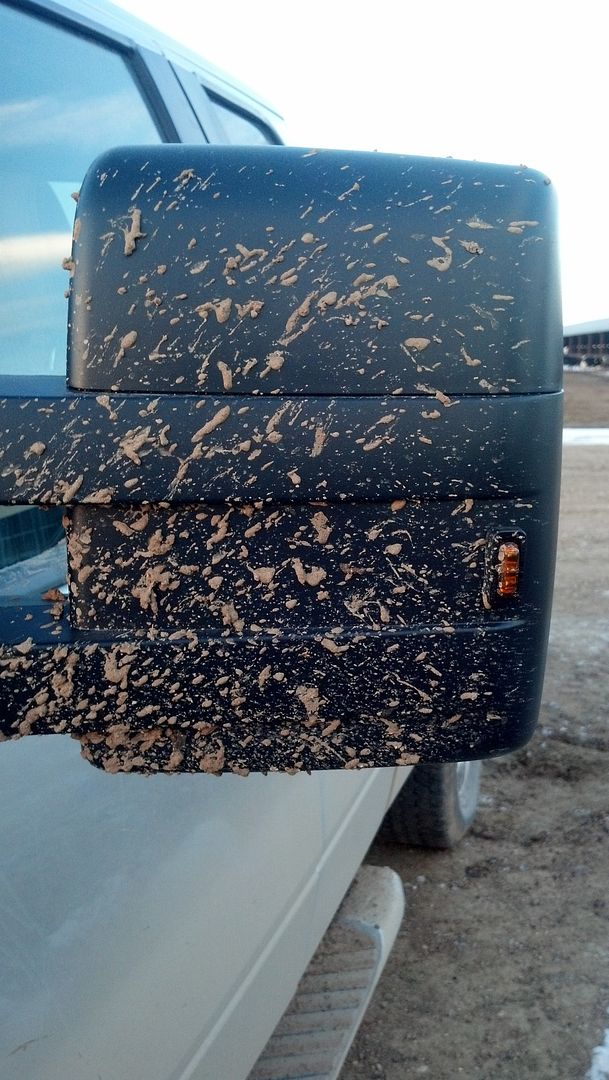
And here's a picture of where I mounted them, sorry for the dirty mirror
http://www.youtube.com/watch?nomobile=1&v=nIRNRy-sPvQ
And here's a picture of where I mounted them, sorry for the dirty mirror
12-23-2012, 01:04 PM
#86
...is a sweet ride
Pic and video are great, really illustrates the functionality of the light. Side visibility seems much better than I imagined from what you said in your earlier post. It's a very small and bright light, looks sharp.
Can the light be pushed a little more to the outside, looks like about 1/4"+?
How did you attach the light housing to the mirror housing? I'm thinking I personally will buy the same light as you. I don't know what I could gain from getting something different.
Any problems with positioning, wiring, etc. after you have everything apart? Estimated time for project?
12-23-2012, 02:29 PM
#87
Meaner than ymeski56
Thread Starter
Pic and video are great, really illustrates the functionality of the light. Side visibility seems much better than I imagined from what you said in your earlier post. It's a very small and bright light, looks sharp.
Can the light be pushed a little more to the outside, looks like about 1/4"+?
How did you attach the light housing to the mirror housing? I'm thinking I personally will buy the same light as you. I don't know what I could gain from getting something different.
Any problems with positioning, wiring, etc. after you have everything apart? Estimated time for project?
Can the light be pushed a little more to the outside, looks like about 1/4"+?
How did you attach the light housing to the mirror housing? I'm thinking I personally will buy the same light as you. I don't know what I could gain from getting something different.
Any problems with positioning, wiring, etc. after you have everything apart? Estimated time for project?
You may be able to but that's as far as I wanted to go because it starts to curve.
There is adhesive on the back of the light that seals around the hole. It's not very good but it's held so far. I may pull it out, take the adhesive off and use something else to hold it on better but that's just if this doesn't work out.
Getting the 2 plastic halves of the mirror apart is a bit of a PITA and I had to break the clips that hold the arm parts together as there was pretty much no way I could get them off. The stock wiring goes through a really snug, winding route so I just drilled a small hole in the aluminum (behind the foam) that goes into the spot between where the 2 arms swivel and ran the wire that way. Much faster and easier. Just cover with some liquid tape and it'll be sealed well. I tapped into the mirror ground for the lights as well. Estimated time would be 1-2 hours.
I don't know if you're going to make it both signal and running light. If just signal then ignore the part about drilling as you can just tap the rear facing light. If just running light then you don't need the "harness".
Overall, I'm very happy with it. The lights blend in to the mirror very well and are very noticeable at night which is exactly what I was looking for. The small size of the lights actually look a bit like the 13 mirror lights
12-23-2012, 11:49 PM
#88
...is a sweet ride
Getting the 2 plastic halves of the mirror apart is a bit of a PITA and I had to break the clips that hold the arm parts together as there was pretty much no way I could get them off. The stock wiring goes through a really snug, winding route so I just drilled a small hole in the aluminum (behind the foam) that goes into the spot between where the 2 arms swivel and ran the wire that way. Much faster and easier. Just cover with some liquid tape and it'll be sealed well. I tapped into the mirror ground for the lights as well. Estimated time would be 1-2 hours.
I don't know if you're going to make it both signal and running light. If just signal then ignore the part about drilling as you can just tap the rear facing light. If just running light then you don't need the "harness".
I don't know if you're going to make it both signal and running light. If just signal then ignore the part about drilling as you can just tap the rear facing light. If just running light then you don't need the "harness".
I want both turn signal and running light.
Thank you for your help, and this seems to be a great mod!
12-24-2012, 07:13 AM
#89
Meaner than ymeski56
Thread Starter
Even though I removed the mirrors to swap out my black textured skull caps with chrome...I'm not familiar with the innards for the hole drilling and the wiring. I'll try to look that up before I do this....don't wanna get stuck partway through.
I want both turn signal and running light.
Thank you for your help, and this seems to be a great mod!
Unfortunately the pictures I took of the drilling for running my wires are practically black
 I drilled in the hole that is forward of the harness plug. When the mirror is off the door, take the foam off that would be against the outside of the door and you should see what I'm talking about. I just used a step bit till I could run a wire through and sealed it. Make sure to leave plenty of extra wire in the mirror too.
No problem, glad I can help
The following 2 users liked this post by XtraLargeTall:
Diabo8c4 (09-24-2014),
f150skidoo (01-06-2013)