My F150
 06-22-2017, 03:04 PM
#181

Today pulled out parts and cleaned/ready for paint, but I do not have any paint. Will need to pick some up tonight.


mmmm purty freshly blasted.
Going to go flat black with satin clear. Going through the parts it appears I did not get the air filter
As I sat there last night thinking about the Roush install, how much work was it, did I like it, what were the gotchas as I scrolled through the whipple install doc.
It was easy to install, not much work, the gotchas were the stock fan and radiator shroud being a PITA and getting in the way. When I think back to when the Roush was installed the first thing that comes to mind is the headers and how much of a pain in the *** they were. It took two weeks to install the headers with a friend. The blower install was like 1.5 days tops and did it by myself. This go around I figure 1/2 that time as I am planning on having some help from another Whipple'd F150 owner and it's fairly open now

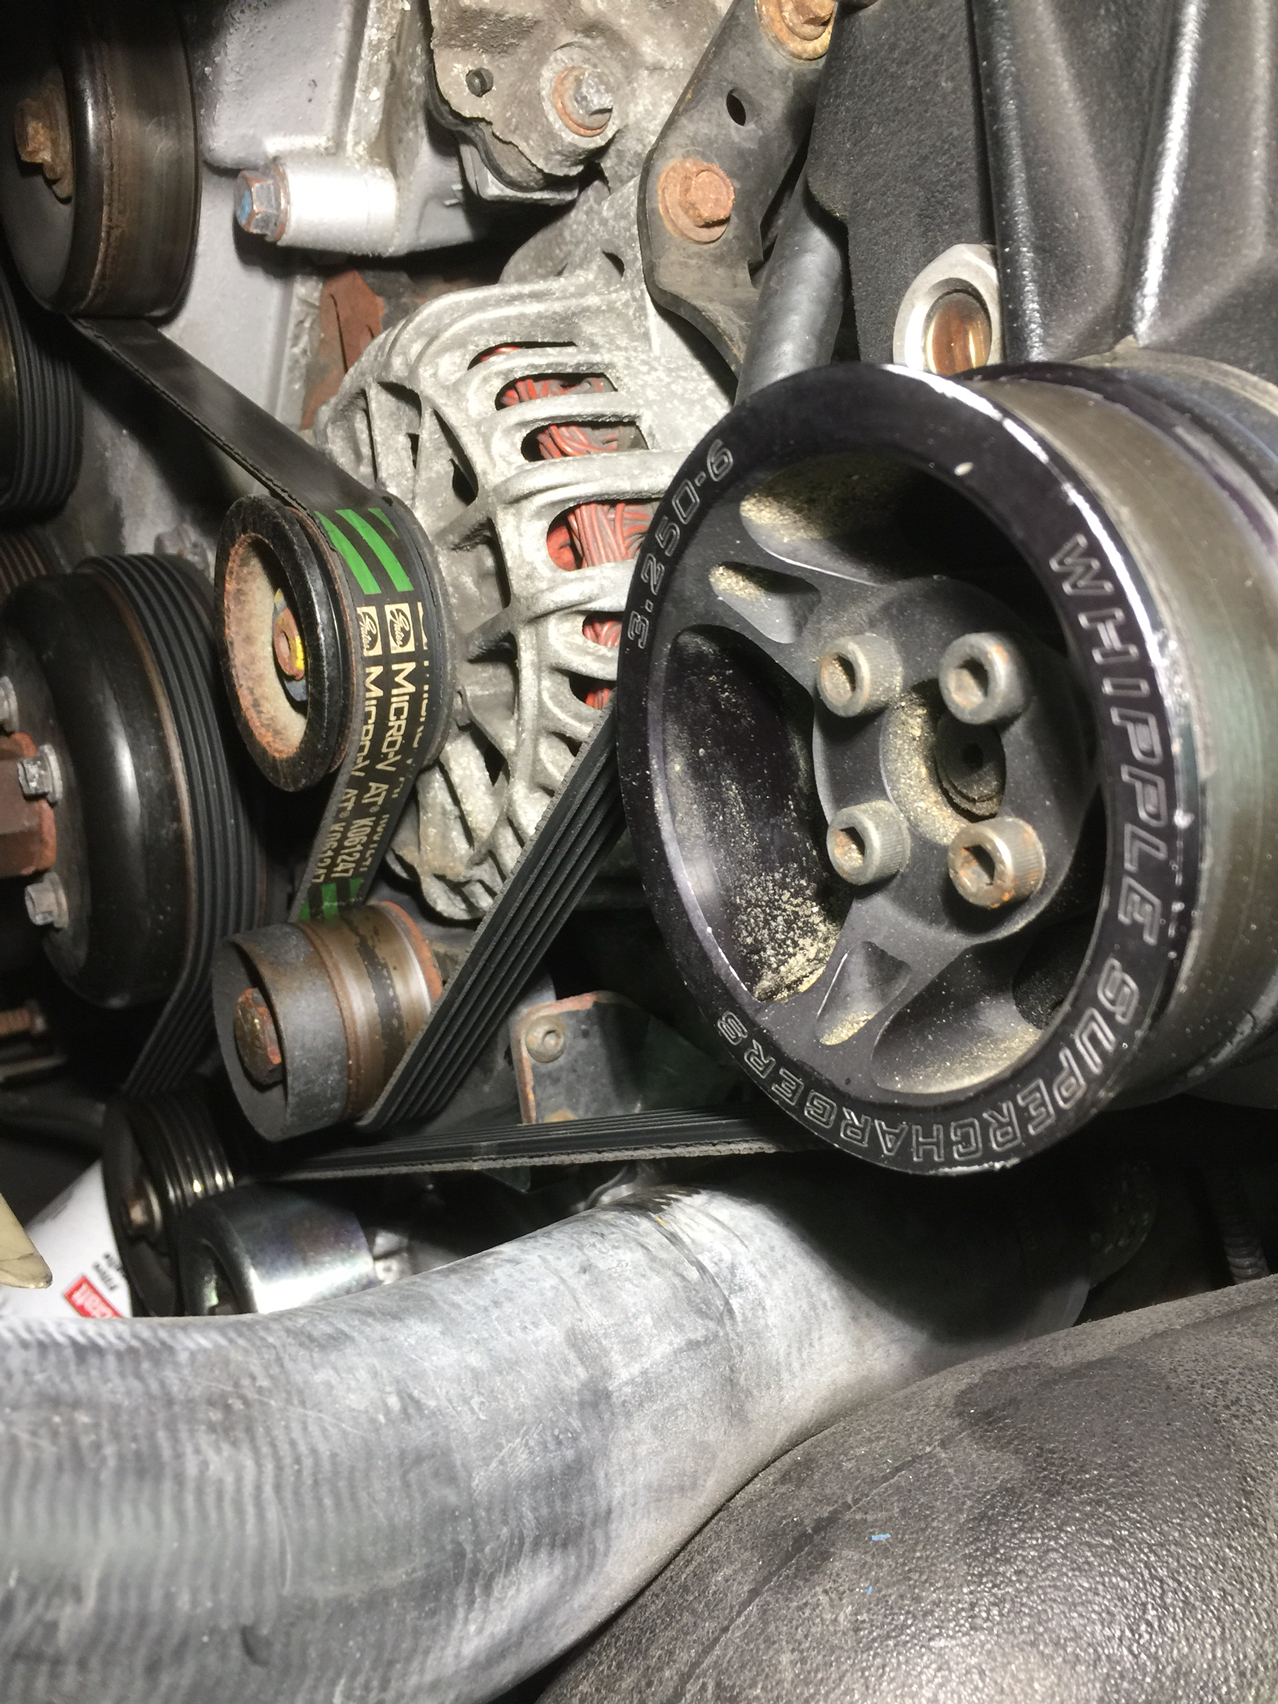
Yes, the blue wire is power wire. That is 1/0 from the alternator to battery, alternator is 270 we like our music loud Can't see it in this pic but in the lower left there is a set of fuse terminals there, where I plumbed electrical for the Roush kit, IIRC it was just the water pump. In this image we see the degaus bottle upper right. This is not the stock shroud so expecting some unplanned fun when it comes to mount the whipple bottle, do have plenty of coolant line so no major snags are anticipated.

Where is that fan and shroud? Oh, yeah it's g-g-g-g-gone! We are going to GAIN more space. Gain more space you say? Yessir! Look at the green belt and all those pulleys it touches(most outer belt), this belt, pulleys, crank pulley, and pulley bridge(black thing in front of alternator pulley all go away. The Roush kit uses a pulley bridge like the Lightning, whereas the whipple uses the serpentine belt hence the reason for 8 rib conversion. A little dirty under the hood but TBH I don't care, this truck is driven not shown.
As it sits in order to move forward(bare minimum) I need a crank pulley(overdrive), 8 rib conversion, air filter and a few misc parts about $800 worth. The stock MAF and TB is reused.
Have not done compression testing, my back was absolutely killing last night so hopefully later tonight, or over the weekend. Provided compression testing is good we will do the swap, if not then probably sit tight and figure out what to do next. Going to clean up and inspect the other items(rubbers/plastics/electrical junk), do need to pressure test a few items.
mmmm purty freshly blasted.
Going to go flat black with satin clear. Going through the parts it appears I did not get the air filter
As I sat there last night thinking about the Roush install, how much work was it, did I like it, what were the gotchas as I scrolled through the whipple install doc.
It was easy to install, not much work, the gotchas were the stock fan and radiator shroud being a PITA and getting in the way. When I think back to when the Roush was installed the first thing that comes to mind is the headers and how much of a pain in the *** they were. It took two weeks to install the headers with a friend. The blower install was like 1.5 days tops and did it by myself. This go around I figure 1/2 that time as I am planning on having some help from another Whipple'd F150 owner and it's fairly open now
Yes, the blue wire is power wire. That is 1/0 from the alternator to battery, alternator is 270 we like our music loud
Can't see it in this pic but in the lower left there is a set of fuse terminals there, where I plumbed electrical for the Roush kit, IIRC it was just the water pump. In this image we see the degaus bottle upper right. This is not the stock shroud so expecting some unplanned fun when it comes to mount the whipple bottle, do have plenty of coolant line so no major snags are anticipated.Where is that fan and shroud? Oh, yeah it's g-g-g-g-gone! We are going to GAIN more space. Gain more space you say? Yessir! Look at the green belt and all those pulleys it touches(most outer belt), this belt, pulleys, crank pulley, and pulley bridge(black thing in front of alternator pulley all go away. The Roush kit uses a pulley bridge like the Lightning, whereas the whipple uses the serpentine belt hence the reason for 8 rib conversion. A little dirty under the hood but TBH I don't care, this truck is driven not shown.
As it sits in order to move forward(bare minimum) I need a crank pulley(overdrive), 8 rib conversion, air filter and a few misc parts about $800 worth. The stock MAF and TB is reused.
Have not done compression testing, my back was absolutely killing last night so hopefully later tonight, or over the weekend. Provided compression testing is good we will do the swap, if not then probably sit tight and figure out what to do next. Going to clean up and inspect the other items(rubbers/plastics/electrical junk), do need to pressure test a few items.
 06-23-2017, 10:44 AM
#182
Went to AutoZone and I live in a town of 445,830 people per 2014 census. I got the last can of flat black and satin clear. Yes, the last of each Was a little bummed out but at least it's not far from the house!

Here are our parts pre-soak full of road grime and ick. Let them soak over night. The solution is simple green crystal mixed up at 3 ounces to 5 gallons.

Mmmm tasty! Hey! Where's the other parts?!

Here's some hoses. Took from soak and wiped down with a dry towel then wiped them down with a towel with p21s on it.

Whipple air filter housing thing. This attaches to the fender well to pull cold air in and an air filter goes inside. Asked the seller about the air filter he said it was gross and appeared to have never been cleaned so he pitched it. This was cleaned the same as items above.

Here's the other part of the intake tube and couplers. These were pretty gross looking and feeling and are now squeaky clean. There's that p21s!

Left over soup water, the last hose has a mesh cover on it so this guy is going to be more effort to clean up.

Had everything staged to paint but its cool/damp and no sun. Some may recall my last gig I worked in metal finishing so know a few tricks here and there My plan was to have the parts be in the sun dry, clean and warm. It appears Monday is 80 and sunny so probably going to hold off for now.
The kit came with a stock TB which was weird, but I like spare parts! Growing up my brother and I did not have a lot of money, and living rural you need to be prepared, so a bucket of random parts is always handy! The blower, plenum and electrical has not been cleaned up yet, a bunch of bolts are in the box that could also use some cleaning and sorting. Expect some more dirty/clean part pics!
Was a little bummed out but at least it's not far from the house!Here are our parts pre-soak full of road grime and ick. Let them soak over night. The solution is simple green crystal mixed up at 3 ounces to 5 gallons.
Mmmm tasty! Hey! Where's the other parts?!
Here's some hoses. Took from soak and wiped down with a dry towel then wiped them down with a towel with p21s on it.
Whipple air filter housing thing. This attaches to the fender well to pull cold air in and an air filter goes inside. Asked the seller about the air filter he said it was gross and appeared to have never been cleaned so he pitched it. This was cleaned the same as items above.
Here's the other part of the intake tube and couplers. These were pretty gross looking and feeling and are now squeaky clean. There's that p21s!
Left over soup water, the last hose has a mesh cover on it so this guy is going to be more effort to clean up.
Had everything staged to paint but its cool/damp and no sun. Some may recall my last gig I worked in metal finishing so know a few tricks here and there
My plan was to have the parts be in the sun dry, clean and warm. It appears Monday is 80 and sunny so probably going to hold off for now.The kit came with a stock TB which was weird, but I like spare parts! Growing up my brother and I did not have a lot of money, and living rural you need to be prepared, so a bucket of random parts is always handy! The blower, plenum and electrical has not been cleaned up yet, a bunch of bolts are in the box that could also use some cleaning and sorting. Expect some more dirty/clean part pics!
06-24-2017, 12:45 PM
#183
Yesterday I cleaned up more parts, the bolts, clamps misc brackets and looked at the wiring.

Just the bolts soaking here. The strainer makes it easy to handle/move/shake/rinse.

Here are the bolts after washing. I no longer have access to blast/coating equipment so either I am using rusty nuts or buying some plated nuts, which will just rust anyways. I'll have to look and see if I have any coated nuts in my stash.

Here's the whipple before cleaning, we can see some dust in the ribs and near oil fill port.

Better angle of oil fill port.

That lettering is kind of gross, too!

Ribs are clean!

Fill port area is clean!

Lettering is clean!
Just the bolts soaking here. The strainer makes it easy to handle/move/shake/rinse.
Here are the bolts after washing. I no longer have access to blast/coating equipment so either I am using rusty nuts or buying some plated nuts, which will just rust anyways
. I'll have to look and see if I have any coated nuts in my stash.Here's the whipple before cleaning, we can see some dust in the ribs and near oil fill port.
Better angle of oil fill port.
That lettering is kind of gross, too!
Ribs are clean!
Fill port area is clean!
Lettering is clean!
06-24-2017, 01:07 PM
#184

This is the wiring for the whipple kit, there's not much here for this. Essentially this will run the pump and with how they want you to land the wires, the pump runs as soon as the ignition is on(like the roush kit, but goes for a different ignition source). I removed the wire loom and probably will not put it back on until after it is installed. The yellow ring terminal would land on the back of the alternator, and the other ring is ground. The alternator point will more than likely go to the positive post on the battery terminal. More than likely much of this will be skinnied way down and/or customized.
Did compression check today, the min was 150psi and max 155psi which is 3%, we are good to move forward!

The plugs in the back are the worst to get to, both #4 and #8 are a real treat to get to but we got to them!
More parts ordered:
OEM intake/TB gasket set
8 rib water pump pulley
8 rib alternator pulley
8 rib AC pulley
A few idlers needed for 8 rib conversion, was going to buy a new tensioner but mine is NEW and I just need the pulley for mine
What's left to order:
Whipple gaskets/bolts
Metco OD pulley
8 rib belt
8 rib whipple pulley
Air filter
SC oil
Larger wrench to remove the OEM fan spacer in order to remove the water pump pulley
06-26-2017, 09:45 AM
#185

Bought a garden hose adapter then hooked up the coolant lines for the intercooler/heat exchanger. Stopped the end of the hose down with a vice grips and ran it full tilt for about 30min.
Everything was dry which is further good news!
Yesterday the sun made an appearance so we got some poop picked up:

I still managed to step in some

One of the lower intakes with some paint on it.


One of the other lowers with some paint on it.

MAF housing with some paint on it.

Everything with some more paint on it.
Hoping the sun makes an appearance today, per the can if you do not re-coat within the hour, then you are supposed to wait 7 days then can paint again for proper cure. I think getting the parts into the hot sun are going to cut that time requirement down MUCH MUCH more


The following users liked this post:
scobar (06-29-2017)
06-30-2017, 08:29 AM
#187
Hey man I just tried messaging through the GT app twice and it keeps crashing while typing, so I'm leaving my comments here..
The 3.250 pulley is technically the 9# pulley
Which is what I've got..
"I've seen 9psi with it" before JBA short tubes hi flow cats and x pipe.
the 3.125 pulley is actually the 10psi pulley, my mistake.
The 3.00 is the 11# pulley which I also have, Just haven't installed yet.
I Want to datalog it before commissioning it for daily use. Might bolt it on this July 4th weekend.
What's the part # on those iridiums? How do they hold up and what's their heat range?
Here's a few pics of the 70mm pulley.
You do need to grind down some bosses on the timing cover here for the whipple supplied idler, but this new pulley sets back nicer to avoid that, hopefully that pic will show you the better blower belt wrap
Attachment 479831
Attachment 479830
Attachment 479832
The lightening upper radiator hose is also a nice fit for this congested area over stock..
Check out my blower build thread for a bunch of little details that might help you out.
Like I mentioned before about cooling supporting mods being the most crucial to boosted "heat" safety, I'd start slow with your elevation factors, and make sure those front 02's are reading evenly and switching quickly.
Hp tuners has long been on my list of things to do, I'm very interested in seeing how this works out for you. I've contemplated the pro racer software with SCT as well, and writing my own tune is this years major goal for my truck..
I've been building a pro touring T56 6 speed muscle car and just flipped my first one at Barrett Jackson on June 22 (71 chevelle ss convertable), so I haven't done a ton of rocking the boat with what works on my F150.
Attachment 479833
Attachment 479834
Attachment 479835
Last edited by Especial86; 06-30-2017 at 08:52 AM.
06-30-2017, 11:04 AM
#188
Good information.
The SCT software has limitations,most of what I see are local tuners do not have the software for trucks. SCT I guess charges more for this, since there is not much demand for trucks not many will tune a truck.
The plugs I run are NGK 7554 gapped to .030. I know both of the front o2's are newer but I've not checked or tested them.
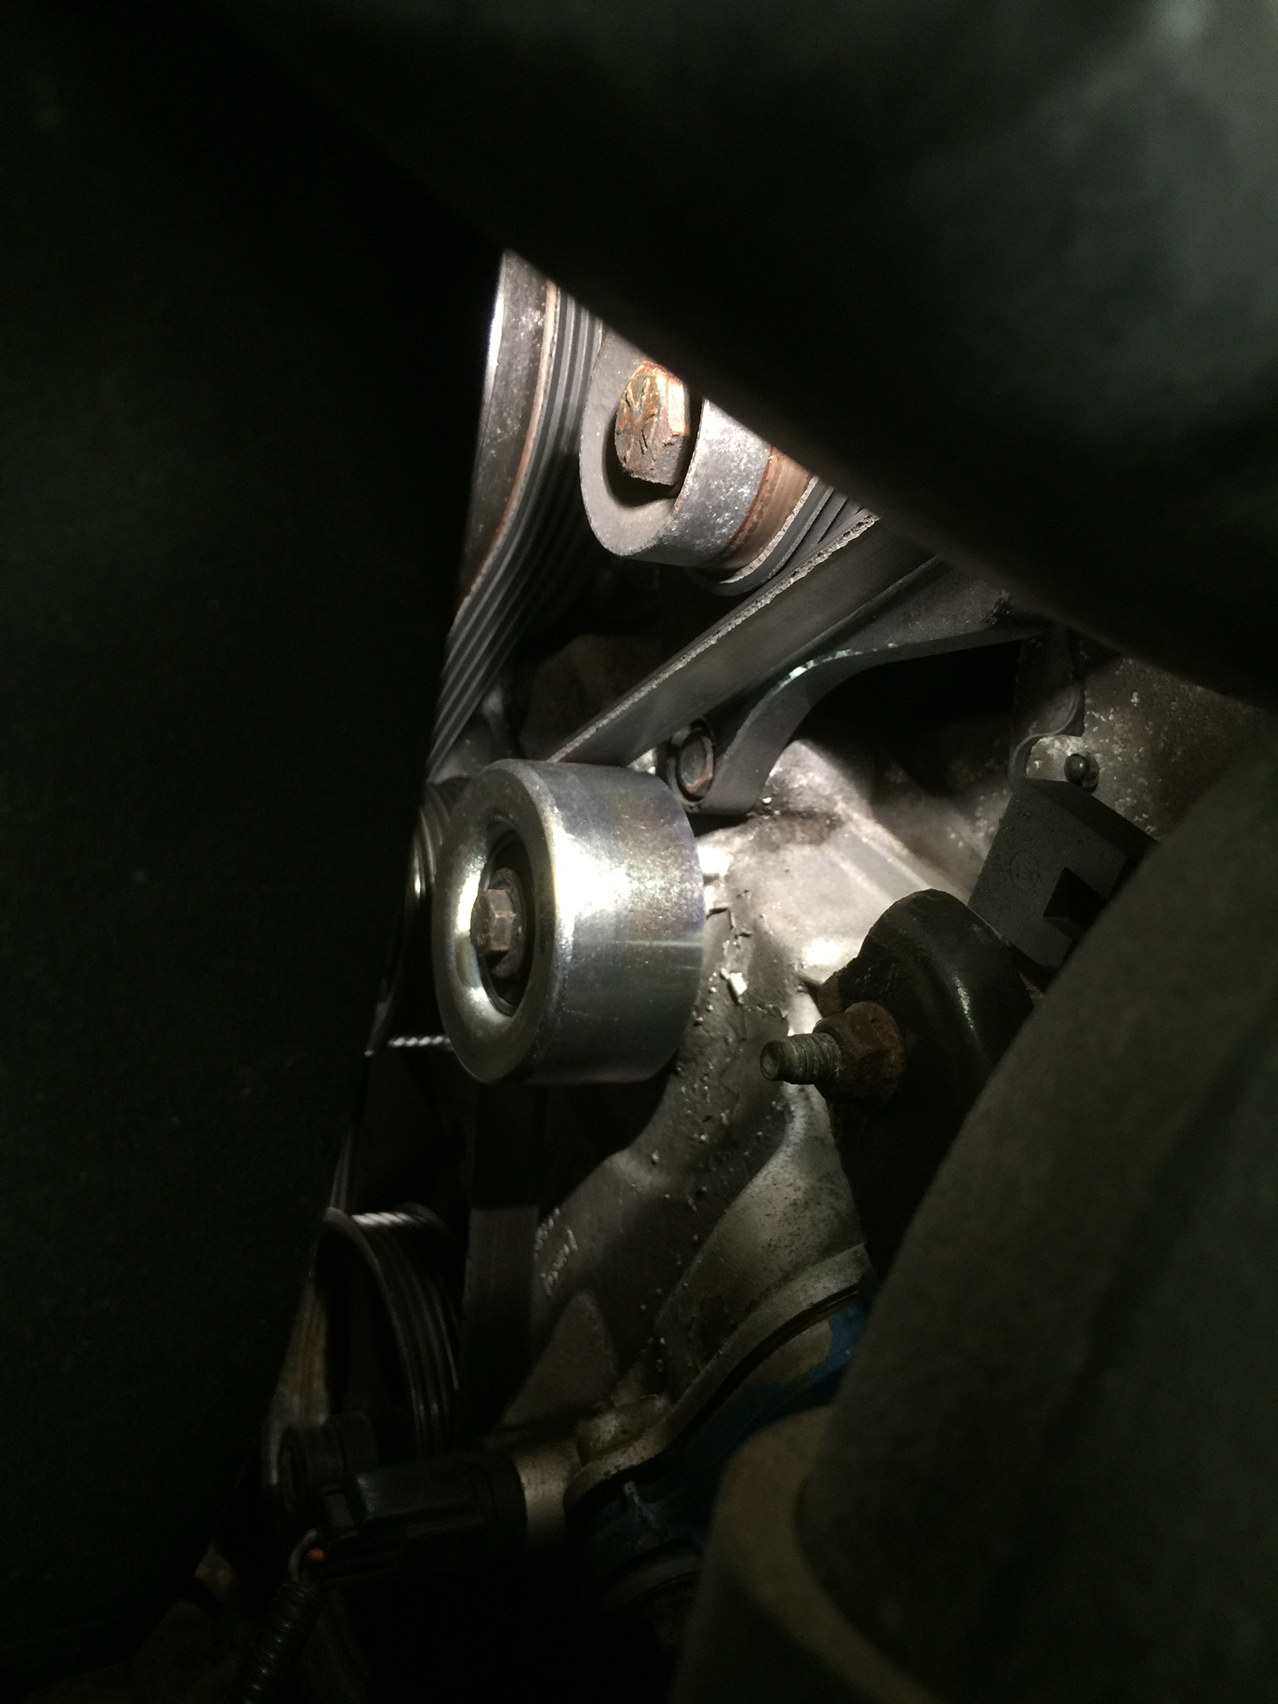
I believe The_Cleaner is running a 3" pulley with Metco OD to achieve 10psi, he also has long tubes. He is also here in the springs. If I skip 8 rib conversion, once the whipple parts arrive I would be pretty much ready to bolt it on/tune but figure if I am in there, let's do the conversion. There's a belt chirp in there on 1-2 and 2-3 and it appears to be slipping on water pump pulley, it is polished like chrome
None of the attachments are loading
The SCT software has limitations,most of what I see are local tuners do not have the software for trucks. SCT I guess charges more for this, since there is not much demand for trucks not many will tune a truck.
The plugs I run are NGK 7554 gapped to .030. I know both of the front o2's are newer but I've not checked or tested them.
I believe The_Cleaner is running a 3" pulley with Metco OD to achieve 10psi, he also has long tubes. He is also here in the springs. If I skip 8 rib conversion, once the whipple parts arrive I would be pretty much ready to bolt it on/tune but figure if I am in there, let's do the conversion. There's a belt chirp in there on 1-2 and 2-3 and it appears to be slipping on water pump pulley, it is polished like chrome
None of the attachments are loading
06-30-2017, 04:42 PM
#189
Originally Posted by scobar
Good information.
The SCT software has limitations,most of what I see are local tuners do not have the software for trucks. SCT I guess charges more for this, since there is not much demand for trucks not many will tune a truck.
The plugs I run are NGK 7554 gapped to .030. I know both of the front o2's are newer but I've not checked or tested them.
I believe The_Cleaner is running a 3" pulley with Metco OD to achieve 10psi, he also has long tubes. He is also here in the springs. If I skip 8 rib conversion, once the whipple parts arrive I would be pretty much ready to bolt it on/tune but figure if I am in there, let's do the conversion. There's a belt chirp in there on 1-2 and 2-3 and it appears to be slipping on water pump pulley, it is polished like chrome
None of the attachments are loading
The water pump is a definite slip zone for the belt. I've read some guys swap in the larger V10 pulley for better belt wrap, but most just jump to the 8 rib setup. I've noticed if you toy around with idler pulley diameter and placement you can get the wrap you need where you need it.
I've read some guys run a 124" gatorback belt to cure a lot of slipping and shredding, but it's a 7 rib belt that you will need to cut a rib off to use.
Personally I don't really have any major issues with the 6 rib setup that can't be cured with a little cleverness. I've been running 5 ribs since the last time I shredded a rib off and have had zero issues since. No 1-2 or 3-4 chirping either unless the belt stretched some, at that point I just tighten up on the tensioner...
Is the 8 rib conversion worth it? Probably, but I'm personally too cheap and patient to bother with it.

Pulley pics.. hopefully they work
06-30-2017, 05:55 PM
#190
I did some work on the VB, so my shifts are quick and firm after these changes is when the belt started chirping and mostly when it's cold. Gaterback made no difference, new tensioners, belts, etc. Electric water pump would fix it
I got the water pump pulley for the 8 rib swap and it is smaller than the stock pulley, as in I can fit it inside of my stock pulley. Comparing the 8 rib to 6 rib I am not sure there's a need to swap the pulley but I'm sure there is...
I got the water pump pulley for the 8 rib swap and it is smaller than the stock pulley, as in I can fit it inside of my stock pulley. Comparing the 8 rib to 6 rib I am not sure there's a need to swap the pulley but I'm sure there is...

