

Babe the Blue Ox


Thread Starter


Joined: May 2013
Posts: 1,860
Likes: 1,068
From: Pittsburgh, PA
I have debated about providing a build thread. My truck is not as impressive as some others, but I figured what the hell. So here we go. I came from a 2013 Ford F-150 XLT.

In November 2019, I picked up my cuurent truck and named it Babe the Blue Ox for obvious reasons, but also because I kind of resemble Paul Bunyan. When I got the 2018, I swapped over the OEM Raptor wheels that I had powdercoated black to the new truck.

Here are a list of my current mods and some more recent pictures below. I have also included links to posts for each mod that had more specific photos.
Truck
2018 F-150 Lariat 502A


In November 2019, I picked up my cuurent truck and named it Babe the Blue Ox for obvious reasons, but also because I kind of resemble Paul Bunyan. When I got the 2018, I swapped over the OEM Raptor wheels that I had powdercoated black to the new truck.
Here are a list of my current mods and some more recent pictures below. I have also included links to posts for each mod that had more specific photos.
Truck
2018 F-150 Lariat 502A
- 2.7L EcoBoost
- 3.55 gears
- Leer 100XQ camper shell
- Self made aluminum extrusion rack with Builtright molle panels, overhead bungee net, and Rotopax mounts
- Builtright Industries driver side bed mounts front, rear, and bridge
- Undercover passenger side swingbox with Builtright Industries universal molle unit mounted to side and fire extinguisher mounted to the back
- Bedrug floor mat
- SDHQ A-Pillar light mount
- Diode Dynamics Max SS3 fog lights - selective yellow
- Diode Dynamics Max SS3 combo a-pillar lights - white
- RCI Metalworks skid plates from front bumper to transfer case
- CravenSpeed untenna
- Proven Design Products front mudflaps, cut way down
- Tinted front windows, windshield strip and sunroof
- Cut stock exhaust tip off and added a turndown after the axle
- B&M rear differential cover
- Continuously evolving sticker bombed tailgate
- OEM Upfitter switches and relays
- OEM Expedition Centerstack
- OEM Raptor steering wheel
- OEM trailer brake controller
- BoostedGreyGoose paddle shifter harness
- BoostedGreyGoose upfitter harness and relay box mount
- BoostedGreyGoose side mirror spotlight wiring harness
- Builtright Industries console lid panel
- Builtright Industries drivers side seat back panel
- Apple wireless MagSafe charger mounted to center console lid
- 400W power outlet moved to inside of center console with 10-port Anker USB power hub
- OEDRO under seat storage
- OCD seat vent extenders
- Banks iDash gauge with a PLX Devices mount and Autometer gauge cup
- Wolfbox G840H Dashcam mirror with FitDVR power adapter.
- K&N cabin air filter replacement
- Timers Shop Drive Mode Memory module
- DDI seat jackers and MMP
- SCT X4 tuner
- MPT 87 Daily-Tow custom tune
- K&N dry stock replacement filter
- Ronin easy oil drain plug
- Method Racing MRW703 wheels in bronze - 17"x8.5" with +25 offset
- Toyo Open Country ATIII 35x11.50
- King Racing 2.5 front coilovers and rear shocks
- OEM Raptor rear lift blocks
- Firestone airbags and on board compressor
- R1Concepts Offroad Performance brake pads
- Crown stainless steel brake lines
Last edited by larryo108; Nov 10, 2025 at 10:56 AM.

Thread Starter
Joined: May 2013
Posts: 1,860
Likes: 1,068
From: Pittsburgh, PA
Welp. I said I wasn't going to tune it, but I am thinking hard about it now. I have a hypertech speedo calibrator and a timers shop drivemode memory module. They both do what they want, but I am tired of having to wait for the drivemode to kick in and a little more power wouldn't be a bad thing.
Thinking about an SCT X4 with an MPT daily-tow 87-octane tune. Anybody have thoughts on this?
Thinking about an SCT X4 with an MPT daily-tow 87-octane tune. Anybody have thoughts on this?

Thread Starter
Joined: May 2013
Posts: 1,860
Likes: 1,068
From: Pittsburgh, PA
I did not like the Autometer steering column pod because it blocked too much **** on the instrument cluster. Plus the Banks gauge didn't fit in it very well. I just got a standard old mount anywhere autometer mount and will be hanging off the side of the steering column where it doesn't block the view of anything. I will get a photo at lunch.
Thread Starter
Joined: May 2013
Posts: 1,860
Likes: 1,068
From: Pittsburgh, PA
Here are some pics of the gauge and pod. It is only temporarily mounted to make sure the location works, but I think I am good. I will more permanently mount it when I get a chance.

I also got some photos of my wireless charger setup. I cut a slit in the bottom of the console lid so that I could mount a universal panavise mount to it. I already had a ProClip USA mount for the wireless charger, so I just used that and then routed the cable to a charger in the console cavern. It's a perfect setup for me and I feel it is pretty clean. The only downsides are that I can't open the lid with the phone charging because it is too heavy. Not really a problem or even an annoyance though. I just pull the phone off, get what I need, and then put it back on the charger. I also had to remove one side of the stock closure, but the one is more than enough to keep the lid closed without flopping around and I can still lock it if I want.
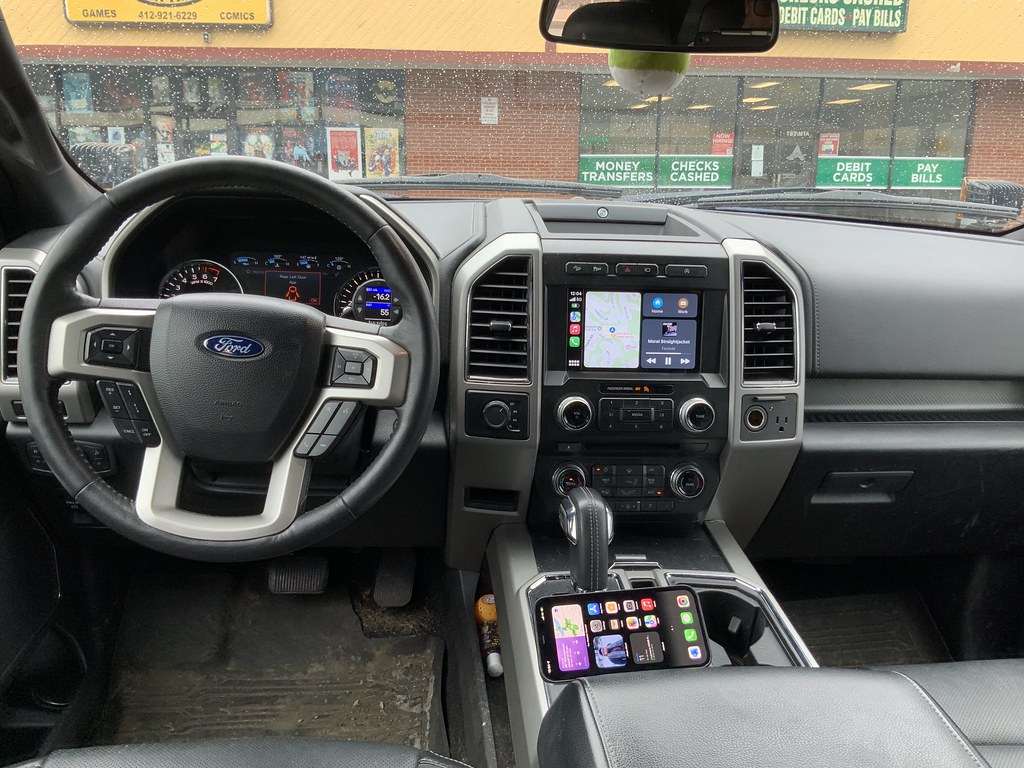


Finally, excuse the mess and dirtiness of the inside of the truck. I need to do some detailing.
I also got some photos of my wireless charger setup. I cut a slit in the bottom of the console lid so that I could mount a universal panavise mount to it. I already had a ProClip USA mount for the wireless charger, so I just used that and then routed the cable to a charger in the console cavern. It's a perfect setup for me and I feel it is pretty clean. The only downsides are that I can't open the lid with the phone charging because it is too heavy. Not really a problem or even an annoyance though. I just pull the phone off, get what I need, and then put it back on the charger. I also had to remove one side of the stock closure, but the one is more than enough to keep the lid closed without flopping around and I can still lock it if I want.
Finally, excuse the mess and dirtiness of the inside of the truck. I need to do some detailing.
Trending Topics
 Soon adds up doesn't it?
Thread Starter
Joined: May 2013
Posts: 1,860
Likes: 1,068
From: Pittsburgh, PA
Yeah man. Out of town trips for work and kids hockey tournaments leave me with little time to actually do any cleaning. When I have some free time I prefer to spend it with the lady or on a bike ride. Detailing just keeps getting pushed to the side.

Member

Joined: May 2020
Posts: 39
Likes: 6
From: Wichita, KS
Here are some pics of the gauge and pod. It is only temporarily mounted to make sure the location works, but I think I am good. I will more permanently mount it when I get a chance.
I also got some photos of my wireless charger setup. I cut a slit in the bottom of the console lid so that I could mount a universal panavise mount to it. I already had a ProClip USA mount for the wireless charger, so I just used that and then routed the cable to a charger in the console cavern. It's a perfect setup for me and I feel it is pretty clean. The only downsides are that I can't open the lid with the phone charging because it is too heavy. Not really a problem or even an annoyance though. I just pull the phone off, get what I need, and then put it back on the charger. I also had to remove one side of the stock closure, but the one is more than enough to keep the lid closed without flopping around and I can still lock it if I want.
Finally, excuse the mess and dirtiness of the inside of the truck. I need to do some detailing.