Rigid Industries DOT/Dually/D2 install '09-14 F150
 03-04-2015, 12:24 AM
#1
Member
Thread Starter


Ok guys and gals, here's a quick how-to on installing any DOT Fogs/Duallys/D2's in the stock fog buckets of your F150. This is just my process and design, there are several ways of doing it that I will share at the end. Successful installs on two trucks now, this seems to be a sturdy and inexpensive mounting solution that allows adjustability on all axis.
This install shows the New Rigid DOT Approved Dually Fog Lights. I'll have some output shots later in the thread as well.
This install shows the New Rigid DOT Approved Dually Fog Lights. I'll have some output shots later in the thread as well.
Required parts not included in DOT/Dually/D2 box:
- Flat bar aluminum (about 16" total length)
- Pair of 1/2" or so bolts with nuts and washers
- Paint
- 2 x http://www.ebay.com/itm/201175102693?_trksid=p2059210.m2749.l2649&ssPageName=STRK%3AMEBIDX%3AITor
1 x http://www.ebay.com/itm/FOGLIGHT-WIRING-ADAPTERS-H10-TO-DEUTSCH-FORD-F-SERIES-JEEP-FOGLAMP-CONVERSION-/141367518489?pt=Motors_Car_Truck_Parts_Accessories&hash=item20ea292519&vxp=mtr
Required tools:
- Sockets/wrenches
- Drill with assorted larger bits
- Flat Head screwdriver
- Soldering iron/electrical bits and pieces
- A way to bend the aluminum. (I used a table top vise, but I've used a plank of wood before that I just stood on)
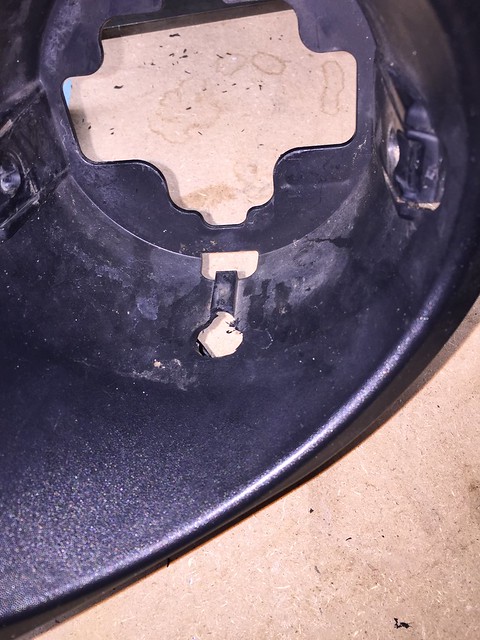
(1) Let's get started. Remove the OEM Fog Light buckets by removing the 3 bolts on each. This will require either an 8mm or 10mm socket depending on your year. Once out, remove the stock fog light pod by lifting up on the side tabs with a flat head on both sides. Set aside stock pods, you will NOT be needing them again.
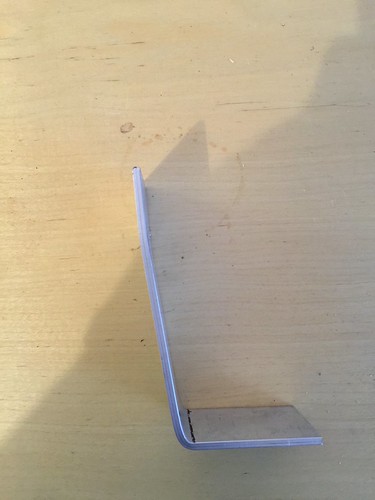
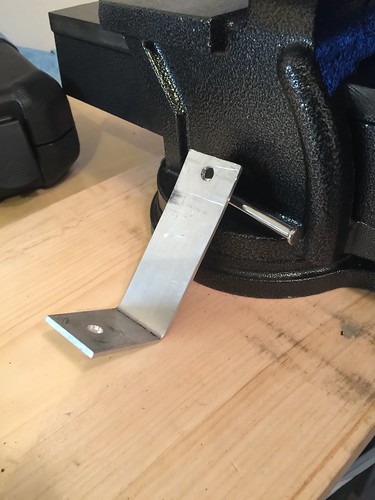
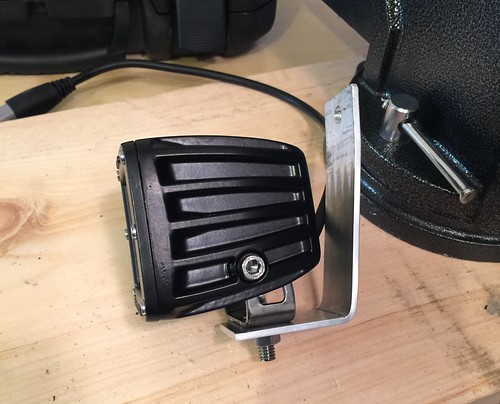
(2) Cut 2 ~8" lengths from your aluminum flat bar. Make an ~80* bend about 2.5" inches down the bar on both. That will leave you with the rough L-brackets you will be using.
(3) Drill one hole in top back wall of the fog buckets, the diameter will need to be whatever size bolt you are using to mount the bracket.
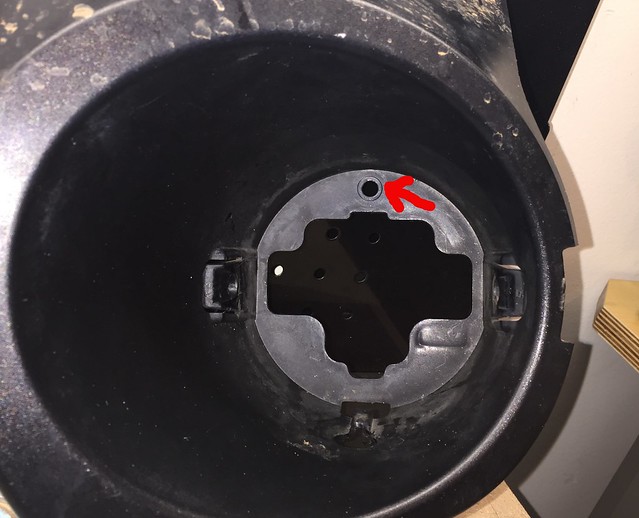
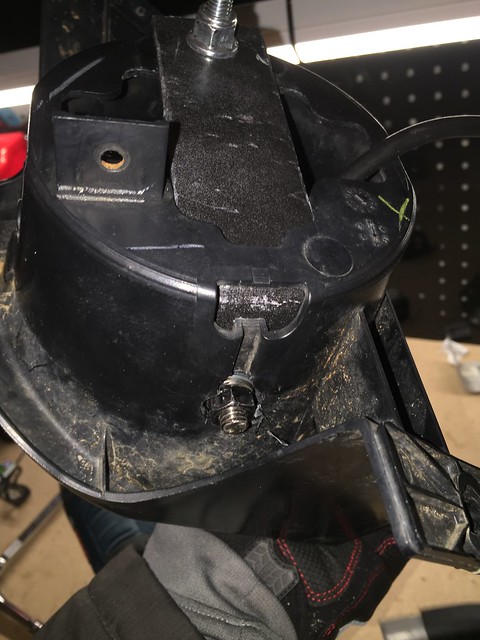
(4) Place the bracket in place inside the bucket and mark through that hole onto the L bracket, where you will need to drill the hole through the bracket.
It will mount like this so keep the positioning in mind:
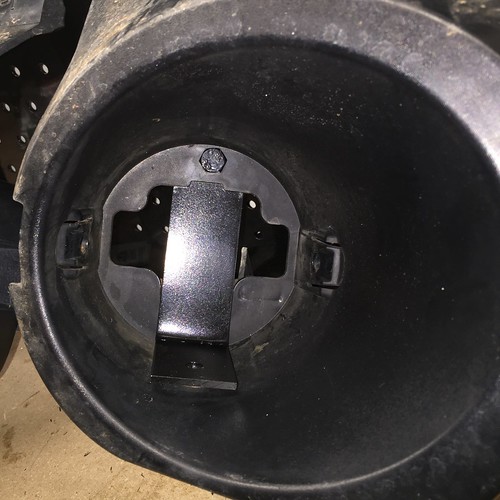
(5) Install the Rigid mount on the light and position it on the L bracket, determine your idea mounting position, and mark the bracket for the hole. Drill hole large enough for the Rigid supplied carriage bolt. Test fit light and make sure everything checks out. Trim excess length off either end of bracket if you wish to make it look cleaner. You should end up with a nice clean bracket.
(6) You will now need to drill a hole in the bottom of the bucket to fit the lower bolt that attaches the Rigid Mount to your L bracket. Position your bracket with the mount attached to determine the right location then go to town on it. You will need to make the hole quiet large to be able to fit the nut as well.

Last edited by goneMINIcrazy; 03-05-2015 at 12:17 AM.

The following users liked this post:
TDavis (03-05-2015)
03-04-2015, 12:34 AM
#2
Member
Thread Starter
(7) Install Light and bracket into the bucket and tighten everything. Make sure everything fits properly. If you're happy with fit, dismantle and hit the bracket with paint or just skip ahead to installing on the truck.


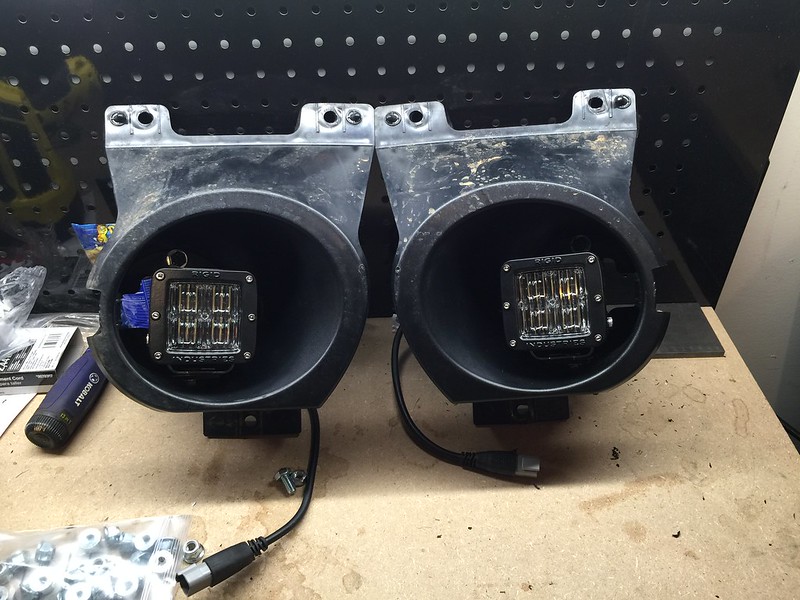
(8) The buckets go back on the truck same way they came off, tighten the 3 bolts.
(9)Now for the wiring.
(10) Test and adjust the beam. Assuming you didn't tighten the Rigid mount to all hell you should have a fair amount of adjustment-ability to the light to fine tune the beam to exactly how you want it.
(11) Enjoy your handiwork. If you're installing the new Rigid DOT's like I was, enjoy being able to legally run the best fog lights on the road with no fear of blinding any unfortunate motorists!
***Anyone looking for full size copies of any of the above pictures, click HERE***
(8) The buckets go back on the truck same way they came off, tighten the 3 bolts.
(9)Now for the wiring.
- If you chose to use the Deutsch pigtails, snip off the stock H10 plug from the Truck's harness and solder on the pigtails.
- If you chose to use the H10 to Deutsch adapter, plug the H10 end into the stock plug, and the Deutsch into the light's plug.
(10) Test and adjust the beam. Assuming you didn't tighten the Rigid mount to all hell you should have a fair amount of adjustment-ability to the light to fine tune the beam to exactly how you want it.
(11) Enjoy your handiwork. If you're installing the new Rigid DOT's like I was, enjoy being able to legally run the best fog lights on the road with no fear of blinding any unfortunate motorists!
***Anyone looking for full size copies of any of the above pictures, click HERE***
Last edited by goneMINIcrazy; 03-04-2015 at 12:37 AM.
The following users liked this post:
TDavis (03-05-2015)
03-04-2015, 12:56 AM
#3
Member
Thread Starter
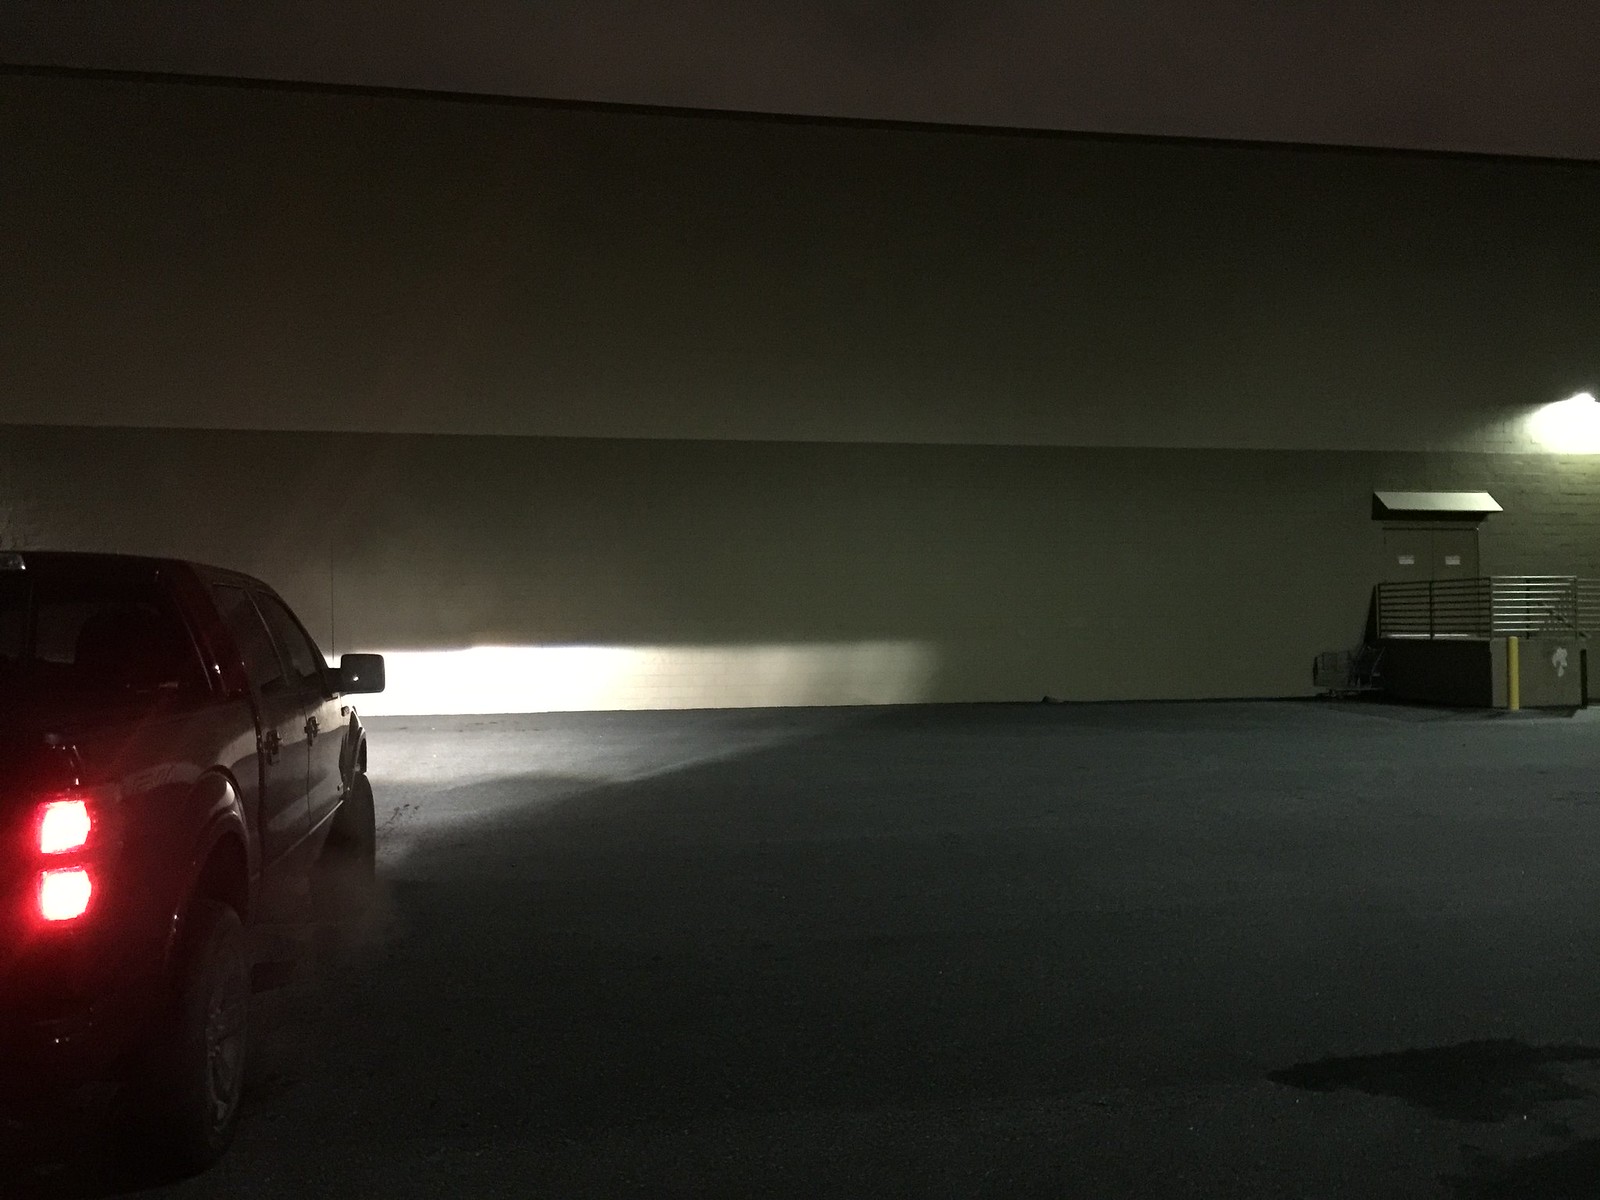
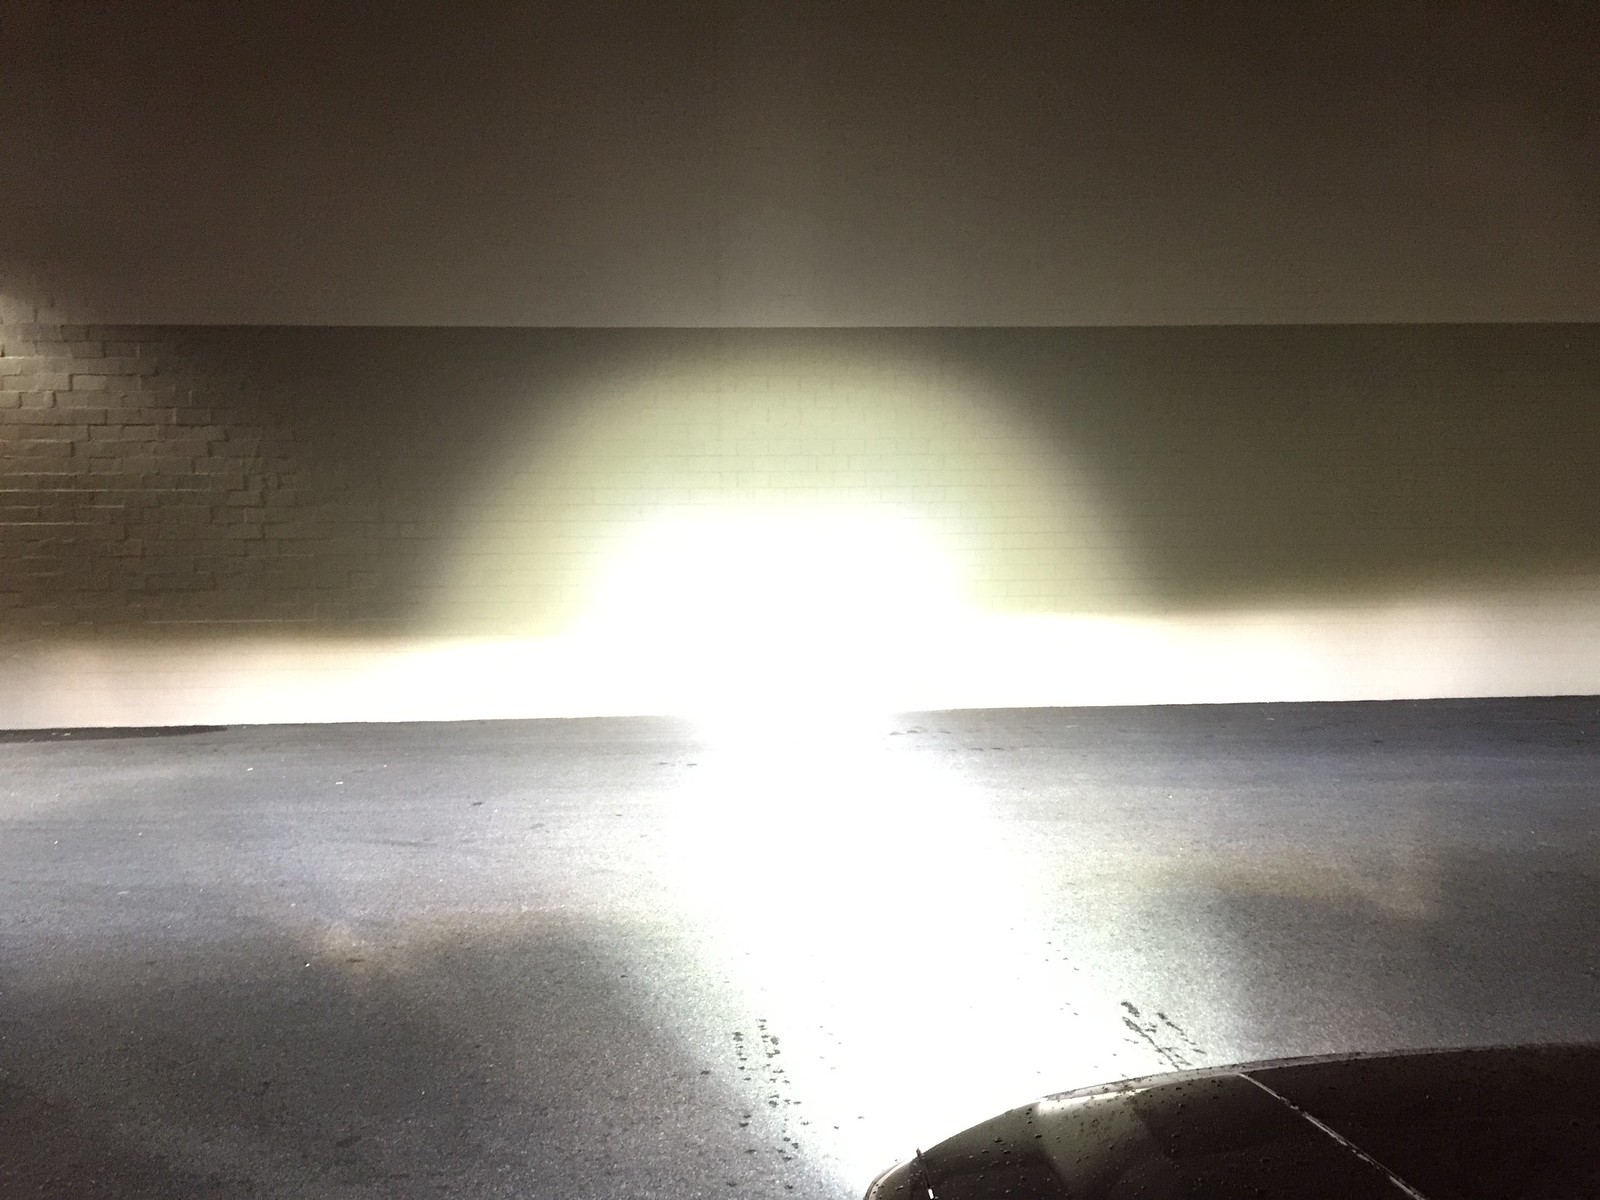
Time for some DOT output shots. All were at about 30-40 feet from the wall.
OEM Projectors Lowbeam only

OEM Projectors Lowbeam and DOT Fogs

OEM Projectors Lowbeam only
OEM Projectors Lowbeam and DOT Fogs

OEM Projectors Lowbeam only

OEM Projectors Lowbeam and DOT Fogs

OEM Projectors Lowbeam, DOT Fogs, Rigid SR20" Spot/Flood combo
OEM Projectors Lowbeam only
OEM Projectors Lowbeam and DOT Fogs
OEM Projectors Lowbeam only
OEM Projectors Lowbeam and DOT Fogs
OEM Projectors Lowbeam only
OEM Projectors Lowbeam and DOT Fogs
OEM Projectors Lowbeam, DOT Fogs, Rigid SR20" Spot/Flood combo
The following users liked this post:
TDavis (03-05-2015)
07-06-2015, 07:15 PM
#5
Rather than using an adapter of any sort couldn't you just solder or connect the lights with the stock wiring as is? Great write up though, going to help me out when I install mine. Not the Rigid DOT ones though, so I am not sure if they are going to blind people or not. Wait and see I guess.
07-06-2015, 07:20 PM
#6
Member
Thread Starter
Originally Posted by RichyJ
Rather than using an adapter of any sort couldn't you just solder or connect the lights with the stock wiring as is? Great write up though, going to help me out when I install mine. Not the Rigid DOT ones though, so I am not sure if they are going to blind people or not. Wait and see I guess.
If it doesn't have a cutoff, you ARE GOING to blind people. DOT's are the only ones I'd run on the road.
The following users liked this post:
AricsFX (07-06-2015)
07-07-2015, 07:19 AM
#7
Because in case I wanted to change our for different lights in the future, I could just plug and play to swap out anything with a Deutsch connector. Also thinking ahead to a possible new bumper.
If it doesn't have a cutoff, you ARE GOING to blind people. DOT's are the only ones I'd run on the road.
If they do blind people I'll just use them as I use my other light bars, turn off as traffic approaches and make it so all lights come on with high beams so they are used then as well. Just after finding something that is pretty well identical to rigid bars for 1/4 the price, it's hard to fork that over. Just don't have they're speciality stuff like the DOT ones unfortunately.
Trending Topics
The following users liked this post:
MCDavis (07-07-2015)
07-09-2015, 03:19 PM
#9
Especially compared to bars like what I already have (speed demon) which are just a step above the ebay bars you can find. A lot of wasted light, the reflectors send it everywhere so much so I won't be getting them again.
Last edited by Newfie FX4; 07-09-2015 at 03:25 PM.
08-05-2015, 01:23 AM
#10
2nd Amendment Supporter!
goneFXcrazy.... Awesome Write up!!!
Thanks!
Thanks!
Last edited by Lethal Weapon; 08-08-2015 at 07:07 PM. Reason: 'Cause I can't frigg'n spell !!!