Replace factory gauge lighting with LEDs!
 03-26-2009, 03:18 PM
#1
Car Audio FANATIC
Thread Starter
NOTE--> I did all of this with no prior knowledge of LED wiring
This is a long write up but it's a long process... took me quite a while to get this whole process done. Only a day though.
So jumping into this you're going to need a few things...
1) 7mm nut driver
2) 8 LEDs
3) the required OHM resistors (discussed later)
4) 22awg wire
5) T10 wrench
6) T15 wrench
7) Wire strippers
8) Soldering iron/ Crimpers
9) Very small flat head screwdriver
10) Rubbing alcohol
11) Q-tips (a bunch) <-- approx. 30
12) Led holders
Sitting in your driver's seat you have to pull off the knee panel first. You remove the two 7mm screws on the bottom of the panel. After this the rest of the panel will just pop off with some effort.
Now you have to use your 7mm nut driver to remove the two screws holding on the plastic panel which surrounds/houses your gauge cluster. Two 7mm screws were revealed after removing the knee panel. With these out you can now remove the upper piece of the dash. This can easily be done by removing the lower sections first, one side at a time. Then grabbing the top of the piece, you can pull the entire piece back to you and it will come off. It's held in place by 3 clips so it might take a bit of effort to get it out.
Now with that done, there will be 4 exposed 7mm screws (two on top and two on bottom). The top two should come out easy enough but the bottom two gave me a run for my money.
These all out, you can now unplug the two wire clusters which are plugged into the top. This now frees you to take the entire gauge cluster inside. This piece is important, so be sure to be nice to it!
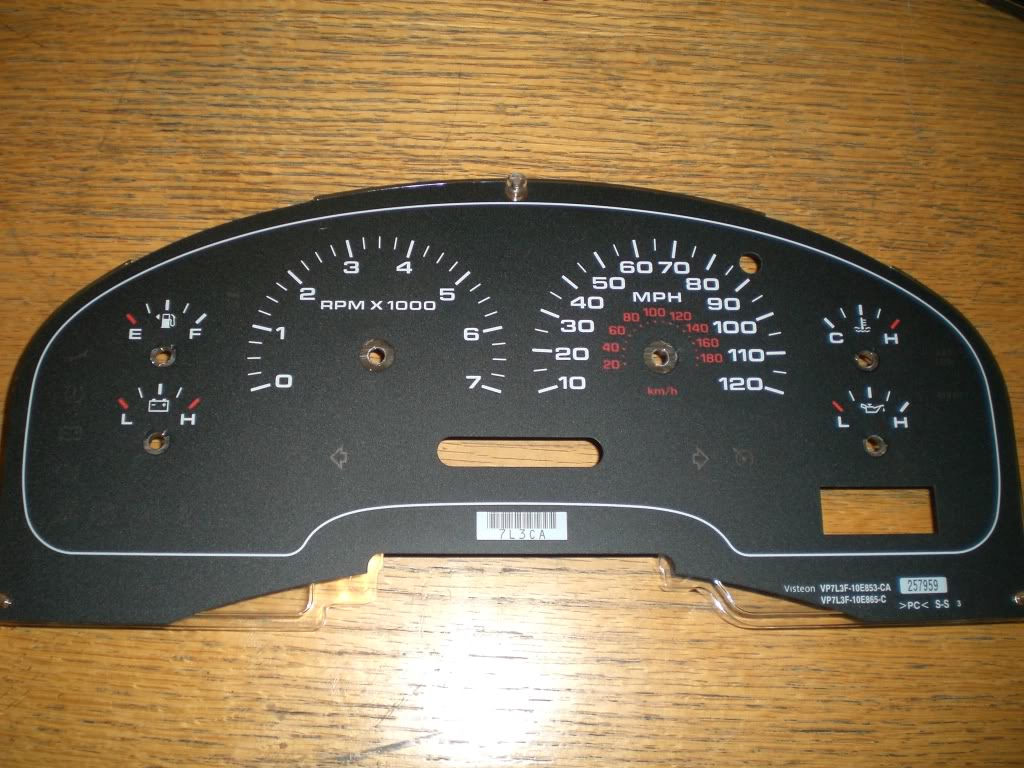
Looking at the back of the gauge cluster, you will see 6 - 8 t15 screws holding on a plastic liner. Remove these and the plastic liner. Now you will find about 4 t10 screws. Remove these too. This will now free up your plastic cover from the front of your gauge cluster but it will not come off just yet. To free it, you must remove all of your needles. I do recommend marking down where they sit so you can put them all back on when you're done. I removed my needles with a very small flat head screwdriver. Apply force to lift the needle straight out of it's holding spot. Mine took quite a bit of force to remove but they did come out finally. If your needles "break" into a couple pieces, that's fine because you can fix this with some super glue when you're done. Needles removed, you can now remove the front of your gauge cluster. You will only need this piece for right now. You will see the black background for your gauges is glued onto a plastic background. Feel around the edges and find the edge which comes off easiest. Carefully remove the black plastic piece. Do not pry it off because bending it would not be good.
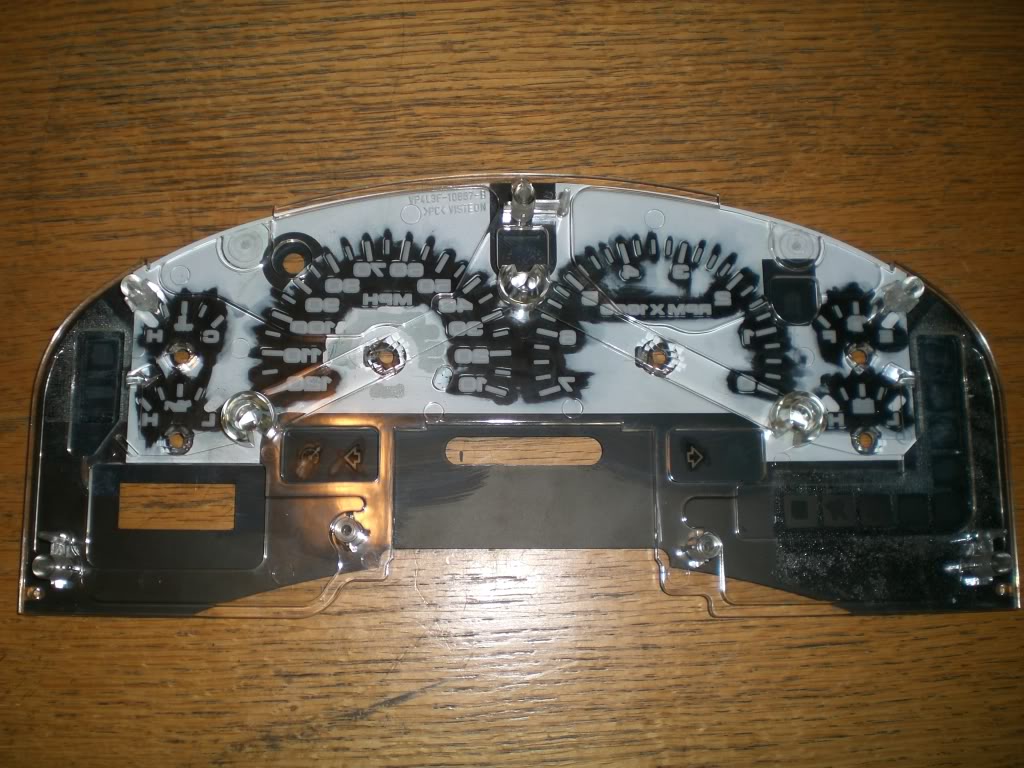
Black plastic cover removed, flip it over to see this.
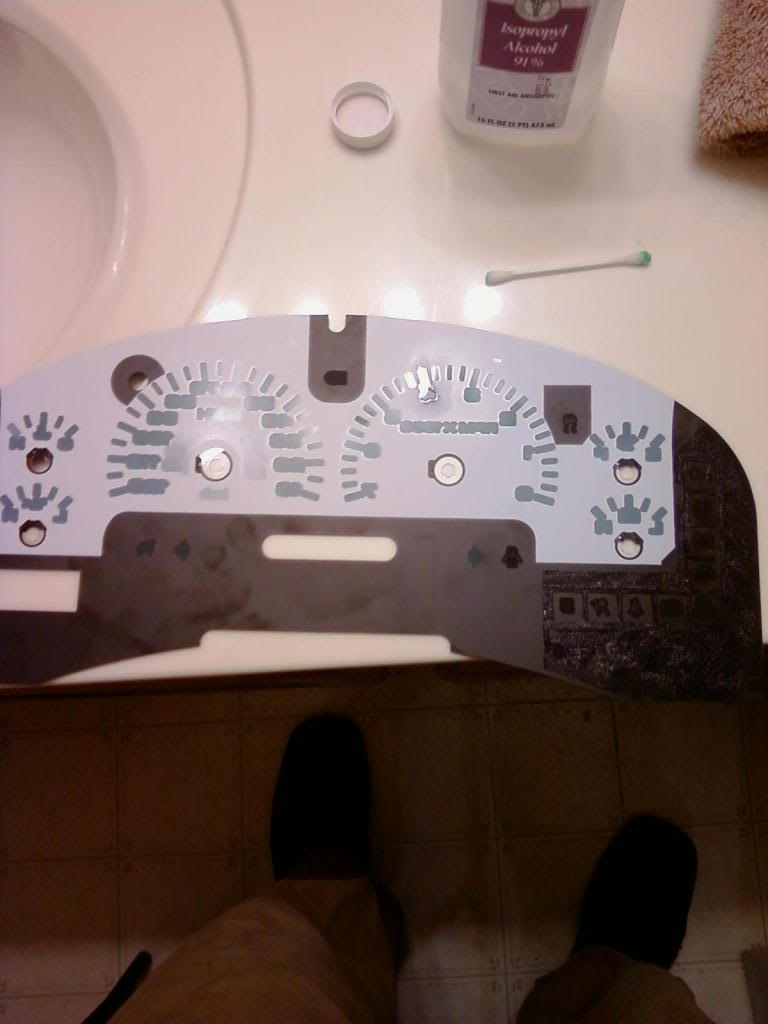
Now, with some rubbing alcohol and a LOT of q-tips, you can remove the white background from your gauges. With a bunch of elbow grease and about an hour of your time you can have your gauges looking like this.
Now, take this piece and clean it gently with some rubbing alcohol to make sure all the residue is off of it. This will cloud your display if you do not do it properly. Take your cleaned panel back to the clear plastic piece from which it was removed and reapply it to it's original position.
Now with that done, you will be able to work on your LED display. Color does not matter but as you can see I used blue. Brightness however does matter. I had to buy two separate types of LEDs. Dependent upon your year model, your dash will be split up into different sections with lighting. Looking at my gauge cluster, I noticed my blinker lights each had their own LED and the rest were scattered around the background of the gauge cluster.
With no prior knowledge to wiring for LEDs, a quick lesson from professor Google lead me to this website. --> http://ledcalc.com/
Running my number I found out which resistors I needed and you can do the same. I had 6 LEDs running off of two resistors (3 to each on respectively) and another 2 LEDs running off of their own separate resistor (these two were for the blinkers) <-- it is important to remember each of your blinker LEDs will need their own power source that way they can be wired into your blinker power wires.
ALSO NOTE--> the flat side of the LED is the negative lead when you wire everything in for a series circuit
All wiring done, you can install the LEDs in the back of your gauge cluster by removing the stock bulbs and hot gluing the LEDs into place. With zip ties you can move from this
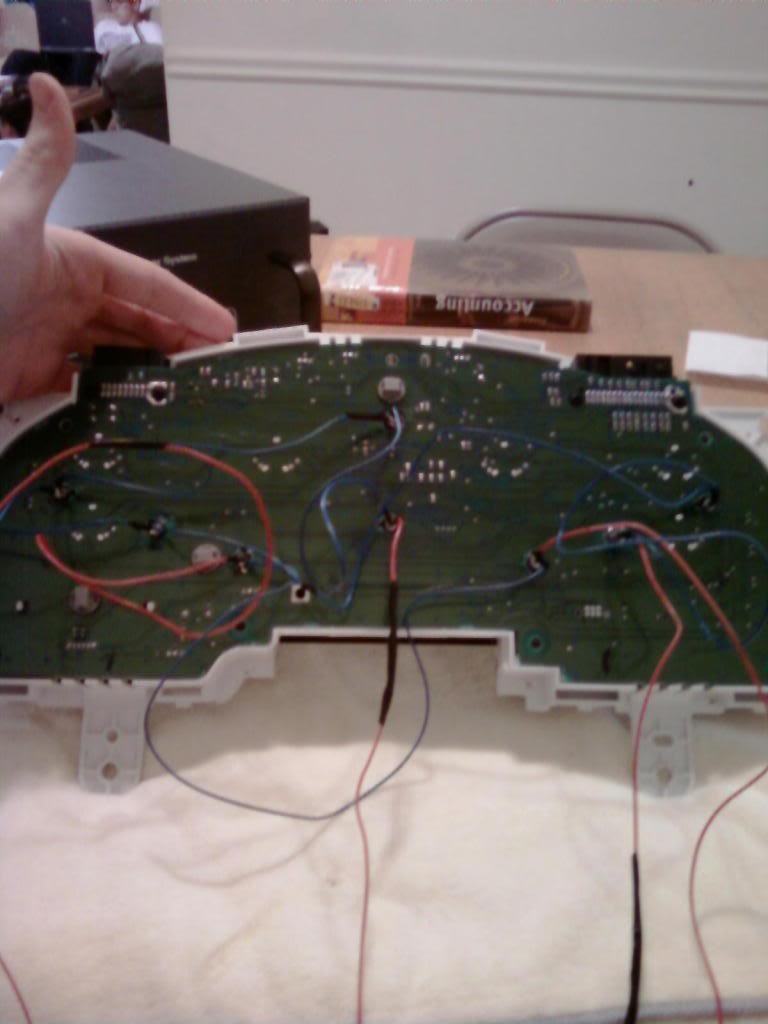
to this
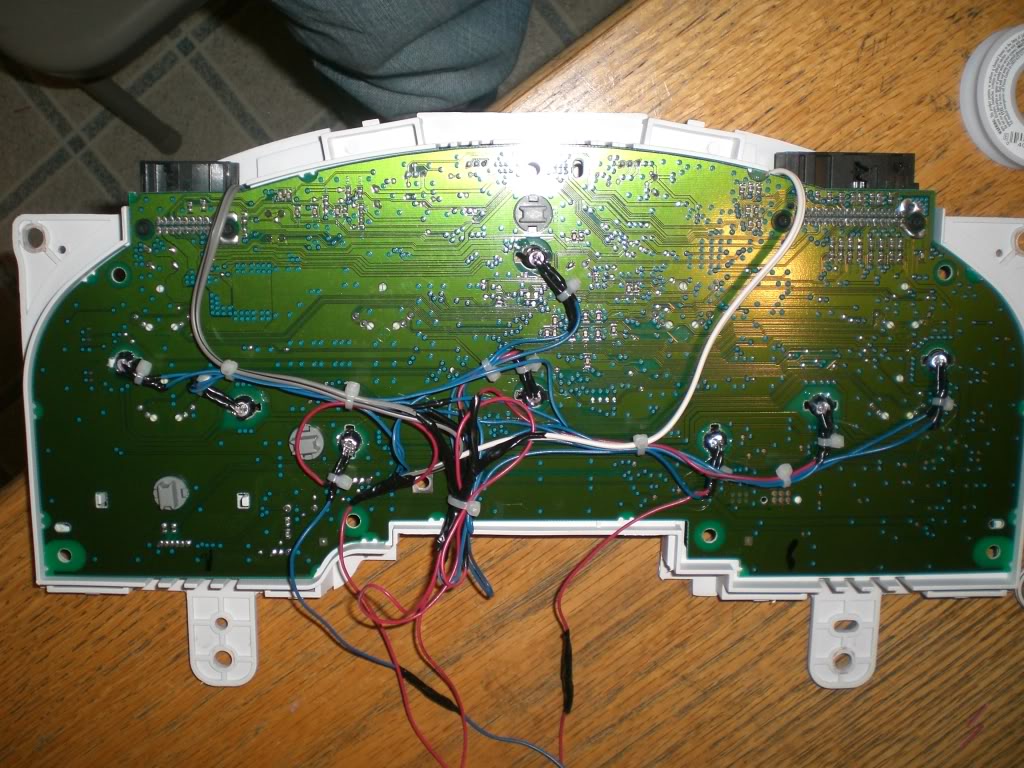
you will need to wire these LEDs directly into the power source of your can, BUT there's something you must remember. If you want to keep the "fade" effect of your gauges, you must connect the positive lead for your LEDs to the blue/red wire. This is your illumination wire and will allow you to retain the same effects as stock lighting. The other end will simply need to be grounded. If you are having trouble getting your LEDs to work, you might wanna double check your LEDs are set the right way. Don't forget the flat side of the LED is the negative side.
Now, reassemble the gauge cluster. Put the 4 T15 screws back in and then put the plastic cover back on with the 6 T10 screws. With your wiring complete you can now wire them back into your truck. Be sure to solder all connections to ensure a quality install and cover all solder/exposed wire with electrical tape or shrink wrap.
Now you're pretty much done! Just reverse the disassembly instructions and put everything back together.
This is a long write up but it's a long process... took me quite a while to get this whole process done. Only a day though.
So jumping into this you're going to need a few things...
1) 7mm nut driver
2) 8 LEDs
3) the required OHM resistors (discussed later)
4) 22awg wire
5) T10 wrench
6) T15 wrench
7) Wire strippers
8) Soldering iron/ Crimpers
9) Very small flat head screwdriver
10) Rubbing alcohol
11) Q-tips (a bunch) <-- approx. 30
12) Led holders
Sitting in your driver's seat you have to pull off the knee panel first. You remove the two 7mm screws on the bottom of the panel. After this the rest of the panel will just pop off with some effort.
Now you have to use your 7mm nut driver to remove the two screws holding on the plastic panel which surrounds/houses your gauge cluster. Two 7mm screws were revealed after removing the knee panel. With these out you can now remove the upper piece of the dash. This can easily be done by removing the lower sections first, one side at a time. Then grabbing the top of the piece, you can pull the entire piece back to you and it will come off. It's held in place by 3 clips so it might take a bit of effort to get it out.
Now with that done, there will be 4 exposed 7mm screws (two on top and two on bottom). The top two should come out easy enough but the bottom two gave me a run for my money.
These all out, you can now unplug the two wire clusters which are plugged into the top. This now frees you to take the entire gauge cluster inside. This piece is important, so be sure to be nice to it!
Looking at the back of the gauge cluster, you will see 6 - 8 t15 screws holding on a plastic liner. Remove these and the plastic liner. Now you will find about 4 t10 screws. Remove these too. This will now free up your plastic cover from the front of your gauge cluster but it will not come off just yet. To free it, you must remove all of your needles. I do recommend marking down where they sit so you can put them all back on when you're done. I removed my needles with a very small flat head screwdriver. Apply force to lift the needle straight out of it's holding spot. Mine took quite a bit of force to remove but they did come out finally. If your needles "break" into a couple pieces, that's fine because you can fix this with some super glue when you're done. Needles removed, you can now remove the front of your gauge cluster. You will only need this piece for right now. You will see the black background for your gauges is glued onto a plastic background. Feel around the edges and find the edge which comes off easiest. Carefully remove the black plastic piece. Do not pry it off because bending it would not be good.
Black plastic cover removed, flip it over to see this.
Now, with some rubbing alcohol and a LOT of q-tips, you can remove the white background from your gauges. With a bunch of elbow grease and about an hour of your time you can have your gauges looking like this.
Now, take this piece and clean it gently with some rubbing alcohol to make sure all the residue is off of it. This will cloud your display if you do not do it properly. Take your cleaned panel back to the clear plastic piece from which it was removed and reapply it to it's original position.
Now with that done, you will be able to work on your LED display. Color does not matter but as you can see I used blue. Brightness however does matter. I had to buy two separate types of LEDs. Dependent upon your year model, your dash will be split up into different sections with lighting. Looking at my gauge cluster, I noticed my blinker lights each had their own LED and the rest were scattered around the background of the gauge cluster.
With no prior knowledge to wiring for LEDs, a quick lesson from professor Google lead me to this website. --> http://ledcalc.com/
Running my number I found out which resistors I needed and you can do the same. I had 6 LEDs running off of two resistors (3 to each on respectively) and another 2 LEDs running off of their own separate resistor (these two were for the blinkers) <-- it is important to remember each of your blinker LEDs will need their own power source that way they can be wired into your blinker power wires.
ALSO NOTE--> the flat side of the LED is the negative lead when you wire everything in for a series circuit
All wiring done, you can install the LEDs in the back of your gauge cluster by removing the stock bulbs and hot gluing the LEDs into place. With zip ties you can move from this
to this
you will need to wire these LEDs directly into the power source of your can, BUT there's something you must remember. If you want to keep the "fade" effect of your gauges, you must connect the positive lead for your LEDs to the blue/red wire. This is your illumination wire and will allow you to retain the same effects as stock lighting. The other end will simply need to be grounded. If you are having trouble getting your LEDs to work, you might wanna double check your LEDs are set the right way. Don't forget the flat side of the LED is the negative side.
Now, reassemble the gauge cluster. Put the 4 T15 screws back in and then put the plastic cover back on with the 6 T10 screws. With your wiring complete you can now wire them back into your truck. Be sure to solder all connections to ensure a quality install and cover all solder/exposed wire with electrical tape or shrink wrap.
Now you're pretty much done! Just reverse the disassembly instructions and put everything back together.
Last edited by iRmARK88; 12-11-2009 at 03:12 PM.

The following users liked this post:
albertasfinest (07-02-2014)
03-26-2009, 05:13 PM
#2
Combat Trucker

Join Date: Sep 2008
Location: Chester MD and Goldsboro NC
Posts: 389
Likes: 0
Received 0 Likes
on
0 Posts

GREAT! One question though; are they just normal LED's or is it the little tiny square ones. I know for the A/C lights and all that good stuff, theyre the really small square lights.
03-28-2009, 11:35 AM
#6
Car Audio FANATIC
Thread Starter
yeah actually i did find that camera! haha I'm going to go take some pics right now and get some more done on the install. gotta finish just a couple things so I'll get detailed pics for everything
blk08stx... honestly it's not hard at all. lots of people are scared by wiring and electronics in cars but it's extremely easy. like i said i jumped into this with no LED wiring experience. the only experience i have is from when i was an installer a little bit back. all your doing though is soldering LEDs together and then hitting it up with a ground and a power. very simple
blk08stx... honestly it's not hard at all. lots of people are scared by wiring and electronics in cars but it's extremely easy. like i said i jumped into this with no LED wiring experience. the only experience i have is from when i was an installer a little bit back. all your doing though is soldering LEDs together and then hitting it up with a ground and a power. very simple
03-28-2009, 11:55 AM
#7
Junior Member

Join Date: Jan 2009
Posts: 28
Likes: 0
Received 0 Likes
on
0 Posts
thanks man any question i will let you know i wanna do something like that the outside of my truck looks nice but the inside doesn't look that nice so this will make it look alot better
Trending Topics
03-28-2009, 02:49 PM
#8
Car Audio FANATIC
Thread Starter
just finished up the wiring on some changes which i thought of haha going to put it back in the truck before i have to run to work. pictures to come and night pictures to come later... not off work till 11 tonight
 03-31-2009, 07:19 PM
#10
Junior Member

Join Date: Feb 2009
Posts: 8
Likes: 0
Received 0 Likes
on
0 Posts
That looks really sharp! good job!
were the LED's you purchased defused? Led's are so directional I was worried that you would have some really dark spots and other really bright spots but that does not appear to have happened at all, I'm impressed.
Is display too bright at night considering you can't dim LED's? I tend to make electrical projects way more advanced then necessary so I'm considering getting some multicolor LED's so I can change the colors, stupid because it is unnecessarily complicated and after a week I'll never change it anyway, but I enjoy that sort of project.