
How to replace rusted brake line


Thread Starter
Junior Member
Joined: Oct 2013
Posts: 20
Likes: 3
From: Ft. Blackmore VA
Just recently had brake line rust in two on me so I thought I'd document the fix in case some else needs some guidance.
Would like to state that I am not a master mechanic I just do most of my own work, so proceed at your own risk
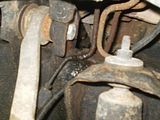
First clue, low brake fluid, next puddle of fluid near tire, head in fender well revealed this
(click for bigger picture)
so time to buy some line. I opted for some 3/16 Nickle Copper alloy lines(no more crusty lines) from advance, regular price was 49.99. I Got 20% off that
Things you'll need:
phillips screw driver
7/16 wrench
1/2 wrench
3/8 wrench
5.5mm socket
prying tool or curved needle nose pliers
a way to bleed brakes(pressurized bleed tool, helper,indentured servant, random body that can push a brake pedal )
brake fluid(bought a gallon cuz thats how I roll)
brake and caliper grease(safe for rubber)
tube bender and cutter
a good double flaring kit(don't buy the harbor freight one, seriously don't do it. Ask me how I know)
files
And a few cold beers or other drink of choice
First thing to do is start removing the 5.5mm bolts from the inner fender well there are 5 total with one being underneath the truck on the door side of the fender
You will also need to remove this screw to make it easier to remove the 5.5mm bolt near it
Next remove the round plastic tabs
Now with all bolts and tabs removed gently slide the fender well in towards the motor and down once it's loose tilt the top towards you and the bottom away and you should now see the wires attached to the fender well. Carefully remove them from the fender well. This can also be done before loosening the fender well by going in through the engine compartment. Might be easier if you have smaller hands but for me loosening the fender well is easier.
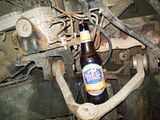
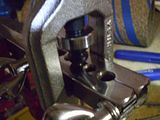
Once the well is out you can now easily see the Hydraulic Control Unit or HCU(left of beer) which from my understanding is what controls your ABS. Time to take a sip of beer and get your game plan together.
If memory serves me well the fitting at the HCU is 1/2 and at the caliper it is 7/16. Loosen these as best you can with out damaging the fittings, they can be reused. If they are really stuck DON'T use wd-40 or other petroleum based oils. I just use some of my brake fluid and it seemed to suffice enough to help me loosen the threads. Once the line was off I checked for fluid coming from the HCU, if not leaking good. If it is leaking plugs the hole or reattach line and pump the brakes some then remove line again.
Once you have your line off try try to determine the length of line you'll need, don't stretch the old line out your going to try and replicate the bends(didn't work for me but you luck may vary)
Once you've figured out how much line you need you a pipe cutting tool. Cut the ends of the old line off but leave enough line to grip with pliers and try and remove the fittings.
If they are frozen and won't move which will be almost certain. Place the fitting squarely in a vice. Pour brake fluid around the line and fitting and let it soak awhile. Then take the pliers and grab onto the line and start twist back and forth while pushing down and pulling up. You may also need sand paper or a wire brush if you line is extra crispy like mine was. Keep hitting the line with the brush or sand paper and brake fluid until it starts moving freely. Then you should be able to pull the line back up and cut it flush with the fitting and tap the rest of the line out.
Of course if you got the extra cash and can find the correct fittings then new ones will be less of a hassle. After salvaging the old fittings use a wire brush to clean up the threads.
Now take your new line and either start copying the bends from the original line or say the heck with it and do them when your finished flaring.
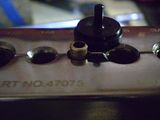
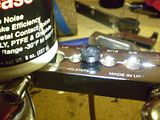
To double flare your lines you need to make sure your cuts are nice and square and clean. Use a file to smooth outside edge of the new line and you'll need a small file or deburing tool to clean the inside of the cut. Then take the 3/16 adapter from your flaring kit it will be the smallest top looking thing in the kit.
Some practice will be required to get a feel for proper flaring. Your not strong arming the clamp just want to tighten it just enough. So practice a few times on some scrap or even better a small piece of new Line.
Put your flaring bar in your vice and place your new line in the hole marked for 3/16. Turn the adapter upside down so the rod is pointing up and on this kit the 3/16 adapter has two lips, you want to set the line level with the lowest lip like so.
Then tighten the flaring bar down starting with the **** closest to the vice first. Then take a dab of brake and caliper grease and apply to the top side of the adapter and the around the flat part of the bottom side(make sure it's safe for rubber, if not don't grease the underside of the adapter)
Then place your flaring clamp onto the adapter like so
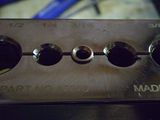
Tighten the clamp until the adapter bottom touches the flaring bar. No need to crank it down just make sure the adapter is fully seated against the bar. Then loosen the clamp and remove the adapter Should look similar to this.
Next place the clamp back on the line without the adapter this time and tighten it down. This part is some what tricky I've noticed the upper fitting doesn't require as much of a flare as the bottom fitting did. Your flare should look something like this:
Now with one side of the line flared, slip on your fittings on the line and make sure they are facing in the correct direction. Now flare the other side of the line. When finished be sure to clean up the grease on the line if any got on or in it. For good measure I use a air compressor to blow out any grease or metal shavings in the line.
Now attach the new line to the HCU and start bending or tweeking your bends to fit until you can attach the line back at the flex hose on the caliper. You want your bends to have plenty of slack so to speak, so that the line can move up and down without being under any stress or run the risk of being pinched by the upper control arm.
I only replaced the one bad line for now since I was in a hurry but I'm planning on going back to do the others soon.
The front passenger side line runs towards the bumper all the way around the front of the engine and and along the frame rail on the passenger side. The rear brakes on my truck which a rear ABS only truck has a single line that runs along the frame rail towards the rear end where it eventually tee's off to both brake drums. The other two lines run to the master cylinder one is a send and other return I presume. If changing these lines do not let the master cylinder run dry, plug the holes.
After replacing lines follow proper brake bleed procedures, once all air has been removed from the system. Then reinstall fender well and Done.
Hope this will be helpful for those with extra crispy brake lines
Would like to state that I am not a master mechanic I just do most of my own work, so proceed at your own risk
First clue, low brake fluid, next puddle of fluid near tire, head in fender well revealed this
(click for bigger picture)

so time to buy some line. I opted for some 3/16 Nickle Copper alloy lines(no more crusty lines) from advance, regular price was 49.99. I Got 20% off that
Things you'll need:
phillips screw driver
7/16 wrench
1/2 wrench
3/8 wrench
5.5mm socket
prying tool or curved needle nose pliers
a way to bleed brakes(pressurized bleed tool, helper,indentured servant, random body that can push a brake pedal )
brake fluid(bought a gallon cuz thats how I roll)
brake and caliper grease(safe for rubber)
tube bender and cutter
a good double flaring kit(don't buy the harbor freight one, seriously don't do it. Ask me how I know)
files
And a few cold beers or other drink of choice
First thing to do is start removing the 5.5mm bolts from the inner fender well there are 5 total with one being underneath the truck on the door side of the fender
You will also need to remove this screw to make it easier to remove the 5.5mm bolt near it

Next remove the round plastic tabs
Now with all bolts and tabs removed gently slide the fender well in towards the motor and down once it's loose tilt the top towards you and the bottom away and you should now see the wires attached to the fender well. Carefully remove them from the fender well. This can also be done before loosening the fender well by going in through the engine compartment. Might be easier if you have smaller hands but for me loosening the fender well is easier.
Once the well is out you can now easily see the Hydraulic Control Unit or HCU(left of beer) which from my understanding is what controls your ABS. Time to take a sip of beer and get your game plan together.

If memory serves me well the fitting at the HCU is 1/2 and at the caliper it is 7/16. Loosen these as best you can with out damaging the fittings, they can be reused. If they are really stuck DON'T use wd-40 or other petroleum based oils. I just use some of my brake fluid and it seemed to suffice enough to help me loosen the threads. Once the line was off I checked for fluid coming from the HCU, if not leaking good. If it is leaking plugs the hole or reattach line and pump the brakes some then remove line again.
Once you have your line off try try to determine the length of line you'll need, don't stretch the old line out your going to try and replicate the bends(didn't work for me but you luck may vary)
Once you've figured out how much line you need you a pipe cutting tool. Cut the ends of the old line off but leave enough line to grip with pliers and try and remove the fittings.
If they are frozen and won't move which will be almost certain. Place the fitting squarely in a vice. Pour brake fluid around the line and fitting and let it soak awhile. Then take the pliers and grab onto the line and start twist back and forth while pushing down and pulling up. You may also need sand paper or a wire brush if you line is extra crispy like mine was. Keep hitting the line with the brush or sand paper and brake fluid until it starts moving freely. Then you should be able to pull the line back up and cut it flush with the fitting and tap the rest of the line out.
Of course if you got the extra cash and can find the correct fittings then new ones will be less of a hassle. After salvaging the old fittings use a wire brush to clean up the threads.
Now take your new line and either start copying the bends from the original line or say the heck with it and do them when your finished flaring.
To double flare your lines you need to make sure your cuts are nice and square and clean. Use a file to smooth outside edge of the new line and you'll need a small file or deburing tool to clean the inside of the cut. Then take the 3/16 adapter from your flaring kit it will be the smallest top looking thing in the kit.
Some practice will be required to get a feel for proper flaring. Your not strong arming the clamp just want to tighten it just enough. So practice a few times on some scrap or even better a small piece of new Line.
Put your flaring bar in your vice and place your new line in the hole marked for 3/16. Turn the adapter upside down so the rod is pointing up and on this kit the 3/16 adapter has two lips, you want to set the line level with the lowest lip like so.

Then tighten the flaring bar down starting with the **** closest to the vice first. Then take a dab of brake and caliper grease and apply to the top side of the adapter and the around the flat part of the bottom side(make sure it's safe for rubber, if not don't grease the underside of the adapter)

Then place your flaring clamp onto the adapter like so

Tighten the clamp until the adapter bottom touches the flaring bar. No need to crank it down just make sure the adapter is fully seated against the bar. Then loosen the clamp and remove the adapter Should look similar to this.

Next place the clamp back on the line without the adapter this time and tighten it down. This part is some what tricky I've noticed the upper fitting doesn't require as much of a flare as the bottom fitting did. Your flare should look something like this:

Now with one side of the line flared, slip on your fittings on the line and make sure they are facing in the correct direction. Now flare the other side of the line. When finished be sure to clean up the grease on the line if any got on or in it. For good measure I use a air compressor to blow out any grease or metal shavings in the line.
Now attach the new line to the HCU and start bending or tweeking your bends to fit until you can attach the line back at the flex hose on the caliper. You want your bends to have plenty of slack so to speak, so that the line can move up and down without being under any stress or run the risk of being pinched by the upper control arm.
I only replaced the one bad line for now since I was in a hurry but I'm planning on going back to do the others soon.
The front passenger side line runs towards the bumper all the way around the front of the engine and and along the frame rail on the passenger side. The rear brakes on my truck which a rear ABS only truck has a single line that runs along the frame rail towards the rear end where it eventually tee's off to both brake drums. The other two lines run to the master cylinder one is a send and other return I presume. If changing these lines do not let the master cylinder run dry, plug the holes.
After replacing lines follow proper brake bleed procedures, once all air has been removed from the system. Then reinstall fender well and Done.
Hope this will be helpful for those with extra crispy brake lines