97-03 V8 F150 spark plug change
 07-14-2013, 02:17 AM
#81
Senior Member
This is exactly what i was looking for, im going to attempt to change all of my plugs today, and i have an 03 f150 5.4L. So does it matter if i torque it to the right specs? And if it does, what is the right amount? My Service-Repair manual says that 11 Ft. Lbs. should be enough... i would love to know what others can suggest, thanks in advance! 
 07-14-2013, 01:44 PM
#82
Senior Member
Thread Starter

This is exactly what i was looking for, im going to attempt to change all of my plugs today, and i have an 03 f150 5.4L. So does it matter if i torque it to the right specs? And if it does, what is the right amount? My Service-Repair manual says that 11 Ft. Lbs. should be enough... i would love to know what others can suggest, thanks in advance!
08-22-2013, 12:13 AM
#83
I never torque them. I just do it tight, but not so im stripping it out. Did mine in an hour, just used several different extension sizes, a universal joint and a parts grabber for reaching in and pulling out the old ones. Done this on several vehicles and never had a blow out.
09-12-2013, 04:32 PM
#84
Junior Member

Join Date: Aug 2013
Posts: 1
Likes: 0
Received 0 Likes
on
0 Posts
I have a 99 f150 4.6 with 146k and orginial plugs that runs smooth as silk. I am not saying not to change plugs as mind are probably welded in, but won't sell my truck if its running ok. I know the feeling use to do all my tune-ups too. This is a good write up with pictures I am just to old!
09-23-2013, 09:54 PM
#85
Junior Member

Join Date: Sep 2013
Posts: 1
Likes: 0
Received 0 Likes
on
0 Posts
I attempted this last week. The hex nut broke off of the spark plug and now I have nothing to get the socket around. I thought about using an easy out extractor but how would I get past the terminal head of the plug?
10-15-2013, 09:30 PM
#86
This thread was such a help, thanks!!!!
Just my advice, don't even think about doing this job without good tools. And no, your junk socket set from Walmart is not good tools. You need good, tight extensions. You have to have the universal 7mm socket....you will not be able to get the #7 coil loose without it. And no, a universal with a 7mm socket will not work, has to be the one with the socket built in it. Also get you a good light, it will save a lot if headaches.
This is no Chevy 350 plug change. If you don't plan on doing this correctly, your going to have a horrible time. It's not a Sunday afternoon with the bro's in your cousins driveway job.
Good luck.
The following users liked this post:
iFord (09-01-2014)
10-31-2013, 08:23 AM
#87


Read Otto's spark plug change post a couple of times. And decided to do it myself. Got all of my parts together, new plugs, new coil packs, dilectric greese and anti seize compound. Took a bad cut to my hand a couple of days ago so asked a good friend who used to work for ford to help me out. He agreed and we got her done. He was totally amazed with what I knew about performing the job. I actually helped him through the process (mostly supervising) removing and replacing everything. My friend keeps saying how do you know all of this? I'll have to tell him it was Otto's post. One of the new coil packs was bad and my mechanic found out which one it was pretty fast and we put one of the old ones back on until I can get another one today. Old setup had 119,000 on it. It is a 2003 4.6. I was really worried about stripping out or breaking a plug or finding where someone had already made a repair. But all went well. Torqued them down to 28 lbs. Running fine. Thanks Otto.
01-30-2014, 07:00 AM
#89
Senior Member
Thread Starter
The following users liked this post:
iFord (09-01-2014)
01-30-2014, 07:08 PM
#90

Changing the spark plugs on a 97-03 may be daunting at first. With the proper tools and a little knowledge, it is not the horrible experience it may seem. I hope that this will allow most with tools and mechanical ability to feel confident about performing the job. The recommendations in this article are not set in stone and any additions/omission suggestions are welcomed. The most accurate information is wanted to help as many as possible. The truck in this article is a 1999 F150 2V 5.4L. Some slight differences from year to year may be apparent; the general concept is the same though for all 97-03 V8�s (ie 97-98 5.4L and 97-99 4.6�s motors use a wire system instead of COPs).
Tools needed: 10 mm socket, 8 mm socket, � inch drive ratchet, 3/8 drive ratchet, � and 3/8 extensions, 3/8 drive torque wrench, 5/16� socket, dielectric grease.
1. Start with the truck on a flat surface. I like to put the rear of the truck up on ramps to gain better access to the engine bay. If you do put the rear on ramps, be sure to block the front wheels and set the parking brake to prevent any rolling issues. I also use a 1-foot tall wooden step to stand on while working to help with the height issue.

2. Open the hood and disconnect the negative battery cable. This will prevent most electrical safety concerns while working. It also resets the ECU so fuel trims can be adjusted if the old plugs were out of spec and the ECU compensated.
3. Start by removing the throttle body cover. There are three 10 mm bolts, one on the passenger side two on the driver�s, that hold it on.


4. Disconnect the IAT, MAF sensor, and all vacuum hoses from the intake tube and remove the intake from the engine bay.
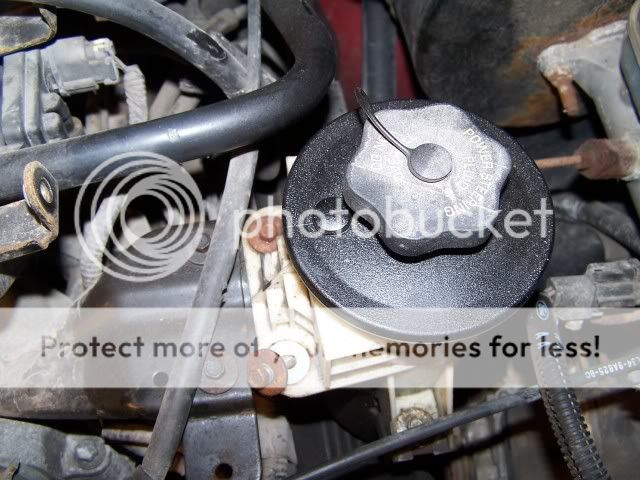
5. Take out the three 5/16� bolts that hold the power steering reservoir on and the three that hold the bracket on. I take both off to add a little more room to maneuver. Place the reservoir out of the way. The hoses will hold it while it is off.
6. I like to start with #4 and #5 as they are easy to get to and don�t require too much working around the fuel rail. Cylinders 2,3,4,7, and 8 I find it easier to remove the fuel rail. (For fuel rail removal refer step 14) Eye your first target. First, undo the clip that provides power to the COP. It is a small push tab on the underside of the connector. Push on the tab and pull out the connector from the COP.

7. There is a 7 mm bolt that holds the COP in place. Take this bolt out and the COP will be free to come out. It is very helpful to have magnetic sockets or a long pen magnet for the rear COP bolts. If it drops it can be very hard to retrieve them without assistance.
8. Pull the COP out. Some slight twisting may be needed to help get the boot off the spark plug. Take compressed air and blow out the spark plug well and the area around before attempting to remove the plug. This prevents any debris falling into the cylinder while the plug is out. I attach a length of hose to the end of a small blowgun to get down into the well and around the plug.

9. To remove the spark plug, use a 5/8� spark plug socket. Only remove and install the spark plugs with a fully cool engine. I use a Performance Tool Extended Spark Plug Socket 5/8�, 3/8in drive (Model# W80533), which is 5 inches in length and can get into the sparkplug well with ease. Extensions and swivels used will vary by sparkplug #. I like to tape the socket to the extension/swivel to keep them from coming apart, although will a long socket it isn�t hard to retrieve it if it comes off. If using a short socket I strongly suggest doing this.

Here is what the socket on #4 looks like. Loosen and remove the sparkplug.

10. Motorcraft are recommended for the reinstall. You can use the sparkplug you choose, but these Triton motors are VERY picky on which plugs they like. The correct heat range is a must. I used Motorcraft SP-479 for the new plugs. Motorcraft plugs have a nickel coating on the threads. Gap all plugs to factory specified .054.

11. Start the spark plug back into the head by hand. A piece of vacuum hose or the socket can be used. Feel the plug thread in by hand to prevent cross threading and damaging the head. For all 97-03 V8�s 28-32 lb/ft of torque is the new recommended to prevent the common blowout issue. Using a properly calibrated torque wrench is the most accurate for this. The 2 valve motors until during 2003 only have 4 threads in the head. The factory recommended torque is too low and causes the plugs to back out and blow out of the head. Anti seize is also not recommended as it skews the torque reading and can act as a lubricant. Using nickel coated plugs and the aluminum heads eliminates corrosion issues. The 97-03�s do not have the breaking issue the 04-08�s have.
Tools needed: 10 mm socket, 8 mm socket, � inch drive ratchet, 3/8 drive ratchet, � and 3/8 extensions, 3/8 drive torque wrench, 5/16� socket, dielectric grease.
1. Start with the truck on a flat surface. I like to put the rear of the truck up on ramps to gain better access to the engine bay. If you do put the rear on ramps, be sure to block the front wheels and set the parking brake to prevent any rolling issues. I also use a 1-foot tall wooden step to stand on while working to help with the height issue.
2. Open the hood and disconnect the negative battery cable. This will prevent most electrical safety concerns while working. It also resets the ECU so fuel trims can be adjusted if the old plugs were out of spec and the ECU compensated.
3. Start by removing the throttle body cover. There are three 10 mm bolts, one on the passenger side two on the driver�s, that hold it on.
4. Disconnect the IAT, MAF sensor, and all vacuum hoses from the intake tube and remove the intake from the engine bay.
5. Take out the three 5/16� bolts that hold the power steering reservoir on and the three that hold the bracket on. I take both off to add a little more room to maneuver. Place the reservoir out of the way. The hoses will hold it while it is off.
6. I like to start with #4 and #5 as they are easy to get to and don�t require too much working around the fuel rail. Cylinders 2,3,4,7, and 8 I find it easier to remove the fuel rail. (For fuel rail removal refer step 14) Eye your first target. First, undo the clip that provides power to the COP. It is a small push tab on the underside of the connector. Push on the tab and pull out the connector from the COP.
7. There is a 7 mm bolt that holds the COP in place. Take this bolt out and the COP will be free to come out. It is very helpful to have magnetic sockets or a long pen magnet for the rear COP bolts. If it drops it can be very hard to retrieve them without assistance.
8. Pull the COP out. Some slight twisting may be needed to help get the boot off the spark plug. Take compressed air and blow out the spark plug well and the area around before attempting to remove the plug. This prevents any debris falling into the cylinder while the plug is out. I attach a length of hose to the end of a small blowgun to get down into the well and around the plug.
9. To remove the spark plug, use a 5/8� spark plug socket. Only remove and install the spark plugs with a fully cool engine. I use a Performance Tool Extended Spark Plug Socket 5/8�, 3/8in drive (Model# W80533), which is 5 inches in length and can get into the sparkplug well with ease. Extensions and swivels used will vary by sparkplug #. I like to tape the socket to the extension/swivel to keep them from coming apart, although will a long socket it isn�t hard to retrieve it if it comes off. If using a short socket I strongly suggest doing this.
Here is what the socket on #4 looks like. Loosen and remove the sparkplug.
10. Motorcraft are recommended for the reinstall. You can use the sparkplug you choose, but these Triton motors are VERY picky on which plugs they like. The correct heat range is a must. I used Motorcraft SP-479 for the new plugs. Motorcraft plugs have a nickel coating on the threads. Gap all plugs to factory specified .054.
11. Start the spark plug back into the head by hand. A piece of vacuum hose or the socket can be used. Feel the plug thread in by hand to prevent cross threading and damaging the head. For all 97-03 V8�s 28-32 lb/ft of torque is the new recommended to prevent the common blowout issue. Using a properly calibrated torque wrench is the most accurate for this. The 2 valve motors until during 2003 only have 4 threads in the head. The factory recommended torque is too low and causes the plugs to back out and blow out of the head. Anti seize is also not recommended as it skews the torque reading and can act as a lubricant. Using nickel coated plugs and the aluminum heads eliminates corrosion issues. The 97-03�s do not have the breaking issue the 04-08�s have.