
An Outside-The-Bed Cargo Tie-Down System


Thread Starter
Member
Joined: May 2012
Posts: 39
Likes: 12
An Outside-The-Bed Cargo Tie-Down System -- Part 1 of 3
INTRODUCTION
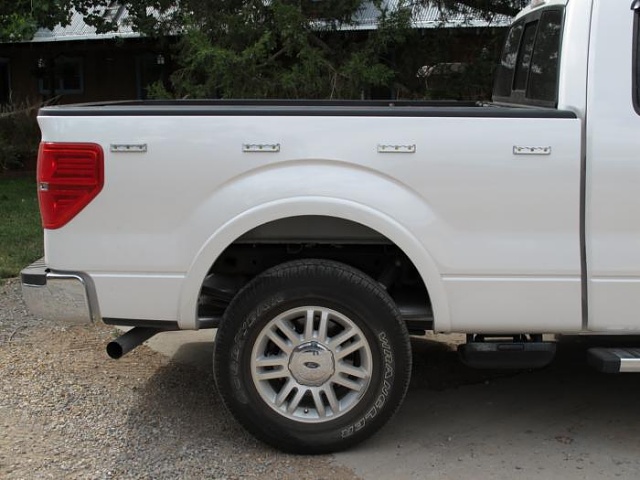
When I bought my Ford F-150 I knew that one of its recurring duties would be to haul bulky loads such as brush or furniture. The truck did not come with outside-the-bed tie-downs so I knew I would have to add them. This article explains what approach I chose, why, and how I installed it.
CHOICE OF TIE-DOWN SYSTEM
Originally I had intended to put several traditional-style cleats around the perimeter of the bed:
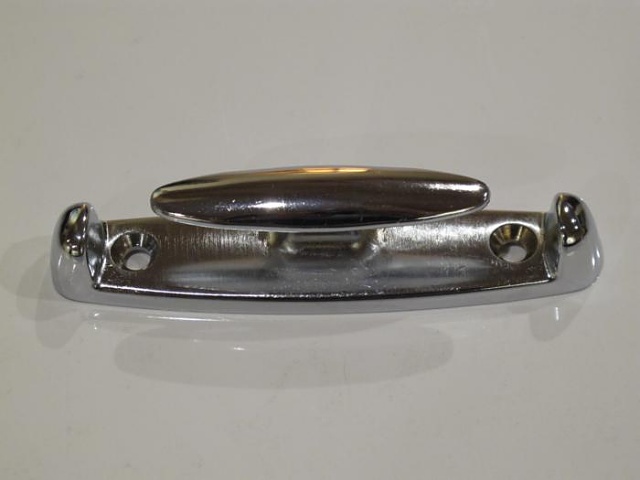
These cleats are sold under several brand names such as Keeper and Erickson, but they all seem identical so I expect they're all made by a single company in China. The Keeper-branded ones I bought seem to be of high quality and they come with sheet-metal screws so you can just drill some small holes and screw them in from the outside of the bed. But they only have a working load limit of 150 pounds. I knew that I wanted in most cases to use not ropes but ratchet straps to secure my loads and I thought these would often exceed the 150 pound limit.
In addition, a problem I always have with ratchet straps is that I hook one on one side of the truck, toss it over the load, go to the other side of the truck to secure the far end and find that the first end has become unhooked.
Then I found out about the L-track system. It appears that this system was created to secure cargo in airliners, but it is also commonly used inside pickup truck beds to tie-down motorcycles and ATVs, etc.. It consists of a track that is mounted to the vehicle and clips that snap into the track to provide mount points:
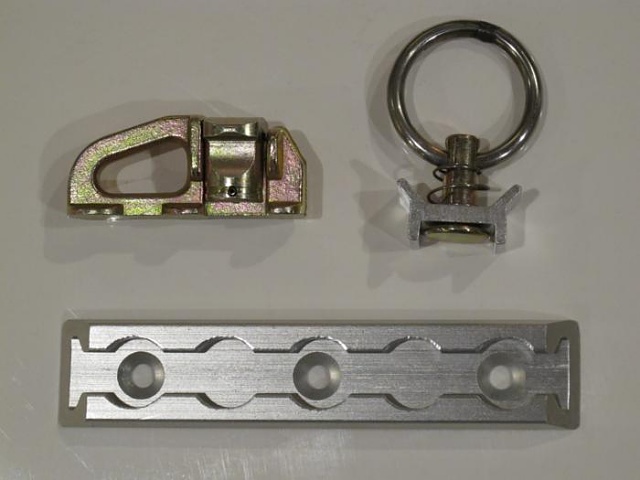
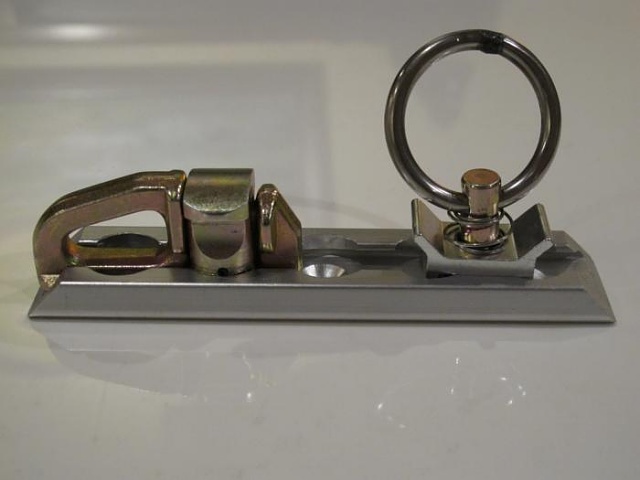
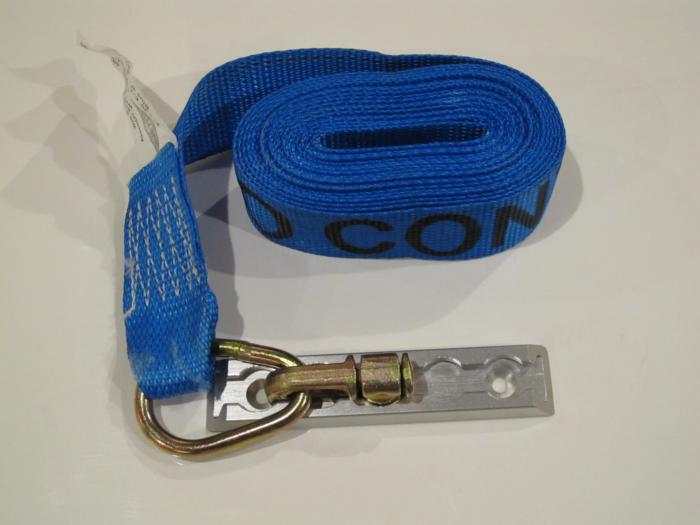
You can also get clips with ratchet straps attached:

The clip with the silver, circular loop has a working load limit of 1,333 pounds, and the squat, wide, gold clip has a working load limit of 2,000 pounds. There are additional styles of clips available.
I decided to use this system because: (1) I can mount several short strips around the perimeter of the bed, (2) they will be low profile when not in use, (3) they are stronger than I need, (4) I can use different clips for different purposes, (5) It's a widely available system with parts available from many vendors so I will always be able to get parts for it, (6) it's versatile enough that I might find new ways of using it over time, (7) I can add tracks inside the bed and use the same clips and straps, and (8) when I clip a ratchet strap on one side of the truck and toss it over the load and walk around to the other side the first side will remain attached to the bed.
INTRODUCTION
When I bought my Ford F-150 I knew that one of its recurring duties would be to haul bulky loads such as brush or furniture. The truck did not come with outside-the-bed tie-downs so I knew I would have to add them. This article explains what approach I chose, why, and how I installed it.
CHOICE OF TIE-DOWN SYSTEM
Originally I had intended to put several traditional-style cleats around the perimeter of the bed:

These cleats are sold under several brand names such as Keeper and Erickson, but they all seem identical so I expect they're all made by a single company in China. The Keeper-branded ones I bought seem to be of high quality and they come with sheet-metal screws so you can just drill some small holes and screw them in from the outside of the bed. But they only have a working load limit of 150 pounds. I knew that I wanted in most cases to use not ropes but ratchet straps to secure my loads and I thought these would often exceed the 150 pound limit.
In addition, a problem I always have with ratchet straps is that I hook one on one side of the truck, toss it over the load, go to the other side of the truck to secure the far end and find that the first end has become unhooked.
Then I found out about the L-track system. It appears that this system was created to secure cargo in airliners, but it is also commonly used inside pickup truck beds to tie-down motorcycles and ATVs, etc.. It consists of a track that is mounted to the vehicle and clips that snap into the track to provide mount points:


You can also get clips with ratchet straps attached:
The clip with the silver, circular loop has a working load limit of 1,333 pounds, and the squat, wide, gold clip has a working load limit of 2,000 pounds. There are additional styles of clips available.
I decided to use this system because: (1) I can mount several short strips around the perimeter of the bed, (2) they will be low profile when not in use, (3) they are stronger than I need, (4) I can use different clips for different purposes, (5) It's a widely available system with parts available from many vendors so I will always be able to get parts for it, (6) it's versatile enough that I might find new ways of using it over time, (7) I can add tracks inside the bed and use the same clips and straps, and (8) when I clip a ratchet strap on one side of the truck and toss it over the load and walk around to the other side the first side will remain attached to the bed.
Thread Starter
Member
Joined: May 2012
Posts: 39
Likes: 12
An Outside-The-Bed Cargo Tie-Down System -- Part 2 of 3
MOUNTING STRATEGY
I didn't feel that it would be strong enough to mount the tracks with sheetmetal screws. Instead I wanted to use bolts that would screw into nuts. I experimented on scrap sheetmetal with jack nuts but was not happy with the results. Upon further investigation I found that the bed walls are hollow and open at the bottom and I wondered if there was some way to get nuts and washers up into the hollow space to screw the bolts into.
After more thinking and experimentation I decided to get some pieces of 1/8" thick aluminum bar stock the same length as the tracks and to drill and tap holes that matched the mounting holes in the tracks. These backing bars would act as both nuts and washers for the bolts and would reinforce the sheetmetal -- which bends rather easily. I also got a sheet of translucent silicone rubber and cut it into gaskets to place between each track and the outside of the bed.
INSTALLATION PROCEDURE
Here's how I got each backing bar up into the hollow walls of the bed and bolted its track onto it.
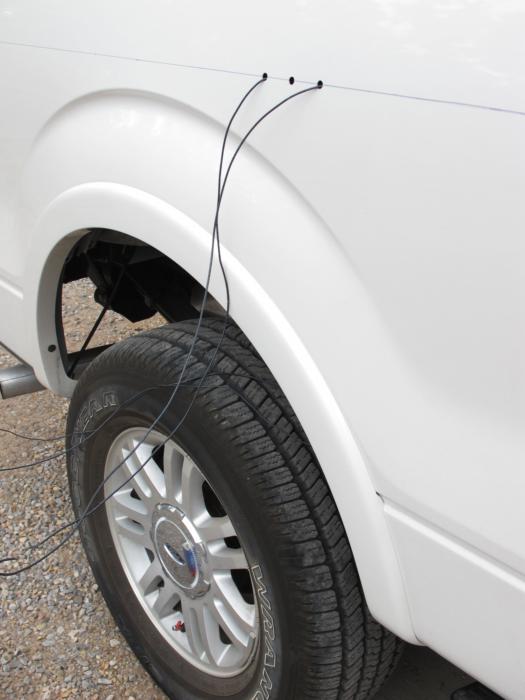
First I drilled the holes for a piece of track:
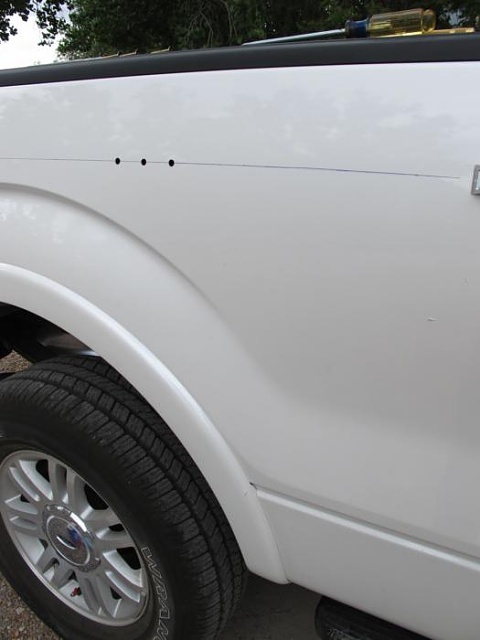
Then I took two, 8-foot long pieces of 14-gauge solid copper wire (the kind used for power wiring in homes) and ran them through the two outside holes and down to where I could grab them from underneath the truck:

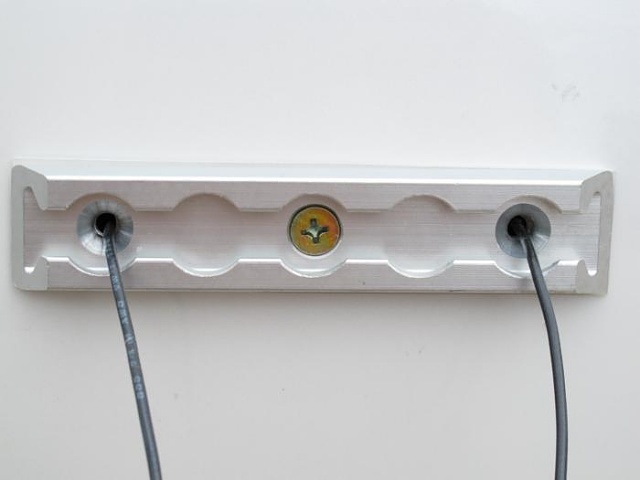
Then I slid the gasket and the track onto the top ends of the wires and twisted the wires together, and the backing plate onto the bottom ends of the wires and twisted the wires together:
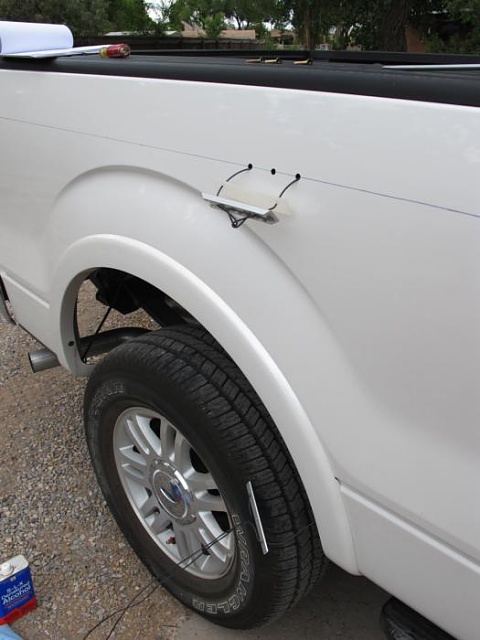
Then I pulled the top ends of the wires until the backing plate came up behind the holes:
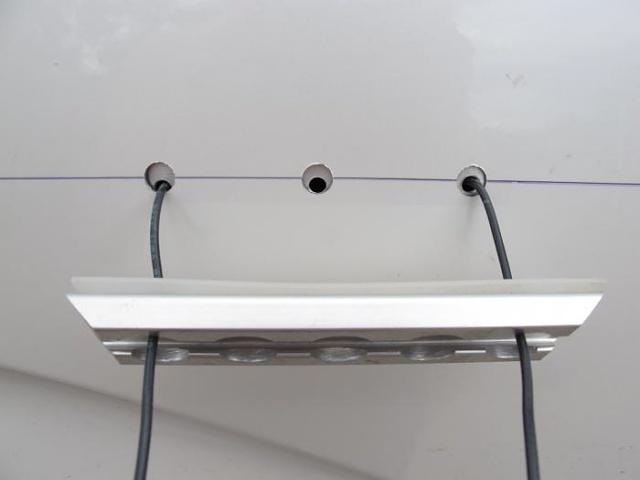

Then I threaded in the center screw:
MOUNTING STRATEGY
I didn't feel that it would be strong enough to mount the tracks with sheetmetal screws. Instead I wanted to use bolts that would screw into nuts. I experimented on scrap sheetmetal with jack nuts but was not happy with the results. Upon further investigation I found that the bed walls are hollow and open at the bottom and I wondered if there was some way to get nuts and washers up into the hollow space to screw the bolts into.
After more thinking and experimentation I decided to get some pieces of 1/8" thick aluminum bar stock the same length as the tracks and to drill and tap holes that matched the mounting holes in the tracks. These backing bars would act as both nuts and washers for the bolts and would reinforce the sheetmetal -- which bends rather easily. I also got a sheet of translucent silicone rubber and cut it into gaskets to place between each track and the outside of the bed.
INSTALLATION PROCEDURE
Here's how I got each backing bar up into the hollow walls of the bed and bolted its track onto it.
First I drilled the holes for a piece of track:

Then I took two, 8-foot long pieces of 14-gauge solid copper wire (the kind used for power wiring in homes) and ran them through the two outside holes and down to where I could grab them from underneath the truck:
Then I slid the gasket and the track onto the top ends of the wires and twisted the wires together, and the backing plate onto the bottom ends of the wires and twisted the wires together:

Then I pulled the top ends of the wires until the backing plate came up behind the holes:


Then I threaded in the center screw:

Thread Starter
Member
Joined: May 2012
Posts: 39
Likes: 12
An Outside-The-Bed Cargo Tie-Down System -- Part 3 of 3
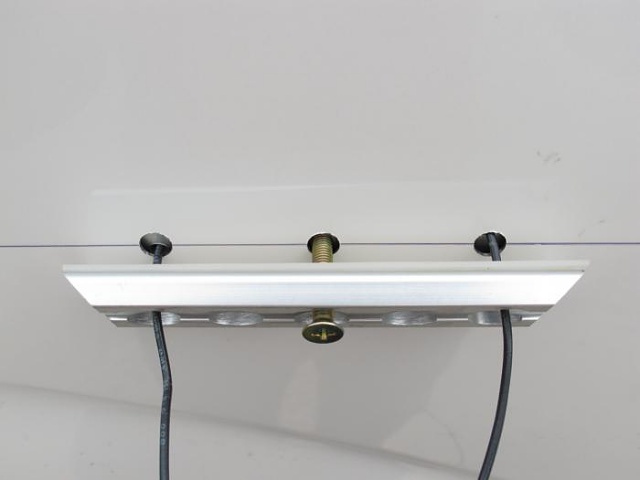
Then I carefully aligned the backing plate behind the track and tightened the center screw:
Then I pulled out the wires and threaded in the side screws:
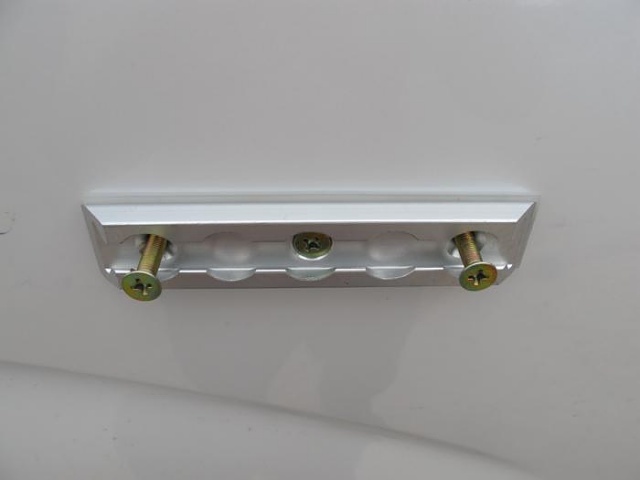
Then I adjusted all screws to be barely loose, rotated the track into level and tightened all three screws:
THE FINISHED PRODUCT
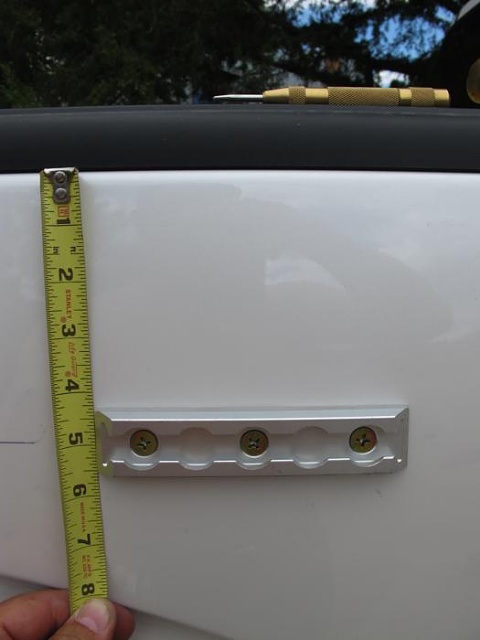
Here are all the tracks installed:
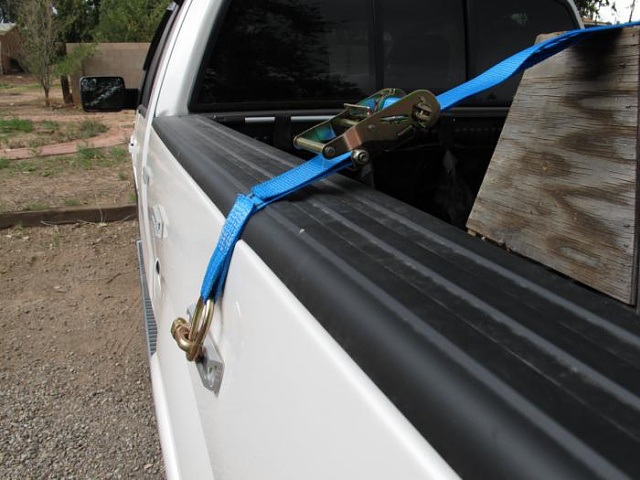
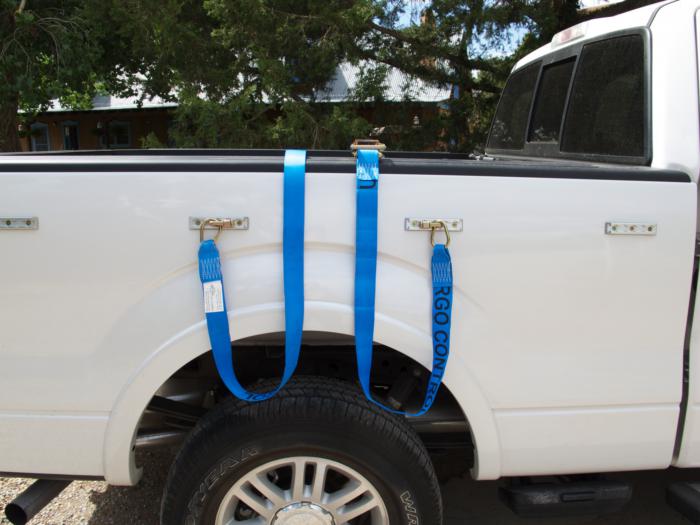
Here are some ratchet straps clipped into tracks:

And here is a ratchet strap in use. Notice how the metal loop doesn't touch, and hence can't scratch, the paint:
NOTES
(1) The track system is generically called "Airline," "logistics" or "L" track but some vendors sell it under proprietary brand names such as "S-Track" or "Core-Track". It most often comes in bare aluminum, but you can sometimes find it in silver, black red or blue.
(2) The tracks I bought did not have the mounting holes precisely 2" apart. The distances varied from track to track as much as 1/8" so I had to custom drill every set of holes in both the backing plates, the silicone rubber gaskets and the truck bed. I think these were fabricated especially by or for this particular vendor and would not be the case for generic tracks bought from industrial suppiers.
(3) I used multiple, short 6" tracks. You can get these tracks in longer lengths but the side of the truck bed has a lot of subtle compound curves that make it impractical to mount long, straight tracks.
(4) I bought kits of screws from the same vendor as the tracks. These were 1/4" dia. with 28 threads per inch with 100 degree flatheads. I was thinking of using some stainless steel screws I already had which were 1/4" dia. with 20 threads per inch and 82 degree flatheads, but I didn't want to have to re-countersink all the mounting holes in the tracks.
(5) I drilled the holes in the side of the truck 3/8" dia. The extra size is necessary to leave some working room to jockey things around.
(6) I also put two tracks on the tailgate, but with a Torx-Plus size TP-27 bit I was able to remove the inside cover of the tailgate and access the inside hollow space, so I just used nylon locknuts and fender washers to mount the tracks on the tailgate.
(7) The pressure of the strap on the track in the last picture has caused the track to rotate a little in the direction of the pull. The sheetmetal side of the truck is being deformed a bit (although not as much as the angle of the photo makes it seem). I left it overnight then released the strap and the track rotated back to its unstressed position. So at least initially the sheetmetal of the truck can recover from this slight deformation. Only time will tell what the long-term effects will be. Fortunately I don't have to haul loads very often.
SOURCES
(1) The tracks and screws I bought from http://www.PitPosse.com. This was the only source where I could find off-the-shelf exactly the configuration I wanted in the tracks: 6" long, three pre-drilled mounting holes and with a silver coating (rather than bare aluminum). Pit Posse also has them in black, bright red and bright blue.
(2) The silicone rubber sheet that I used for gaskets I got on Amazon.com in their new industrial supplies section.
(3) It was hard to find a 1/4-28 tap. The local home improvement centers didn't have them. Eventually I found that one of the local wholesale bolt and fastener suppliers had them in stock at a very good price ($5 each).
(4) The ratchet straps were available with the L-track clips already attached from http://www.uscargocontrol.com. Unfortunately they also had E-track clips on each end dangling next to the L-track clips, so I had to hacksaw off the E-track clips. On the ratchet end of the strap there was an additional problem in that the strap was about 4 feet long. This would put the ratchet at the top of the load where it would be impossible to reach. So I had to cut each ratchet strap short and re-sew it so that the resulting strap (the fabric part) was only 8" long.
I used upholstery thread for the first one, then found out that Coats and Clark has a new "Outdoor Living" thread that's UV and weather resistant. So I've ordered some of that and will use it to sew the remaining straps. Neither of these threads is as thick as the original thread and so probably won't be as strong, but they should still have more strength than I need.
(5) I also got an assortment of clips of various types from http://www.uscargocontrol.com.
Then I carefully aligned the backing plate behind the track and tightened the center screw:

Then I pulled out the wires and threaded in the side screws:

Then I adjusted all screws to be barely loose, rotated the track into level and tightened all three screws:

THE FINISHED PRODUCT
Here are all the tracks installed:

Here are some ratchet straps clipped into tracks:
And here is a ratchet strap in use. Notice how the metal loop doesn't touch, and hence can't scratch, the paint:

NOTES
(1) The track system is generically called "Airline," "logistics" or "L" track but some vendors sell it under proprietary brand names such as "S-Track" or "Core-Track". It most often comes in bare aluminum, but you can sometimes find it in silver, black red or blue.
(2) The tracks I bought did not have the mounting holes precisely 2" apart. The distances varied from track to track as much as 1/8" so I had to custom drill every set of holes in both the backing plates, the silicone rubber gaskets and the truck bed. I think these were fabricated especially by or for this particular vendor and would not be the case for generic tracks bought from industrial suppiers.
(3) I used multiple, short 6" tracks. You can get these tracks in longer lengths but the side of the truck bed has a lot of subtle compound curves that make it impractical to mount long, straight tracks.
(4) I bought kits of screws from the same vendor as the tracks. These were 1/4" dia. with 28 threads per inch with 100 degree flatheads. I was thinking of using some stainless steel screws I already had which were 1/4" dia. with 20 threads per inch and 82 degree flatheads, but I didn't want to have to re-countersink all the mounting holes in the tracks.
(5) I drilled the holes in the side of the truck 3/8" dia. The extra size is necessary to leave some working room to jockey things around.
(6) I also put two tracks on the tailgate, but with a Torx-Plus size TP-27 bit I was able to remove the inside cover of the tailgate and access the inside hollow space, so I just used nylon locknuts and fender washers to mount the tracks on the tailgate.
(7) The pressure of the strap on the track in the last picture has caused the track to rotate a little in the direction of the pull. The sheetmetal side of the truck is being deformed a bit (although not as much as the angle of the photo makes it seem). I left it overnight then released the strap and the track rotated back to its unstressed position. So at least initially the sheetmetal of the truck can recover from this slight deformation. Only time will tell what the long-term effects will be. Fortunately I don't have to haul loads very often.
SOURCES
(1) The tracks and screws I bought from http://www.PitPosse.com. This was the only source where I could find off-the-shelf exactly the configuration I wanted in the tracks: 6" long, three pre-drilled mounting holes and with a silver coating (rather than bare aluminum). Pit Posse also has them in black, bright red and bright blue.
(2) The silicone rubber sheet that I used for gaskets I got on Amazon.com in their new industrial supplies section.
(3) It was hard to find a 1/4-28 tap. The local home improvement centers didn't have them. Eventually I found that one of the local wholesale bolt and fastener suppliers had them in stock at a very good price ($5 each).
(4) The ratchet straps were available with the L-track clips already attached from http://www.uscargocontrol.com. Unfortunately they also had E-track clips on each end dangling next to the L-track clips, so I had to hacksaw off the E-track clips. On the ratchet end of the strap there was an additional problem in that the strap was about 4 feet long. This would put the ratchet at the top of the load where it would be impossible to reach. So I had to cut each ratchet strap short and re-sew it so that the resulting strap (the fabric part) was only 8" long.
I used upholstery thread for the first one, then found out that Coats and Clark has a new "Outdoor Living" thread that's UV and weather resistant. So I've ordered some of that and will use it to sew the remaining straps. Neither of these threads is as thick as the original thread and so probably won't be as strong, but they should still have more strength than I need.
(5) I also got an assortment of clips of various types from http://www.uscargocontrol.com.


 Thats one heck of a how-to man!
Member
Joined: May 2009
Posts: 30
Likes: 0
This is a definite up-grade from the OEM ties in the BED (how practical is that FORD?).
The FX4 did have nice tie-downs on early models..
After market ties mounted higher on the exterior were what I installed on my old 87 truck.
I am not sure if newer body panels can hold up to sheet metal fasteners (thinner steel?)
I have yet to mod my 2010. Something about putting a drill bit through the side wall is holding me back ; ) .
I would think if you shifted your tie downs up closer to the top bend on the bed you would have less deflection of the side panel?
I have not investigated the access of this higher location, may be too difficult to get a backer plate / nut..
thanks for the post
Thread Starter
Member
Joined: May 2012
Posts: 39
Likes: 12
Peter K: There's plenty of hollow space to move the tie-downs up, and that might reduce the sheetmetal deflection under load, but I needed the space because I often have to carry large loads of brush covered by a tarp and I need room for the tarp to hang down and cover the top portion of the bed.
Of course I didn't know whether or how much deflection there would be until I did the mod, but my early experiments with jack nuts and with large fender washers is one of the things that lead me to choose a large backer bar and I'm very glad I did.
Of course I didn't know whether or how much deflection there would be until I did the mod, but my early experiments with jack nuts and with large fender washers is one of the things that lead me to choose a large backer bar and I'm very glad I did.

