How to Detail your Vehicle back to a Show-Room Finish
 02-05-2010, 11:57 PM
#1
PART 1 - INTRODUCTION AND MATERIALS
============================
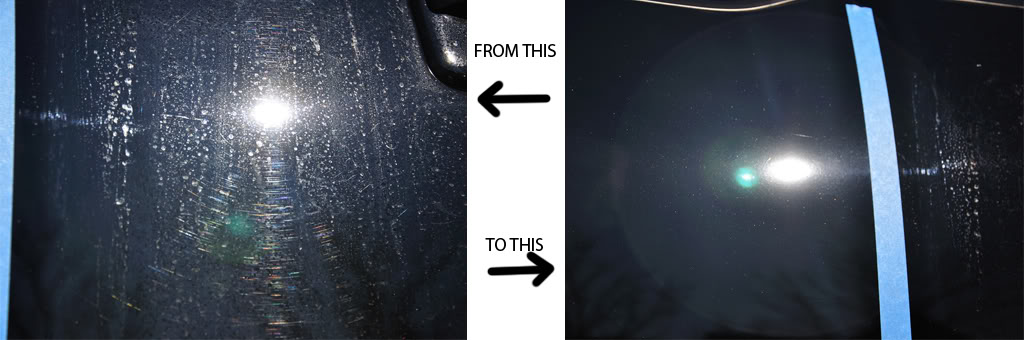
If you'd like to greatly improve your paint's condition and how your truck looks please read on! You can go from swirl marks and water spots to a mirror finish!
Introduction:
Okay guys many of you saw my 2nd Detail thread and wanted me to go into more detail. Here’s my reply. What I’m going to cover in this is what I’ve learned about exterior detailing. More specifically in this one, paint correction. Many of you guys are caught up to speed on proper car washing (two-bucket method, etc), but I’m going to cover it all for those that aren’t. This will be pretty in-depth, but I’ll try to keep this as user-friendly as possible, so that someone with extremely limited experience should be able to have their vehicle looking like it belongs in a show room. :thumbs:
Disclaimer: Please keep in mind that this is how I detail my truck. I will thus list the materials that I use and list the steps that I take. Detailing is more of an art than a science. There are many available materials and many methods to get to the same result. Most important rule to follow: HAVE FUN!
Also keep in mind that I am aiming this at someone who wants to do a whole detail from start to finish. If you want to skip steps (don’t need paint correction, etc) feel free. Keep in mind, though, that you should do everything to get the best results possible. I am also going to mention now that if you are doing a full detail that it would be best if you could split it up into a few days (two or more) as it’s much easier to accomplish with everything spread out. I did an entire detail in one day before. It’s possible, yes, but not much fun.
Materials Checklist:
I am going to list everything that I use in a proper detailing. I found that I was missing a few things from my ‘2nd Detail Thread’ so I will put in what I feel is necessary. I’ll try to list things in the order that you will be using them during the detail. If you already have some (or most) of the materials, or have something that will work as a substitute, congratulations! You’re that much closer to going from a monthly washer to an enjoying hobbyist. Try to keep it there, though. It’s not fun to be OCD.
I've linked each item back to Auto Detailing Solutions. I've had great experiences with them. If you can find it cheaper, feel free to buy elsewhere. I also noticed that much of the stuff is 'Out of Stock' at his place. I just put them up so you'd know what I was talking about.
Wheels, Tires, Etc:
Waxing, Glass Cleaning, and Final Rinse/Dry:

Now, you're looking at this and going, "Damn that's a lot off stuff to wash a car!"
Yes, it is, but it's not just washing a car anymore. This is the next level where attention to detail is magnified. If you've ever seen a dark color car in direct sunlight and seen all the swirl marks and said to yourself, "That sucks....", then this is for you. Yes, it's expensive, but it's well worth it. I consider this one of the best things you can do for your truck. It will be in your top list of money spent on your truck. Screw the mods, keep her clean.
It's so nice walking out to your truck and seeing her sparkle in the sunlight, with no flaws in sight. You also get a lot more compliments when she's clean.
With Part I complete, let me take the time and officially say: Welcome to the world of detailing!!!
============================
If you'd like to greatly improve your paint's condition and how your truck looks please read on! You can go from swirl marks and water spots to a mirror finish!
Introduction:
Okay guys many of you saw my 2nd Detail thread and wanted me to go into more detail. Here’s my reply. What I’m going to cover in this is what I’ve learned about exterior detailing. More specifically in this one, paint correction. Many of you guys are caught up to speed on proper car washing (two-bucket method, etc), but I’m going to cover it all for those that aren’t. This will be pretty in-depth, but I’ll try to keep this as user-friendly as possible, so that someone with extremely limited experience should be able to have their vehicle looking like it belongs in a show room. :thumbs:
Disclaimer: Please keep in mind that this is how I detail my truck. I will thus list the materials that I use and list the steps that I take. Detailing is more of an art than a science. There are many available materials and many methods to get to the same result. Most important rule to follow: HAVE FUN!
Also keep in mind that I am aiming this at someone who wants to do a whole detail from start to finish. If you want to skip steps (don’t need paint correction, etc) feel free. Keep in mind, though, that you should do everything to get the best results possible. I am also going to mention now that if you are doing a full detail that it would be best if you could split it up into a few days (two or more) as it’s much easier to accomplish with everything spread out. I did an entire detail in one day before. It’s possible, yes, but not much fun.
Materials Checklist:
I am going to list everything that I use in a proper detailing. I found that I was missing a few things from my ‘2nd Detail Thread’ so I will put in what I feel is necessary. I’ll try to list things in the order that you will be using them during the detail. If you already have some (or most) of the materials, or have something that will work as a substitute, congratulations! You’re that much closer to going from a monthly washer to an enjoying hobbyist. Try to keep it there, though. It’s not fun to be OCD.
I've linked each item back to Auto Detailing Solutions. I've had great experiences with them. If you can find it cheaper, feel free to buy elsewhere. I also noticed that much of the stuff is 'Out of Stock' at his place. I just put them up so you'd know what I was talking about.
Wheels, Tires, Etc:
- Meguiar's All-Purpose Cleaner Plus (APC+)
- Meguiar's All-Wheel Cleaner
- Brush (for tires, wheel wells, fender flares, exhaust tips, etc)
- Dedicated wash mitt for wheels (to avoid damaging wheels)
- Two five-gallon buckets (one plain water, one soapy solution)
- At least one grit-guard (for plain water bucket)
- Two wash mitts (one dedicated for lower panels and dirtiest parts of truck)
- Meguiar's Gold Class Wash Soap
- Foam applicator pad (for working product into trim, etc)
- Meguiar's Exterior Trim Detailer (aerosol can--makes life easier. says out of stock but you can find elsewhere if you look)
- Meguiar's Hyperdressing (for tires and if you have them, black wheels. my favorite product ever)
- Porter Cable 7424
- 5" Backing plate (included in link above)
- At least 3 5.5" Lake Country Orange (cutting) pads
- At least 3 5.5" Lake Country Green (polishing) pads (link above)
- Blue painter's tape
- Meguiar's Ultimate Compound **
- Meguiar's M205
- Meguiar's Deep Crystal Polish
- 10 Microfiber Towels
Waxing, Glass Cleaning, and Final Rinse/Dry:
- Meguiar's NXT 2.0 Wax (comes with applicator pad)
- 5 Microfiber towels (for wiping wax--switch constantly to avoid swirling freshly corrected paint)
- Stoner's Invisible Glass Cleaner (amazing stuff)
- 2 Foam applicator pads
- 2 microfiber towels (for glass cleaner)
- 2 Meguiar's Water Magnets (don't want water spots!)
========Condensed Materials Checklist (hint--print me!)========
Now, you're looking at this and going, "Damn that's a lot off stuff to wash a car!"
Yes, it is, but it's not just washing a car anymore. This is the next level where attention to detail is magnified. If you've ever seen a dark color car in direct sunlight and seen all the swirl marks and said to yourself, "That sucks....", then this is for you. Yes, it's expensive, but it's well worth it. I consider this one of the best things you can do for your truck. It will be in your top list of money spent on your truck. Screw the mods, keep her clean.
It's so nice walking out to your truck and seeing her sparkle in the sunlight, with no flaws in sight. You also get a lot more compliments when she's clean.
With Part I complete, let me take the time and officially say: Welcome to the world of detailing!!!
Last edited by mblouir; 02-06-2010 at 08:54 PM.

The following 10 users liked this post by mblouir:
albertasfinest (07-02-2014),
brianj7045 (11-16-2017),
Climber211 (09-10-2016),
Coul (02-20-2014),
Daltonkk (02-27-2015),
and 5 others liked this post.
02-05-2010, 11:58 PM
#2
Part II: Putting the Materials to Use
============================
Note: It is best to do these steps on overcast days. Trying to work polish on bright, sunny days will just give you headaches.
Note 2: This is a lot of info thrown at you at once--so please take some time and learn it all before trying it. Please ask if you have questions. I felt the easiest way to explain the steps (besides just words) was to link videos. Seeing is better than reading.
The only reason I didn't make my own videos is because it would require me to strip the new wax off my truck to show the steps. It also takes forever to upload videos and I'm not that patient. Here are a few I found that will make things a lot easier than just reading text. I spent a good deal of time finding the best videos to represent the steps that I take. There are so many methods that I'd find something in all the other ones that sort of went against my method, so I had to look elsewhere. Take note at the paint correction video--like I mentioned before, you can use different products to get the same results. It's all personal preference. Also look at Junkman's video playlist on YT. He has amazing videos on everything you'd ever need (detailing, washing, using the PC, wetsanding, etc).
Outline of steps:
Wheels and Tires
Materials Needed: APC+, Meg's All-Wheel Cleaner, stiff brush, old wash mitt
Wash
Materials: Two buckets w/grit guards, two wash mitts, wash soap
Prep: Put grit guard in first bucket and fill it with water only. Fill the second bucket with water and pour in the recommended amount of wash soap. (A trick for this is to use a measuring cup and water. Pour the recommended amount of water into a Dixie cup and use a permanent marker to mark the top of the water line. Now you have the exact amount of soap needed for each wash.) After pouring in the wash soap swirl it around by hand to spread it throughout the water. Many people put the soap in then spray in the water, causing lots of bubbles and foam. FYI this is a waste of product. We want soapy water—not foamy water. Put your wash mitts in the soapy bucket and let them soak while you do Step 1.
The two-bucket method:
Wash one panel at a time, flipping the mitt if necessary. After using the soapy mitt to wash a panel, take that mitt to the plain water bucket with grit guard. Plunge the mitt into the bucket and rub it against this grit guard. This removes the dirt and grit picked up from the panel. This grit will fall underneath the grit guard and stay there. After scrubbing the mitt on the grit guard, wring out the excess water and dunk it into the soapy bucket. Go to next panel. We use this method to prevent dirt and grit from remaining on the wash mitt and scratching the next panel.
(Thanks to Junkman for the videos. His channel on YT has tons of good info and videos)
Clay
Materials: Clay bar, detail spray
Dressing
Materials: Sponges, Meguiar’s Exterior Trim Detailer, Meguiar’s Hyperdressing
Paint Correction
Materials: Painter's tape, drop cord, PC, pads, microfiber towels, UC or M105, M205
Tips for working polish:
GREAT VIDEO!!!
Example Method:
Wax
Materials: Wax, application pads, microfiber towels
Glass Cleaning
Materials: Stoner's glass cleaner, foam applicator pad, microfiber towels
Final Rinse
Materials: Waffle weave towels
============================
Note: It is best to do these steps on overcast days. Trying to work polish on bright, sunny days will just give you headaches.
Note 2: This is a lot of info thrown at you at once--so please take some time and learn it all before trying it. Please ask if you have questions. I felt the easiest way to explain the steps (besides just words) was to link videos. Seeing is better than reading.
The only reason I didn't make my own videos is because it would require me to strip the new wax off my truck to show the steps. It also takes forever to upload videos and I'm not that patient. Here are a few I found that will make things a lot easier than just reading text. I spent a good deal of time finding the best videos to represent the steps that I take. There are so many methods that I'd find something in all the other ones that sort of went against my method, so I had to look elsewhere. Take note at the paint correction video--like I mentioned before, you can use different products to get the same results. It's all personal preference. Also look at Junkman's video playlist on YT. He has amazing videos on everything you'd ever need (detailing, washing, using the PC, wetsanding, etc).
Outline of steps:
- Clean wheels and tires
- Wash using two-bucket method
- Clay
- Apply dressing
- Paint correction
- Wax
- Clean glass
- Final rinse and dry
Wheels and Tires
Materials Needed: APC+, Meg's All-Wheel Cleaner, stiff brush, old wash mitt
- Do one wheel/tire combo at a time
- Spray APC+ on first wheel well and tire and let them soak
- Spray wheel cleaner on heel
- Rub wheel with old wash mitt
- Scrub tire and wheel well with stiff brush
- Rinse and go to next wheel and tire
- Do other non-pained items with old mitt (exhaust tips, step rails, etc)
Wash
Materials: Two buckets w/grit guards, two wash mitts, wash soap
Prep: Put grit guard in first bucket and fill it with water only. Fill the second bucket with water and pour in the recommended amount of wash soap. (A trick for this is to use a measuring cup and water. Pour the recommended amount of water into a Dixie cup and use a permanent marker to mark the top of the water line. Now you have the exact amount of soap needed for each wash.) After pouring in the wash soap swirl it around by hand to spread it throughout the water. Many people put the soap in then spray in the water, causing lots of bubbles and foam. FYI this is a waste of product. We want soapy water—not foamy water. Put your wash mitts in the soapy bucket and let them soak while you do Step 1.
The two-bucket method:
Wash one panel at a time, flipping the mitt if necessary. After using the soapy mitt to wash a panel, take that mitt to the plain water bucket with grit guard. Plunge the mitt into the bucket and rub it against this grit guard. This removes the dirt and grit picked up from the panel. This grit will fall underneath the grit guard and stay there. After scrubbing the mitt on the grit guard, wring out the excess water and dunk it into the soapy bucket. Go to next panel. We use this method to prevent dirt and grit from remaining on the wash mitt and scratching the next panel.
(Thanks to Junkman for the videos. His channel on YT has tons of good info and videos)
- Rinse vehicle from top down
- Wash top half first, using one mitt and two-bucket method
- Leave second mitt to soak while you wash the top half
- Wash bottom half last, one side at a time, using the second dedicated "dirty" mitt
- Rinse truck from top down
- Don't worry about drying the truck since we're doing paint correction
Clay
Materials: Clay bar, detail spray
- Spray one panel at a time and clay
- Clay top half first
- Do bottom half next
- Clay glass last
- Leave residue on vehicle
Dressing
Materials: Sponges, Meguiar’s Exterior Trim Detailer, Meguiar’s Hyperdressing
- Spray dressing on trim pieces (b-pillars, wiper cowl, glass trim, etc)
- Take a detailing spong and rub dressing into trim
- Don't worry about residue on paint or glass
- Apply HD to tires (and if you have them, black wheels)
- You can wipe off the excess HD if you want--I don't bother
Paint Correction
Materials: Painter's tape, drop cord, PC, pads, microfiber towels, UC or M105, M205
Tips for working polish:
- Only do small sections at a time (2'x2' max)
- Give pad a quick mist of detail spray before adding polish
- Do not work polish until it starts dusting
- If polish starts dusting, give pad another quick mist of detail spray
- If it's a sunny day, I will say a prayer for you (just use more detail spray to work the polish longer)
- Work "cut" polish slowly across section, overlapping
- Use moderate to heavy pressure with "cut" polish, lightening pressure as you work the polish in
- Work "light" polish a little quicker than "cut" polish
- Use light to moderate pressure with "light" polish, lightning pressure as you work it in
GREAT VIDEO!!!
- Tape off all trim, emblems, between panels, etc
- Do a test section (2'x2') with every stepto find a method that works. You don't want to spend all day on the entire vehicle only to find that it wasn't enough to get out all the swirls

- Follow test section results for each panel separately
Example Method:
- Only work small sections at a time (2'x2' Max)
- Put heavy polish (UC or M105) on cutting pad and spread around panel by hand
- Turn PC to 2 and spread around evenly to prevent sling
- Turn PC up to 5 or 6 and work polish for several minutes
- Wipe off and check section. If necessary do a second pass.
- Put M205 on polishing pad and spread around by hand
- Turn PC to 2 and spread around evenly
- Turn PC up to 4 or 5 and work for several minutes
- Wipe off polish and inspect. If necessary do a second pass.
Wax
Materials: Wax, application pads, microfiber towels
- Apply coat of wax over entire vehicle by hand. You want your coat to look like the left side here. As you can see from my detail thread I used entirely too much. It's not a problem--just harder to wipe off and more product used, but I'm OCD so it's okay

- Let wax dry while cleaning glass
- Perform the swipe test to see if wax is ready for removal. If it's ready you should see the top result. I usually go inside for lunch while the wax dries.

- Remove with microfiber towels, using several microfiber towels and rotating them constantly. It should be effortless to remove the wax.
Glass Cleaning
Materials: Stoner's glass cleaner, foam applicator pad, microfiber towels
- While the wax dries clean the glass
- Generously spray cleaner on foam pad
- Clean glass panels one at a time
- Wipe off each panel with dry microfiber
Final Rinse
Materials: Waffle weave towels
- There will likely be leftover polish and wax dust
- Rinse vehicle from top down to remove this dust
- Remove nozzle from hose and run water over vehicle. This "sheets" the water droplets off the vehicle.
- Dry vehicle with waffle weave towels
Last edited by mblouir; 02-06-2010 at 08:55 PM.
The following 4 users liked this post by mblouir:
02-05-2010, 11:59 PM
#3
Maintenance Tips:
Conclusion
Well that's it---the materials and steps you can use to attain a near-perfect finish on your vehicle! Like I said in the beginning I tried to keep this as user-friendly as possible. If you have any questions at all please ask! I will keep up with this thread as often as possible should any questions arise. I will also likely add stuff in the future as I think of more things that would fit in well here. If you happen to notice anything I missed please give me a shout!
If you follow this method and are pleased with the results please feel free to post some before/after pictures. Here's the first entry--my own.


A few days later and still clean....:thumbs:


- Avoid the drive-thru car wash, as the soaps used are harsh on waxes. The only reason to ever go there is to rinse off caked-on crud and dirt.
- To clean the truck only use the two-bucket method, which is designed to prevent (minimize) swirls
- Wash your vehicle at least every two weeks to prevent dirt built-up
- Apply a new coat of wax every 6 months. When you do this, wash the car with dishwashing liquid instead of car wash soap (optional--I'll explain why). The dishwashing liquid will strip the old wax off of the vehicle, leaving just the vehicle's paint open for a new coat. We don't bother using it in the steps above because the clay bar will remove any old waxes. You don't have to, it's just my personal preference. I feel that if I don't remove the old coat that there will be dirt and grit trapped between the layers of wax that a wash (or clay) didn't get. Just me being OCD again.
Conclusion
Well that's it---the materials and steps you can use to attain a near-perfect finish on your vehicle! Like I said in the beginning I tried to keep this as user-friendly as possible. If you have any questions at all please ask! I will keep up with this thread as often as possible should any questions arise. I will also likely add stuff in the future as I think of more things that would fit in well here. If you happen to notice anything I missed please give me a shout!
If you follow this method and are pleased with the results please feel free to post some before/after pictures. Here's the first entry--my own.
A few days later and still clean....:thumbs:
Last edited by mblouir; 02-06-2010 at 12:18 AM.
The following 6 users liked this post by mblouir:
07scab4x4 (01-26-2016),
catesmw (04-13-2016),
EcoBoosted11 (06-06-2014),
FallGuy0217 (03-18-2014),
hughes022 (04-29-2016),
and 1 others liked this post.
 02-06-2010, 10:21 PM
#5
Hunter of Moose
Join Date: Jan 2010
Location: Quebec
Posts: 327
Likes: 0
Received 0 Likes
on
0 Posts
Great write up!!!
Thanks for taking the time to put that together....
Nice Truck too!....I like the emblem.
It's winter here which does unimaginable things to a vehicles paint with all the salt and sand that they put down....Of course it is for good reason..
I have bookmarked this thread and will dig it up in another 6 weeks, when spring hits.
Last edited by ottawaguy; 02-06-2010 at 10:27 PM.
 02-10-2010, 08:00 AM
#7

Great write-up! I've read over this thread a few times now and watched all of the videos, along with a few others on YT and I have a few questions.
I've read (and watched) articles and vidoes that say with a factory paint job, you can only use this paint correction method a couple times before you wear through the clearcoat, or paint/clearcoat if it was mixed from the factory. What are your thoughts on this? I don't know whether the paint job from the factory on mine was mixed (paint/clear), or if the clearcoat was applied over the paint. From what I read, if the clear is applied over the paint, factory paint jobs have a much thinner layer of clear than what a paint job would have on say a show vehicle, where the paint correction method would "cut" a lot of the clear off to get the mirror finish look. I'm guessing that my truck would have the paint first, clear over top method for the paint job and I would be worried that using this process more than once or twice would eliminate my layer of clear and expose the paint. I could be wrong on that, but even if the paint and clear was mixed, I would think you would eventually wear through that as well.
Also, how do you go about doing the paint correction with the PC when you have uneven/curved surfaces, or sections where you can't get the entire pad flat on the paint (like the grill area, around the fenders, door panels)? Do you still use the PC or would you do these areas by hand? I have used a buffer before to apply coats of wax to my vehicles, and in these areas, I always have applied by hand simply because of the restricted area or because the buffer was too big to be able to get it flat on the painted surface.
Any comments would be appreciated.
Trending Topics
02-10-2010, 10:49 AM
#8

Wow! What wonderful information!
I was wondering...what is it that the clay does that the polish doesn't, or vice versa? You clay the windows?
Very interesting. I got delivery of my truck during this winter and wasn't able to do anything to it before getting into salt, gravel, snow, etc. I'm very scared what the paint will look like in the spring. I will need to follow most of these steps!
02-10-2010, 12:21 PM
#10
Thanks, everyone! I just hope it helps a few people.
To answer your first question--I seriously doubt you will do any damage to your paint with the PC. It's a completely different animal than a rotary and would take a lot of paint correction to wear through the clear. Here are two good videos by Junkman to watch....called "How Safe is the PC 7424XP?"
For your second question, there are three ways you can do it:
1. Just angle the pad in there and give enough pressure to keep it rotating.
2. Buy smaller pads (~4") for those areas.
3. Do it by hand.
2 and 3 are the best options.
The clay removes bonded contaminants in the paint. You should always clay before polishing unless you just recently did a full clay-job. I clay the windows because they, too, have bonded contaminants. Moreso because it helps with light water spots.
Great write-up! I've read over this thread a few times now and watched all of the videos, along with a few others on YT and I have a few questions.
I've read (and watched) articles and vidoes that say with a factory paint job, you can only use this paint correction method a couple times before you wear through the clearcoat, or paint/clearcoat if it was mixed from the factory. What are your thoughts on this? I don't know whether the paint job from the factory on mine was mixed (paint/clear), or if the clearcoat was applied over the paint. From what I read, if the clear is applied over the paint, factory paint jobs have a much thinner layer of clear than what a paint job would have on say a show vehicle, where the paint correction method would "cut" a lot of the clear off to get the mirror finish look. I'm guessing that my truck would have the paint first, clear over top method for the paint job and I would be worried that using this process more than once or twice would eliminate my layer of clear and expose the paint. I could be wrong on that, but even if the paint and clear was mixed, I would think you would eventually wear through that as well.
Also, how do you go about doing the paint correction with the PC when you have uneven/curved surfaces, or sections where you can't get the entire pad flat on the paint (like the grill area, around the fenders, door panels)? Do you still use the PC or would you do these areas by hand? I have used a buffer before to apply coats of wax to my vehicles, and in these areas, I always have applied by hand simply because of the restricted area or because the buffer was too big to be able to get it flat on the painted surface.
Any comments would be appreciated.
I've read (and watched) articles and vidoes that say with a factory paint job, you can only use this paint correction method a couple times before you wear through the clearcoat, or paint/clearcoat if it was mixed from the factory. What are your thoughts on this? I don't know whether the paint job from the factory on mine was mixed (paint/clear), or if the clearcoat was applied over the paint. From what I read, if the clear is applied over the paint, factory paint jobs have a much thinner layer of clear than what a paint job would have on say a show vehicle, where the paint correction method would "cut" a lot of the clear off to get the mirror finish look. I'm guessing that my truck would have the paint first, clear over top method for the paint job and I would be worried that using this process more than once or twice would eliminate my layer of clear and expose the paint. I could be wrong on that, but even if the paint and clear was mixed, I would think you would eventually wear through that as well.
Also, how do you go about doing the paint correction with the PC when you have uneven/curved surfaces, or sections where you can't get the entire pad flat on the paint (like the grill area, around the fenders, door panels)? Do you still use the PC or would you do these areas by hand? I have used a buffer before to apply coats of wax to my vehicles, and in these areas, I always have applied by hand simply because of the restricted area or because the buffer was too big to be able to get it flat on the painted surface.
Any comments would be appreciated.
For your second question, there are three ways you can do it:
1. Just angle the pad in there and give enough pressure to keep it rotating.
2. Buy smaller pads (~4") for those areas.
3. Do it by hand.
2 and 3 are the best options.
Wow! What wonderful information!
I was wondering...what is it that the clay does that the polish doesn't, or vice versa? You clay the windows?
Very interesting. I got delivery of my truck during this winter and wasn't able to do anything to it before getting into salt, gravel, snow, etc. I'm very scared what the paint will look like in the spring. I will need to follow most of these steps!
I was wondering...what is it that the clay does that the polish doesn't, or vice versa? You clay the windows?
Very interesting. I got delivery of my truck during this winter and wasn't able to do anything to it before getting into salt, gravel, snow, etc. I'm very scared what the paint will look like in the spring. I will need to follow most of these steps!