When you click on links to various merchants on this site and make a purchase, this can result in this site earning a commission. Affiliate programs and affiliations include, but are not limited to, the eBay Partner Network.
So I must have read a dozen tutorials on installing a double din deck, and:
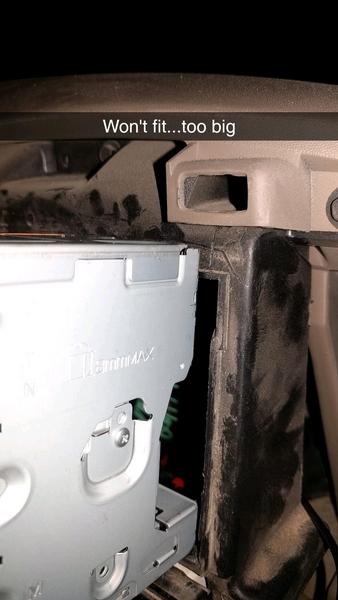
1.) for some reason my 2001 had a plastic "shell" (not a bracket) behind the deck that needs to be cut out. Jig saw won't fit; used snips and made a mess.
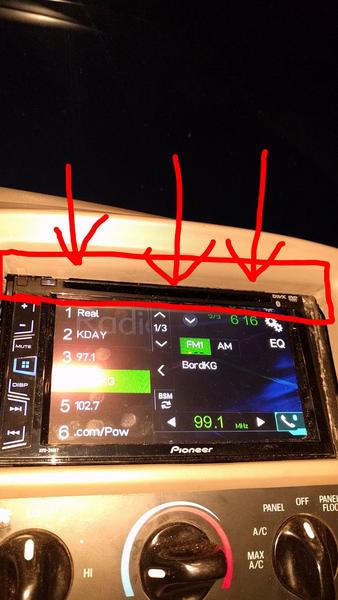
2.) traditionally, the tutorials say you should trim along the top:
But trimming along the top makes the deck sit a bit too high. So if you don't push the deck all the way into the dash, the trim piece hits it and won't go in.
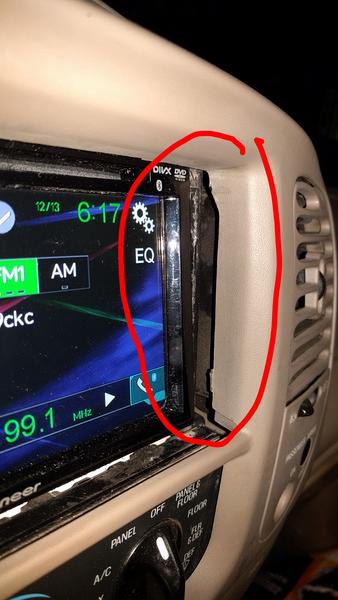
3.) then there's a pretty big gap all the way along the sides and bottom. It makes it look like a hack job.
there is so much of a gap above the HVAC controls that you can see the factory sticker/label on the top of it under the deck
the factory trim is not a square opening. There are multiple depths that need to get covered from a bezel standpoint.
In conclusion: either the top of the trim piece needs to get cut or the lower piece above the HVAC controls needs to get cut (to let the deck drop down a little bit), then slid forward, combined with a metra trim kit/bezel to fill in the gap the best you can.
I need to pull mine out this weekend. I'll post pics. You shouldn't have to cut the sides, only the top or bottom. I then drill holes in the vertical bracing on the sides of the opening. I put screws through them. Then I just placed trim ring around the radio. The OEM shroud holds it in place.
I dont know what you did. I would say this has been tens of thousands of times before at least, with no issues.
Trimming the part behind the bezel is easy. Score it with a utility knife, then use pliers to snap it off is the EASIEST way to enlarge the opening. It only takes a scratch to make it flex at that point. This is the easiest way to cut all brittle materials.
Did you use install kit? Its a trim ring that covers the areas that need covering. And side brackets that snap it in place. The trim ring locates the deck in right place, it screws to the HVAC control panel and fixes its location.
Your deck looks too deep. The install kit locates it at right depth. It can tilt up and down and adjust a bit because the bezel is a distance in front of the support bracket.
I recall trimming about 3/8" off top. Maybe hitting corners a bit with hacksaw blade.
I think where you might be mistaken, is bottom doesnt go over the middle bar....it goes just behind it. As in my pic.
My Pioneer AVH-4100NEX just cleared the top of the trim plate. I cut only the top of the radio opening. It looks like you might have to file down that lower edge just a little, but I'm surprised. Once you clear the trim, you'll want to bring that deck out a bit. It's set way too far in right now.
Here's mine: (Note: It sticks out farther than yours (and mbb's) needs to due to the flip-open face.)
I used self-adhesive weathersrip to fill the gaps on the sides, as the trim plate in the kit would not fit and allow the unit's face to flip open. I actually used none of the kit at all, and fastened the radio in place with screws going through the factory bracketry. (If I find the pic I know I have of this, I'll post it up.)
P.S. I used an oscillating multitool to cut the top of the factory bracket away. It was really easy, and made a clean, square cut.
.
Last edited by OhioLariat; 12-17-2017 at 12:38 AM.
It is kind of obvious that the OP cut the dash too much and instead of leaving the edge exposed to cover the hole, he cut it more than he should of, and now it is set about 3/8 to 1/2 too deep. The front should be to the trim bezel cross bar.
You can buy the bezel kit from Schoshe or Metra and use the face plate, with some modifications to fit the hole and cover the mistake. The later 04 and up radio mount
bezel will make up for the overcut.
My Pioneer AVH-4100NEX just cleared the top of the trim plate. I cut only the top of the radio opening. It looks like you might have to file down that lower edge just a little, but I'm surprised. Once you clear the trim, you'll want to bring that deck out a bit. It's set way too far in right now.
Here's mine: (Note: It sticks out farther than yours (and mbb's) needs to due to the flip-open face.)
I used self-adhesive weathersrip to fill the gaps on the sides, as the trim plate in the kit would not fit and allow the unit's face to flip open. I actually used none of the kit at all, and fastened the radio in place with screws going through the factory bracketry. (If I find the pic I know I have of this, I'll post it up.)
P.S. I used an oscillating multitool to cut the top of the factory bracket away. It was really easy, and made a clean, square cut.
.
What's going on with the left side? Looks like foam in there for the gap?
You left the trim edge a bit larger than the hole, which is perfectly done. The lip gives the radio a front support and keeps it from dropping into the hole, like the OP's did.
OP, if you want to bring the radio back to the front and you don't have a trim bezel extra to cover it, try and remove the radio, cut a panel to fit the metal back of the radio, and slide it up to the trim on the front. You can now reinstall the radio with some outer trimming of the made up panel. It will also give you a good looking trim surround to cover any mistakes.
What's going on with the left side? Looks like foam in there for the gap?
As mandingo said, "It is." the trim ring in the Scosche kit wouldn't fit due to the motorized face. Since these pics were taken, I've trimmed the surround a bit at the top, and the weatherstrip isn't "stuffed in" any more. It looks almost as good as plastic.
And I found the pic of my mounting method. Much like mandingo's.
 12-14-2017, 09:07 AM