DIY: Side Molding Removal
 10-17-2012, 04:21 AM
#1
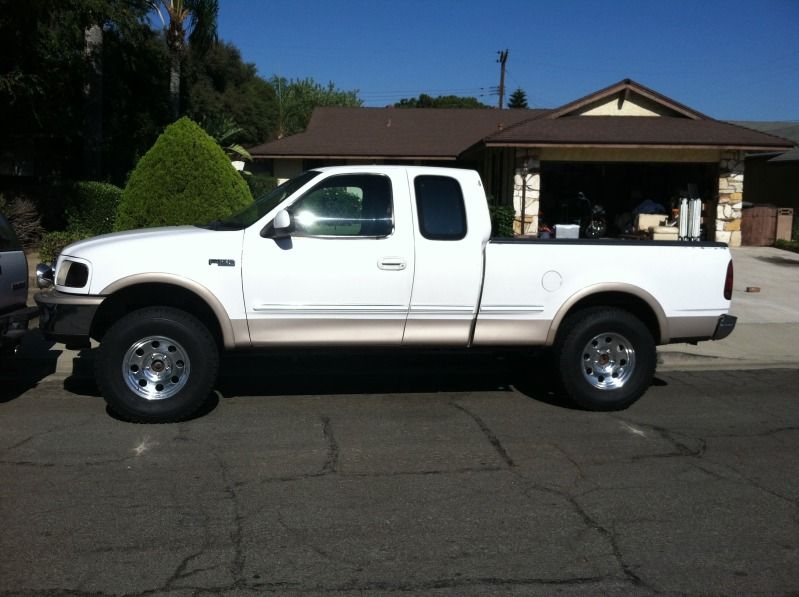
Hey everyone here is my first DIY i took on a little project today by removing my side moldings that have bugged me since day one.
Total Time - About 1.5 hours
Difficulty - 2
Things you will need:
-hairdryer/heat gun
-plastic scraper (i used a wall socket cover.. haha)
-Brakeleen (not needed but helps)
-Microfiber rags
-Rubbing Compound (i used meguiars ultimate compound worked very well)
-Final Carnuba wax
(i did not need fishing line but may be needed for your truck)
FIRST
I started off by grabbing the molding at one end and peeling it off the day was about 90 degrees out and did not need a heat gun for this step
SECOND
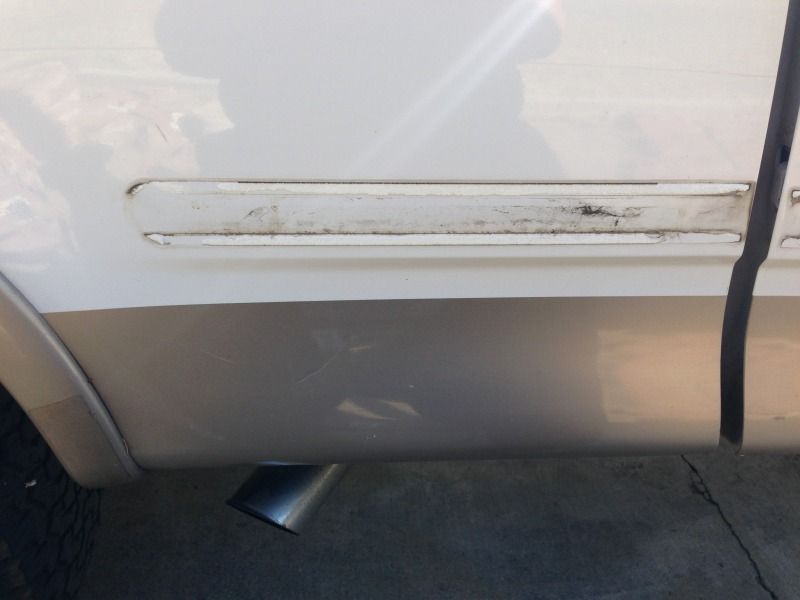
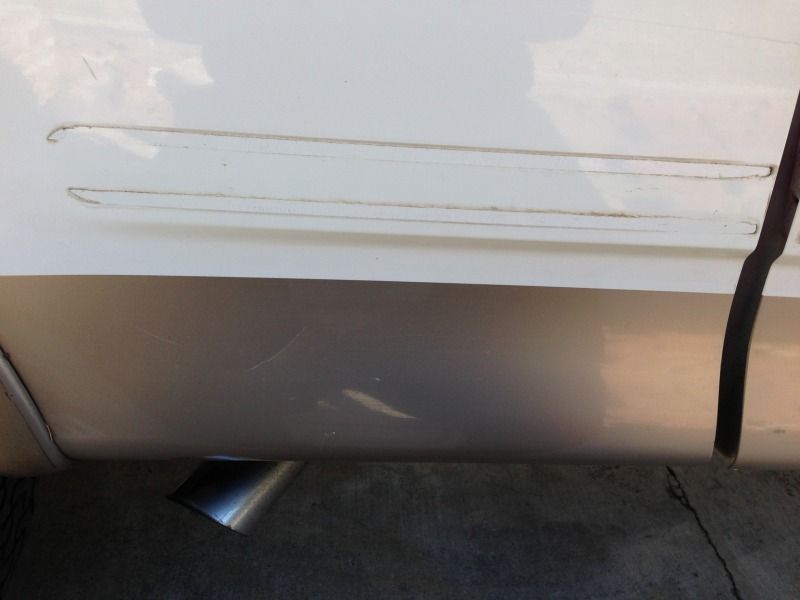
After that i took some brakeleen and sprayed it onto a microfiber rag (will destroy rag do not use your girlfriends favorite rag) and clean off any dirt from under the old molding
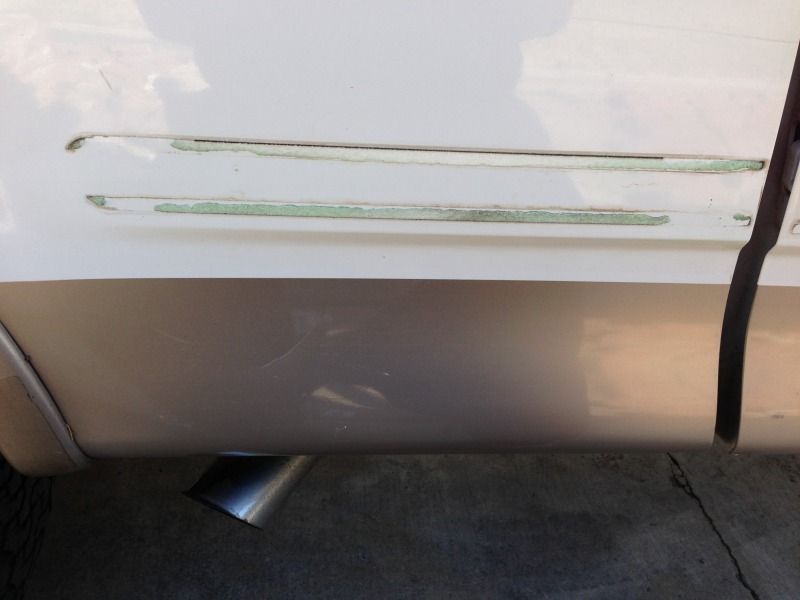
THIRD
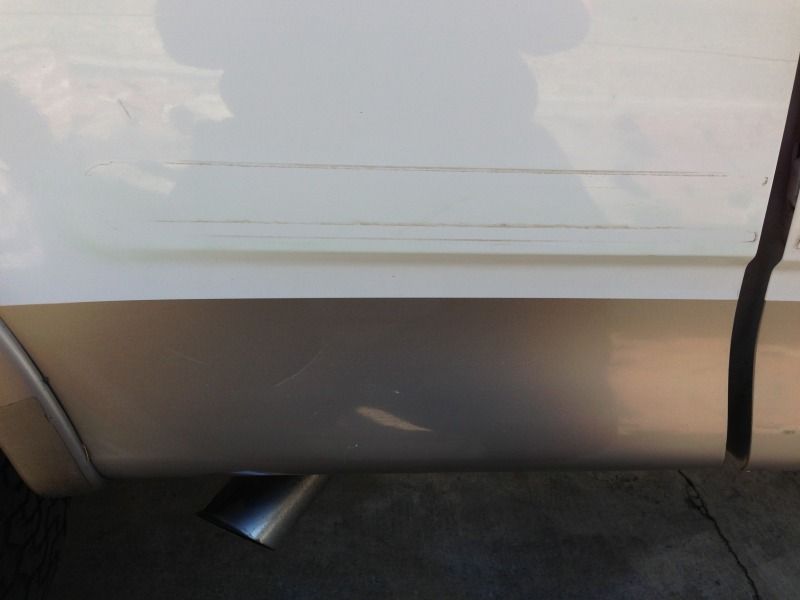
Next take your hair dryer and heat up the entire strip of glue the bottom one will be easier because there will be less contaminants in it so i suggest starting with that one get the tape and paint fairly hot but be carefull and use your judgement on how hot! not take your scraper and slowly scrape off the glue while keeping the hairdryer on low pointed 1-2 inches infront of where you are scraping to heat as you go (Go SLOW and take your TIME!)
FOURTH
After all big glue chunks are scraped off take your brakeleen and spray rag again and rub off the small glue residue Do not worry about the dirt lines at this point the we will take care of those in a minute
FIFTH
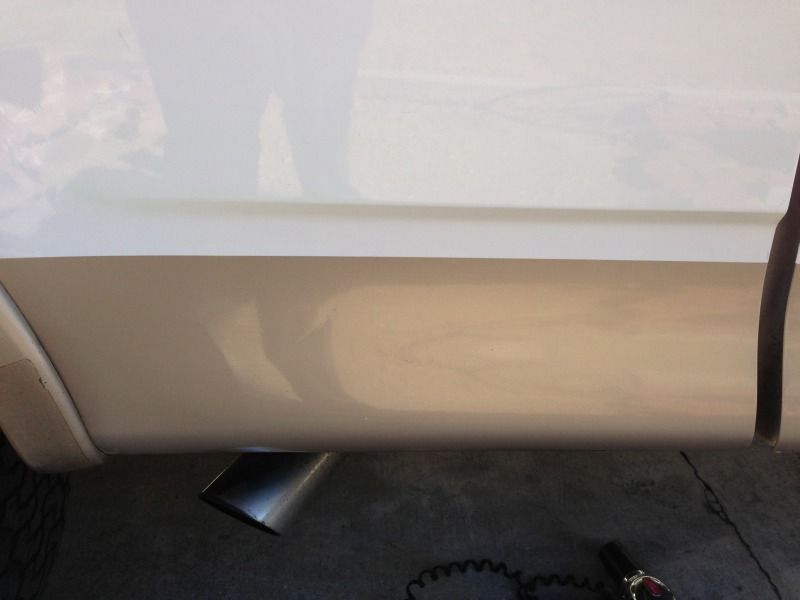
Now take your rubbing compound and slowly rub out all the scratches and dirt marks i prefer meguiars ultimate compound because it is non abrasive but still cuts very fast i recommend polishing your whole truck after so you do not have a dirt line where you quit with the compound
SIXTH
Stand back and take a big swig of your beer and enjoy your work!
here is my final product along with a side by side before and after
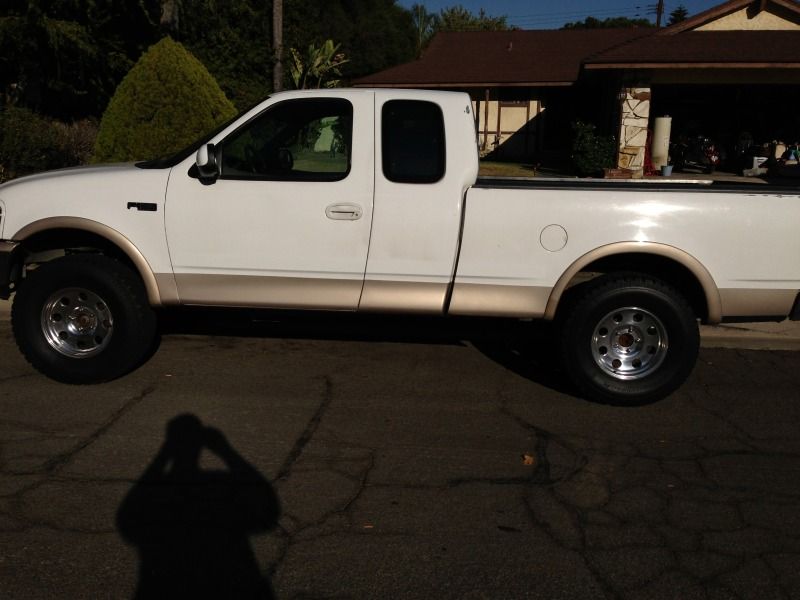
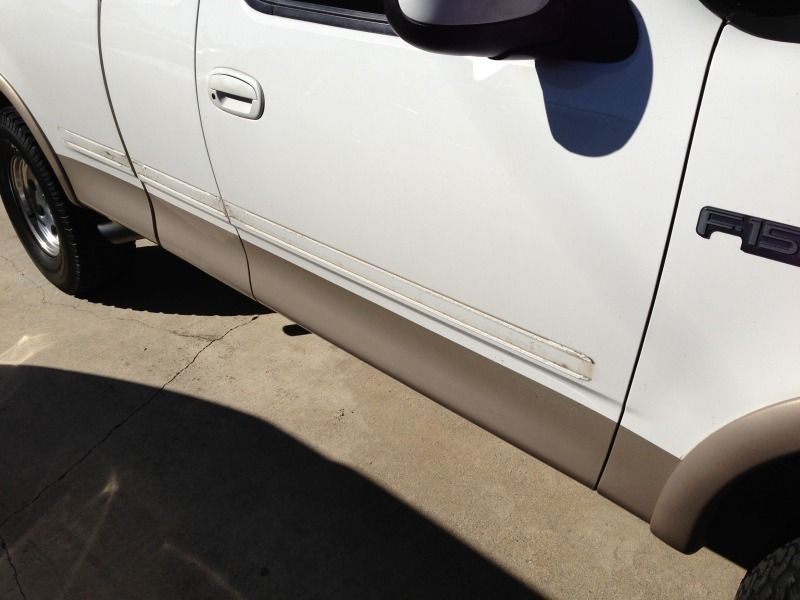
Hope this helps anyone leery of doing this i was skeptical of the results but i thought hey.. its a 4X4 if i scratch it i will just say it was trail damage =] But it came out PERFECT
Total Time - About 1.5 hours
Difficulty - 2
Things you will need:
-hairdryer/heat gun
-plastic scraper (i used a wall socket cover.. haha)
-Brakeleen (not needed but helps)
-Microfiber rags
-Rubbing Compound (i used meguiars ultimate compound worked very well)
-Final Carnuba wax
(i did not need fishing line but may be needed for your truck)
FIRST
I started off by grabbing the molding at one end and peeling it off the day was about 90 degrees out and did not need a heat gun for this step
SECOND
After that i took some brakeleen and sprayed it onto a microfiber rag (will destroy rag do not use your girlfriends favorite rag) and clean off any dirt from under the old molding
THIRD
Next take your hair dryer and heat up the entire strip of glue the bottom one will be easier because there will be less contaminants in it so i suggest starting with that one get the tape and paint fairly hot but be carefull and use your judgement on how hot! not take your scraper and slowly scrape off the glue while keeping the hairdryer on low pointed 1-2 inches infront of where you are scraping to heat as you go (Go SLOW and take your TIME!)
FOURTH
After all big glue chunks are scraped off take your brakeleen and spray rag again and rub off the small glue residue Do not worry about the dirt lines at this point the we will take care of those in a minute
FIFTH
Now take your rubbing compound and slowly rub out all the scratches and dirt marks i prefer meguiars ultimate compound because it is non abrasive but still cuts very fast i recommend polishing your whole truck after so you do not have a dirt line where you quit with the compound
SIXTH
Stand back and take a big swig of your beer and enjoy your work!
here is my final product along with a side by side before and after
Hope this helps anyone leery of doing this i was skeptical of the results but i thought hey.. its a 4X4 if i scratch it i will just say it was trail damage =] But it came out PERFECT
Last edited by macsrule15; 10-17-2012 at 04:29 AM.

The following users liked this post:
bobkyle2 (10-17-2012)
10-17-2012, 04:42 AM
#2

After this floats around through the thread. You can PM me in a few days or weeks or whenever, And i will add this to the "how-to" section!
Great Job
Great Job
The following users liked this post:
Bent Crosshairs (01-14-2014)
10-17-2012, 05:23 AM
#3
Thank you again!
The following users liked this post:
bobkyle2 (10-17-2012)
10-17-2012, 07:27 AM
#5

brake kleen on paint???? not a very good idea. There is a high strength goo gone that wal mart sells thats safe on paint. I used it to remove the decals on my truck and it didnt even dull the paint.
Good write up BTW
Good write up BTW
10-17-2012, 08:12 AM
#6
Senior Member
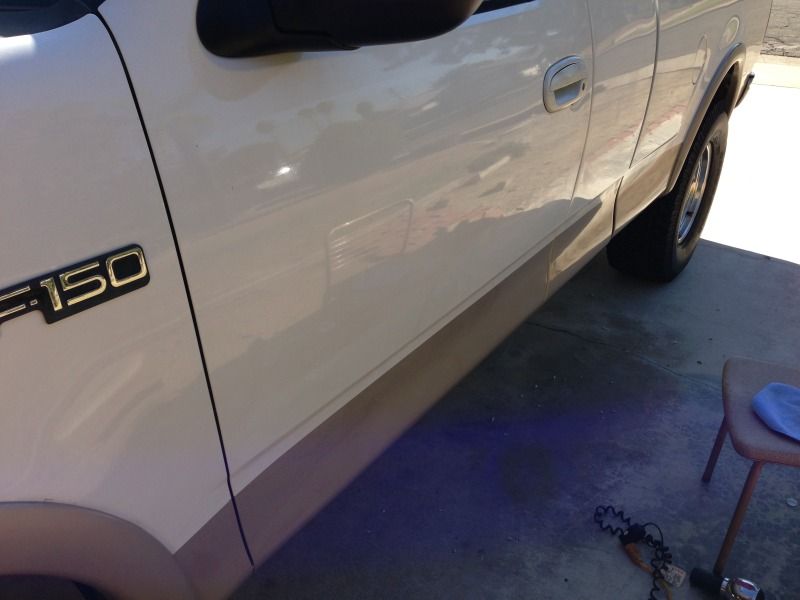
For a super quick and easy way to remove the tape, get an "eraser wheel" for your power drill. It's a very soft rubber wheel that feels like a pencil eraser, and is specifically designed for removing tape and pinstripes from cars without damaging the finish. They cost about $15 on Amazon.
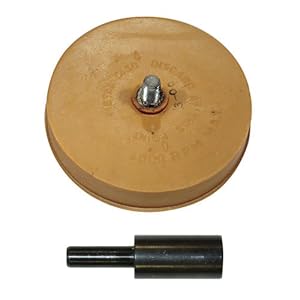
It will save you a whole bunch of scraping and you'll be less likely to damage your finish. It took me about 5 mins to strip all of the tape off of both sides when I removed my moldings. Total time for the entire job was about 30-45 mins.
(Obligatory photo with moldings removed )
)

It will save you a whole bunch of scraping and you'll be less likely to damage your finish. It took me about 5 mins to strip all of the tape off of both sides when I removed my moldings. Total time for the entire job was about 30-45 mins.
(Obligatory photo with moldings removed
)
Last edited by Warhammer; 10-17-2012 at 08:16 AM.
10-17-2012, 08:37 AM
#7
For a super quick and easy way to remove the tape, get an "eraser wheel" for your power drill. It's a very soft rubber wheel that feels like a pencil eraser, and is specifically designed for removing tape and pinstripes from cars without damaging the finish. They cost about $15 on Amazon.
It will save you a whole bunch of scraping and you'll be less likely to damage your finish. It took me about 5 mins to strip all of the tape off of both sides when I removed my moldings. Total time for the entire job was about 30-45 mins.
(Obligatory photo with moldings removed)
It will save you a whole bunch of scraping and you'll be less likely to damage your finish. It took me about 5 mins to strip all of the tape off of both sides when I removed my moldings. Total time for the entire job was about 30-45 mins.
(Obligatory photo with moldings removed
)Trending Topics
10-18-2012, 01:07 AM
#8
i've used those eracers before any they work awesome but my goal was to do this completely free haha im broke as hell and 15 bucks is a can of paint i need to do my touch ups haha
brakeleen on paint was fine.. remember you are using rubbing compound and wax not 5 min after using the brakeleen... so all residue is gone i would not recomend using it and not using compound of alcohol or something to take it off..
thanks for all the support!!!
brakeleen on paint was fine.. remember you are using rubbing compound and wax not 5 min after using the brakeleen... so all residue is gone i would not recomend using it and not using compound of alcohol or something to take it off..
thanks for all the support!!!
01-13-2014, 10:06 PM
#9

Hey everyone here is my first DIY i took on a little project today by removing my side moldings that have bugged me since day one.
Total Time - About 1.5 hours
Difficulty - 2
Things you will need:
-hairdryer/heat gun
-plastic scraper (i used a wall socket cover.. haha)
-Brakeleen (not needed but helps)
-Microfiber rags
-Rubbing Compound (i used meguiars ultimate compound worked very well)
-Final Carnuba wax
(i did not need fishing line but may be needed for your truck)
FIRST
I started off by grabbing the molding at one end and peeling it off the day was about 90 degrees out and did not need a heat gun for this step
SECOND
After that i took some brakeleen and sprayed it onto a microfiber rag (will destroy rag do not use your girlfriends favorite rag) and clean off any dirt from under the old molding
THIRD
Next take your hair dryer and heat up the entire strip of glue the bottom one will be easier because there will be less contaminants in it so i suggest starting with that one get the tape and paint fairly hot but be carefull and use your judgement on how hot! not take your scraper and slowly scrape off the glue while keeping the hairdryer on low pointed 1-2 inches infront of where you are scraping to heat as you go (Go SLOW and take your TIME!)
FOURTH
After all big glue chunks are scraped off take your brakeleen and spray rag again and rub off the small glue residue Do not worry about the dirt lines at this point the we will take care of those in a minute
FIFTH
Now take your rubbing compound and slowly rub out all the scratches and dirt marks i prefer meguiars ultimate compound because it is non abrasive but still cuts very fast i recommend polishing your whole truck after so you do not have a dirt line where you quit with the compound
SIXTH
Stand back and take a big swig of your beer and enjoy your work!
here is my final product along with a side by side before and after
Hope this helps anyone leery of doing this i was skeptical of the results but i thought hey.. its a 4X4 if i scratch it i will just say it was trail damage =] But it came out PERFECT
Did you take the triton emblem off? if so was there a back peg on it or was there just adhesive?
The following users liked this post:
gcdidthis (03-05-2015)


