Replacing Stabilizer Bar End Link Bushings Write Up!
 11-09-2012, 12:34 PM
#1
Ok guys, I promised ya'll pictures and a step by step on how to replace your worn out Stabilizer Bar End Link Bushings. This is a very easy removal and install and you don't have to remove your tires nor jack your truck up!
First off the tools needed:
21mm Open Wrench
18mm Open Wrench
15 mm deep well or socket with extension
Hammer or mallet
8mm socket
10mm socket
The way I did this was the easiest way for me to do. Your way might be different, but this way you can replace all your bushings at one time!

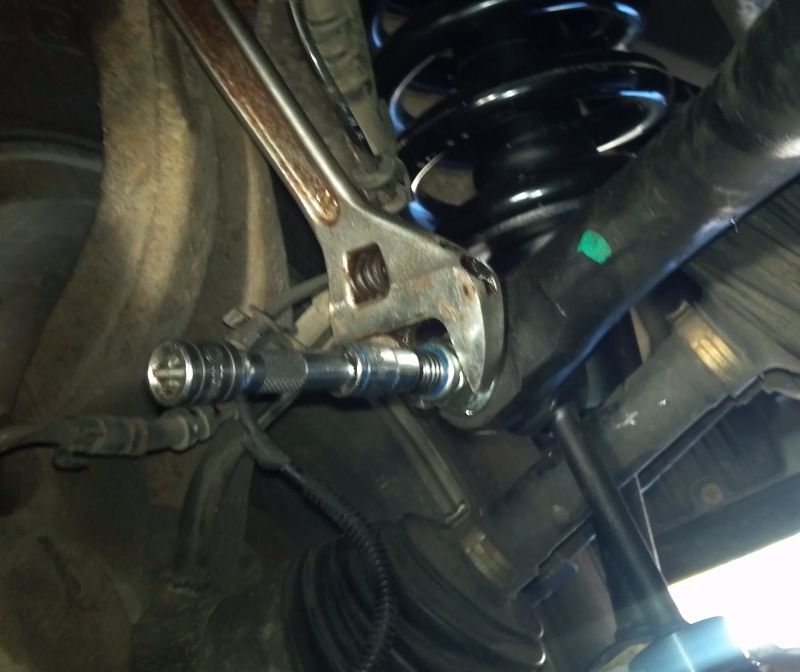
Step One is locate your stabilizer bar end link bushings. it should be located right behind the and CV joint. the top end connects to the stabilizer bar while the lower end attaches to the Lower Control Arm.
These I am replacing wore out prematurely. That is why they look new.
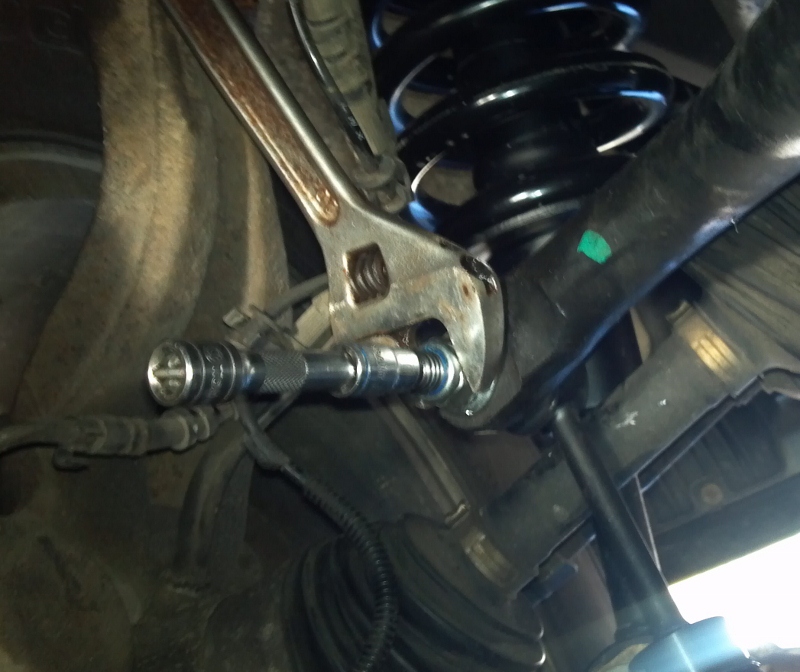
The top of the end link bushing is a 21mm nut. If you will notice you cannot spin these off with an impact. You will need to use a 10 mm socket to hold the spindle to back off the nut with a 21mm open end wrench. I used an adjustable wrench. Worked flawlessy.

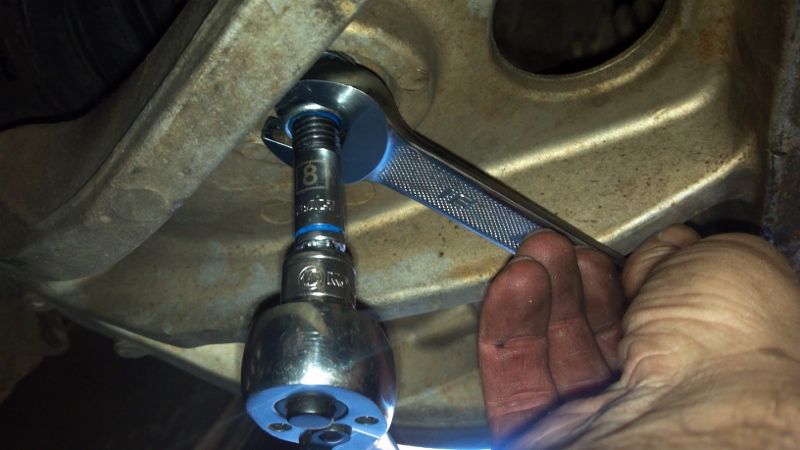
Next remove the lower nut that hold the link from the bottom of the lower control arm. You will use a 8mm socket to hold the spindle while using a 18 mm open end wrench to back the bottom nut off the spindle.
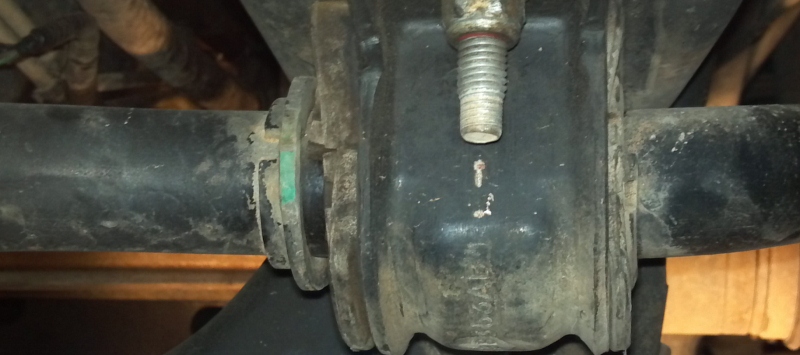
Next locate the two stabilizer bar bushings that are held on with two 15mm bolts... BE ADVISED! When you remove the brackets from the frame, the bar WILL FALL DOWN. Be careful! After you remove the two brackets, you should be able to pick up on the bar to remove the end link bushings from the lower control arm.
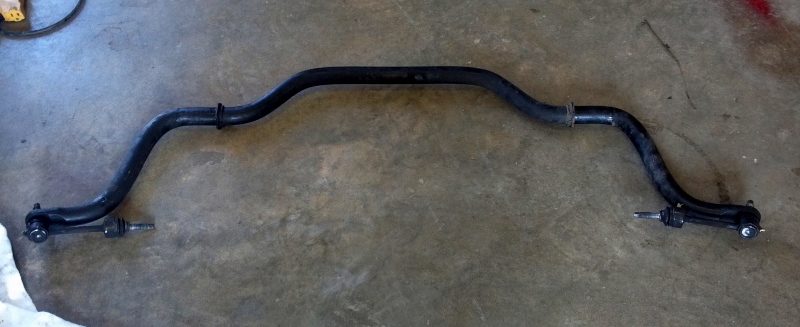
This is the stabilizer bar completely out. You might have to take a hammer or mallet to knock the top spindle out of the stabilizer bar. you can go ahead and install top part of the end link bushing to the bar while it is out of the truck. Just leave a little loose so you are able to remount the bottom of the end link through the lower control arm during reinstallation.
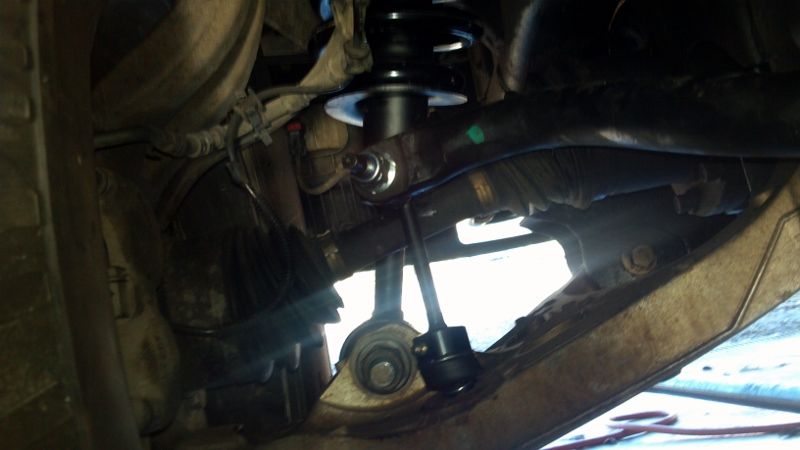
Reinstallation is opposite of the removal process. Make sure that your truck is on the ground with full load on the front end while tightening up everything. These end link bushings are different than others I have seen. That is why I went ahead and did a write up for those who want to change them out themselves without having to take it to a mechanic.
You might want to have a friend help out with this install. The stabilizer bar can be a headache during reinstallation because of the weight. Just someone to hold it in place while you tighten everything up.
This solved the issue with some of the clunking noise I had while going over small bumps or manholes. Also truck handles better..
Hope ya'll can use this as a reference.
First off the tools needed:
21mm Open Wrench
18mm Open Wrench
15 mm deep well or socket with extension
Hammer or mallet
8mm socket
10mm socket
The way I did this was the easiest way for me to do. Your way might be different, but this way you can replace all your bushings at one time!
Step One is locate your stabilizer bar end link bushings. it should be located right behind the and CV joint. the top end connects to the stabilizer bar while the lower end attaches to the Lower Control Arm.
These I am replacing wore out prematurely. That is why they look new.
The top of the end link bushing is a 21mm nut. If you will notice you cannot spin these off with an impact. You will need to use a 10 mm socket to hold the spindle to back off the nut with a 21mm open end wrench. I used an adjustable wrench. Worked flawlessy.
Next remove the lower nut that hold the link from the bottom of the lower control arm. You will use a 8mm socket to hold the spindle while using a 18 mm open end wrench to back the bottom nut off the spindle.
Next locate the two stabilizer bar bushings that are held on with two 15mm bolts... BE ADVISED! When you remove the brackets from the frame, the bar WILL FALL DOWN. Be careful! After you remove the two brackets, you should be able to pick up on the bar to remove the end link bushings from the lower control arm.
This is the stabilizer bar completely out. You might have to take a hammer or mallet to knock the top spindle out of the stabilizer bar. you can go ahead and install top part of the end link bushing to the bar while it is out of the truck. Just leave a little loose so you are able to remount the bottom of the end link through the lower control arm during reinstallation.
Reinstallation is opposite of the removal process. Make sure that your truck is on the ground with full load on the front end while tightening up everything. These end link bushings are different than others I have seen. That is why I went ahead and did a write up for those who want to change them out themselves without having to take it to a mechanic.
You might want to have a friend help out with this install. The stabilizer bar can be a headache during reinstallation because of the weight. Just someone to hold it in place while you tighten everything up.
This solved the issue with some of the clunking noise I had while going over small bumps or manholes. Also truck handles better..
Hope ya'll can use this as a reference.

The following 2 users liked this post by alsatropine:
danieljosefo (11-10-2017),
o6S1D9e (09-19-2020)

 07-26-2014, 12:21 PM
#3
Senior Member

If you are going to change your end links on the 09-13 f150s , I'd suggest reading this post , wish I'd seen it before I started working on mine ... You will never get the end links off without knowing they're not just a normal bolt you take off , I spun the bolt around fore ever and never got it loose , I figured it was something like described in this post , a pic is worth ten thousand words ... Should have no problems now ...... Ya right 
Ok guys, I promised ya'll pictures and a step by step on how to replace your worn out Stabilizer Bar End Link Bushings. This is a very easy removal and install and you don't have to remove your tires nor jack your truck up!
First off the tools needed:
21mm Open Wrench
18mm Open Wrench
15 mm deep well or socket with extension
Hammer or mallet
8mm socket
10mm socket
The way I did this was the easiest way for me to do. Your way might be different, but this way you can replace all your bushings at one time!
Step One is locate your stabilizer bar end link bushings. it should be located right behind the and CV joint. the top end connects to the stabilizer bar while the lower end attaches to the Lower Control Arm.
These I am replacing wore out prematurely. That is why they look new.
The top of the end link bushing is a 21mm nut. If you will notice you cannot spin these off with an impact. You will need to use a 10 mm socket to hold the spindle to back off the nut with a 21mm open end wrench. I used an adjustable wrench. Worked flawlessy.
Next remove the lower nut that hold the link from the bottom of the lower control arm. You will use a 8mm socket to hold the spindle while using a 18 mm open end wrench to back the bottom nut off the spindle.

Next locate the two stabilizer bar bushings that are held on with two 15mm bolts... BE ADVISED! When you remove the brackets from the frame, the bar WILL FALL DOWN. Be careful! After you remove the two brackets, you should be able to pick up on the bar to remove the end link bushings from the lower control arm.

This is the stabilizer bar completely out. You might have to take a hammer or mallet to knock the top spindle out of the stabilizer bar. you can go ahead and install top part of the end link bushing to the bar while it is out of the truck. Just leave a little loose so you are able to remount the bottom of the end link through the lower control arm during reinstallation.
Reinstallation is opposite of the removal process. Make sure that your truck is on the ground with full load on the front end while tightening up everything. These end link bushings are different than others I have seen. That is why I went ahead and did a write up for those who want to change them out themselves without having to take it to a mechanic.
You might want to have a friend help out with this install. The stabilizer bar can be a headache during reinstallation because of the weight. Just someone to hold it in place while you tighten everything up.
This solved the issue with some of the clunking noise I had while going over small bumps or manholes. Also truck handles better..
Hope ya'll can use this as a reference.
First off the tools needed:
21mm Open Wrench
18mm Open Wrench
15 mm deep well or socket with extension
Hammer or mallet
8mm socket
10mm socket
The way I did this was the easiest way for me to do. Your way might be different, but this way you can replace all your bushings at one time!
Step One is locate your stabilizer bar end link bushings. it should be located right behind the and CV joint. the top end connects to the stabilizer bar while the lower end attaches to the Lower Control Arm.
These I am replacing wore out prematurely. That is why they look new.
The top of the end link bushing is a 21mm nut. If you will notice you cannot spin these off with an impact. You will need to use a 10 mm socket to hold the spindle to back off the nut with a 21mm open end wrench. I used an adjustable wrench. Worked flawlessy.
Next remove the lower nut that hold the link from the bottom of the lower control arm. You will use a 8mm socket to hold the spindle while using a 18 mm open end wrench to back the bottom nut off the spindle.
Next locate the two stabilizer bar bushings that are held on with two 15mm bolts... BE ADVISED! When you remove the brackets from the frame, the bar WILL FALL DOWN. Be careful! After you remove the two brackets, you should be able to pick up on the bar to remove the end link bushings from the lower control arm.
This is the stabilizer bar completely out. You might have to take a hammer or mallet to knock the top spindle out of the stabilizer bar. you can go ahead and install top part of the end link bushing to the bar while it is out of the truck. Just leave a little loose so you are able to remount the bottom of the end link through the lower control arm during reinstallation.
Reinstallation is opposite of the removal process. Make sure that your truck is on the ground with full load on the front end while tightening up everything. These end link bushings are different than others I have seen. That is why I went ahead and did a write up for those who want to change them out themselves without having to take it to a mechanic.
You might want to have a friend help out with this install. The stabilizer bar can be a headache during reinstallation because of the weight. Just someone to hold it in place while you tighten everything up.
This solved the issue with some of the clunking noise I had while going over small bumps or manholes. Also truck handles better..
Hope ya'll can use this as a reference.
07-27-2014, 03:43 PM
#4
Senior Member
I'm surprised that this post is the only one I've found that actually shows you how to remove the end link nuts on the newer 08-14 f150s , if you don't know you have to use a socket on the spindle you could be the spinning the nut forever as it won't come off ... Just did mine on my 2013 yesterday and it took a while because one of the end link spindle threads were buggered so bad I had to cut it off ... Took forever on that side , the other only took a few minutes to change out and man what a different ride I'm enjoying now , so much better than the oem ride . I don't see how the oem end links could ever wear out as there is no bushings ... Just a ball socket that moves .... No wonder these trucks have so much body roll when left to oem junk ... I hate spending money on things that shoulda been done right from the factory , these newer trucks need lots of money and aftermarket help to make them the truck they should be when they leave the factory. Thanks again for this great post!
09-03-2014, 12:04 PM
#5
Great thread! I am looking forward to doing mine now.
Quick question though. Did you guys order MOOG parts for yours?
End links
http://www.moog-suspension-parts.com...od=Moog-K80337
Sway bar bushings.
http://www.moog-suspension-parts.com...d=MOOG-K200331
http://www.energysuspensionparts.com...sp?prod=4.5185
I of course will shop around for the best prices. Thanks so much
The following users liked this post:
o6S1D9e (09-19-2020)
09-03-2014, 02:46 PM
#6
Senior Member

Ok Al,
First, what year is your truck? And mileage?
Second, will I require a realignment after this?
Third, how tight do you bolt up the new ones? Do you have a torque spec for the stabilizer bolts or end links?
Thanks!
First, what year is your truck? And mileage?
Second, will I require a realignment after this?
Third, how tight do you bolt up the new ones? Do you have a torque spec for the stabilizer bolts or end links?
Thanks!
Trending Topics
09-29-2014, 08:47 AM
#8
Ok got mine put on!
1. My truck is an 06 2wd with 118k miles
2. No alignment as you are not messing with any steering. Just the sway bar.
3. I know there is a spec for this, but I don't know what it is. I just tighten it down.
Truck rides like brand new now. My shocks and struts are new last year, and now the sway bar is tightened up with poly bushings and moog endlinks.
My old ones weren't really that bad. I have seen a lot worse. But the new poly bushings are much more firm. The endlinks are tighter as well.
Overall the job took me a bit over an 45 min.
The drive is tighter and overall refreshed. I had just a small judder that is now gone. I am very particular on how my truck rides and drives. Now it is just so! I would highly recommend doing this if you are looking to refresh your truck. Obviously the new shocks did the most good for me. However this brought it back up that extra 20%

New parts

The following users liked this post:
o6S1D9e (09-19-2020)
09-29-2014, 11:31 AM
#10
My 2wd looks a bit different but not by much. The endlinks do not have that 90 attachment on the top they just are straight though. See my pics of the new end links and you will see.
Spray your nuts and bolts with penetrating fluid now! Mine weren't bad, but I let them soak in some PB Blaster for about 30 min before I tackled this.
The following 2 users liked this post by wolfy53:
danieljosefo (11-10-2017),
o6S1D9e (03-02-2021)