When you click on links to various merchants on this site and make a purchase, this can result in this site earning a commission. Affiliate programs and affiliations include, but are not limited to, the eBay Partner Network.
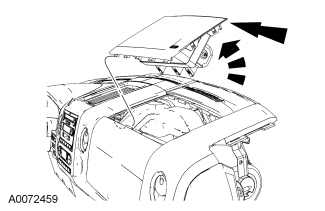
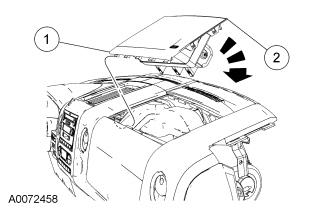
I have a 08 scab with nice grey (cloth) interior and i am planning to swap or convert it over to a black leather interior. I have 3 options for dealing with the dash: 1) full dash removal/swap 2) do nothing keep as is with grey. OR 3) swap out ONLY the panels directly in from of driver and passenger (see areas circled in red).
for option #3: Looking for suggestions on removing the panels circled in red� mainly asking about part above glove box that has airbag.
Are you just doing the seat covers or full seat swap? The whole dash seems like a ton of work. I’d ask how long you plan to keep the truck to warrant going through with all of the work.
Are you just doing the seat covers or full seat swap? The whole dash seems like a ton of work. I�d ask how long you plan to keep the truck to warrant going through with all of the work.
Sorry I can�t answer the questions.
agree; that�s why i don�t intend to swap whole dash, only do option #3, only swap the panels circled in red�. and of those, i think the only two that may be difficult are the two above glovebox (one is marked airbag). i don�t know how (easily or hard) those come out
Before servicing the vehicle, refer to the Precautions Section.
Disconnect the negative battery cable.
If equipped with adjustable pedals, move the pedals to the full forward position.
If equipped with a floor console:
Remove the 3 floor trim panel push pins.
Remove the 2 floor trim panels.
Remove the shifter trim panel.
Instrument panel exploded view—F-150 and Mark LTFloor console—F-150 and Mark LTDriver’s air bag module—F-150 and Mark LTClockspring—F-150 and Mark LT
Disconnect the shifter cable.
Disconnect the floor console electrical connector.
Remove the 4 floor console bolts.
Remove the floor console.
CAUTION
To reduce the risk of serious personal injury, read and follow all warnings, cautions, notes and instructions in the supplemental restraint system (SRS) deactivation/reactivation procedure.
De-power the supplemental restraint system (SRS). For additional information, refer to Steering.
Position the left and right door weatherstrip seals aside.
Remove the A-pillar trim panels and right cowl side trim panel.
Remove the left and right instrument panel side finish panels.
Remove the 2 steering column opening trim screws.
Remove the steering column opening trim.
WARNING
Removing the steering wheel without using a puller can damage the column bearings.
WARNING
Do not allow the steering column shaft to rotate while the intermediate shaft is disconnected or damage to the clockspring can result. If there is evidence that the shaft has rotated, the clockspring must be removed and re-centered.
Place the steering wheel in the straight-ahead position and turn the ignition switch to the OFF position.
CAUTION
Always wear safety glasses when repairing an air bag supplemental restraint system (SRS) vehicle and when handling an air bag module. This will reduce the risk of injury in the event of an accidental deployment.
CAUTION
Carry a live air bag module with the air bag and trim cover pointed away from your body. This will reduce the risk of injury in the event of an accidental deployment.
CAUTION
Do not set a live air bag module down with the trim cover face down. This will reduce the risk of injury in the event of an accidental deployment.
CAUTION
After deployment, the air bag surface can contain deposits of sodium hydroxide, a product of the gas generant combustion that is irritating to the skin. Wash your hands with soap and water afterwards.
CAUTION
Never probe the connectors on the air bag module. Doing so can result in air bag deployment, which can result in personal injury.
CAUTION
Air bag modules with discolored or damaged trim covers must be replaced, not repainted.
CAUTION
To reduce the risk of personal injury, do not use any memory saver devices.
NOTE
The air bag warning lamp illuminates when the RCM fuse is removed and the ignition switch is ON. This is normal operation and does not indicate a supplemental restraint system (SRS) fault.
NOTE
The SRS must be fully operational and free of faults before releasing the vehicle to the customer.
NOTE
Repair is made by installing a new part only. If the new part does not correct the condition, install the original part and perform the diagnostic procedure again.
Remove the 2 steering wheel back cover plugs.
Remove the 2 driver’s air bag module bolts.
Partially remove the driver’s air bag module from the steering wheel.
WARNING
The clockspring electrical connectors are unique and cannot be reversed when connected to the driver’s air bag module. Match the electrical connector key to the keyway in the driver’s air bag module. Do not force the electrical connectors into the driver’s air bag module during installation.
Disconnect the driver’s air bag module electrical connectors.
Disconnect the horn switch electrical connector and remove the driver’s air bag module.
NOTE
Do not remove the bolt until the steering wheel has been separated from the column.
Loosen the steering wheel bolt.
Using a puller, separate the steering wheel from the steering column assembly.
Remove the steering wheel bolt and the steering wheel.
Remove the lower steering column cover screw.
Remove the lower steering column cover.
Remove the 2 upper steering column cover screws.
Remove the upper steering column cover.
Remove the instrument cluster finish panel.
Remove the instrument panel center finish panel.
Remove the instrument cluster center finish panel.
Remove the parking brake release handle bolt.
Position aside the parking brake release handle. Remove the parking brake release handle pin-type retainer.
Remove the hood release handle bolt.
Position aside the hood release handle.
Loosen the electrical connector screw and disconnect the bulkhead electrical connector.
Remove the ground bolt.
Disconnect the electrical connectors.
Position aside the front carpet.
Remove the 4 left center brace bolts.
Remove the left center brace.
If equipped, disconnect the transmission range indicator cable and position aside.
WARNING
To avoid damage to the clockspring, do not allow the steering column shaft to rotate while the intermediate shaft is disconnected.
Remove the steering column pinch bolt and disconnect the steering column intermediate shaft.
Disconnect the steering column electrical connector.
Remove the ground bolt.
Disconnect the radio antenna.
Disconnect the 4 PDB (B1, B2, L1 and L2) electrical connectors.
Disconnect the ETAC electrical connector.
Disconnect the instrument panel electrical connectors.
Position aside the front carpet.
Remove the 4 right center brace bolts.
Remove the right center brace.
NOTE
If equipped with a floor console, remove the third center brace.
If equipped, remove the 4 third center brace bolts.
If equipped, remove the third center brace.
Remove the 2 defrost grilles.
Disconnect the wiring harness pin-type retainer.
WARNING
To avoid damage to the instrument panel, an assistant is required to support the panel before carrying out this step.
Remove the 9 instrument panel bolts.
WARNING
Before removing the instrument panel, make sure all electrical connector wiring is free and not hindered.
Remove the instrument panel.
To install, reverse the removal procedure.
Observe the following torques:
PCM bracket: 89 inch lbs. (10 Nm)
Instrument panel bolts: 15 ft. lbs. (20 Nm)
Steering column pinch bolt: 30 ft. lbs. (40 Nm)
Steering wheel bolt and the steering wheel: 30 ft. lbs. (40 Nm)
Driver’s air bag module bolts: 89 inch lbs. (10 Nm)
PRINTSECTION 501-20B: Supplemental Restraint System
2008 F-150/Mark LT Workshop Manual
REMOVAL AND INSTALLATION
Procedure revision date: 11/21/2008
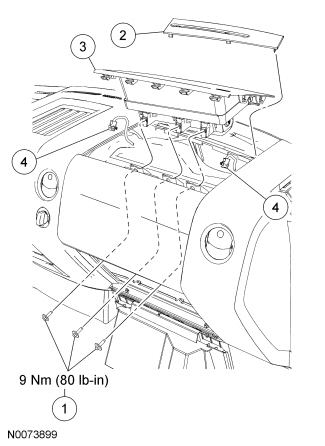
Passenger Air Bag Module
Click to EnlargeItem
Part Number
Description
1 W709027 Passenger air bag module bolts (3 required) 2 046B62 RH defrost grille 3 044A74 Passenger air bag module 4 — Passenger air bag module connectors (2 required) (part of 14401)Removal and Installation
WARNING
WARNING: Always wear eye protection when servicing a vehicle. Failure to follow this instruction may result in serious personal injury.
WARNING
WARNING: Always carry or place a live air bag module with the air bag and deployment door/trim cover/tear seam pointed away from the body. Do not set a live air bag module down with the deployment door/trim cover/tear seam face down. Failure to follow these instructions may result in serious personal injury in the event of an accidental deployment.
WARNING
WARNING: Never probe the electrical connectors on air bag, Safety Canopy� or side air curtain modules. Failure to follow this instruction may result in the accidental deployment of these modules, which increases the risk of serious personal injury or death.
WARNING
WARNING: Do not paint any air bag module trim covers or deployment doors. Paint may cause the air bag to deploy incorrectly. Failure to follow this instruction may increase the risk of serious personal injury or death in a crash.
NOTE
NOTE: The air bag warning indicator illuminates when the restraints control module (RCM) fuse is removed and the ignition switch is ON. This is normal operation and does not indicate a supplemental restraint system (SRS) fault.
NOTE
NOTE: The SRS must be fully operational and free of faults before releasing the vehicle to the customer.
NOTE
NOTE: Repair is made by installing a new part only. If the new part does not correct the condition, install the original part and carry out the diagnostic procedure again.
Depower the SRS. For additional information, refer to Supplemental Restraint System (SRS) Depowering and Repowering in the General Procedures portion of this section.
While pushing in on the 2 glove compartment door tabs, position the glove compartment downward.
Remove the passenger air bag module bolts.
Remove the RH defrost grille.
Remove the 2 pin-type retainers that retain the passenger air bag module deployment door to the instrument panel (if equipped).
NOTICE
NOTICE: Do not handle the passenger air bag module by grabbing the edges of the deployment doors. Damage to the air bag module may occur.
Reaching one hand into the glove compartment opening, push out on the front of the passenger air bag module, releasing the clips at the front of the bag and partially remove the passenger air bag module from the instrument panel.
Disconnect the 2 passenger air bag module electrical connector and remove the passenger air bag module.
Installation
Connect the 2 passenger air bag module electrical connectors.
NOTE
NOTE: Make sure the J-clips are in place before positioning the passenger air bag module to the instrument panel.
Position the passenger air bag module into the instrument panel.
Angle the rear of the passenger air bag module deployment door so the tabs engage to the instrument panel.
Position the passenger air bag module into place and push down on the deployment door, engaging the remaining tabs.
Install the RH defrost grille.
Install the 2 pin-type retainers that retain the passenger air bag module deployment door to the instrument panel (if equipped).
Install the passenger air bag module bolts.
To install, tighten to 9 Nm (80 lb-in).
Close the glove compartment.
Repower the SRS. For additional information, refer to Supplemental Restraint System (SRS) Depowering and Repowering in the General Procedures portion of this section.
i don�t want to mess with the actual airbag (thought maybe panel/cover itself could�ve been pulled). guess i�ll just leave it the way it is, which is good enough).
Although they won't cover the lower part of the dash, there are some options for dash covers which can be used to cover the top. Or you could just paint it whatever color you want. Lots of choices these days for really good paints for plastics and vinyls.


 Listen
 PRINT
PRINT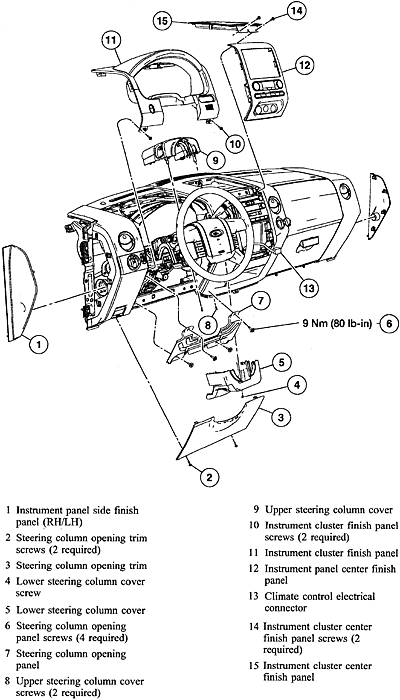 Floor console—F-150 and Mark LT
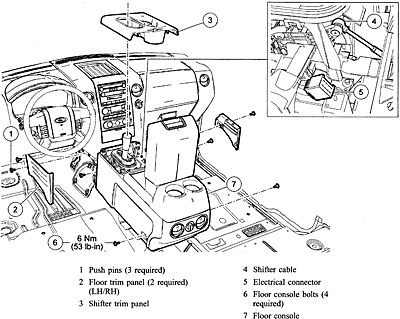 Driver’s air bag module—F-150 and Mark LT
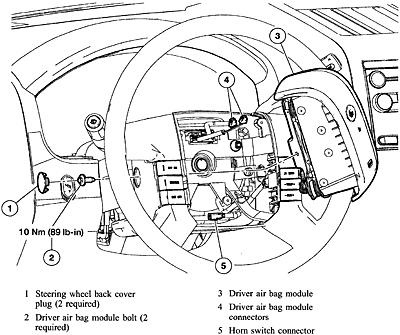 Clockspring—F-150 and Mark LT
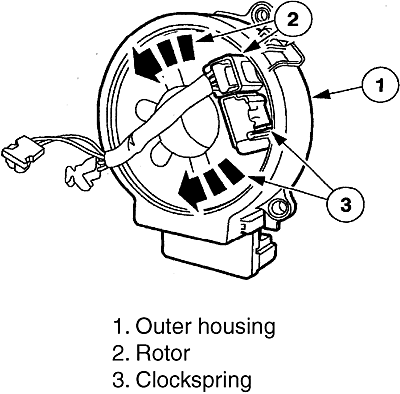
 Click to EnlargeItem