
Painted Edges on Taillights looks very clean and easy to do!

 08-10-2013, 01:32 PM
#502

Well....it costs a little more than that - I did it 2 weeks ago and it cost me the $55 + $26 to ship my original ones from FL to CA.
Here's a link to the thread:
https://www.f150forum.com/f59/new-ha...hipped-203128/
Bob
08-10-2013, 01:48 PM
#503
Senior Member
Like RES4CUE says, there's a guy on the forum that does the $55 deal.
Well....it costs a little more than that - I did it 2 weeks ago and it cost me the $55 + $26 to ship my original ones from FL to CA.
Here's a link to the thread:
https://www.f150forum.com/f59/new-ha...hipped-203128/
Bob
08-10-2013, 03:17 PM
#504
Senior Member
great mod did mine today.. didn't take long at all.. the toughest part was the edge closest to the tail gate. I decided to tape up the entire taillight and use the spray can to spray some into the groove and it worked great messy but great!!
08-16-2013, 03:07 PM
#505
Junior Member

Join Date: Aug 2013
Posts: 6
Likes: 0
Received 0 Likes
on
0 Posts
Where is the best place to get those Harley raptor lights I found some on CL but they wanted $350 for them. I wish there was an easy way to take the lences off and paint the borader around the lights.
08-16-2013, 03:50 PM
#506
Senior Member
Look in the for sale section here. There is a member named shakezone that sells them for $140 then if you ship him your old ones he will refund $85 leaving you with $55 tails less the shipping it took to send them to him.
08-16-2013, 04:23 PM
#507
It Stinks in Here...
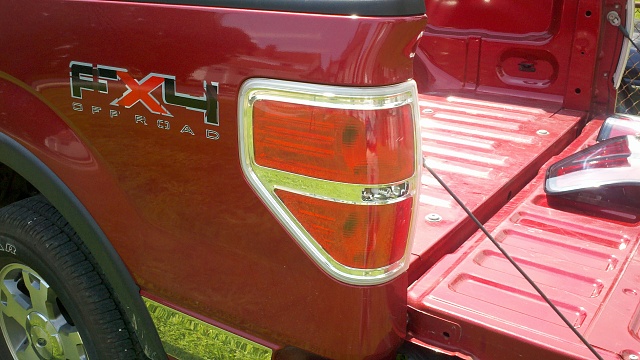
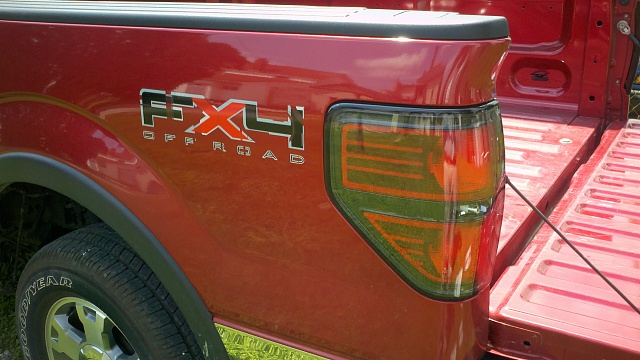
I ordered the FX style taillights and painted the edges before I installed them.
Before:
After:
I used this paint. It is water based and pre-thinned for airbrush use on plastic models:

They turned out pretty ok. There is a couple of spots where I couldn't get the glue out, but you have to look right at them to see it. I used a syringe that I got at Walmart pharmacy for free for the first coat. Just asked them for a baby syringe. I then used a small paint brush to put a second and third coat on and do some touch up. I spread it out over two days, but my total time in doing it was about two and half hours. I will keep an eye on them to see how the paint holds up. All in all, I am happy and I love the love the look.
Before:

After:

I used this paint. It is water based and pre-thinned for airbrush use on plastic models:

They turned out pretty ok. There is a couple of spots where I couldn't get the glue out, but you have to look right at them to see it. I used a syringe that I got at Walmart pharmacy for free for the first coat. Just asked them for a baby syringe. I then used a small paint brush to put a second and third coat on and do some touch up. I spread it out over two days, but my total time in doing it was about two and half hours. I will keep an eye on them to see how the paint holds up. All in all, I am happy and I love the love the look.
Last edited by boy_welder2000; 08-17-2013 at 10:50 PM.


