
Painted Edges on Taillights looks very clean and easy to do!
 05-13-2012, 11:45 PM
#301
Platinum Member!


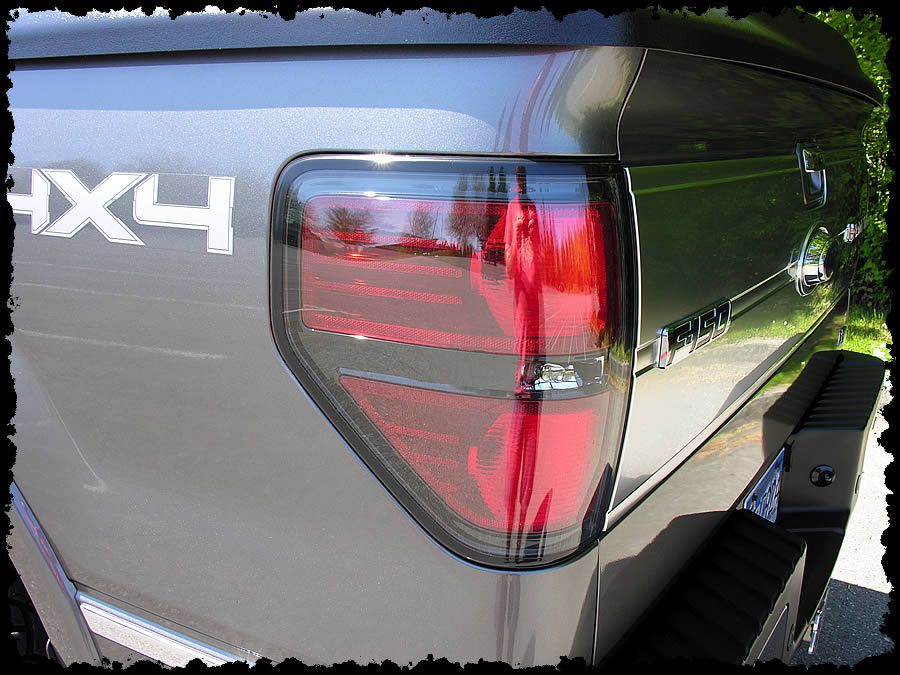
I took a different route for blackening the clear edge....I masked off the front of the lens and sprayed the outside perimeter with Gloss Black Krylon Fusion for plastics. I used automotive tape for a super clean edge, then lightly wet sanded and polished the paint step.

 05-14-2012, 12:08 AM
#302
Tommy
Join Date: Jan 2012
Location: Denver, working in N. Dakota
Posts: 903
Likes: 0
Received 29 Likes
on
28 Posts
Originally Posted by bilinvic
I took a different route for blackening the clear edge....I masked off the front of the lens and sprayed the outside perimeter with Gloss Black Krylon Fusion for plastics. I used automotive tape for a super clean edge, then lightly wet sanded and polished the paint step.
05-14-2012, 12:11 AM
#303
Platinum Member!
I actually tried the traditional method everyone is doing, but didn't like the results, so that's the main reason I went this route....glad I did too.
05-14-2012, 12:14 AM
#304
Tommy
Join Date: Jan 2012
Location: Denver, working in N. Dakota
Posts: 903
Likes: 0
Received 29 Likes
on
28 Posts
Originally Posted by bilinvic
I actually tried the traditional method everyone is doing, but didn't like the results, so that's the main reason I went this route....glad I did too.
05-14-2012, 09:51 AM
#305

I also used PTM on the outside. It looks great on the Sterling Grey. Not hard to do, just be careful and work the tape around the corners for a smooth look. I sanded the painted edge smooth before I retaped for the clearcoat. Clearcoated an area a little larger that the painted area and used rubbing/polishing compounds to finish to a clean transition. So much easier that the paint from behind method and it looks really clean. 
05-14-2012, 10:39 AM
#306

I also used PTM on the outside. It looks great on the Sterling Grey. Not hard to do, just be careful and work the tape around the corners for a smooth look. I sanded the painted edge smooth before I retaped for the clearcoat. Clearcoated an area a little larger that the painted area and used rubbing/polishing compounds to finish to a clean transition. So much easier that the paint from behind method and it looks really clean.
Pics Please!!!
05-14-2012, 09:11 PM
#307
Senior Member

How did the KRYLON FUSION work out? Just the spray paint? No clearcoat or anything. Did you have to wet sand the plastic before you painted it?
I had thought about this first as well. There are some spots in the "inside method" where the paint would not stick, and sort of reflects the light. Only I can probably tell it though.
I had thought about this first as well. There are some spots in the "inside method" where the paint would not stick, and sort of reflects the light. Only I can probably tell it though.
05-14-2012, 09:26 PM
#308
Originally Posted by bilinvic
I took a different route for blackening the clear edge....I masked off the front of the lens and sprayed the outside perimeter with Gloss Black Krylon Fusion for plastics. I used automotive tape for a super clean edge, then lightly wet sanded and polished the paint step.
05-15-2012, 12:32 AM
#310
Platinum Member!
How did the KRYLON FUSION work out? Just the spray paint? No clearcoat or anything. Did you have to wet sand the plastic before you painted it?
I had thought about this first as well. There are some spots in the "inside method" where the paint would not stick, and sort of reflects the light. Only I can probably tell it though.
I had thought about this first as well. There are some spots in the "inside method" where the paint would not stick, and sort of reflects the light. Only I can probably tell it though.
Wheels are Black Rhino Zambia...thanxs very much.
Last edited by bil-in-vic; 05-15-2012 at 12:40 AM.