
"Just Right" Door Detent: Possible Mod
 03-24-2013, 02:10 PM
#281
Senior Member


With the glove box off reach in with your left hand just like you did on the driver side, but do it on the passenger side. Use your right hand to hold the flashlight and see what your left hand is doing. The second pic showing the cover was actually with me putting the camera in the slot near the disconnected plugs so one could see the cover.
*Note that the black ~2" pipe is the vent pipe. Use that as your reference point in both pictures. I will try to make another pic to show this better.
Also I don't know if there is a difference, but mine is a 2012 Lariat and my wife's is a 2013 Platinum.
*Note that the black ~2" pipe is the vent pipe. Use that as your reference point in both pictures. I will try to make another pic to show this better.
Also I don't know if there is a difference, but mine is a 2012 Lariat and my wife's is a 2013 Platinum.
Last edited by gwpfan; 03-24-2013 at 02:32 PM. Reason: * and Pic

The following users liked this post:
Northlight (03-30-2013)
03-24-2013, 07:33 PM
#282
Hey guys, I haven't actually done mine yet they are order and in the mail. I just wanted to throw out a suggestion to either help the install or give you more light. But if you open your door all the way and look by the hinges on the dash piece there is a triangular panel that faces the door when the door is closed if you pop that piece out the plug is right next to it.


The following users liked this post:
Northlight (03-30-2013)
03-25-2013, 01:23 PM
#283
Senior Member
Thread Starter

...to everyone who looked deeper into the dark secrets of the F150 Passenger Side.
On Sunday morning, the crack Northlight Labs Investigative Team was out in force with tools, flashlights, knee pads and more.
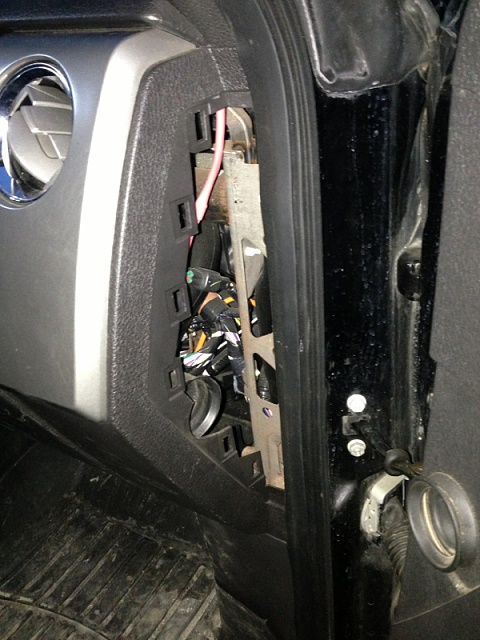
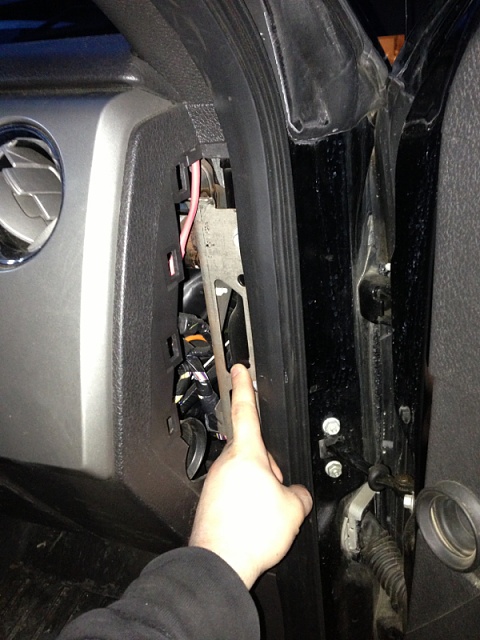
We removed both the glove compartment (three 7mm screws on the bottom edge) and the instrument panel end cover (just a little tugging and it pops out).
Removing both of these does help see into the crowded space in front of the black plastic plug covering the door check assembly access port.
Right now, up on the 23rd floor of the Northlight Labs Headquarters Complex, the Northlight Labs Department of Writing Installation Instructions Department is busily completing a 17-page requisition form for "New Words" and "New Pictures".
With corporate approval, we'll add the new words and pictures to the next generation of Door Detent 3.0 Installation Instructions.
Thanks again!!
Northlight
On Sunday morning, the crack Northlight Labs Investigative Team was out in force with tools, flashlights, knee pads and more.
We removed both the glove compartment (three 7mm screws on the bottom edge) and the instrument panel end cover (just a little tugging and it pops out).
Removing both of these does help see into the crowded space in front of the black plastic plug covering the door check assembly access port.
Right now, up on the 23rd floor of the Northlight Labs Headquarters Complex, the Northlight Labs Department of Writing Installation Instructions Department is busily completing a 17-page requisition form for "New Words" and "New Pictures".
With corporate approval, we'll add the new words and pictures to the next generation of Door Detent 3.0 Installation Instructions.
Thanks again!!
Northlight
03-25-2013, 05:42 PM
#284
Senior Member
Just a quick note on install:
It took longer to collect tools and find strap for door than actual install!
I have a 2010 STX and do NOT have the black rubber covers on either side. The back of the mechanism is completely exposed already so one less step!
I found that instead of using a string that if you just twist and manipulate them into place you will have no problems. I just twisted them and passed them through, once arm was through I grabbed it from the other side and twisted and pulled them through until in place.
These work like a champ and living in a townhouse I'll benefit everyday!
Thanks again for solving the one real problem I had with my truck!
Do you need the old arms?
The following users liked this post:
Northlight (03-30-2013)
 03-25-2013, 05:54 PM
#286
After having mine on for several days now I'd have to say that aside from my powersteps this is the next-best thing I've added to my 2013. It's just awesome cool! That a word? Well it is now. That passenger side was a bear to do but it's in.
I'd highly recommend this to anyone who thinks Ford should have done this from the factory and disappointed or frustrated they didn't.
I'd highly recommend this to anyone who thinks Ford should have done this from the factory and disappointed or frustrated they didn't.
The following users liked this post:
Northlight (03-30-2013)
03-25-2013, 06:03 PM
#287
Senior Member
After having mine on for several days now I'd have to say that aside from my powersteps this is the next-best thing I've added to my 2013. It's just awesome cool! That a word? Well it is now. That passenger side was a bear to do but it's in.
I'd highly recommend this to anyone who thinks Ford should have done this from the factory and disappointed or frustrated they didn't.
I'd highly recommend this to anyone who thinks Ford should have done this from the factory and disappointed or frustrated they didn't.
I just pulled the side panel, fuse panel, the piece that curves down to the scuff plate and was able to reach in there by the glove box while looking into the end of the dash. It went almost faster than the driver side. It literally took less than 20 mins for both. I didn't have to mess with the plugs though as I didn't have any.
The following users liked this post:
Northlight (03-30-2013)
03-26-2013, 04:55 PM
#288
Member

I just finished installing mine, 2012 XLT Super Crew, Ecoboost. I had to wait for warmer, drier weather. My driver side was more trouble than the passenger, probably due to my aftermarket backup alarm and camera wiring. Anyway, I couldn't get a good hold on the detent unit as I could only peel back part of the plug. Fortunately I used about a 10 foot string so I finally took one of those magic finger grabber things and grabbed the center of the string and fed it through until I could gab it and then just pulled it out with the string. After that it was easy. I used the same technique to feed the new one back in.
The right side was much easier although I found that sharp piece of metal and left a blood sacrifice to Mr Murphey. Total time for both sides about an hour including a phone call interuption.
I am very pleased with the result, the new detent is in the perfect place for me. Thanks much for the time and effort to develop these, I can't wait for the back door solution.
Rod
The following users liked this post:
Northlight (03-30-2013)
03-26-2013, 05:05 PM
#289
Senior Member
I had more time using it today and I love it, price may be a bit steep but worth every penny as I will use this every day!
I may be crazy but the new ones won't let the doors come close to the hinge if over extended! I wish I had these as I have the snake bite chip on my driver as a gust of wind caught it.
Great product, great fast service.
Once again, I'm glad I don't have the plugs! That sounds like it is the most difficult part getting them in and out. Lol
The following users liked this post:
Northlight (03-30-2013)
03-26-2013, 05:16 PM
#290
Member

There I was at the end of the workday and in came a package from the labs of Northlight. I am just leaving to attempt to get these in before dinner. And tomorrow I will show them to the owners I know here. I have at least 10 trucks that are interested but skeptical. I will show them the error of their ways and they will want to pay the labrats the just and fair price! For without the fathers ingenuity we would not have the best add on accessory there is! Thanks Father
The following 2 users liked this post by vikrax1:
Northlight (03-30-2013),
RES4CUE (03-26-2013)