
Custom center console/sub box build.
 04-25-2014, 03:03 AM
#1

Hey guys,
I thought I would start a thread for this build soliciting your thoughts and help. I have a 2012 stx and absolutely hate the middle seat so I took it out today and made some templates for the sides. I figured since I was doing this I might as well add a sub to the console. I'm not looking for a system so loud it blows women's clothes off, though that would be sweet, but something a little more modest. I picked up Kicker - CompS 8" Single-Voice-Coil 4-Ohm Subwoofer from Best buy for and will build the box for it within the middle console.
My initial questions, of which there will probably be many, are
1. The sub is calling for .5-1.22 cubic feet for a sealed box, does it matter how that space is configured? The way I was going to lay it out would be almost a rhombus shape.
2. Is there a noticeable difference if the box is .5 cub. feet vs 1.22 cub. feet? The way I have it sketched out currently equals about .75 cub. feet.
Thanks for your help!
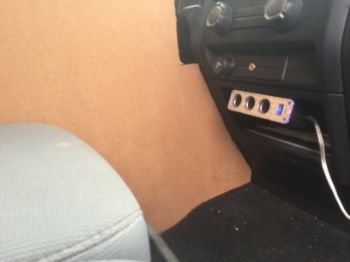
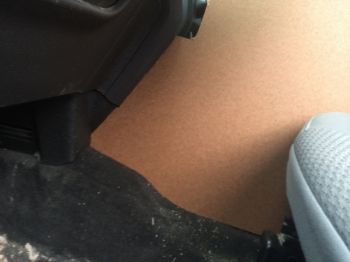
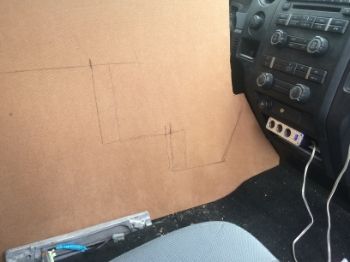
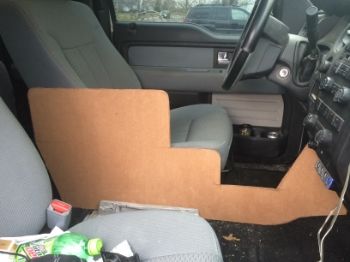
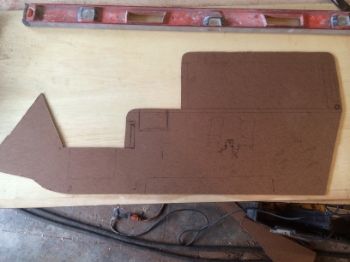
I started by jamming a 1/8 hardboard sheet between the seats and kept trimming until I got the profile nice and snug to the dash console. Then I used the actual seat heights when folded down and up and marked them on the board to use for my profile. I am going to build a phone mount and wire up some switches on the front angled portion that faces the back, the lowest flat tier will have a storage drawer with a lid built in, the 2nd tier will be for the cup holders and the top will be for the majority of my storage. The sub will go on the bottom angled portion in the rear of the console.

I thought I would start a thread for this build soliciting your thoughts and help. I have a 2012 stx and absolutely hate the middle seat so I took it out today and made some templates for the sides. I figured since I was doing this I might as well add a sub to the console. I'm not looking for a system so loud it blows women's clothes off, though that would be sweet, but something a little more modest. I picked up Kicker - CompS 8" Single-Voice-Coil 4-Ohm Subwoofer from Best buy for and will build the box for it within the middle console.
My initial questions, of which there will probably be many, are
1. The sub is calling for .5-1.22 cubic feet for a sealed box, does it matter how that space is configured? The way I was going to lay it out would be almost a rhombus shape.
2. Is there a noticeable difference if the box is .5 cub. feet vs 1.22 cub. feet? The way I have it sketched out currently equals about .75 cub. feet.
Thanks for your help!
I started by jamming a 1/8 hardboard sheet between the seats and kept trimming until I got the profile nice and snug to the dash console. Then I used the actual seat heights when folded down and up and marked them on the board to use for my profile. I am going to build a phone mount and wire up some switches on the front angled portion that faces the back, the lowest flat tier will have a storage drawer with a lid built in, the 2nd tier will be for the cup holders and the top will be for the majority of my storage. The sub will go on the bottom angled portion in the rear of the console.
 04-25-2014, 07:43 AM
#2

My initial questions, of which there will probably be many, are
1. The sub is calling for .5-1.22 cubic feet for a sealed box, does it matter how that space is configured? The way I was going to lay it out would be almost a rhombus shape.
2. Is there a noticeable difference if the box is .5 cub. feet vs 1.22 cub. feet? The way I have it sketched out currently equals about .75 cub. feet.
Fun project.
Box shape: no real constraints, as long as there are no severe restrictions between 'sections' or 'chambers', that would cause decoupling effects ( appear to the driver as a smaller box than it really is).
Box volume: As long as you keep within specs I don't think you would notice much, if anything. Typically for A/S enclosures, a smaller box will be slightly 'tighter' (air compliance is lower) than a larger box, but the extension of the large box would be slightly greater, but less tightly controlled (air compliance is higher).
Some resources (just scratching the surface, but plenty for a project like this).
http://www.the12volt.com/caraudio/boxes.asp
http://www.diysubwoofers.org/
Note the caveats on box rigidity and bracing.
good luck
MGD
Last edited by MGD; 04-25-2014 at 07:47 AM.
04-25-2014, 08:11 AM
#3
Hi.
Fun project.
Box shape: no real constraints, as long as there are no severe restrictions between 'sections' or 'chambers', that would cause decoupling effects ( appear to the driver as a smaller box than it really is).
Box volume: As long as you keep within specs I don't think you would notice much, if anything. Typically for A/S enclosures, a smaller box will be slightly 'tighter' (air compliance is lower) than a larger box, but the extension of the large box would be slightly greater, but less tightly controlled (air compliance is higher).
Some resources (just scratching the surface, but plenty for a project like this).
http://www.the12volt.com/caraudio/boxes.asp
http://www.diysubwoofers.org/
Note the caveats on box rigidity and bracing.
good luck
MGD
04-25-2014, 08:44 AM
#4

1.2 sealed is huge for an 8, even. 75 is pretty big. I would build your box at the lowest end of the recommended scale, or get another sub and put the pair in 1 cube. I know you don't want a booming system, but I highly doubt you will be satisfied with one 8 sealed. Shape makes no difference to the sub
Last edited by king nothing; 04-25-2014 at 08:47 AM.
04-25-2014, 11:37 AM
#5
Naw - jes' a retired old fart wif way too much edumacation, and too many hobbies....
Apparently, according to some members, I allegedly don't even own a truck. And even when I posted a pic of it, they implied it wasn't mine.
Still completely blindsided and reeling somewhat from that ... I dunno what to think of this place anymore....

MGD
PS: Ol' King Nada has a good point. It all depends what yer goals are. If it's just to add a bit of bottom-end 'filler' you should be okay. It's possible to design the box with that upgrade in mind (removable baffle) if/when yer needs were to grow.
PPS:
Originally Posted by Bathroom Reno Guru
I am going to build a phone mount and wire up some switches on the front angled portion that faces the back


Last edited by MGD; 04-25-2014 at 11:52 AM.
04-27-2014, 03:37 AM
#6
1.2 sealed is huge for an 8, even. 75 is pretty big. I would build your box at the lowest end of the recommended scale, or get another sub and put the pair in 1 cube. I know you don't want a booming system, but I highly doubt you will be satisfied with one 8 sealed. Shape makes no difference to the sub

 04-27-2014, 04:09 AM
#7
Progress thus far:
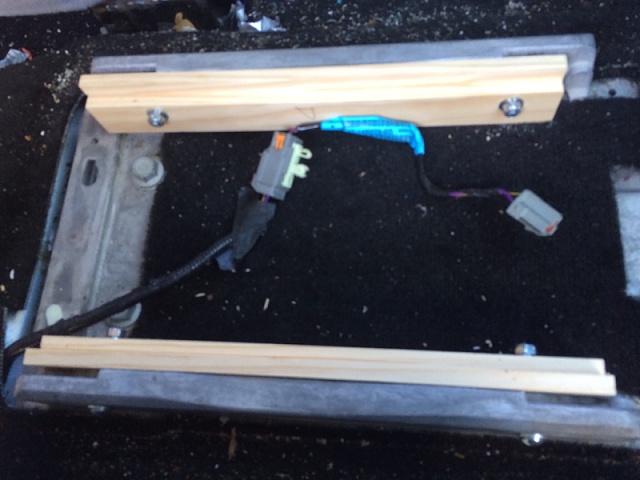
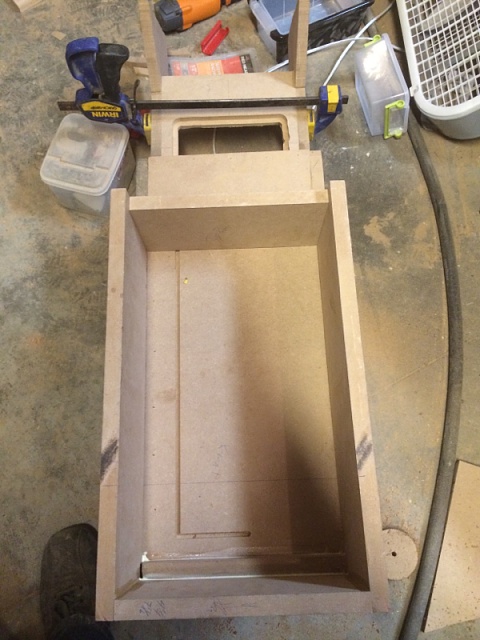
I cut two pcs of pine stock down, dadoed the edges to accommodate 1/2" plywood and bolted them to the existing floor brackets.
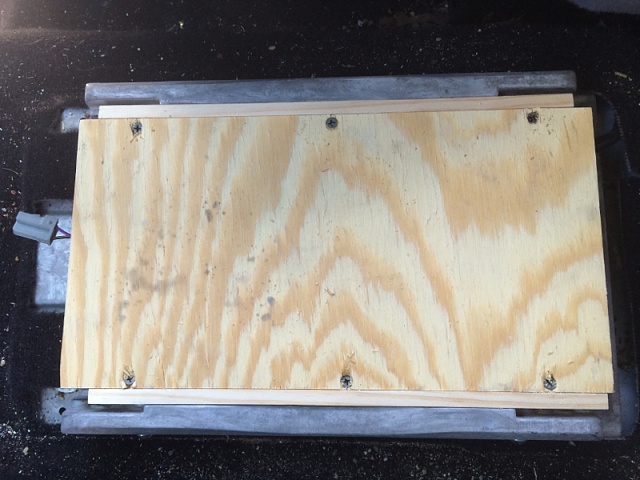
Then I cut some 1/2" plywood, screwed it into the wood bracing, then attached one more layer of 1/2" plywood on top and screwed it into both the metal brackets and the first layer of plywood. I plan to put a layer of cork between this and the box to dampen any extra vibrations.
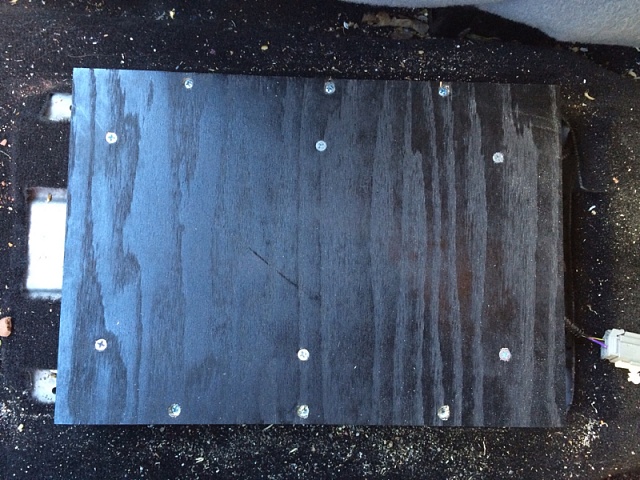
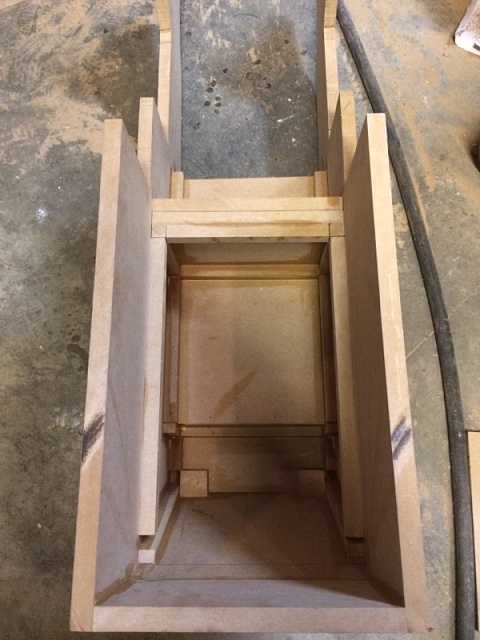
At this point it looks more like a sled but just bare with me for a little bit. Here you can see the sub enclosure, fully braced, all corners glued , siliconed, and sealed the entire interior of the enclosure with an oil based polyurethane.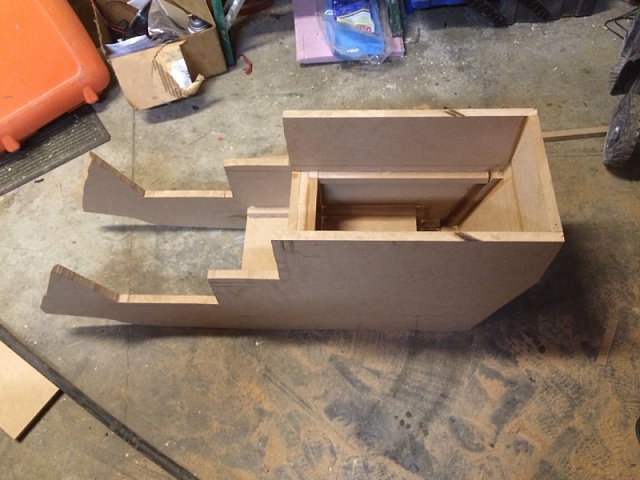
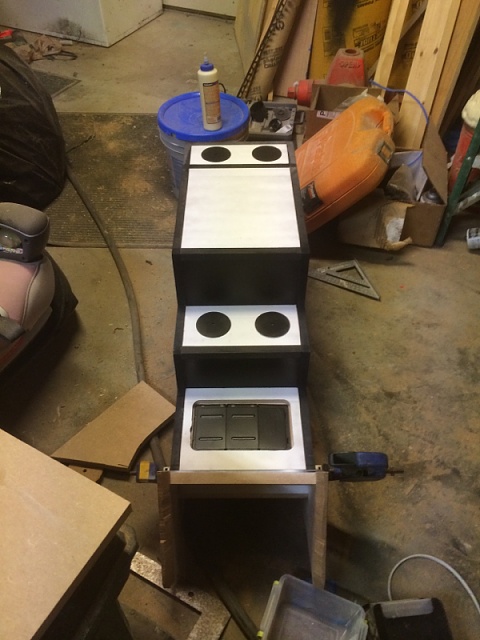
I channeled in a line to run the wire for a socket/USB hub in the back of the console.
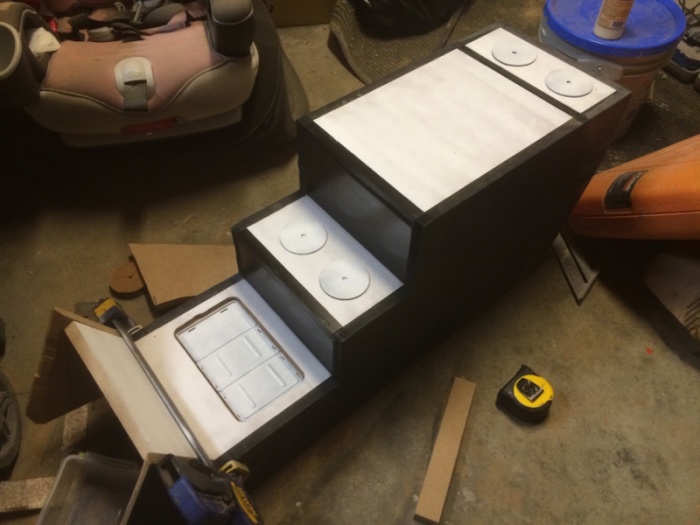
I wasn't sure how I wanted the color scheme to look and I didn't want to be playing around with paint colors after I have it all edged and final sanded so I mocked up a few designs. I'm not sure which I like best yet right now so I'm going to sleep on it for the night, let me know which style you guys like.
Option A:

Option B:
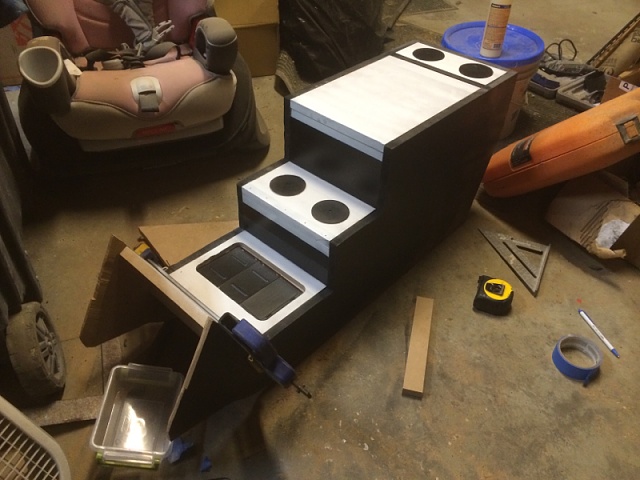
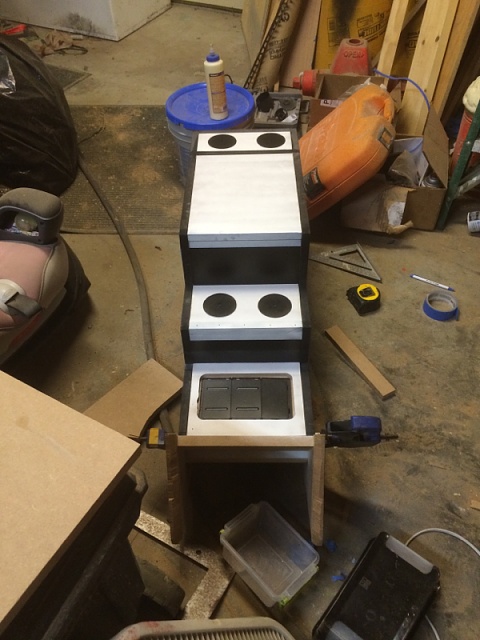
Option C:

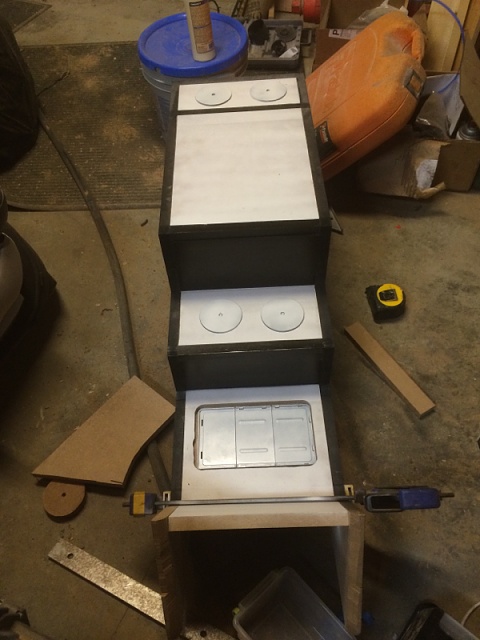
I'll post up some pics after I get it the edges routered out, everything filled in, completely sanded and ready for final paint.
I cut two pcs of pine stock down, dadoed the edges to accommodate 1/2" plywood and bolted them to the existing floor brackets.

Then I cut some 1/2" plywood, screwed it into the wood bracing, then attached one more layer of 1/2" plywood on top and screwed it into both the metal brackets and the first layer of plywood. I plan to put a layer of cork between this and the box to dampen any extra vibrations.


At this point it looks more like a sled but just bare with me for a little bit. Here you can see the sub enclosure, fully braced, all corners glued , siliconed, and sealed the entire interior of the enclosure with an oil based polyurethane.


I channeled in a line to run the wire for a socket/USB hub in the back of the console.

I wasn't sure how I wanted the color scheme to look and I didn't want to be playing around with paint colors after I have it all edged and final sanded so I mocked up a few designs. I'm not sure which I like best yet right now so I'm going to sleep on it for the night, let me know which style you guys like.
Option A:


Option B:


Option C:

I'll post up some pics after I get it the edges routered out, everything filled in, completely sanded and ready for final paint.
Last edited by The Machine; 04-27-2014 at 04:44 AM.
The following users liked this post:
MGD (04-27-2014)
Trending Topics
04-27-2014, 07:49 AM
#8
Mad skills, my friend 
Me likey Option 'C'.
Padded console armrest / lid right? Is that armrest height comfortable for you and yer passenger?
Round the corners as well, perhaps?
good luck
MGD
Me likey Option 'C'.
Padded console armrest / lid right? Is that armrest height comfortable for you and yer passenger?
Round the corners as well, perhaps?
good luck
MGD
04-27-2014, 12:57 PM
#9
Thanks MGD, I've decided not to pad/upholster the lid strictly due to the fact that my arms are usually covered in mortar at the end of the work day and it really is tough to get out of fabric. I'll paint everything and finish it with a nice satin lacquer. The height matches up to the same height of the arm rests of the door so we should be good there. The corners will be all routered with a 45 degree bevel to soften it a bit. Thanks for the feedback!
04-27-2014, 06:23 PM
#10
Thanks MGD, I've decided not to pad/upholster the lid strictly due to the fact that my arms are usually covered in mortar at the end of the work day and it really is tough to get out of fabric. I'll paint everything and finish it with a nice satin lacquer. The height matches up to the same height of the arm rests of the door so we should be good there. The corners will be all routered with a 45 degree bevel to soften it a bit. Thanks for the feedback!
Gotcha. I was thinkin' then, aboot that fake leather/vinyl/ Naugahyde stuff. East to clean - perhaps make a coupla modular spares that you can detach from beneath - that sorta thing. I think you'll appreciate the padding after a long day

MGD