
A Couple Bilstein 5100 DIY Install Tips
 01-23-2012, 12:25 PM
#1
I installed my 5100's this last weekend. I had read as many threads on the 5100's as I could find to catch any tips for the install. I wish I had taken some pics to pass along, but I get on a roll and find it hard to stop and take pics--sorry! Here's the tips I have to pass along:
First thing I did was disconnect my battery to save the EPAS (2011+). I had read in one thread it needed to be powered down for 45min to ensure no damage. I don't know if that's true or not, but didn't take any chances. I disconnected the battery and then started work on the rear so that by the time I got to the front, the system would've been powered down for more than 45min.
Rears: if you need help with the rears, stop right there. No need to even attempt anything else; take your truck to a shop and have them do it. Seriously, about the only thing I have to add for the rears is that Bilstein does not specifiy which end goes up in their directions. The shocks can be physically installed with either end up since both ends are the same. From my past experience, they are designed to be installed so the label is right side up when installed, or in our case with the boots on the bottom. I installed an add-a-leaf while I was doing the back which went pretty smooth as well. I think maybe it took an hour to install the rear shocks and add-a-leaf taking my time.
Fronts: I thought I had read that someone was able to remove the front shock/spring assembly with only breaking the tie rod loose but not the upper balljoint. What I found is that you *might* be able to do this, but it would be tough, especially trying to get the new longer Bilstein assembly back into place. It wasn't a big deal to break the upper balljoint loose so I ended up breaking both the tie rod and balljoint loose.
You will need a set of large sockets for the lower shock bolt/nut. If I remember correctly, it was a 30mm. I also needed a pretty long breaker bar to get the nut loose, it was very tight.
With the upper balljoint and tie rod disconnected, removing the old spring/shock assembly is pretty easy, maybe just a bit of pressure on the lower control arm to maneuver the assembly out.
Compressing the spring--obviously the most dangerous and PITA part of the job. I had read that the springs are extremely stiff and learned that is completely accurate. I have compressed a lot of springs in the past with setting up my road race car so I had a quality pair of spring compressors. I'm not sure what the spring rate is on the stock springs, but they were way harder than any springs I've worked on, even stiff race springs. I was able to compress the spring enough with my pair of compressors to get the spring off the stock assembly. However, unless you set the Bilsteins at stock height, you have to compress the spring even further to get the new assembly back together. I had wanted to install mine at the highest setting. My compressors were already straining to just get the springs compressed to stock height. I was about to give up when I got the idea to add a second pair of spring compressors. I ran down to Autozone and rented a second pair of compressors. I put all 4 spring compressors on the spring and tightened them in a cross-pattern. Using this method I was able to compress the spring far enough to get my Bilsteins set at the 3rd highest setting (1.5" lift). I might've been able to get them compressed far enough to get to the highest setting but my bravery/common sense equation equalled out at the 3rd setting. Even with 4 compressors on the springs, they were starting to strain (bow) pretty good to get to the 3rd setting. I don't know that you can do this with just 2 compressors, I would not recommend it.
My spring perches were tack-welded to the stock shocks, but as advertised, a few taps with a 5lb ballpeen hammer and they came right off.
When I installed the first side, I had a hell of a time getting the new assembly back in place. The Bilstein shock is a bit longer and was almost impossible to get back into the lower control arm. It took me standing on the lower control arm (250lbs) and my wife using a prybar to get the shock in place. Even with this method, it was a struggle and took several attempts. Up until this point, I had been doing this all solo.
When I installed the second side, I got an idea which worked out great. Instead of removing all of the spring compressors after I got the new assembly put together, I left 2 in place on the side that would be facing away from the truck. I did loosen them a bit so they weren't completely strained but kept the spring somewhat compressed. With this method, I was able to get the new assembly back in place with minimal effort by myself (my wife was very happy about that). After I got the Bilstein assembly in place, I loosened and removed the last two spring compressors.
That's about it, otherwise pretty straight forward.
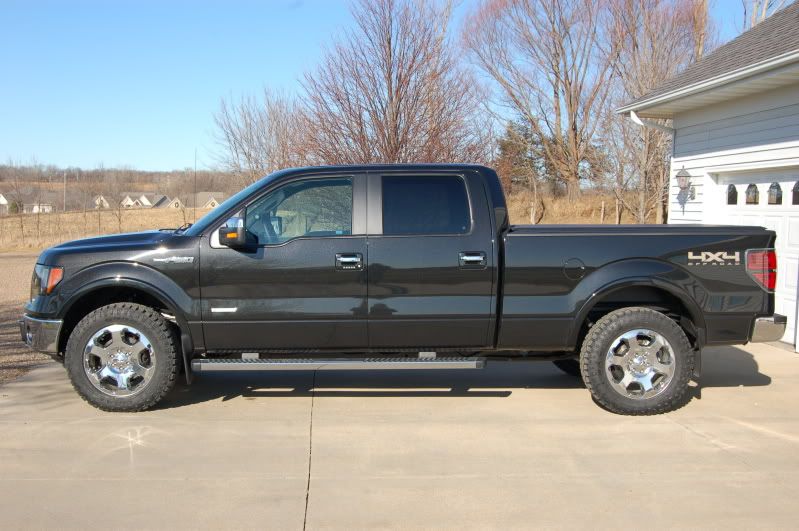
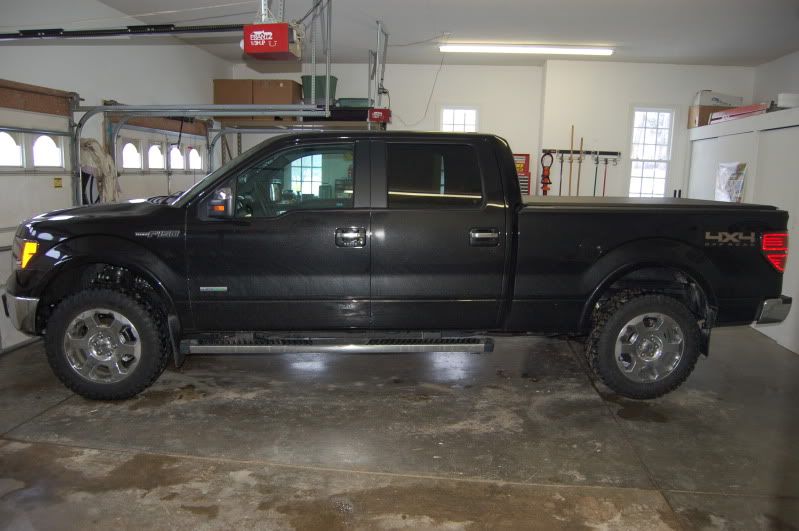
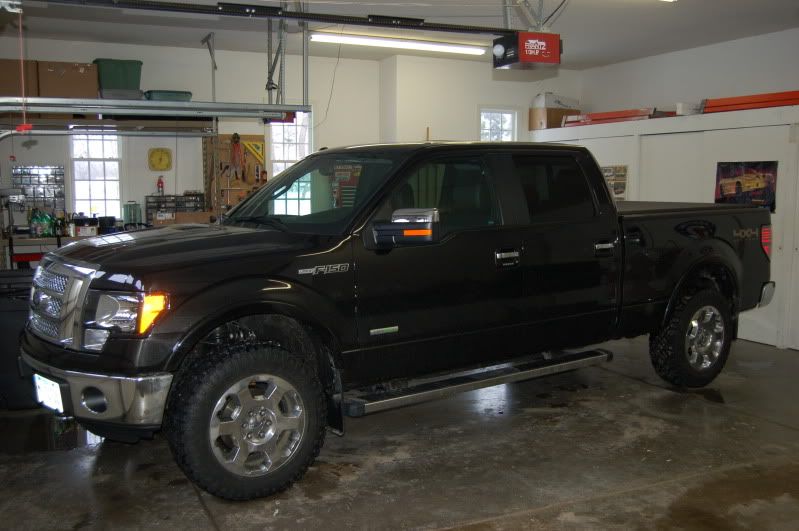
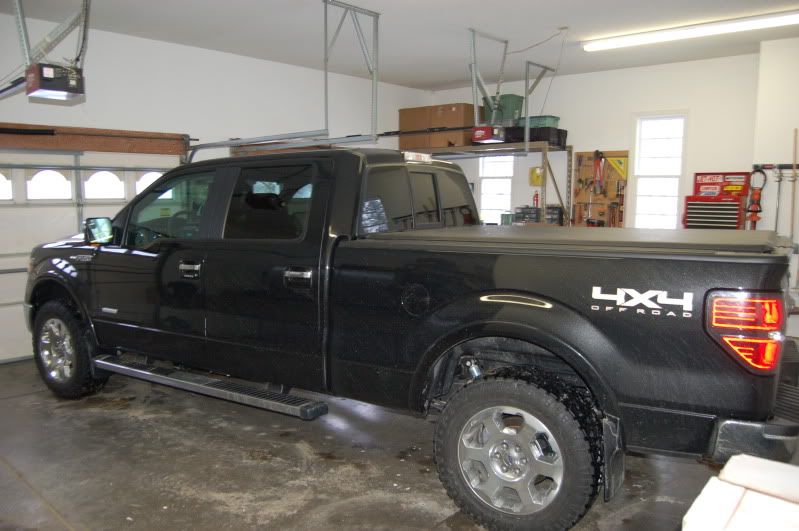
I did end up with a somewhat unique combination with my suspension. My original plan as I mentioned was to set my Bilsteins at the highest setting and add an add-a-leaf to the rear so I didn't end up nose high when towing or hauling. Well since I couldn't get the Bilsteins to the highest setting, I ended up with 2" of rake with the add-a-leaf and the 1.5" front lift. I didn't like the looks of that, so I went to the back and pulled the stock rear block. Unlike what's been noted by others, my rear block was not 1 5/8". It was actually tapered 1 1/8" front and 1 1/4" rear. After removing the block, I ended up with 3/4" of rake (40.5" rear, 39.75" front) which I think looks great. Sorry the truck is dirty from our recent snow but I'll get pics when she's cleaned up a bit. I figure the rear add-a-leaf probably wasn't necessary but will keep me from tail-dragging when loaded better than the stock springs and block.
Ride is almost unchanged. A bit more stiff but hardly noticible. My wife said she could barely notice a change.
First thing I did was disconnect my battery to save the EPAS (2011+). I had read in one thread it needed to be powered down for 45min to ensure no damage. I don't know if that's true or not, but didn't take any chances. I disconnected the battery and then started work on the rear so that by the time I got to the front, the system would've been powered down for more than 45min.
Rears: if you need help with the rears, stop right there. No need to even attempt anything else; take your truck to a shop and have them do it.
Seriously, about the only thing I have to add for the rears is that Bilstein does not specifiy which end goes up in their directions. The shocks can be physically installed with either end up since both ends are the same. From my past experience, they are designed to be installed so the label is right side up when installed, or in our case with the boots on the bottom. I installed an add-a-leaf while I was doing the back which went pretty smooth as well. I think maybe it took an hour to install the rear shocks and add-a-leaf taking my time.Fronts: I thought I had read that someone was able to remove the front shock/spring assembly with only breaking the tie rod loose but not the upper balljoint. What I found is that you *might* be able to do this, but it would be tough, especially trying to get the new longer Bilstein assembly back into place. It wasn't a big deal to break the upper balljoint loose so I ended up breaking both the tie rod and balljoint loose.
You will need a set of large sockets for the lower shock bolt/nut. If I remember correctly, it was a 30mm. I also needed a pretty long breaker bar to get the nut loose, it was very tight.
With the upper balljoint and tie rod disconnected, removing the old spring/shock assembly is pretty easy, maybe just a bit of pressure on the lower control arm to maneuver the assembly out.
Compressing the spring--obviously the most dangerous and PITA part of the job. I had read that the springs are extremely stiff and learned that is completely accurate. I have compressed a lot of springs in the past with setting up my road race car so I had a quality pair of spring compressors. I'm not sure what the spring rate is on the stock springs, but they were way harder than any springs I've worked on, even stiff race springs. I was able to compress the spring enough with my pair of compressors to get the spring off the stock assembly. However, unless you set the Bilsteins at stock height, you have to compress the spring even further to get the new assembly back together. I had wanted to install mine at the highest setting. My compressors were already straining to just get the springs compressed to stock height. I was about to give up when I got the idea to add a second pair of spring compressors. I ran down to Autozone and rented a second pair of compressors. I put all 4 spring compressors on the spring and tightened them in a cross-pattern. Using this method I was able to compress the spring far enough to get my Bilsteins set at the 3rd highest setting (1.5" lift). I might've been able to get them compressed far enough to get to the highest setting but my bravery/common sense equation equalled out at the 3rd setting. Even with 4 compressors on the springs, they were starting to strain (bow) pretty good to get to the 3rd setting. I don't know that you can do this with just 2 compressors, I would not recommend it.
My spring perches were tack-welded to the stock shocks, but as advertised, a few taps with a 5lb ballpeen hammer and they came right off.
When I installed the first side, I had a hell of a time getting the new assembly back in place. The Bilstein shock is a bit longer and was almost impossible to get back into the lower control arm. It took me standing on the lower control arm (250lbs) and my wife using a prybar to get the shock in place. Even with this method, it was a struggle and took several attempts. Up until this point, I had been doing this all solo.
When I installed the second side, I got an idea which worked out great. Instead of removing all of the spring compressors after I got the new assembly put together, I left 2 in place on the side that would be facing away from the truck. I did loosen them a bit so they weren't completely strained but kept the spring somewhat compressed. With this method, I was able to get the new assembly back in place with minimal effort by myself (my wife was very happy about that). After I got the Bilstein assembly in place, I loosened and removed the last two spring compressors.
That's about it, otherwise pretty straight forward.
I did end up with a somewhat unique combination with my suspension. My original plan as I mentioned was to set my Bilsteins at the highest setting and add an add-a-leaf to the rear so I didn't end up nose high when towing or hauling. Well since I couldn't get the Bilsteins to the highest setting, I ended up with 2" of rake with the add-a-leaf and the 1.5" front lift. I didn't like the looks of that, so I went to the back and pulled the stock rear block. Unlike what's been noted by others, my rear block was not 1 5/8". It was actually tapered 1 1/8" front and 1 1/4" rear. After removing the block, I ended up with 3/4" of rake (40.5" rear, 39.75" front) which I think looks great. Sorry the truck is dirty from our recent snow but I'll get pics when she's cleaned up a bit. I figure the rear add-a-leaf probably wasn't necessary but will keep me from tail-dragging when loaded better than the stock springs and block.
Ride is almost unchanged. A bit more stiff but hardly noticible. My wife said she could barely notice a change.
 01-23-2012, 12:55 PM
#2
Senior Member


Thanks for the great write up. Good idea about using 4 compressors. I'm still waiting on my shocks right now and planned on doing the install myself but with your info I might get some quotes for the fronts first, sometimes time is more precious than money.
01-23-2012, 03:35 PM
#3
Senior Member

Good tips. Not sure I would try this myself having never even used a spring compressor before. What is the consensus on which way the rears get installed? Had the 5100's on my last truck (04 lariat) installed at the dealership and they had the boots up. Will hopefully be putting these on my '09 sometime this spring/summer.
01-23-2012, 04:23 PM
#4
Went ahead and took some pics even though the truck's dirty. I'll get some better pics once the weather allows me to get it cleaned up nice.
On a side note, I also got a chance to paint the border on my HD tail lights; I think they look a lot better.
Before:
After:
On a side note, I also got a chance to paint the border on my HD tail lights; I think they look a lot better.
Before:
After:
Last edited by JJKJ; 01-23-2012 at 04:25 PM.
 01-23-2012, 04:32 PM
#6

Dude nice rig! Right now, I wish I could live closer to ya to pay you to have my 5100's installed on mine. Also, where and what add a leaf did you put on yours? Link?
But I am even more jealous that you can fit your SCREW with the 6.5 foot bed inside your garage!
Mind me asking how big is your garage? Ummm that didn't sound right.
But you know what I mean.
But I am even more jealous that you can fit your SCREW with the 6.5 foot bed inside your garage!
Mind me asking how big is your garage? Ummm that didn't sound right.
But you know what I mean.
Last edited by Dogtired; 01-23-2012 at 04:37 PM.
01-23-2012, 05:00 PM
#7
Dude nice rig! Right now, I wish I could live closer to ya to pay you to have my 5100's installed on mine. Also, where and what add a leaf did you put on yours? Link?
But I am even more jealous that you can fit your SCREW with the 6.5 foot bed inside your garage!
Mind me asking how big is your garage? Ummm that didn't sound right.
But you know what I mean.
But I am even more jealous that you can fit your SCREW with the 6.5 foot bed inside your garage!
Mind me asking how big is your garage? Ummm that didn't sound right.
But you know what I mean.
Seriously though, if I had to do it again, I'd probably disassemble the truck, take the spring/shock assembly to a local shop and have them compress the spring off/on. I didn't really have that option late on Sat though cause all the shops were closed and I didn't want to let the truck sit unassembled.I can't remember the exact dimensions of my garage; I measured it a couple years ago when I bought the house. I believe it was about 25' from the door to the built-in cabinets at the front; the built-ins are about 3' deep so I think I was around 28' deep. Width is around 36' with a couple bump outs for storage. The only things I'm missing are a floor drain (I plan to install one this year) and a larger door. I wish I had an 8x18' main door instead of the 7x16'. With the 16' door, I have to back in at an angle so my truck isn't too close to my wife's car, and with a 7' height, I'm limited to pretty much just a level and 33" tires to avoid scraping all the paint off the roof of my truck.
Trending Topics
01-23-2012, 08:53 PM
#9
Originally Posted by JJKJ
Went ahead and took some pics even though the truck's dirty. I'll get some better pics once the weather allows me to get it cleaned up nice.
On a side note, I also got a chance to paint the border on my HD tail lights; I think they look a lot better.
Before:
After:
On a side note, I also got a chance to paint the border on my HD tail lights; I think they look a lot better.
Before:
After:

