
COMPLETE Upfitter switch install into 2013 F150 Platinum
 12-22-2015, 03:28 PM
#101
Senior Member
Great write up and info! This is now on my list of to-do's. I didn't think the switches would fit in that cubby, I was considering fabing something up or using the whole Raptor mount, but didn't want to lose the space by the cup holders.
 12-22-2015, 10:13 PM
#102
Senior Member
The following users liked this post:
Gibby1234 (12-22-2015)
12-22-2015, 11:01 PM
#103
Senior Member
12-23-2015, 05:13 PM
#104
Member
Thread Starter
Join Date: Apr 2011
Location: Red Deer, Alberta, Canada
Posts: 50
Likes: 0
Received 63 Likes
on
24 Posts

Pretty much exactly like what I did with mine as well almost to the tee but I forgot to take the pictures of the actual switch install.
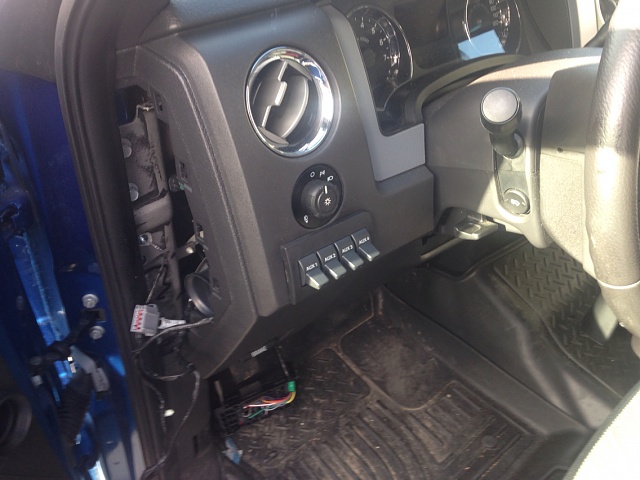
Thought I would share my experience today of mounting the raptor switches in the 'useless cubby' area. I had only read that there was some trimming that had to be done, but never did I see any pictures of how much had to be trimmed.
I will get to the trimming later. I began by removing the panel and taking it inside to attach the switches to the back of the useless cubby. I used hot glue to mount them. I also screwed in 2 machine screws into the old 'plastic rivets' that held in the useless cubby to help support the switch.
Attachment 406665
Then it was back into the garage to trim the inside of the dash until the switches fit in. Lots of plastic had to be trimmed out to get the switches to fit. Rather then describing everything, below is a picture of behind the 'useless cubby' showing how much I trimmed to make it fit in there.
Attachment 406664
I spent nearly 2 hours trimming and test fitting before I finally had it fitting nicely. There is quite a bit of plastic in the way behind the switch. It was also just touching the metal support that goes across the top of the glove box. I ended up grinding off about ⅛" off the corner of the switch itself in order to make it fit. This project is definitely a lot more work then I expected. The tools I used for trimming are as follows:
-Mini hack saw (https://www.lowes.ca/hand-saws/kobal...Q&gclsrc=aw.ds)
-Dremel with flex shaft with cutting disk
-small file to remove small pieces that you can't get to with the Dremel or saw
The following users liked this post:
Gibby1234 (12-24-2015)
12-24-2015, 11:16 AM
#105
I really want to add the upfitter switches to my truck, but would prefer to have them on the driver's side and move the trailer brake controller to the passenger side cubby. Has anyone considered this, or would it be too much trouble to bother with?
12-29-2015, 01:12 AM
#106
Hi Gibby,
Your second pic doesn't show up for me... Can you re-post it to show what you trimmed?
Thanks!
Your second pic doesn't show up for me... Can you re-post it to show what you trimmed?
Thanks!
Thought I would share my experience today of mounting the raptor switches in the 'useless cubby' area. I had only read that there was some trimming that had to be done, but never did I see any pictures of how much had to be trimmed.
I will get to the trimming later. I began by removing the panel and taking it inside to attach the switches to the back of the useless cubby. I used hot glue to mount them. I also screwed in 2 machine screws into the old 'plastic rivets' that held in the useless cubby to help support the switch.
Attachment 406665
Then it was back into the garage to trim the inside of the dash until the switches fit in. Lots of plastic had to be trimmed out to get the switches to fit. Rather then describing everything, below is a picture of behind the 'useless cubby' showing how much I trimmed to make it fit in there.
Attachment 406664
I spent nearly 2 hours trimming and test fitting before I finally had it fitting nicely. There is quite a bit of plastic in the way behind the switch. It was also just touching the metal support that goes across the top of the glove box. I ended up grinding off about ⅛" off the corner of the switch itself in order to make it fit. This project is definitely a lot more work then I expected. The tools I used for trimming are as follows:
-Mini hack saw (https://www.lowes.ca/hand-saws/kobal...Q&gclsrc=aw.ds)
-Dremel with flex shaft with cutting disk
-small file to remove small pieces that you can't get to with the Dremel or saw
I will get to the trimming later. I began by removing the panel and taking it inside to attach the switches to the back of the useless cubby. I used hot glue to mount them. I also screwed in 2 machine screws into the old 'plastic rivets' that held in the useless cubby to help support the switch.
Attachment 406665
Then it was back into the garage to trim the inside of the dash until the switches fit in. Lots of plastic had to be trimmed out to get the switches to fit. Rather then describing everything, below is a picture of behind the 'useless cubby' showing how much I trimmed to make it fit in there.
Attachment 406664
I spent nearly 2 hours trimming and test fitting before I finally had it fitting nicely. There is quite a bit of plastic in the way behind the switch. It was also just touching the metal support that goes across the top of the glove box. I ended up grinding off about ⅛" off the corner of the switch itself in order to make it fit. This project is definitely a lot more work then I expected. The tools I used for trimming are as follows:
-Mini hack saw (https://www.lowes.ca/hand-saws/kobal...Q&gclsrc=aw.ds)
-Dremel with flex shaft with cutting disk
-small file to remove small pieces that you can't get to with the Dremel or saw

The following users liked this post:
arokcrwlr (01-13-2016)
12-29-2015, 06:35 AM
#108
Senior Member
Finally got to mine this weekend, I didn't like the idea of reaching across the dash for my switches, and that Useless cubby keeps the wife's Bobby pins out the rest of the truck and it's cup holders.
Just need to cut a new hole for the dimmer right now.

Just need to cut a new hole for the dimmer right now.
01-13-2016, 12:16 AM
#109

Very interesting write-up. Will try this myself as soon as I get the stuff. I am not liking the idea of trimming so much though. Might have to look around for another spot.
01-18-2016, 11:42 PM
#110
Senior Member

Couple questions about the relay box.
1) are any of the relays 5 prong, or at least a slot to accept one?
2) are there any extra relays?
3) any fuse slots in the relay box?
1) are any of the relays 5 prong, or at least a slot to accept one?
2) are there any extra relays?
3) any fuse slots in the relay box?