
Best modifications under $50
 03-08-2013, 09:33 PM
#871


That center console piece, the one with the cup holders and gear shifter, pops out pretty easily. As you can see in the background of the pictures I already installed interior ambient lighting, so I just tapped into that power which is hidden under/behind the center console. I have that wired into one of the fuses to turn on with the key. I can post more pictures if anyone wants.
Thanks for the guidance!
 03-08-2013, 09:38 PM
#872
Senior Member
03-10-2013, 03:48 PM
#875

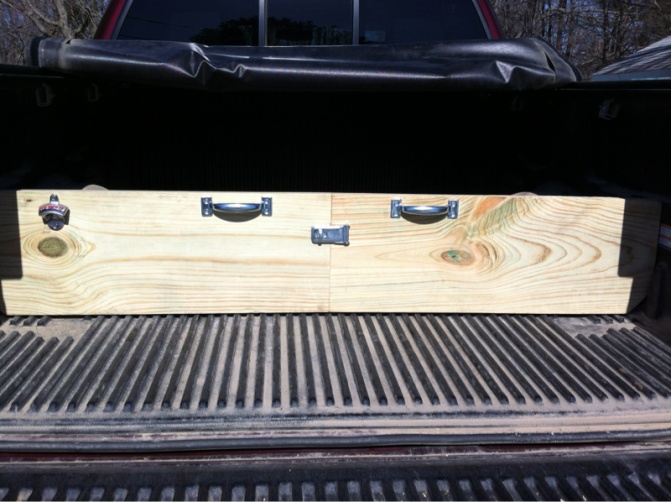
I took the wood divider idea and modified it a tad.....for 20 bucks in hardware I split the board I was using, added a hinge, some handles and a swing lock to secure the board when extended. Then I added a small extension that also folds down. So far it's been very functional
Thanks to all those that offered this bed divder idea, including CAPTAIN_MATH for starting this thread and his first post!
Thanks to all those that offered this bed divder idea, including CAPTAIN_MATH for starting this thread and his first post!
 03-11-2013, 06:50 AM
#876
MWZotti

I love your ideas for a bed divider so I'm putting one together. What did you use to cut out your holes? What kind of hinge did you use for the extender? It almost looks like a cabinet hinge when I zoom in on the picture but I can't tell for sure. Thanks for sharing your ideas
Attachment 201020
Attachment 201020
03-11-2013, 08:30 AM
#877
Senior Member

I took the wood divider idea and modified it a tad.....for 20 bucks in hardware I split the board I was using, added a hinge, some handles and a swing lock to secure the board when extended. Then I added a small extension that also folds down. So far it's been very functional
Thanks to all those that offered this bed divder idea, including CAPTAIN_MATH for starting this thread and his first post!
Thanks to all those that offered this bed divder idea, including CAPTAIN_MATH for starting this thread and his first post!
03-11-2013, 08:44 AM
#878
I don't want to answer for Maximus but I'm hoping to use the holes for an easy way to slide my fishing rods in and out. I used a pressure treated 2x12 so it is on the heavy side so the holes should help with the weight as well. My thought is that the piece that extends to the back of the bed will help keep my tackle box from sliding side to side.
 03-11-2013, 02:41 PM
#880

[MENTION=75690]mbullock[/MENTION]; I'm late for the party I know , but a question , your sign off says you did a
" power heated side mirror upgrade " . I've got a 2012 XLT Screw with the "standard" side mirrors , I would like to change them to the power towing mirrors ( or maybe the manual ones , whichever works out best ) , my local dealer parts guy says not possible , parts not available . My question for you ; Is the wiring in the truck already there or did you have to pull additional wiring? , Was the mounting a simple bolt on or were changes required ? Many thanks for your time and effort , BTW your truck looks great !
" power heated side mirror upgrade " . I've got a 2012 XLT Screw with the "standard" side mirrors , I would like to change them to the power towing mirrors ( or maybe the manual ones , whichever works out best ) , my local dealer parts guy says not possible , parts not available . My question for you ; Is the wiring in the truck already there or did you have to pull additional wiring? , Was the mounting a simple bolt on or were changes required ? Many thanks for your time and effort , BTW your truck looks great !