
Best modifications under $50

 10-22-2016, 02:16 PM
#7622
How's she goin' eh?
Yea, I've done it that way. It's a cool feature.
10-22-2016, 08:21 PM
#7623
Senior Member


Plugging in does give you the benefit of not using up battery.

 10-23-2016, 10:51 AM
#7625
American member
I put mine on 2 -1/2 year's ago and I love it.
Gives the screen a glass tablet look and feel. More importantly zero fingerprints!
Also glare has never been an issue. $20 bucks from Amazon. Wasn't prime eligible then.
Last edited by Masi1926; 08-06-2019 at 01:49 PM.
The following users liked this post:
FX4_2014F150 (10-23-2016)
10-23-2016, 04:42 PM
#7626
How's she goin' eh?
Hmmm. Maybe. Mine has a couple of hotspot from the previous owner. I might try these.
Last edited by M0RRIS; 10-23-2016 at 05:05 PM.
10-23-2016, 11:15 PM
#7627
Senior Member
 10-31-2016, 11:54 PM
#7628
Displaced Texan
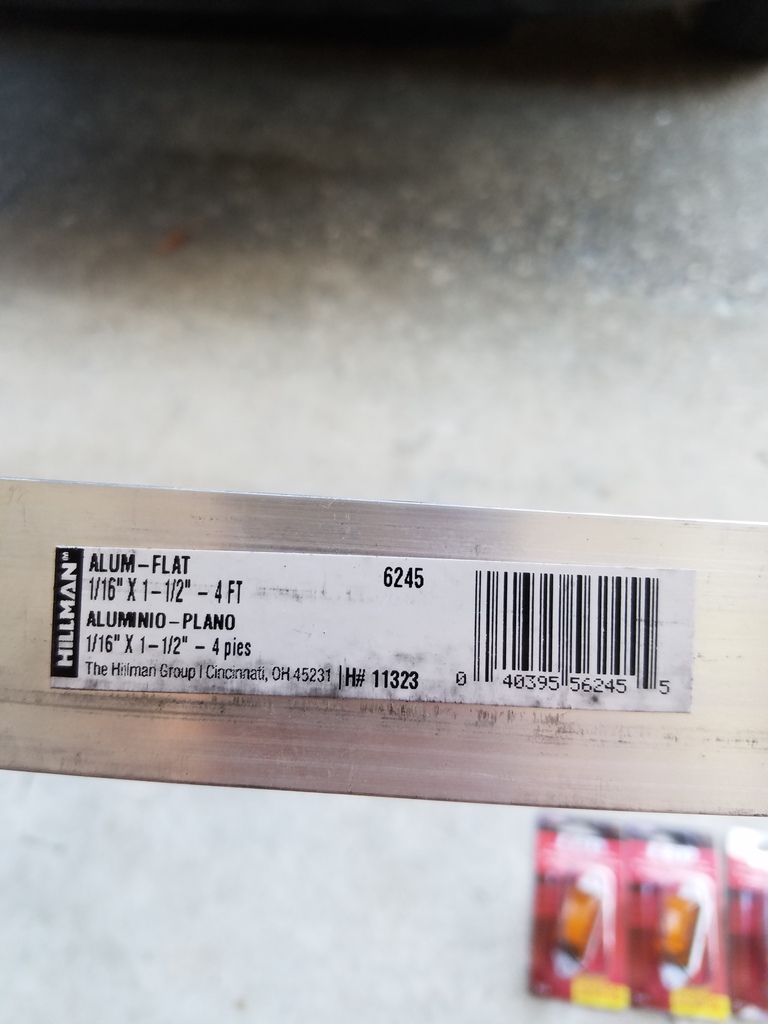
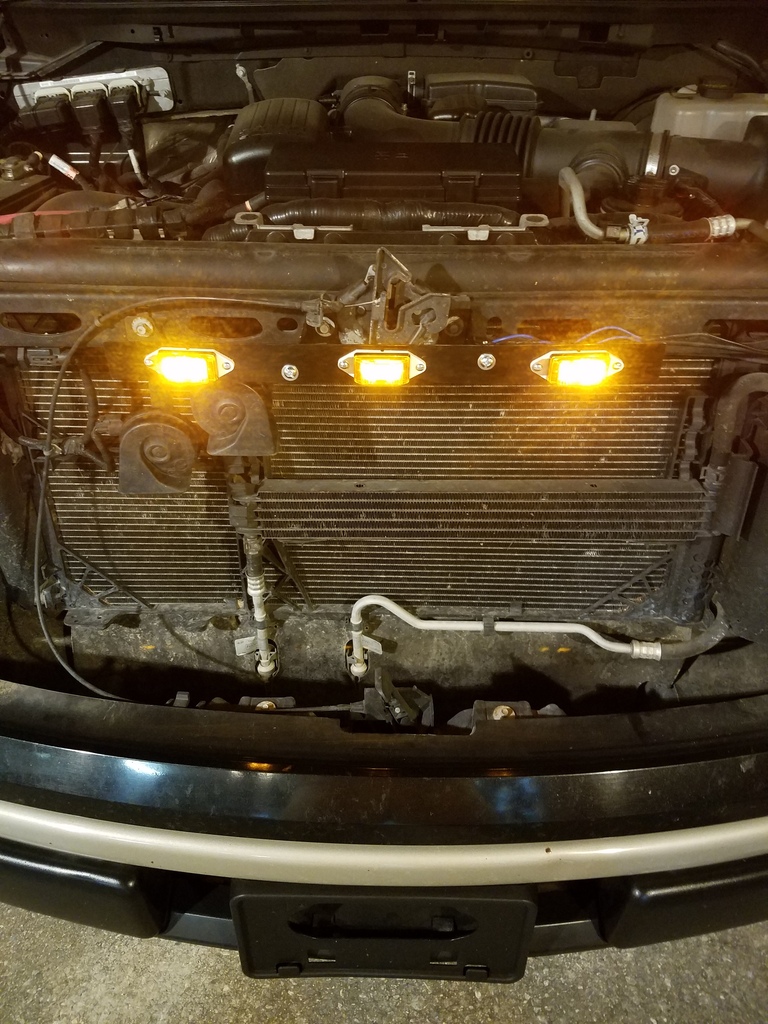
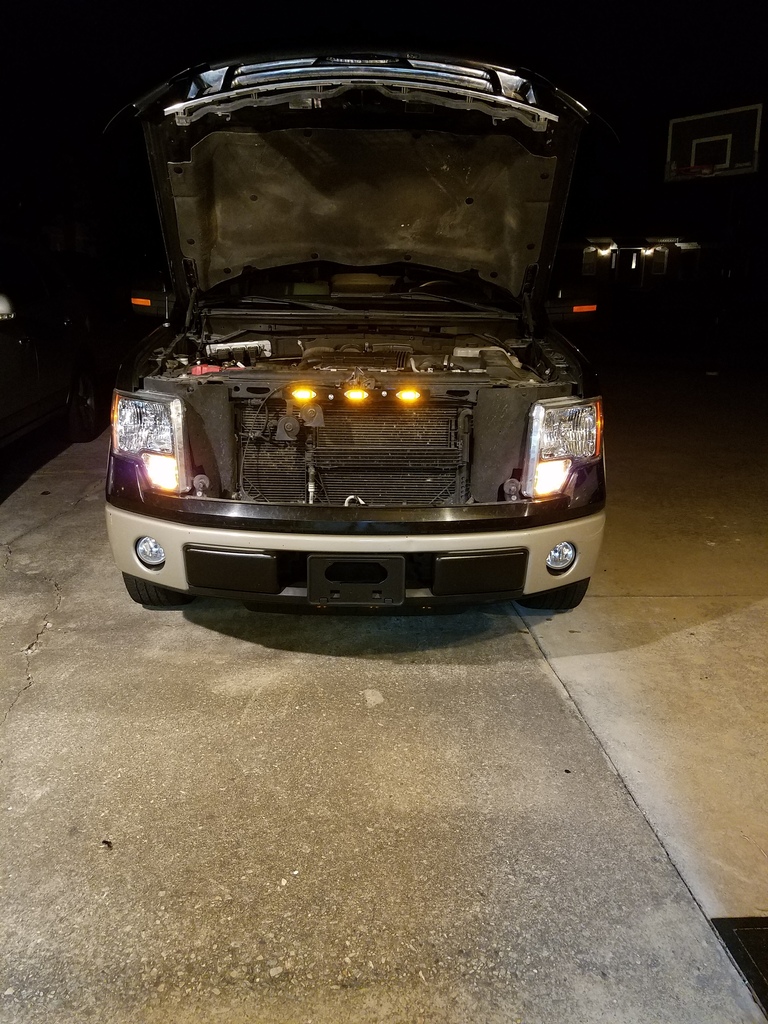
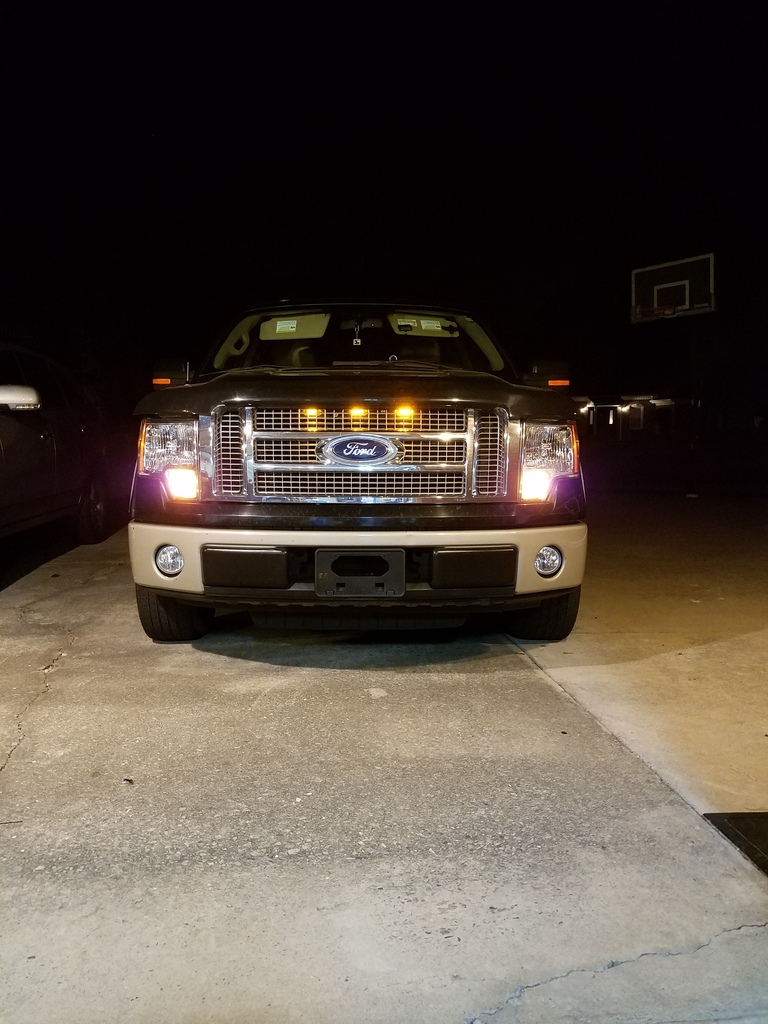
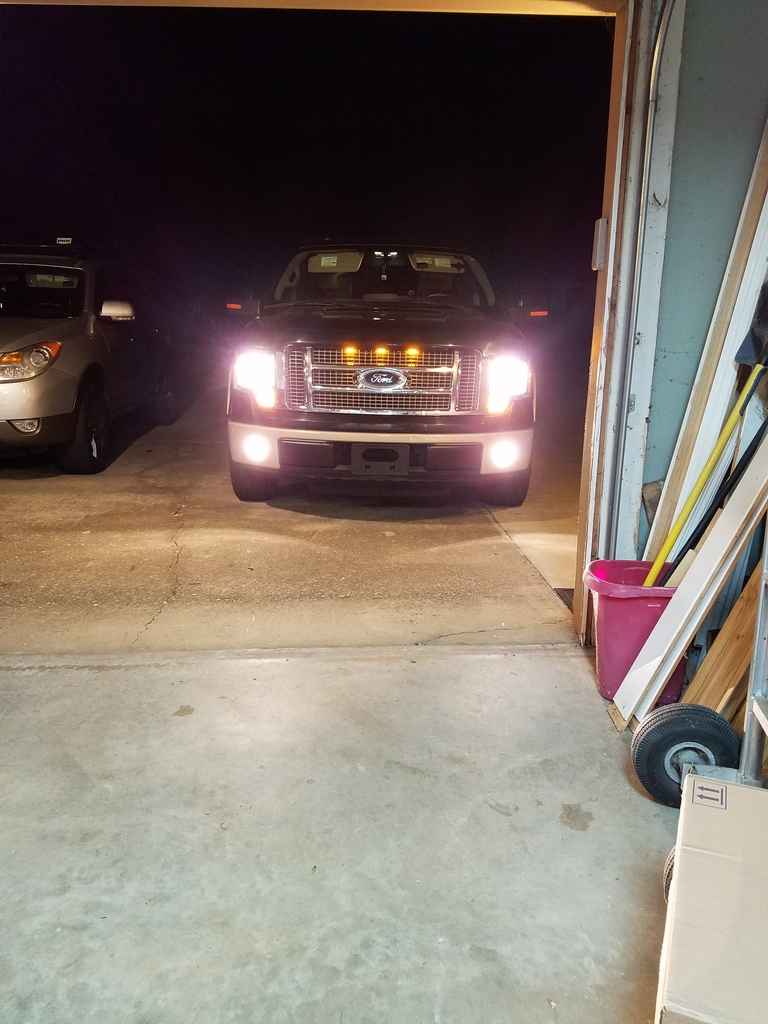
Did the Raptor Grill Light mod this evening. I used three of the Blazer LED 2" Sealed Mini Clearance/Marker Light (Product #C12586A) available at Walmart, and a piece of flat stock aluminum (1/16" x 1-1/2" x 48") I had already to build the mount for it.
I decided to mount it to the hood latch, vice mounting to the grill itself...figured it would be less wire to run, and the LEDs wouldn't be jolted every time I closed the hood. Don't know if that would really be an issue, but seemed plausible, so I avoided it anyway.
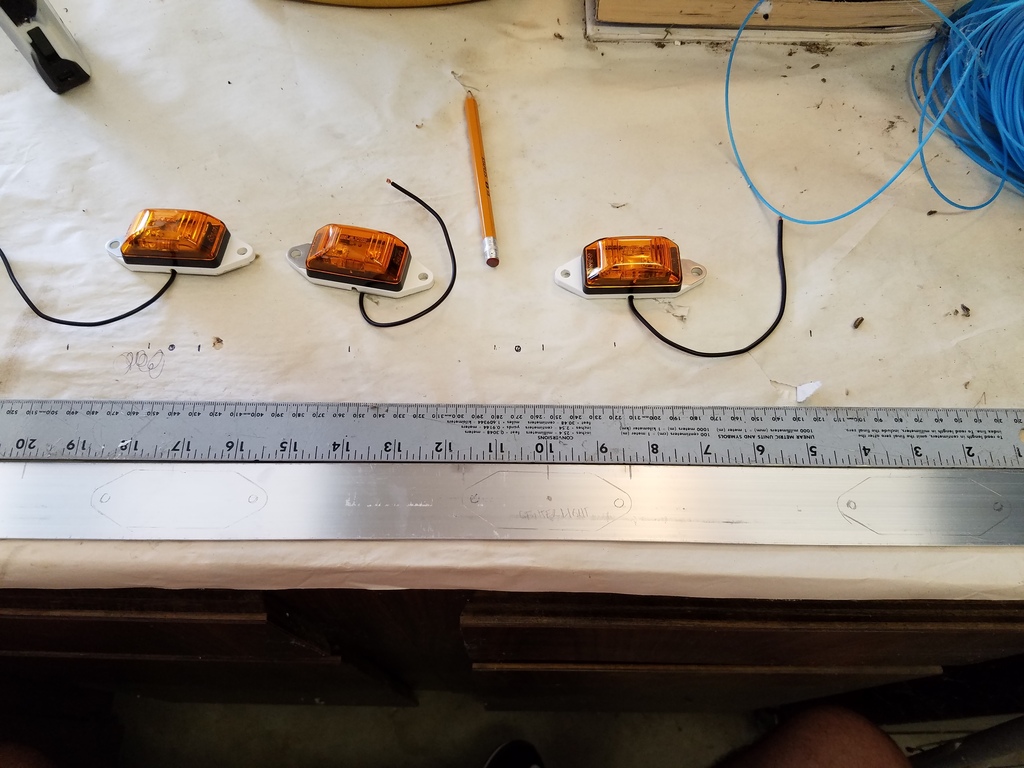
I cut the two short sections of the mount at 6" and then made the bends at the 1" mark on either end. The bends were in opposite directions. I then cut the piece I mounted the LEDs to at 20". I centered the middle LED at the 10" mark, and then mounted the other two about 3-1/4" away on either side. I traced around them with pencil and then drilled all of the holes: two for the mounting screws, and one dead center for the power wire. I used a metal file to get rid of the burrs and sharp edges. After that, I rattle-canned it with 3 coats of black Krylon, and then 2 coats of clear, and let it dry overnight.
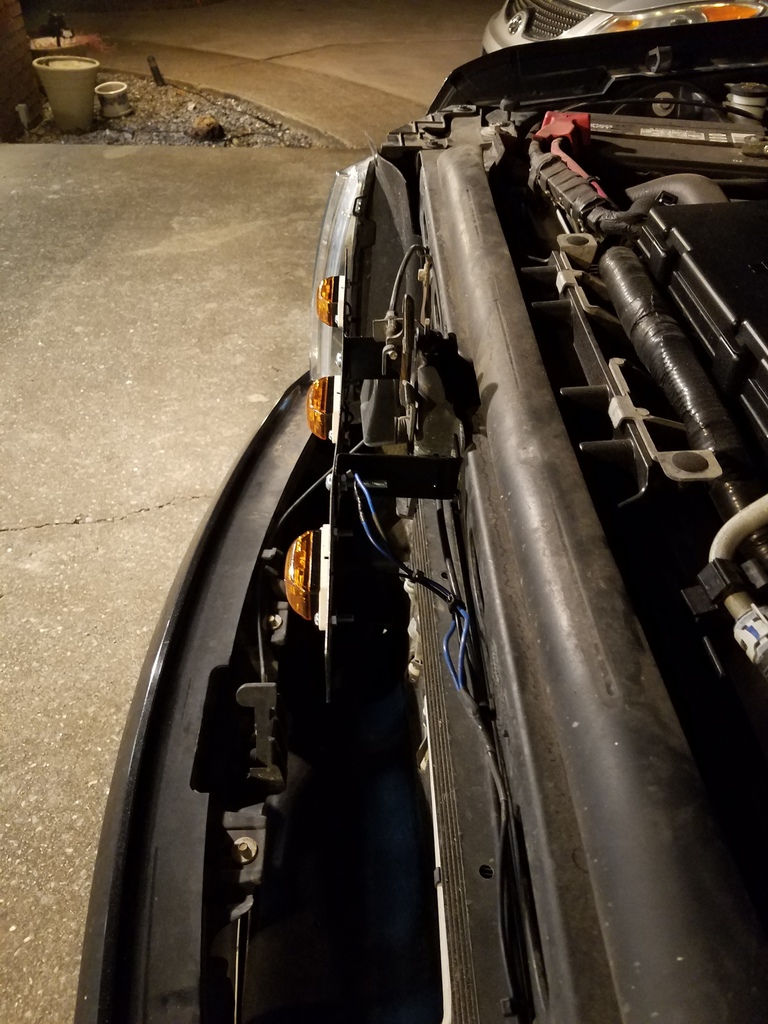
This evening, I mounted all the LEDs, wired/soldered/heat-shrinked all the wires, and got it mounted to the truck. I did use my rotary tool with a wire brush bit to remove the paint from where it would make contact, to help ensure a proper ground. I ran the wire, zip-tied to the hood release cable, to the driver's side marker lamp and tapped into the purple/white wire...Success! Pretty simple process, and I think it looks fairly clean (unlike my truck)...real happy with the way it looks behind the grill. Here's some pics...


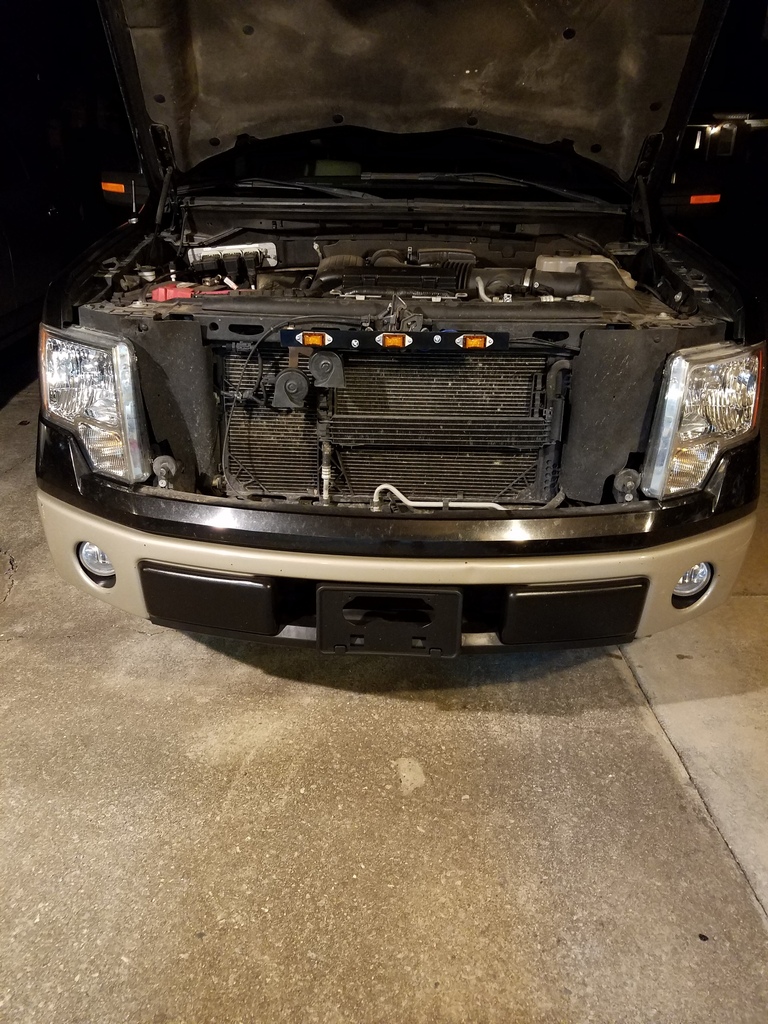
I decided to mount it to the hood latch, vice mounting to the grill itself...figured it would be less wire to run, and the LEDs wouldn't be jolted every time I closed the hood. Don't know if that would really be an issue, but seemed plausible, so I avoided it anyway.
I cut the two short sections of the mount at 6" and then made the bends at the 1" mark on either end. The bends were in opposite directions. I then cut the piece I mounted the LEDs to at 20". I centered the middle LED at the 10" mark, and then mounted the other two about 3-1/4" away on either side. I traced around them with pencil and then drilled all of the holes: two for the mounting screws, and one dead center for the power wire. I used a metal file to get rid of the burrs and sharp edges. After that, I rattle-canned it with 3 coats of black Krylon, and then 2 coats of clear, and let it dry overnight.
This evening, I mounted all the LEDs, wired/soldered/heat-shrinked all the wires, and got it mounted to the truck. I did use my rotary tool with a wire brush bit to remove the paint from where it would make contact, to help ensure a proper ground. I ran the wire, zip-tied to the hood release cable, to the driver's side marker lamp and tapped into the purple/white wire...Success! Pretty simple process, and I think it looks fairly clean (unlike my truck)...real happy with the way it looks behind the grill. Here's some pics...
The following 7 users liked this post by Juliet_Bravo:
Dad150 (08-17-2018),
Enginner5 (11-02-2016),
hphin (06-14-2017),
jfernandez_9 (11-08-2016),
Live4Him (11-03-2016),
and 2 others liked this post.
11-02-2016, 03:48 PM
#7629
First in, Last out.
Did the Raptor Grill Light mod this evening. I used three of the Blazer LED 2" Sealed Mini Clearance/Marker Light (Product #C12586A) available at Walmart, and a piece of flat stock aluminum (1/16" x 1-1/2" x 48") I had already to build the mount for it.
I decided to mount it to the hood latch, vice mounting to the grill itself...figured it would be less wire to run, and the LEDs wouldn't be jolted every time I closed the hood. Don't know if that would really be an issue, but seemed plausible, so I avoided it anyway.
I cut the two short sections of the mount at 6" and then made the bends at the 1" mark on either end. The bends were in opposite directions. I then cut the piece I mounted the LEDs to at 20". I centered the middle LED at the 10" mark, and then mounted the other two about 3-1/4" away on either side. I traced around them with pencil and then drilled all of the holes: two for the mounting screws, and one dead center for the power wire. I used a metal file to get rid of the burrs and sharp edges. After that, I rattle-canned it with 3 coats of black Krylon, and then 2 coats of clear, and let it dry overnight.
This evening, I mounted all the LEDs, wired/soldered/heat-shrinked all the wires, and got it mounted to the truck. I did use my rotary tool with a wire brush bit to remove the paint from where it would make contact, to help ensure a proper ground. I ran the wire, zip-tied to the hood release cable, to the driver's side marker lamp and tapped into the purple/white wire...Success! Pretty simple process, and I think it looks fairly clean (unlike my truck)...real happy with the way it looks behind the grill. Here's some pics...
The following 2 users liked this post by Enginner5:
Juliet_Bravo (11-02-2016),
RustyHammer (11-11-2016)
11-02-2016, 08:19 PM
#7630
Senior Member
Did the Raptor Grill Light mod this evening. I used three of the Blazer LED 2" Sealed Mini Clearance/Marker Light (Product #C12586A) available at Walmart, and a piece of flat stock aluminum (1/16" x 1-1/2" x 48") I had already to build the mount for it.
I decided to mount it to the hood latch, vice mounting to the grill itself...figured it would be less wire to run, and the LEDs wouldn't be jolted every time I closed the hood. Don't know if that would really be an issue, but seemed plausible, so I avoided it anyway.
I cut the two short sections of the mount at 6" and then made the bends at the 1" mark on either end. The bends were in opposite directions. I then cut the piece I mounted the LEDs to at 20". I centered the middle LED at the 10" mark, and then mounted the other two about 3-1/4" away on either side. I traced around them with pencil and then drilled all of the holes: two for the mounting screws, and one dead center for the power wire. I used a metal file to get rid of the burrs and sharp edges. After that, I rattle-canned it with 3 coats of black Krylon, and then 2 coats of clear, and let it dry overnight.
This evening, I mounted all the LEDs, wired/soldered/heat-shrinked all the wires, and got it mounted to the truck. I did use my rotary tool with a wire brush bit to remove the paint from where it would make contact, to help ensure a proper ground. I ran the wire, zip-tied to the hood release cable, to the driver's side marker lamp and tapped into the purple/white wire...Success! Pretty simple process, and I think it looks fairly clean (unlike my truck)...real happy with the way it looks behind the grill. Here's some pics...
The following 2 users liked this post by Ecoengineer:
Juliet_Bravo (11-02-2016),
RustyHammer (05-12-2017)