Topic Sponsor
2009 - 2014 Ford F150 General discussion on 2009 - 2014 Ford F150 truck.
Sponsored by:
Sponsored by:

Best modifications under $50

Thread Tools
 
Search this Thread
 
Old 10-18-2014, 12:07 PM
  #4651  
Senior Member
 
bigburns12's Avatar
 
Join Date: Aug 2013
Location: Cypress, TX
Posts: 310
Received 23 Likes on 17 Posts
Default

Originally Posted by Brett2013fx4
That looks awesome man really digging the carbon fiber I dipped just for temporary to see if I liked it. I do but would prefer paint with a red pinstripe. How easy was it to do the taillights
Not too bad took 45 minutes each, just clean the hell out of them, start in the dead center. Work your way and take your time with a heat gun
Old 10-18-2014, 12:21 PM
  #4652  
Senior Member
 
Brett2013fx4's Avatar
 
Join Date: Sep 2013
Location: Cincinnati, OH
Posts: 3,242
Received 198 Likes on 183 Posts
Default

Originally Posted by bigburns12
Not too bad took 45 minutes each, just clean the hell out of them, start in the dead center. Work your way and take your time with a heat gun
I don't have a heat gun I'll have to use the gf hair dryer lol
Old 10-18-2014, 12:22 PM
  #4653  
Senior Member
 
ndnboy's Avatar
 
Join Date: Jan 2014
Posts: 177
Received 15 Likes on 15 Posts

Default

Originally Posted by mksmth
How about a $3 bumper grill. So just got the new truck and have been dreaming of mods. I need tires first then probably some Clazzio seats then maybe some stereo stuff. Well I always remove all the dealer badges and this time I remove the front license holder since we dont need them. so I have been thinking about how to fill it and while walking through Lowes I found these black rain gutter covers. Exactly what I was envisioning filling the hole.

so tools and materials are
1-Metal Lock in Gutter Cover, black- Lowes $2.98
4-black bulldog paper clips- free from supply closet

tools
tin snips and tape measure
Time: about 20-30 minutes.

here is the product at the store

how it looks normally

after some measuring, cutting and bending

on the truck

the way I made it pretty much will hold itself in place but I used the bulldog clips to secure it better on the backside and just remove the little chrome handles the have on them. Just attached them to the upper part of the bumper where the plate holder clips into and down on the bottom. I probably could have taken more time and made it a bit more precise but I think it looks awesome.

Can you post up pics of inside, to see how u attached.....Thx
Old 10-18-2014, 04:46 PM
  #4654  
Senior Member
 
Commeeche's Avatar
 
Join Date: Sep 2013
Location: Welland, Ontario
Posts: 749
Received 81 Likes on 74 Posts

Default

The carbon fiber on the tailgate looks sick, well done.
Old 10-18-2014, 06:04 PM
  #4655  
Senior Member
 
bigburns12's Avatar
 
Join Date: Aug 2013
Location: Cypress, TX
Posts: 310
Received 23 Likes on 17 Posts
Default

Originally Posted by Commeeche
The carbon fiber on the tailgate looks sick, well done.
Thanks!
Old 10-19-2014, 12:17 AM
  #4656  
Senior Member
 
jwoznica's Avatar
 
Join Date: Oct 2014
Location: Upstate NY
Posts: 517
Received 331 Likes on 145 Posts

Default

Originally Posted by weeks21
Will this work on a 2010 Stx?? I installed the automatic head light switch and new sensor on the dash because the Stx doesn't come with automatic headlights but on my instrument panels where it shows MPG. I don't have an option for lights? Only trip A/B, miles
Till E. MPG and my key settings I think.
A lot later than your question I'm sure, but I did the same thing with my '09 STX. I bought a new headlight switch with an auto setting and fog light pull out. With the switch on auto, the headlights are always on due to the lack of the sensor on the dash.
Old 10-19-2014, 09:26 AM
  #4657  
Senior Member
 
mksmth's Avatar
 
Join Date: Oct 2014
Posts: 135
Received 23 Likes on 14 Posts
Default

Originally Posted by ndnboy
Can you post up pics of inside, to see how u attached.....Thx
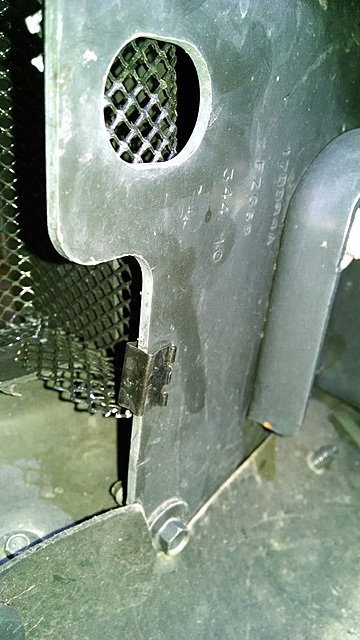
Here is a pic of one of the clips. I used 4 at differnts points on the bumper. I'm sure they is a better way. I just used what I had.
Best modifications under -lzpsks5.jpg
The following users liked this post:
ndnboy (10-19-2014)
Old 10-19-2014, 10:43 AM
  #4658  
Senior Member
 
ndnboy's Avatar
 
Join Date: Jan 2014
Posts: 177
Received 15 Likes on 15 Posts

Default

Originally Posted by mksmth
Here is a pic of one of the clips. I used 4 at differnts points on the bumper. I'm sure they is a better way. I just used what I had.
Thx, have the screen at home and hope to try install soon.
Old 10-19-2014, 12:02 PM
  #4659  
Senior Member
 
wallacemf's Avatar
 
Join Date: Aug 2012
Posts: 113
Likes: 0
Received 18 Likes on 13 Posts
Default

Originally Posted by ndnboy
Thx, have the screen at home and hope to try install soon.
I did this same thing and posted way back in this thread, but I used the silver color gutter screen, my truck is silver with the chrome bumper. I may pull it and try the black, I like the way this looks!
Old 10-19-2014, 12:12 PM
  #4660  
Senior Member
 
threegr8katz's Avatar
 
Join Date: Aug 2010
Location: Lawrence,KS
Posts: 160
Received 6 Likes on 6 Posts
Default

What is this screen or what are you showing us


Quick Reply: Best modifications under $50


All times are GMT -4. The time now is 07:19 PM.