
Added: Recessed back-up lights in bumper
 01-15-2014, 12:57 AM
#11
Keepin' the lights on!
Thread Starter
**TIP**
These oval LED lights do not fit in the closed-back grommet without cutting the grommet. The Truck-lite catalog is a little misleading about that.


 01-15-2014, 10:03 AM
#14
Senior Member

looks clean. i've been thinking about doing something like this as well. Do you have a link to the lights you got? i wanna see the specs on them.
if anyone plans on doing this just make sure you remember to measure twice and cut once! that and i've seen plenty of stock bumpers on cl if you mess up and need a replacement.
if anyone plans on doing this just make sure you remember to measure twice and cut once! that and i've seen plenty of stock bumpers on cl if you mess up and need a replacement.
The following users liked this post:
Red13 (01-16-2014)
01-15-2014, 11:13 AM
#15
Keepin' the lights on!
Thread Starter
looks clean. i've been thinking about doing something like this as well. Do you have a link to the lights you got? i wanna see the specs on them.
if anyone plans on doing this just make sure you remember to measure twice and cut once! that and i've seen plenty of stock bumpers on cl if you mess up and need a replacement.
if anyone plans on doing this just make sure you remember to measure twice and cut once! that and i've seen plenty of stock bumpers on cl if you mess up and need a replacement.
http://www.truck-lite.com/webapp/wcs...4967&langId=-1
01-15-2014, 11:15 AM
#16

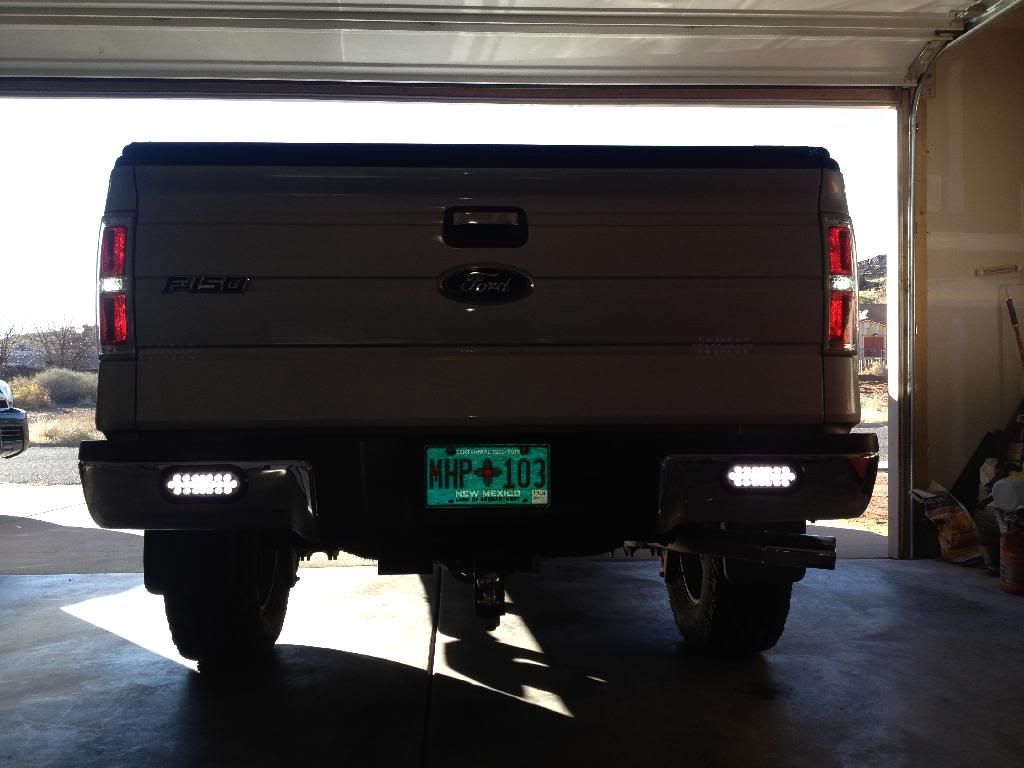
Nothing fancy here. I used two of Truck-lite's LED 6" oval lights from NAPA. http://www.truck-lite.com/webapp/wcs...4967&langId=-1
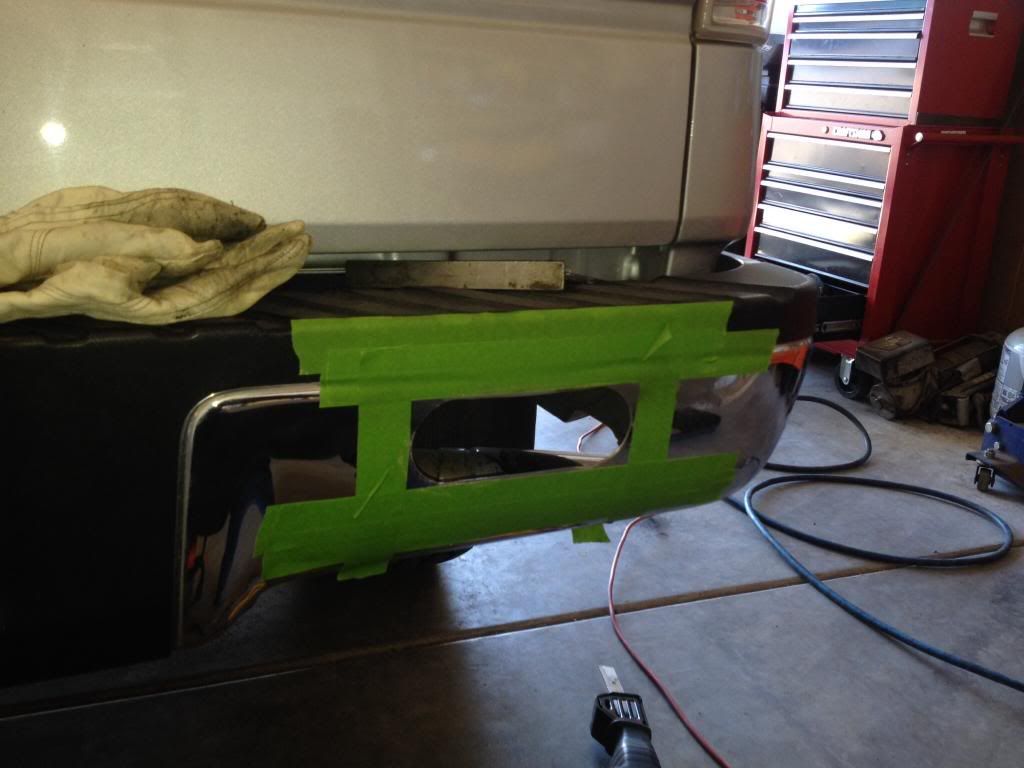
Cutting ovals in the bumper:
Quick pic of the finished product along with some LEDs in place of the stock bulbs:
I have yet to try them at night so no night shots yet.
Cutting ovals in the bumper:
Quick pic of the finished product along with some LEDs in place of the stock bulbs:
I have yet to try them at night so no night shots yet.
How the heck u make such a pretty cut using a sawzall?
 Mine would had looked like Jaws teeth
01-15-2014, 12:52 PM
Mine would had looked like Jaws teeth
01-15-2014, 12:52 PM
#17
Keepin' the lights on!
Thread Starter
I used a 2.5" holesaw on the ends and cut out the middle with the sawzall. The easiest way is to use a plasma cutter to cut the whole oval out. I don't have one yet though. Next take a file to de-bur. Then I went over it with some 80 grit sand paper followed by a few coats of primer and paint to keep it from rusting.
Last edited by Watt-maker; 01-15-2014 at 12:55 PM. Reason: Additional content

The following users liked this post:
Watt-maker (01-15-2014)
01-15-2014, 03:55 PM
#19
I used a 2.5" holesaw on the ends and cut out the middle with the sawzall. The easiest way is to use a plasma cutter to cut the whole oval out. I don't have one yet though. Next take a file to de-bur. Then I went over it with some 80 grit sand paper followed by a few coats of primer and paint to keep it from rusting.

The following users liked this post:
Watt-maker (01-15-2014)