
DIY With VIDEO -2010 F150 Amplifier Install Part One
 02-19-2011, 11:23 AM
#1
Senior Member
Thread Starter

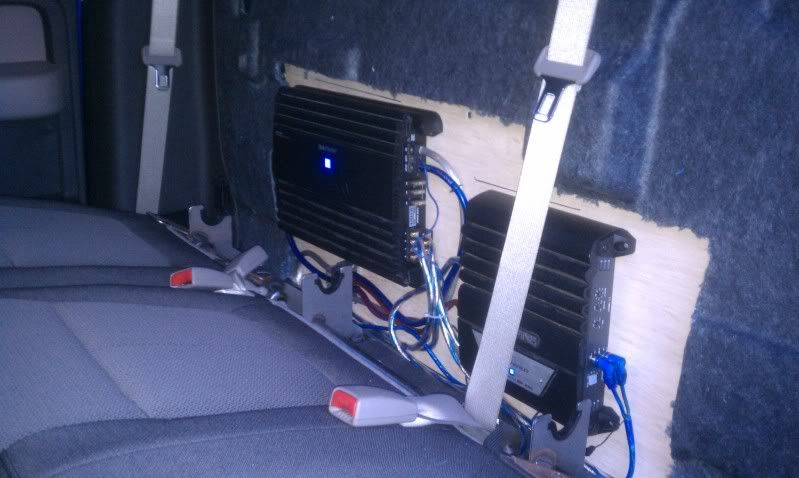
Here I've made a short video on how I installed my amplifier behind the seats and running the power and remote wires down one side of the truck. I also show where I grounded the amp.
I am not a professional, just take what you will from the video and it may help you during your installation.
This is just Part One, Its too cold outside so later on I will post the second half when I run the rest of the wires to the headunit.
***PART TWO POSTED***
Watch this first if you need to know how to remove the headunit
Materials Used:
Panel Removal Kit
3/8" Galvanized Rod - (2x) 3" Pieces
3/8" Nuts&Washers
1/2" MDF 32"x16" With Notch Cut Around Seatbelt
Metra BT-5520 Wiring Harness
Kicker ZX700.5 5 Channel Amplifier
Kicker CK44 4-Channel Amp Install Kit
(2x) Kicker ZISL (09ZISL) (Speaker Wire to RCA Conversion)
Kicker ZXRC (10ZXRC) (Bass Remote Control)
Single Subwoofer Box from SupercrewSound.com
Alpine SWS-1043D Type-S Subwoofer 300w DVC @4ohms
(4x) Infinity Kappa 682.9CF Door Speakers (6x9's) (100w @ 2ohms)
Total Cost of My Installation: $1020 CAD
$30 Wiring Harness
$40 2x RCA to Speaker Cables
$350 Amp
$100 Sub
$30 Bass Control ****
$80 Amp Wiring Kit
$190 4x Door Speakers
$20 MDF Board +Hardware
$180 Sub Box (Shipping+Duty was expensive) Probably Should Have Built This Myself.
Time To Install: Approx 2 1/2 Days.
1 Day Each Side Wiring.
1/2 Day of mounting amplifier behind the seats.
Last edited by macaboo; 03-23-2011 at 07:08 PM.

The following users liked this post:
93Cobra#2771 (12-14-2012)
02-19-2011, 11:34 AM
#2
Senior Member
Looks good, visuals always help! lol
02-19-2011, 11:58 AM
#3
Nice work with the vids buddy. Fellow Canuck here, I'm sure the vids you make will help more than a few people out.
02-19-2011, 08:18 PM
#4
First Tiger of G.R.O.S.S.

Looks good...
couple thoughts:
If you had used 1/2" thick board instead of 3/4" and made enough room for your mounting board to go flush with the metal part that you are mounting against, you might have that little bit more room you need to be able to put both seats all the way up... looks like you are only missing by like, 1/2" or so... I don't have any issues with my seats.. though mine is a SCAB and I believe we actually have more room behind our rear seats than you SCREW guys... ironic, eh?
Good work, subscribing. Want to see your next vid.
I know you didn't want to drill into your cab or cut your insulation... totally understand that... hard to return holes to stock.
Here is a pic of how my amps are mounted:
02-20-2011, 10:25 AM
#5
Senior Member
Thread Starter
Looks good...
couple thoughts:
If you had used 1/2" thick board instead of 3/4" and made enough room for your mounting board to go flush with the metal part that you are mounting against, you might have that little bit more room you need to be able to put both seats all the way up... looks like you are only missing by like, 1/2" or so... I don't have any issues with my seats.. though mine is a SCAB and I believe we actually have more room behind our rear seats than you SCREW guys... ironic, eh?
Good work, subscribing. Want to see your next vid.
I know you didn't want to drill into your cab or cut your insulation... totally understand that... hard to return holes to stock.
Here is a pic of how my amps are mounted:
couple thoughts:
If you had used 1/2" thick board instead of 3/4" and made enough room for your mounting board to go flush with the metal part that you are mounting against, you might have that little bit more room you need to be able to put both seats all the way up... looks like you are only missing by like, 1/2" or so... I don't have any issues with my seats.. though mine is a SCAB and I believe we actually have more room behind our rear seats than you SCREW guys... ironic, eh?
Good work, subscribing. Want to see your next vid.
I know you didn't want to drill into your cab or cut your insulation... totally understand that... hard to return holes to stock.
Here is a pic of how my amps are mounted:
02-20-2011, 07:12 PM
#6
First Tiger of G.R.O.S.S.
Yeah, seats are definitely different.
My amps have at least a 1/2" air gap.
Do like your commitment to doing no harm... sure is a tougher way to go, though.
Does the nut on the inside of the board sit flush against the board, or did you recess a hole for the nut to slide into.... know what I am talking about?
My amps have at least a 1/2" air gap.
Do like your commitment to doing no harm... sure is a tougher way to go, though.
Does the nut on the inside of the board sit flush against the board, or did you recess a hole for the nut to slide into.... know what I am talking about?
02-21-2011, 10:43 AM
#7
Senior Member
Thread Starter
Yeah, seats are definitely different.
My amps have at least a 1/2" air gap.
Do like your commitment to doing no harm... sure is a tougher way to go, though.
Does the nut on the inside of the board sit flush against the board, or did you recess a hole for the nut to slide into.... know what I am talking about?
My amps have at least a 1/2" air gap.
Do like your commitment to doing no harm... sure is a tougher way to go, though.
Does the nut on the inside of the board sit flush against the board, or did you recess a hole for the nut to slide into.... know what I am talking about?
But yes, I made a recessed section for that nut so that the wood could go all the way back and sit flush against the truck metal.
And Yeah, you never know what will happen, if for some reason I have to sell my truck one day then I want to keep it so it can be returned to stock condition easily.
Thanks for watching any other questions anyone has just let me know. Or suggestions too!
Trending Topics
02-21-2011, 10:57 AM
#8
Senior Member
Hey man got a question for you. I'm getting ready to completely redo my system. I'm putting components in front, coaxials in back, with a 4 ch amp pushing them. Also putting two 8"s under the rear seat powered by another mono amp. I'm gonna mount both amps to the back wall like you did. Now my question is, how much wire did you use running your speakers and your subs. I'm trying to figure out how much I need for my whole truck. I don't wanna buy too little and have to stop in middle of the job, but I don't wanna buy way too much either. I appreciate any help. Thanks.
Chris
EDIT: It's a supercrew
Chris
EDIT: It's a supercrew
Last edited by chris_bryan_89; 02-21-2011 at 11:00 AM.
02-21-2011, 05:06 PM
#9
Senior Member
Thread Starter
Hey man got a question for you. I'm getting ready to completely redo my system. I'm putting components in front, coaxials in back, with a 4 ch amp pushing them. Also putting two 8"s under the rear seat powered by another mono amp. I'm gonna mount both amps to the back wall like you did. Now my question is, how much wire did you use running your speakers and your subs. I'm trying to figure out how much I need for my whole truck. I don't wanna buy too little and have to stop in middle of the job, but I don't wanna buy way too much either. I appreciate any help. Thanks.
Chris
EDIT: It's a supercrew
Chris
EDIT: It's a supercrew
But I plan to, convert speaker wire to high-level RCA, behind the head unit. Run 4 RCA Cables (Front R-L, Rear R-L) back to the amp, then run 4 speaker wires from the amp back to the head unit, and use the stock speaker wires to go to the doors.
I will be tying in using a Metra BT-5520 Harness.
Unless I can see that it is easy enough to go through the existing grommet or whatever you call that thing on the doors, then I will just be using the factory wiring from the headunit.
But again I havent run any yet. I just bought a Kicker CK44 4 Channel Wiring kit, and it came with all the stuff I need.
Also my setup is different than most. I didnt want to use a Line Out Converter to try and save some money, so i bought my amp to accept high-level rca inputs.
I havent seen anyone do this yet so I'm hoping everything works out nicely.