
2012 F-150 OEM Heaunit Characterization and Audio System Install
 10-17-2013, 03:58 AM
#1
Junior Member
Thread Starter

Never posted on the forums here before, but I figured that people out there with F-150's might appreciate some of the characterization and work that I've done (and plan to do) with my F-150's audio system (I'll be sure to include plenty of images as I build the system). I chose this forum because it seems to be the most popular, where this information will hopefully get the most exposure. I'll post links to later posts as I add more details of the build on this thread to make it easy to navigate/read.
A couple weekends ago, my friend and I took out the right rear door speaker in my 2012 F-150 (Picked because it would be full range, and we could disconnect the speaker completely during frequency sweeps-no dealing with the tweeter/crossover circuit). Truck has the OEM (not Sony) head unit. We decided to hook up an oscilloscope and characterize the frequency response of the OEM head unit. I've included plots of the frequency response at various volume levels and equalizer settings for your enjoyment. Also including several pictures of the experiment setup with explanations along the way. When I put new speakers in, I will also get a reading for the maximum RMS output of the OEM head unit, and hopefully some data on the amount of noise in the OEM headunit signal at max volume.
After looking at this data, I think it is pretty clear that the OEM speakers are garbage (was there any doubt?). The scope shows that the OEM headunit actually looks surprisingly decent, but to really tell, I'll be listening to a pair of very nice component speakers on the OEM headunit for a week or two until I install the aftermarket head unit. This should also allow me to do a direct comparison between the aftermarket and OEM headunits.
I'm planning to begin replacing audio components this weekend, starting with the front speakers. A list of planned upgrades (and order of upgrades is below). Feel free to let me know what y'all think. Suggestions are definetly welcome as well.
List of components I plan to install (will update as I install them):
Overall goal of this project is to have big audio on a reasonable budget (I'd like to keep it around $1000, but I think I'll exceed that a little bit).
Signal and Ground from Frequency Generator to Aux in for headunit.
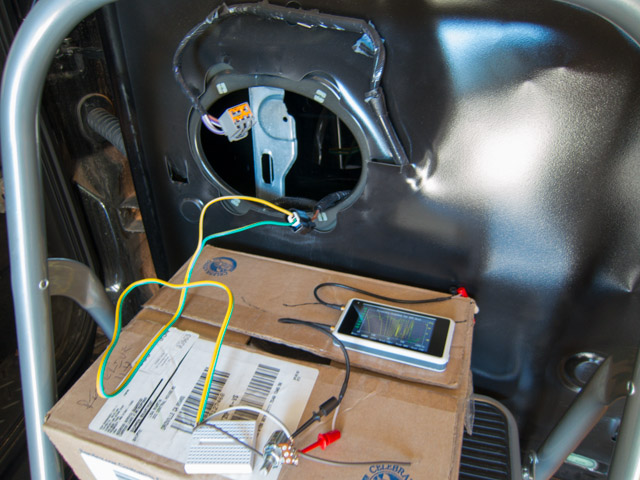
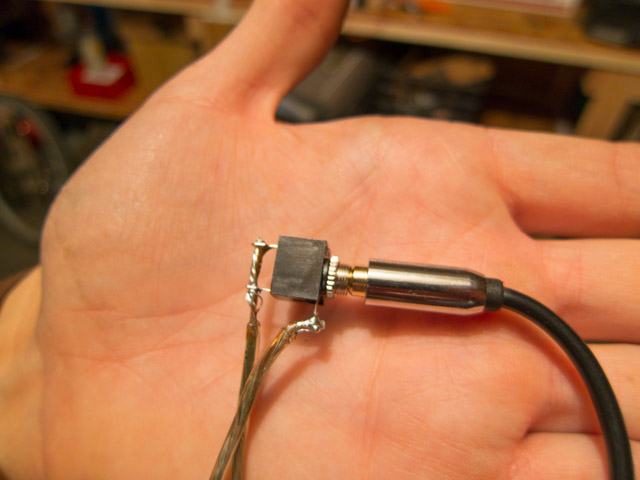
Scope connected to speaker wire. Potentiometer for signal attenuation at high volumes.

Waveform on the scope.
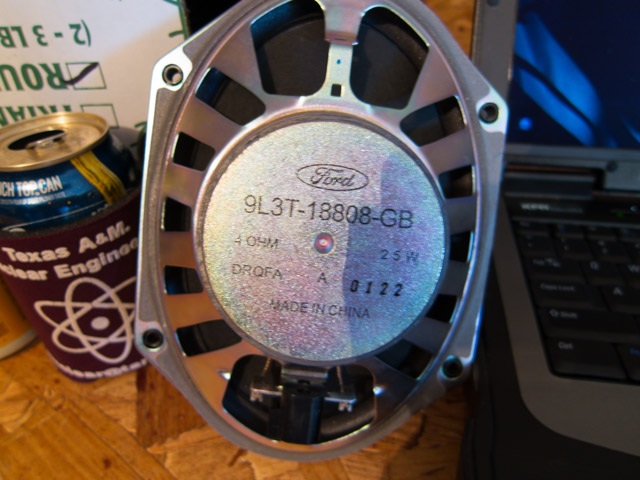
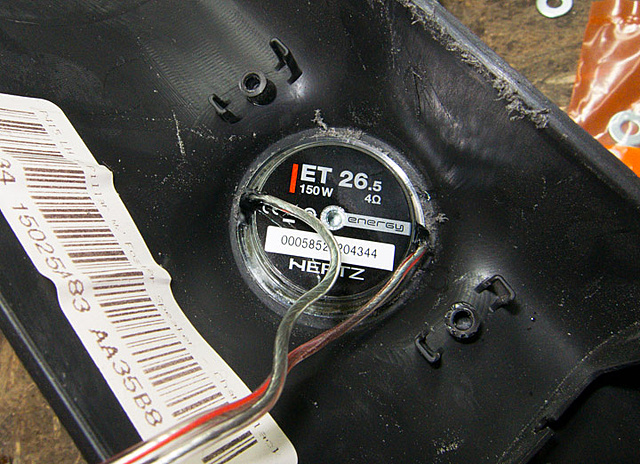
Back of speaker, with serial number etc...
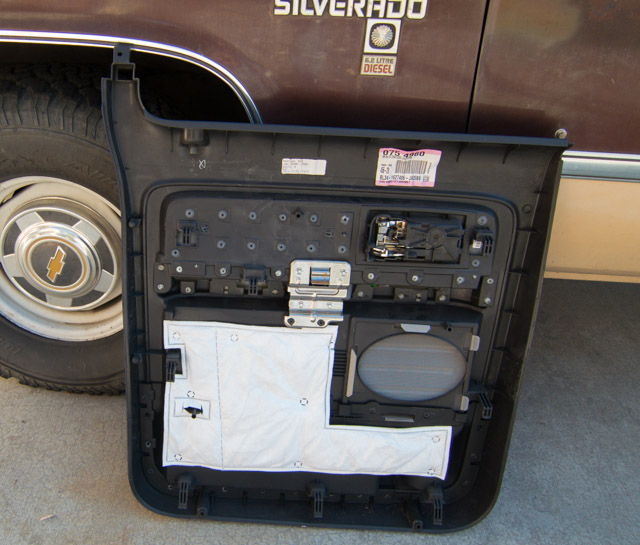
Door panel. Notice the OEM sound deadening (white fabric). I'm reasonably impressed with how easy it was to remove the door panel. Also, my friend's '82 Silverado with the 6.2l Detroit Diesel...
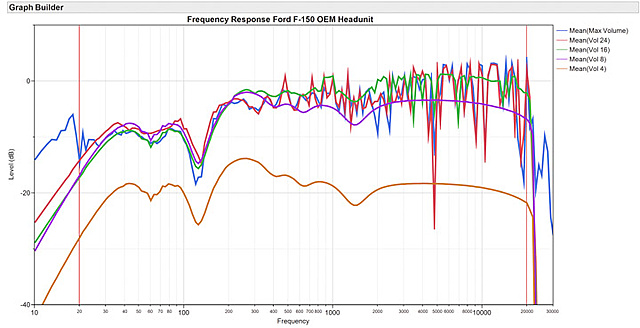
Frequency response at different volumes. Signals attenuated to about 0dB gain with a potentiometer. Notice increased noise at higher volumes. The headunit is not attenuating low frequencies (actually has more very low end at max volume, no bass rolloff).
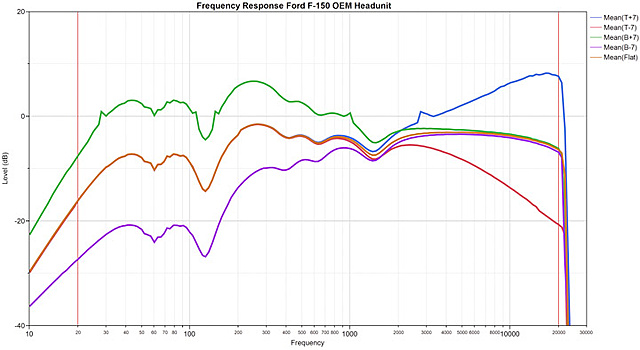
Different equalizer settings. Settings were treble at +/- 7 and bass at +/- 7. I would also like to point out the very steep high frequency attenuation at exactly 20kHz.
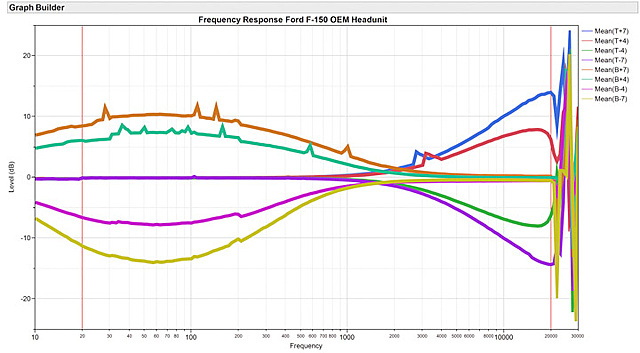
Normalized (difference of equalizer curves and flat frequency response) curves showing effects of equalization. Based on this graph, we can estimate that each level on the equalizer control adjusts the output by about 2dB.
A couple weekends ago, my friend and I took out the right rear door speaker in my 2012 F-150 (Picked because it would be full range, and we could disconnect the speaker completely during frequency sweeps-no dealing with the tweeter/crossover circuit). Truck has the OEM (not Sony) head unit. We decided to hook up an oscilloscope and characterize the frequency response of the OEM head unit. I've included plots of the frequency response at various volume levels and equalizer settings for your enjoyment. Also including several pictures of the experiment setup with explanations along the way. When I put new speakers in, I will also get a reading for the maximum RMS output of the OEM head unit, and hopefully some data on the amount of noise in the OEM headunit signal at max volume.
After looking at this data, I think it is pretty clear that the OEM speakers are garbage (was there any doubt?). The scope shows that the OEM headunit actually looks surprisingly decent, but to really tell, I'll be listening to a pair of very nice component speakers on the OEM headunit for a week or two until I install the aftermarket head unit. This should also allow me to do a direct comparison between the aftermarket and OEM headunits.
I'm planning to begin replacing audio components this weekend, starting with the front speakers. A list of planned upgrades (and order of upgrades is below). Feel free to let me know what y'all think. Suggestions are definetly welcome as well.
List of components I plan to install (will update as I install them):
- Hertz ESK 165.5 (6.5in component speakers for front). I don't care about rear speakers because I don't sit back there.
- Kenwood DDX 370. Cheap touch-screen headunit (Maestro support).
- Maestro unit to retain Sync functionality, hopefully get OBDII readings on the head unit. Looks to have a very cool upside (Maestro system is pretty new, not much information on it yet, only compatible with Kenwood headunits as far as I know). As I stated, it looks very cool.
- JL Audio 8W3V3 subwoofer (This thing sounds amazing, plus it's small and will hide away easily under the rear seat).
- I haven't picked out a subwoofer amp just yet, but I'm leaning towards JL Audio Jx500/1d (capable of powering 2 subs if I need more bass)
- Not sure what amp I want for door speakers, but leaning towards a mid-range class a/b at the moment (This will probably be installed last, as the Hertz speakers are supposed to be very easy to drive).
- I'll be using some dynamat knockoff as well. I'll probably just apply it to door panels, and right behind the speakers. This truck is already incredibly quiet!
- Rear view camera will get installed at some point as well. I'm also toying with the idea of a forward-facing camera mounted underneath the vehicle (mux with the rear view camera) for better visibility when off-roading.
Overall goal of this project is to have big audio on a reasonable budget (I'd like to keep it around $1000, but I think I'll exceed that a little bit).
Signal and Ground from Frequency Generator to Aux in for headunit.
Scope connected to speaker wire. Potentiometer for signal attenuation at high volumes.
Waveform on the scope.
Back of speaker, with serial number etc...
Door panel. Notice the OEM sound deadening (white fabric). I'm reasonably impressed with how easy it was to remove the door panel. Also, my friend's '82 Silverado with the 6.2l Detroit Diesel...
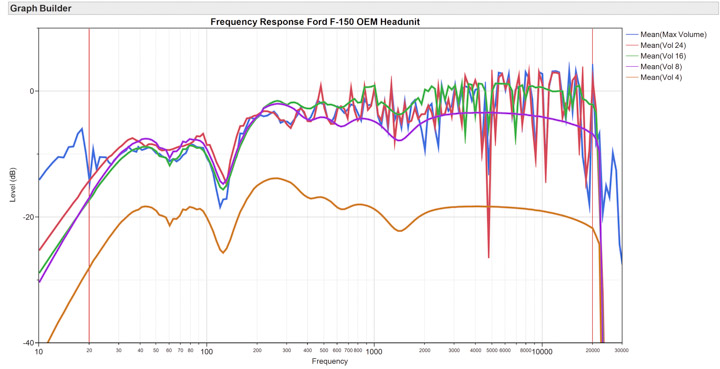
Frequency response at different volumes. Signals attenuated to about 0dB gain with a potentiometer. Notice increased noise at higher volumes. The headunit is not attenuating low frequencies (actually has more very low end at max volume, no bass rolloff).

Different equalizer settings. Settings were treble at +/- 7 and bass at +/- 7. I would also like to point out the very steep high frequency attenuation at exactly 20kHz.

Normalized (difference of equalizer curves and flat frequency response) curves showing effects of equalization. Based on this graph, we can estimate that each level on the equalizer control adjusts the output by about 2dB.
 10-17-2013, 03:24 PM
#2


Thanks for taking time to do this!
It looks to me like the factory HU does do something funky with the bass as volume increases - going from volume 8 to 16 (purple to green) it looks like bass is attenuated as higher frequencies are increased.
Also the roll-off at 40hz becomes more noticeable when subs are added without anything added to correct the factory EQ.
10-17-2013, 04:10 PM
#3

Very much looking forward to this write-up. I knew I would want to upgrade the sound system regardless of whether I got the 2013 FX4 or XLT. I went with XLT and the sound system is pretty much garbage, but I knew that going in. Way cheaper to get my hands on the XLT and like you have figured, $1k for a better than stock FX4 sound system would be sweet.
10-18-2013, 09:27 PM
#4

Great post! I just overhauled my 2013 XLT sound system, but I didn't do the kind of investigation you've done (I just knew the stock speakers were crap). I'm still using the stock HU, and it will be interesting to see how it compares to aftermarket. I can tell it isn't great, but the changes I've made so far, sound so much better than stock, that I haven't really considered swapping it out (yet). That might change based on your findings. 
11-15-2013, 12:18 AM
#5
Junior Member
Thread Starter
It took me a while to finally get this updated, but I've been pretty busy the last couple of weeks. Finally have time to post an update. Thanks for being patient  .
.
I installed the Hertz ESK 6.5 component speakers and a Kenwood DDX370 head unit with Maestro. I did run the Hertz speakers with the factory headunit for about a week before putting in the Kenwood. Having an issue getting the Maestro RR unit to talk to the Kenwood. Apparently I was using the wrong installation document and don't have the correct wire, but I've got the part I need ordered, and I'm hoping to fix that when I install the amp/subwoofer. I'm also going to be adding the rear view camera, I think. Hoping that's the last time I have to get back there.
First impressions of the speakers with only the OEM headunit: Significant improvement. Mid-bass sounded tight. Much better than stock speakers. Overall, sounded clearer, less muddy. Bottom line: didn't sound like $300. If you're just upgrading the speakers, it's not worth it to put in $300 speakers. Put in something cheaper.
First impressions of the speakers + the Kenwood headunit: Sounds incredible. Really brought my music to life. Reproduces music with near perfect accuracy and clarity. I'm actually very surprised, impressed, and extremely happy with how the system sounds. I have the equalizer set flat, and it sounds awesome. Highs are bright and clear, but not harsh. Mid-bass is tight. Really the only "complaint" is that it doesn't have the real bass that only a sub can reproduce, but that'll get fixed sometime next week (hopefully). Doesn't sound quite as good if you're sitting in the back seat, but I never sit back there, so I really don't care. It'll still be better than the OEM garbage.
Since I still have the old speakers in the back doors, I listened to them just long enough with the Kenwood to confirm that they are in fact garbage. They actually sounded worse with the Kenwood headunit than the OEM headunit. Wiring a turd to the Kenwood would sound better.
Next (and hopefully the final audio related phase) is to install an amp and sub. I've really been looking hard at the Rockford Fosgate P400x4 Class A/B amp. I think it makes a ton of sense. It's pretty small and compact (hoping to install in on the floor below the glove box, front passenger side), reported to have great sound quality. Rated at 50 watts per channel for 4 ohm load, 200 watts bridged for the sub. Most reports on this amp that I've read show that it's actually making about 30%-50% more power than what it's rated, so it should be about perfect for the JL8W3V3 sub (I'll be purchasing the CP108LG-W3v3. It's rated for 250W RMS). My current plan is to install amp and sub sometime next week. I think the extra bass will really help. Right now, the system is lacking in the low end.

1/4 in MDF adapter plate for 5x7 to 6.5. Didn't require me to cut any sheet metal to fit, just had to drill a couple hole in it. You can see the knowckoff brand dynamat on the sheet metal inside the door. Supposedly it smells for about a week after install, but I never noticed.
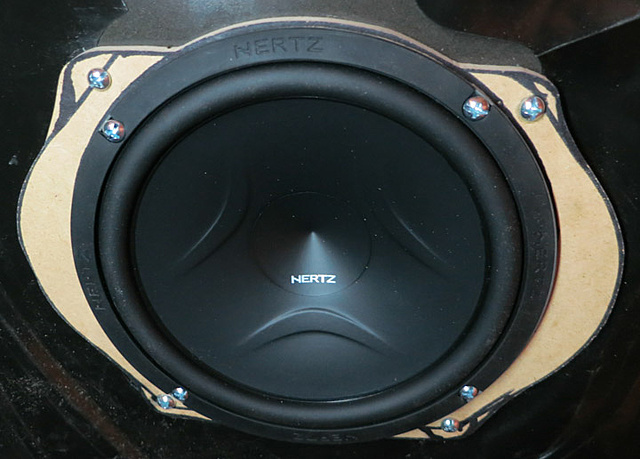
Speaker installed in adapter. If I were to do this over, I would have just used wood screws to attache the speakers to the MDF, and not bolts/washers with loctite. Getting a hand contorted behind the speakers was a real bitch. Those things are never coming out. Used the bolts/loctite because I had doubts about the 1/4 MDF holding. Hindsight, it's not worth the hassle.
Tweeters fit nicely in the a-pillar. A-pillars snapped right off. I used the original tweeter holes, just took a file to them to increase hole diameter about 1/16th of an inch, and super glued the tweeters in. They look great. I'll get a pic posted of the other side at some point.
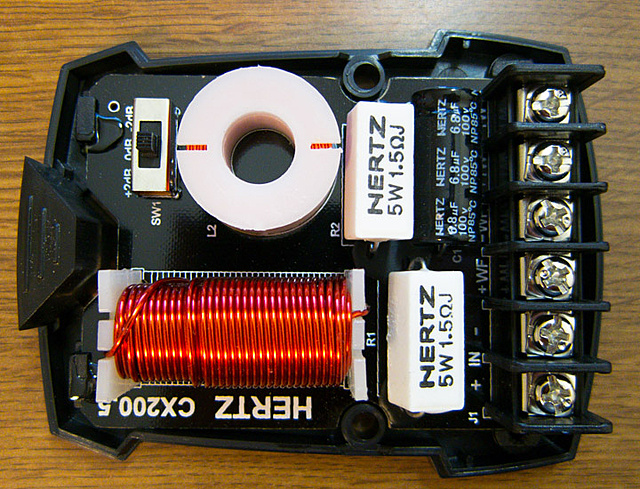
Image of the crossover. Not much to see here, big inductors, cap. Note the tweeter attenuation switch (I have this set to -2dB for both sides and it's perfect). Very clean and clear, but not harsh. Crossovers are just kind of shoved behind the dash out of the way for now. I'll figure out a more permanent solution when I install the amp.
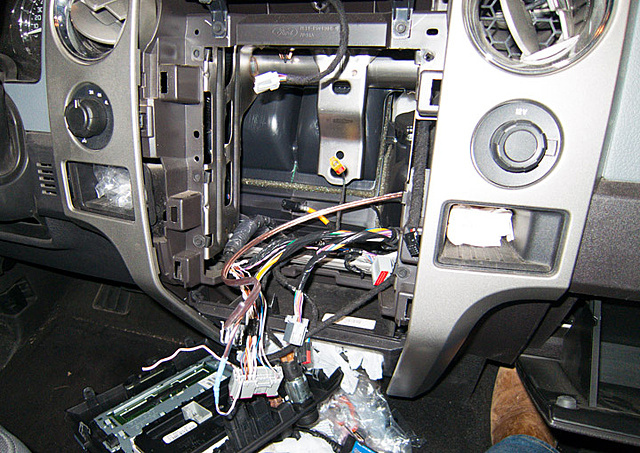
OEM headunit was pretty simple to remove. Glove box is easy. There's actually a pretty decent amount of room in there for stuff. Reference this video for how to do it:
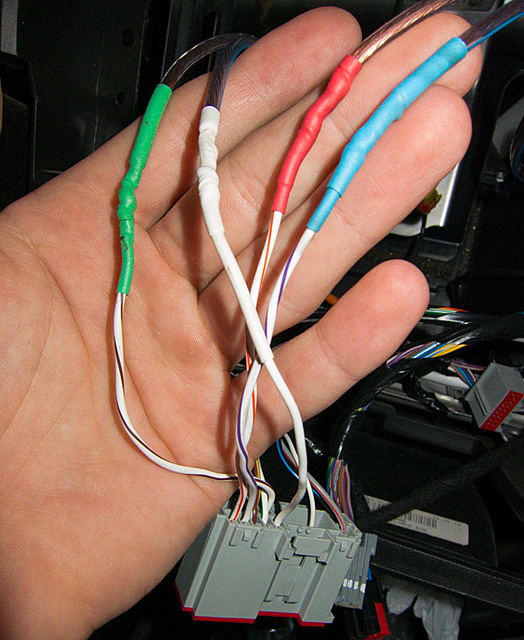
Soldered and heatshrunk Hertz speakers into the factory wiring harness. I'll be cutting this next week when I install the amp. I ended up going with 16 AWG home speaker wire. Seems to be working great.
.I installed the Hertz ESK 6.5 component speakers and a Kenwood DDX370 head unit with Maestro. I did run the Hertz speakers with the factory headunit for about a week before putting in the Kenwood. Having an issue getting the Maestro RR unit to talk to the Kenwood. Apparently I was using the wrong installation document and don't have the correct wire, but I've got the part I need ordered, and I'm hoping to fix that when I install the amp/subwoofer. I'm also going to be adding the rear view camera, I think. Hoping that's the last time I have to get back there.
First impressions of the speakers with only the OEM headunit: Significant improvement. Mid-bass sounded tight. Much better than stock speakers. Overall, sounded clearer, less muddy. Bottom line: didn't sound like $300. If you're just upgrading the speakers, it's not worth it to put in $300 speakers. Put in something cheaper.
First impressions of the speakers + the Kenwood headunit: Sounds incredible. Really brought my music to life. Reproduces music with near perfect accuracy and clarity. I'm actually very surprised, impressed, and extremely happy with how the system sounds. I have the equalizer set flat, and it sounds awesome. Highs are bright and clear, but not harsh. Mid-bass is tight. Really the only "complaint" is that it doesn't have the real bass that only a sub can reproduce, but that'll get fixed sometime next week (hopefully). Doesn't sound quite as good if you're sitting in the back seat, but I never sit back there, so I really don't care. It'll still be better than the OEM garbage.
Since I still have the old speakers in the back doors, I listened to them just long enough with the Kenwood to confirm that they are in fact garbage. They actually sounded worse with the Kenwood headunit than the OEM headunit. Wiring a turd to the Kenwood would sound better.
Next (and hopefully the final audio related phase) is to install an amp and sub. I've really been looking hard at the Rockford Fosgate P400x4 Class A/B amp. I think it makes a ton of sense. It's pretty small and compact (hoping to install in on the floor below the glove box, front passenger side), reported to have great sound quality. Rated at 50 watts per channel for 4 ohm load, 200 watts bridged for the sub. Most reports on this amp that I've read show that it's actually making about 30%-50% more power than what it's rated, so it should be about perfect for the JL8W3V3 sub (I'll be purchasing the CP108LG-W3v3. It's rated for 250W RMS). My current plan is to install amp and sub sometime next week. I think the extra bass will really help. Right now, the system is lacking in the low end.

1/4 in MDF adapter plate for 5x7 to 6.5. Didn't require me to cut any sheet metal to fit, just had to drill a couple hole in it. You can see the knowckoff brand dynamat on the sheet metal inside the door. Supposedly it smells for about a week after install, but I never noticed.

Speaker installed in adapter. If I were to do this over, I would have just used wood screws to attache the speakers to the MDF, and not bolts/washers with loctite. Getting a hand contorted behind the speakers was a real bitch. Those things are never coming out. Used the bolts/loctite because I had doubts about the 1/4 MDF holding. Hindsight, it's not worth the hassle.

Tweeters fit nicely in the a-pillar. A-pillars snapped right off. I used the original tweeter holes, just took a file to them to increase hole diameter about 1/16th of an inch, and super glued the tweeters in. They look great. I'll get a pic posted of the other side at some point.

Image of the crossover. Not much to see here, big inductors, cap. Note the tweeter attenuation switch (I have this set to -2dB for both sides and it's perfect). Very clean and clear, but not harsh. Crossovers are just kind of shoved behind the dash out of the way for now. I'll figure out a more permanent solution when I install the amp.

OEM headunit was pretty simple to remove. Glove box is easy. There's actually a pretty decent amount of room in there for stuff. Reference this video for how to do it:

Soldered and heatshrunk Hertz speakers into the factory wiring harness. I'll be cutting this next week when I install the amp. I ended up going with 16 AWG home speaker wire. Seems to be working great.
11-15-2013, 07:41 AM
#6
F150 Forum

Hi,
Please have a look at this thread and PM me if you need help.
https://www.f150forum.com/f30/maestr...ention-192560/
The DDX370 is only compatible with the most basic Maestro functions (keep Sync and OEM amps and Steering wheel), requires a special hook up cable (ADS-HRN(SX)-ALL01) and will not offer any of the new screens or OBDII interface.
To get all the goodies you need one of the navi radios (DNN or DNX models from the 2013 model year).
With that said, we can help you get the DDX370 to behave properly if you are having trouble.
Best,